
Want to offload WordPress media to S3 but not sure where to get started? This post will show you exactly how to set it up using two different methods.
One method literally just takes a few clicks, while the other method is a little more involved but gives you more options for customization.
Offloading your WordPress site’s media to Amazon S3 has a lot of benefits. Most notably:
- You can reduce storage usage at your host, which lets you save money.

- Your media is portable, which means you can really easily migrate your site to new hosting without downloading/reuploading everything.

- It lessens the load on your server, which helps it perform better under scale.

Of course, if you’re reading a guide on how to offload WordPress media to S3, you’re probably already convinced of the benefits.
For that reason, I’m not going to waste time explaining the “why” in detail. Instead, I’m going to jump straight into sharing two step-by-step tutorials for how to offload WordPress media to S3.
Explaining the two different ways to offload WordPress media to S3
In the tutorials below, I’m going to show you how to use two tools:
- Optimole – the simple option
- WP Offload Media – the technical option
Introducing Optimole – the simple option
Optimole is a full-service image optimization solution for WordPress sites that offers real-time processing and optimization.
It can handle every part of optimizing your site’s images, including the following:
- Serving adaptive images that are being optimized for each user’s device in real-time.
- Compressing images in an optimal way for each device.
- Resizing images to the best dimensions for each device.
- Converting images to the optimal format, with support for WebP and Avif.
- Serving images via its built-in Amazon CloudFront CDN.
If you want to offload your images to S3, Optimole also offers a one-click option that lets you do that.
When enabled, images will be moved off your server and onto S3. Optimole will also still serve them via Amazon CloudFront, which offers better performance than serving from S3 directly.
If you ever want to restore the offloaded images to your server, you can also do that with one click.
The main advantage of Optimole is its simplicity. You literally just need to enable one toggle and click a button to fully offload your images – you won’t find a simpler way to offload WordPress media to S3.
 There are two things that you’ll want to consider, though:
- Optimole is mainly focused on offloading images. While it does offer a feature to handle short GIFs (including converting GIFs to MP4 and WebM), Optimole is not the best option if you want to offload long-form videos (e.g. video content for your online course).
- You don’t control your own S3 bucket. Optimole is able to make the process so simple because it eliminates the need to create your own S3 bucket and sync it to WordPress. However, if you do want to actually have your own S3 bucket, you also might want to consider the other tool.
Optimole is free for up to 5,000 monthly visits on your site(s). After that, paid plans start at $19 per month for 50,000 visits.
Introducing WP Offload Media – the technical option
WP Offload Media is a freemium WordPress plugin that lets you offload all of your WordPress media to S3, with additional support for DigitalOcean Spaces and Google Cloud Storage.
You’ll create your own S3 bucket via the AWS console and then connect it to WordPress by creating an AWS user.
If you want to serve your media via a CDN, you’ll also need to set up your own CDN integration as it’s not built-in like Optimole.
Those are the main disadvantages – it’s not nearly as simple to set up and you’re responsible for configuring everything.
However, this approach also has some potential advantages:
- It works for any type of media, including images, videos, documents, and so on.
- You control your own S3 bucket, which might be important if you’re a developer who wants to make your own customizations.
WP Offload Media has a limited free version. However, one huge limitation is that the free version only lets you offload new files – it doesn’t let you do that with your existing media. The free version also doesn’t let you remove the files from your server after offloading them.
If you want to fix those limitations (plus get other enhancements), the paid version starts at $39 for up to 2,000 offloaded media items and goes up to $199 for 40,000 offloaded media items.
How to offload WordPress media to S3 with Optimole
Optimole offers the absolute simplest way to offload WordPress media to S3. It literally takes just a few clicks.
Let’s go through it…
- Install Optimole and connect API Key
- Offload WordPress images to S3
- Configure other Optimole image optimization settings
1. Install Optimole and connect API Key
To get started, install the free Optimole plugin from WordPress.org.
When you activate the plugin, Optimole should prompt you to register for a free API key (or provide your existing API key if you already have a free Optimole account).
If you don’t see this screen automatically, you can access it by going to Media → Optimole.
If this is your first time using Optimole, enter your email address and click Create & connect account.
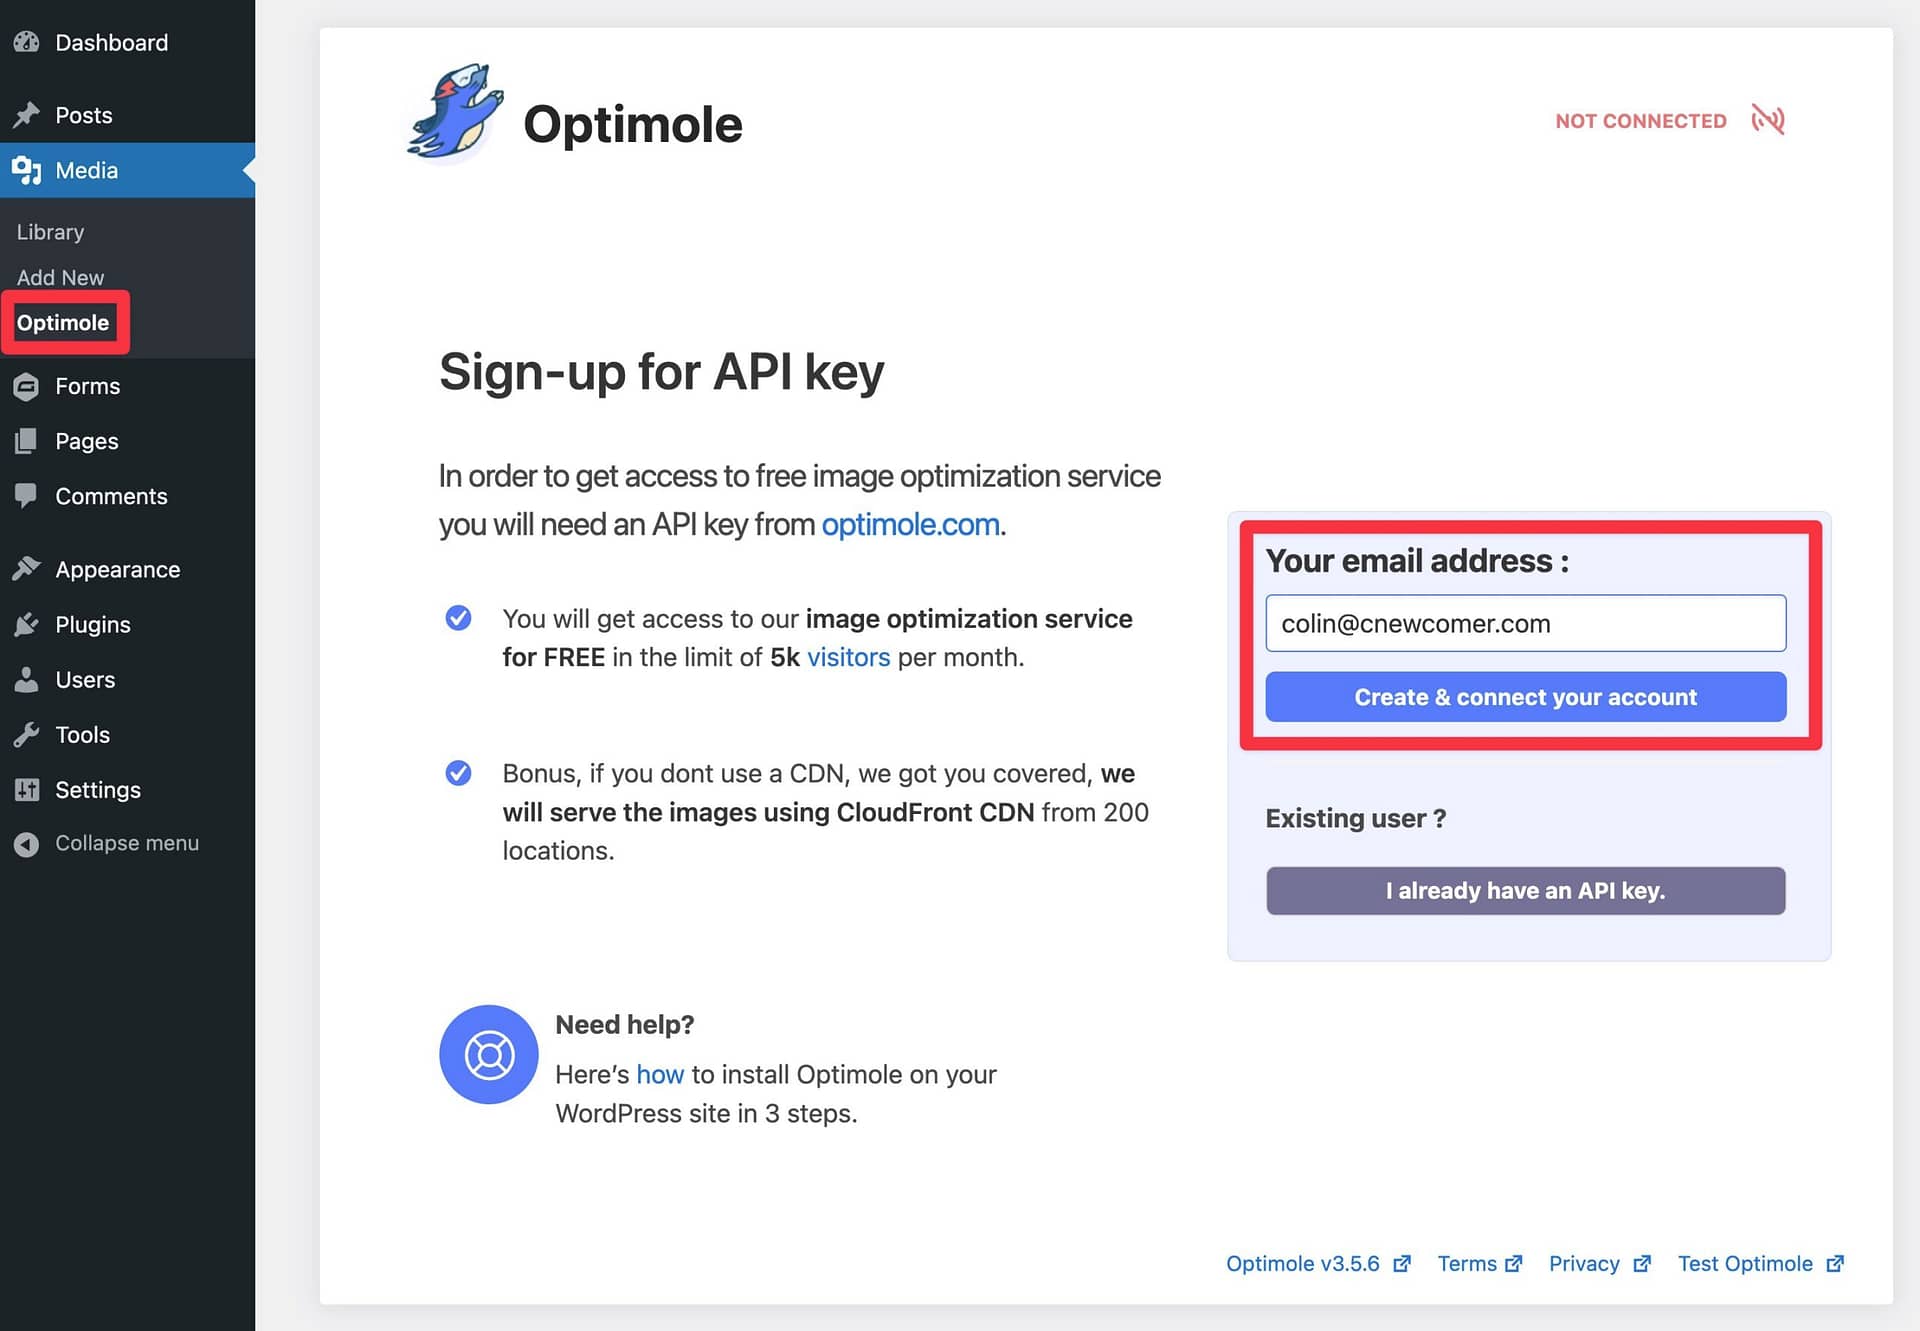
Optimole will now work on setting up your site automatically – it should only take 30 seconds or so.
Once that’s done, you’ll see a success message:
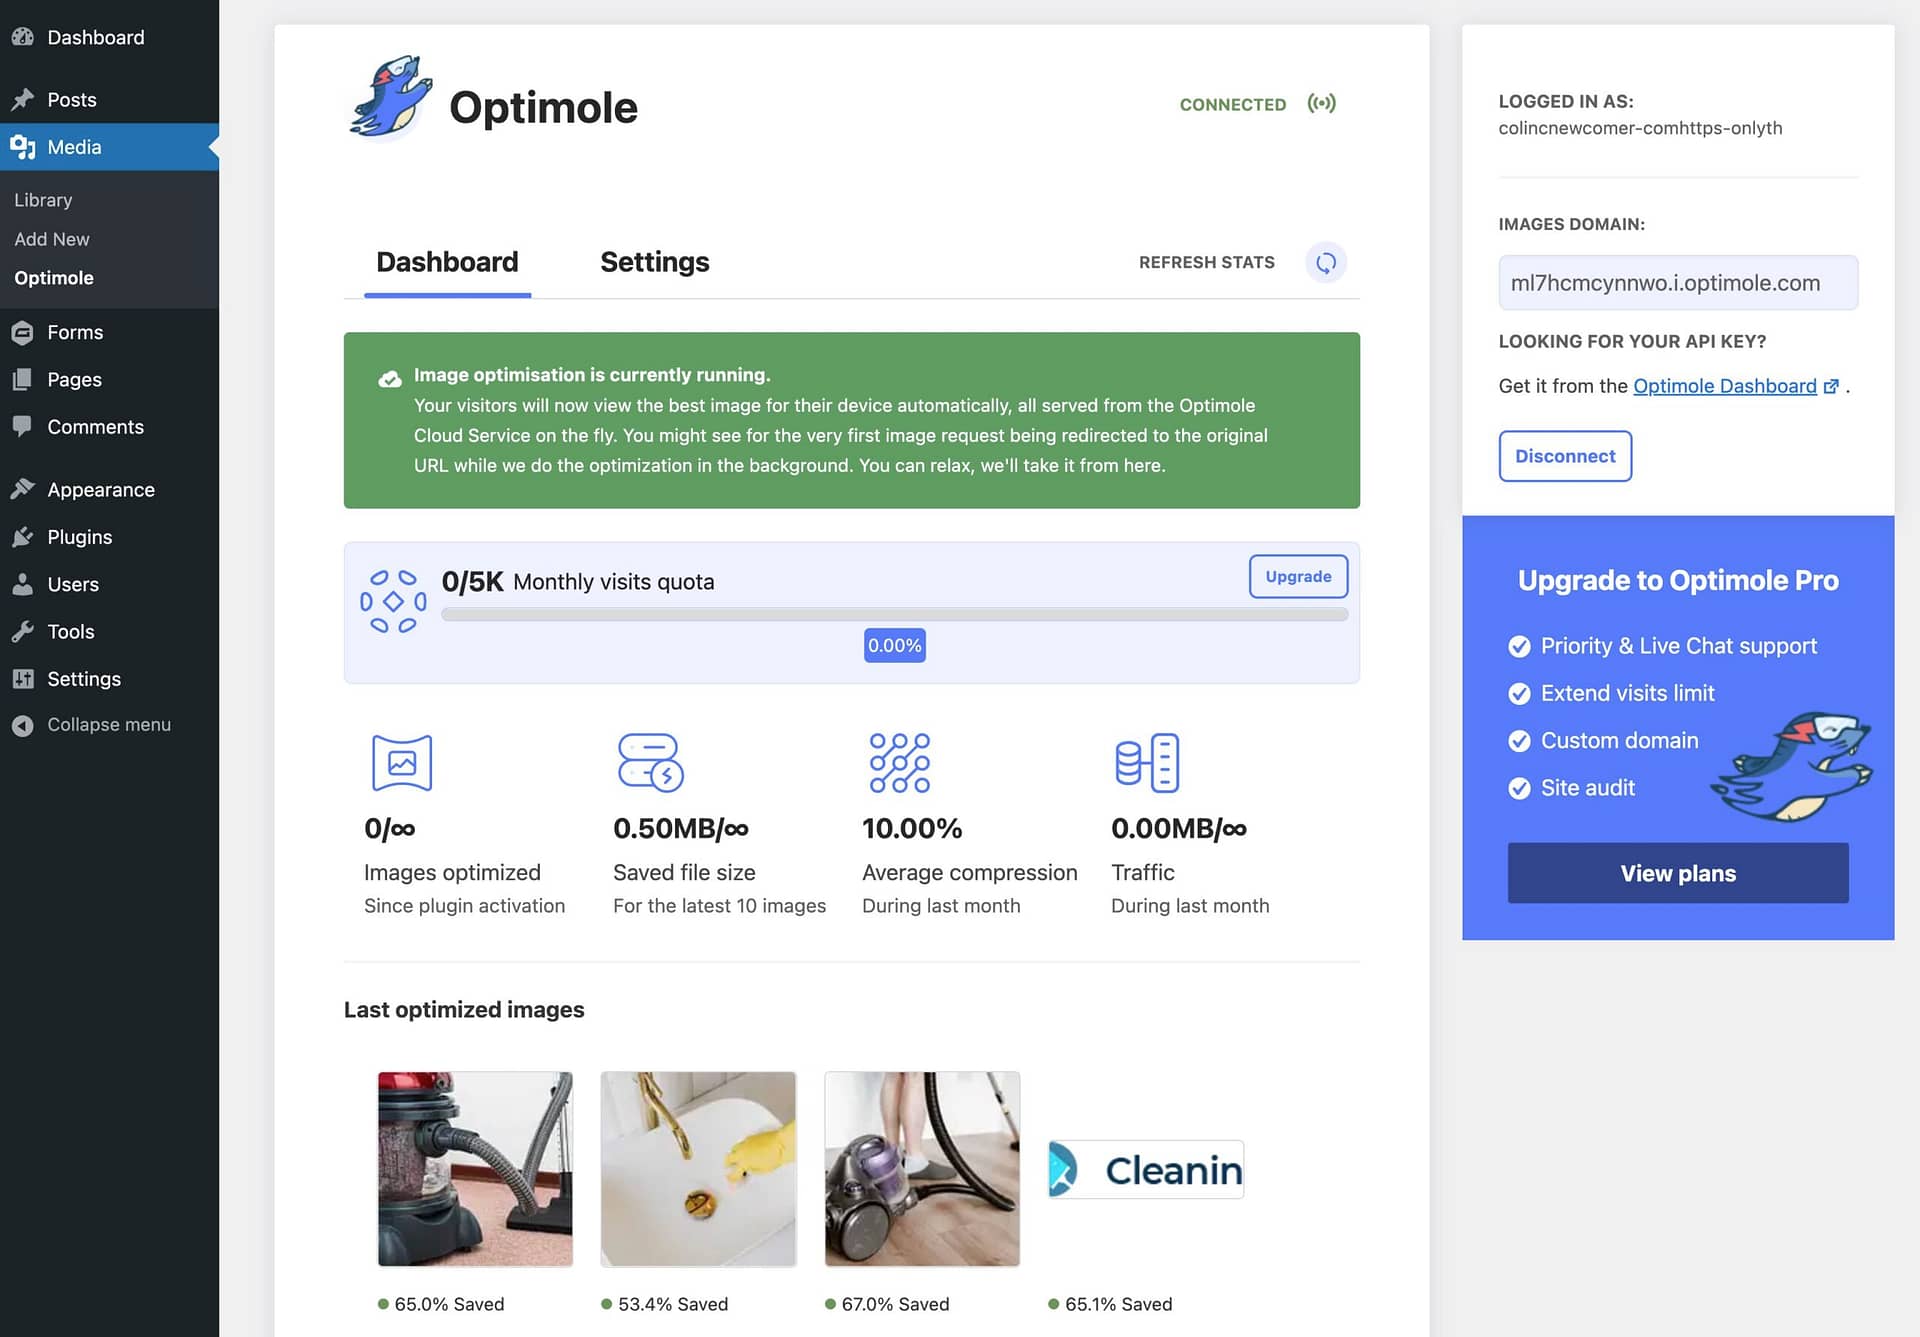
You’re almost finished!
2. Offload WordPress images to S3
To offload WordPress images to S3, follow these instructions:
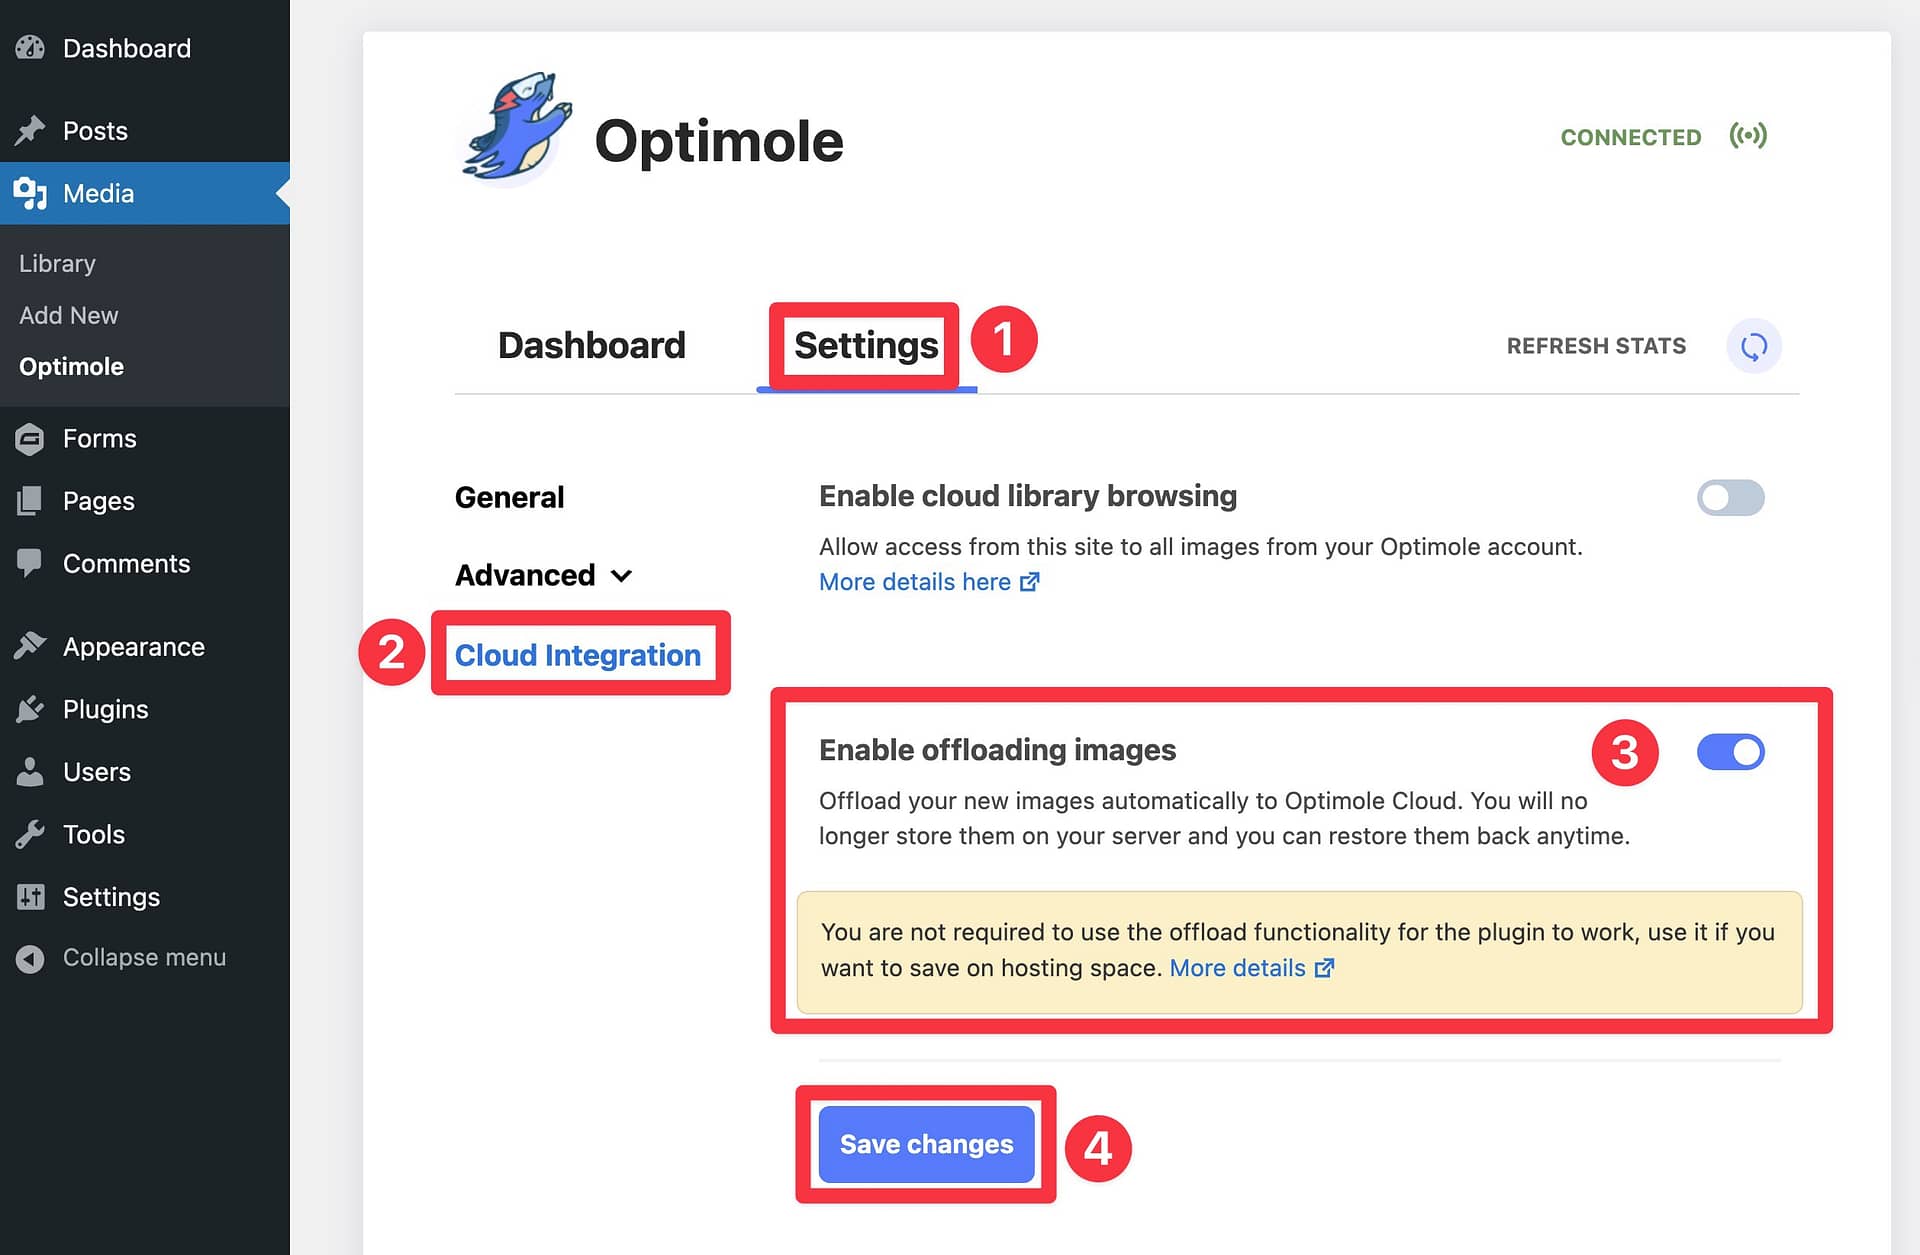
- Go to the Settings tab in Optimole (in your WordPress dashboard).
- Click the Cloud Integration tab in the sidebar.
- Enable the Enable offloading images toggle.
- Click Save changes.
Optimole will now automatically offload all new images that you upload.
If you want to also offload the existing images in your Media Library, you can click the Sync images button (you need to save your changes before this button appears).

That’s it!
If you ever want to restore the offloaded images to your WordPress site’s server, all you need to do is click the Rollback images button and Optimole will restore all of the images for you.
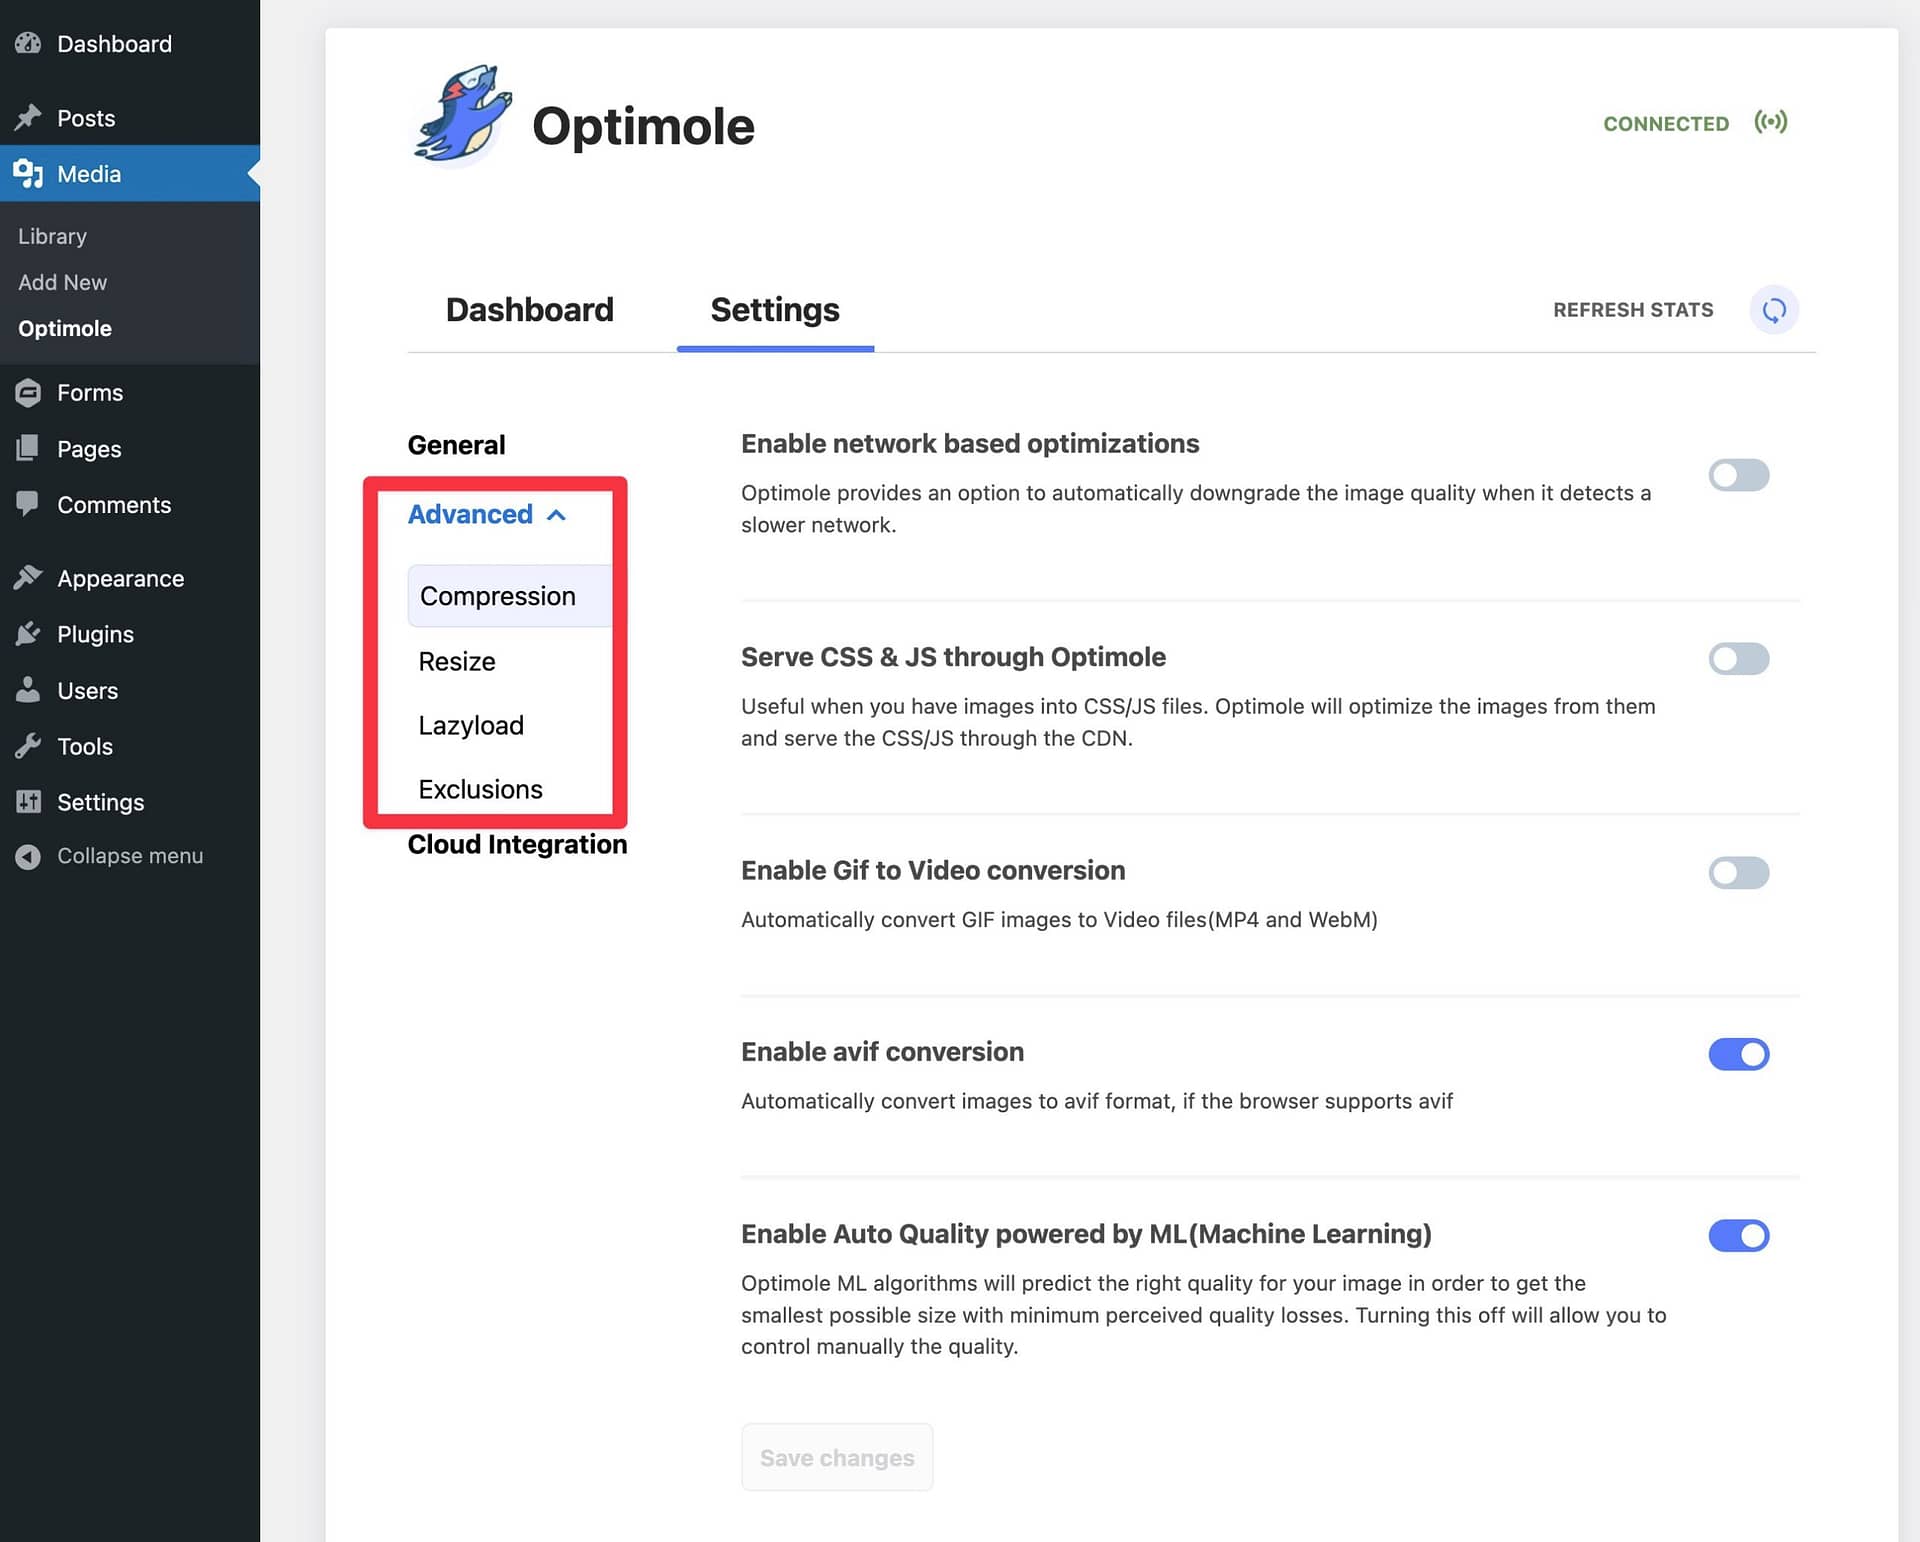
3. Configure other Optimole image optimization settings
At this point, you’ve successfully offloaded your images to S3.
However, as I mentioned above, Optimole also offers lots of other features to help serve your WordPress images in an optimal way.
While a lot of these optimizations happen automatically, you can explore the Advanced settings area to customize your preferences for details like image compression, image resizing (including an option for smart cropping), lazy loading, and more.
How to offload WordPress media to S3 with WP Offload Media
To set up WP Offload Media, the process is a little more technical and will require more time than Optimole. Again, this is the tradeoff that you make in exchange for having control over your own S3 bucket.
Here’s a quick summary of the steps – keep reading for a more detailed breakdown of how it works:
- Create an IAM user in AWS.
- Attach the proper access policy for the IAM user.
- Create a programmatic access key for your user.
- Add your access keys to the plugin’s settings.
- Create a new S3 bucket for your WordPress site (you can do this right from the plugin’s settings).
- Configure the plugin to offload media to S3.
- Set up a CDN to serve your media (optional).
For this tutorial, we’re using the free version of the plugin, but the basic steps are the same for the paid version.
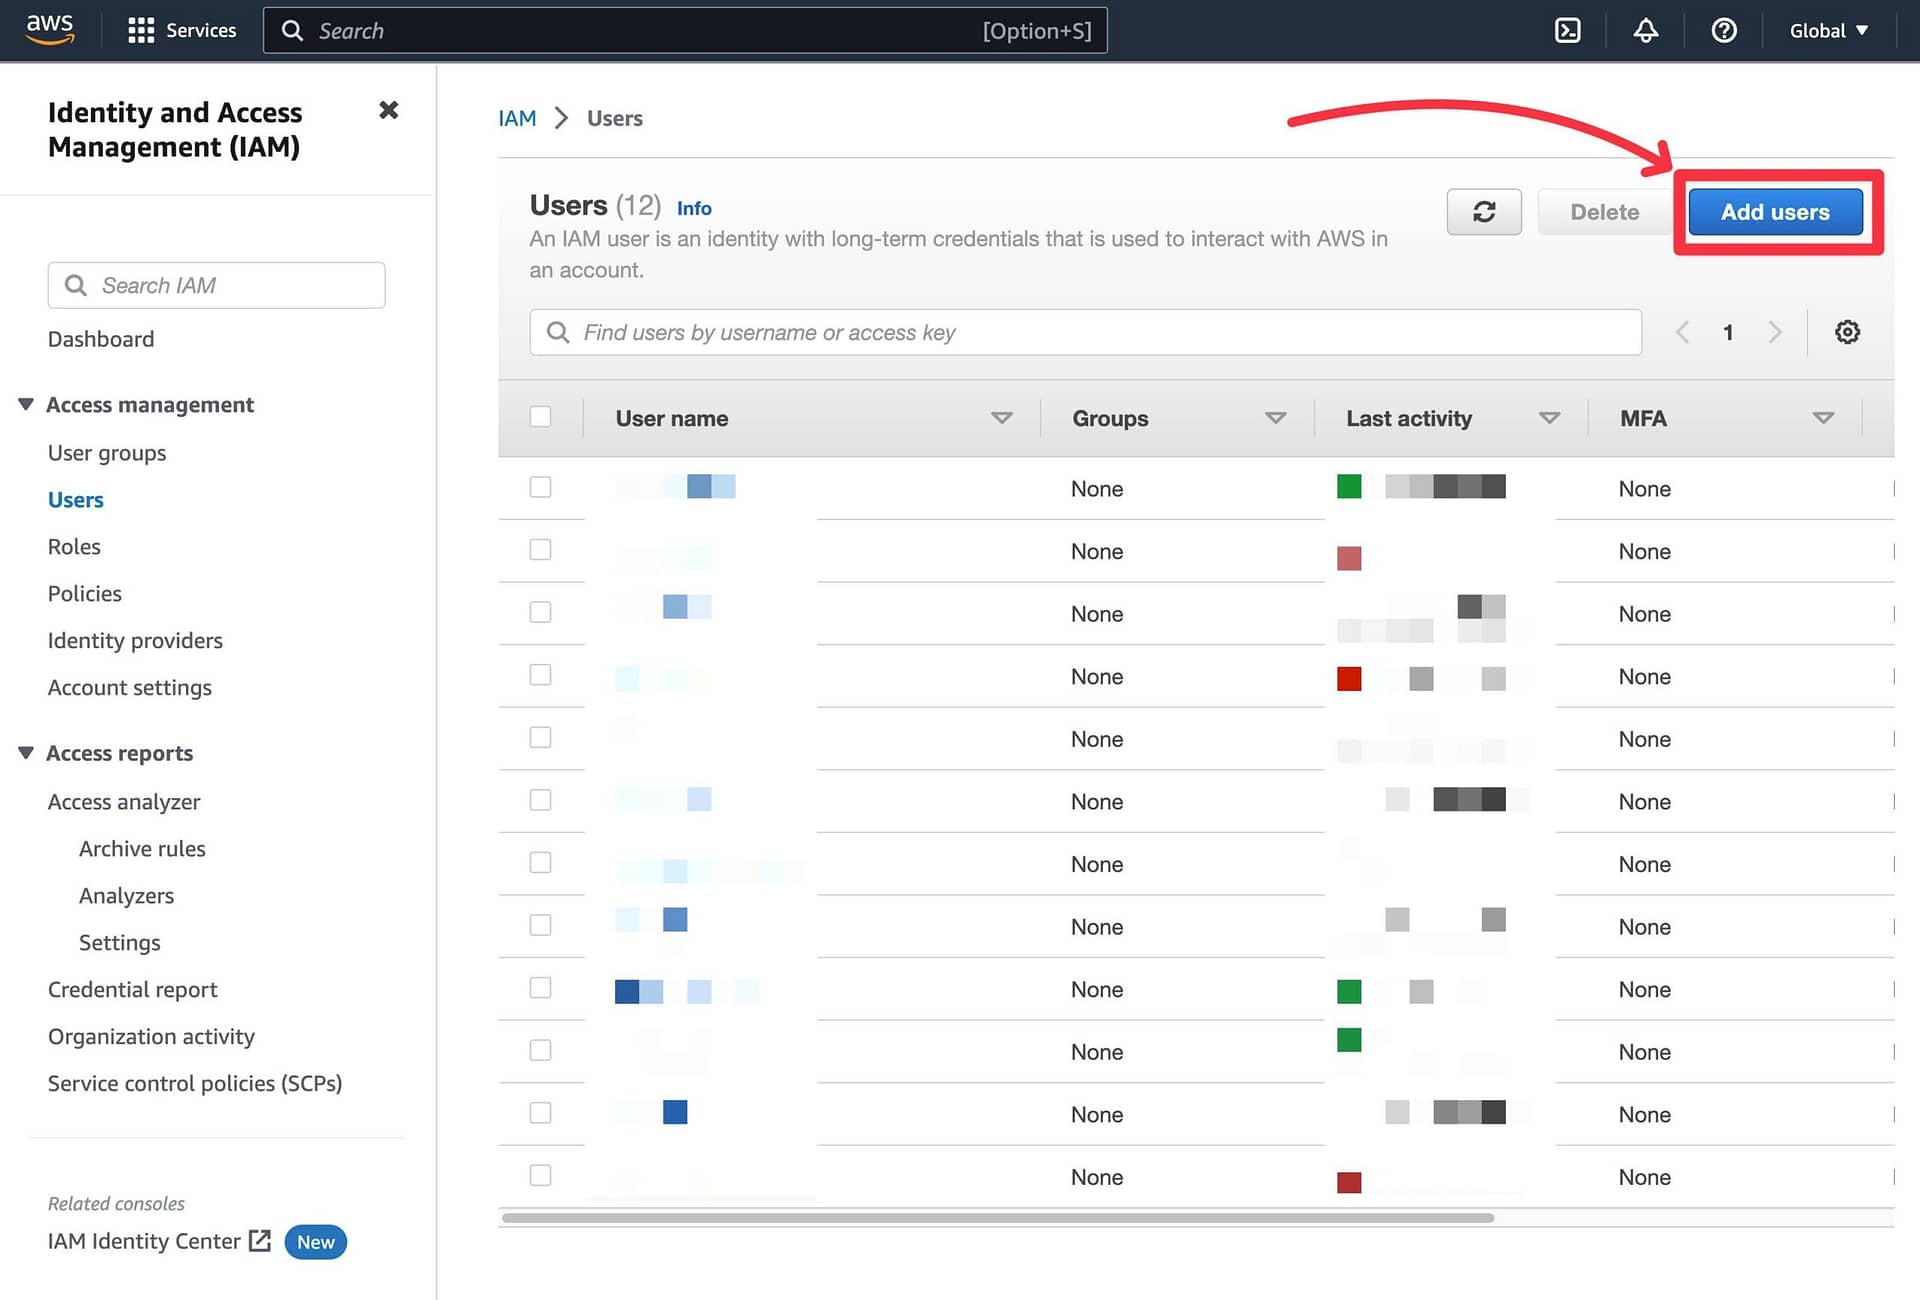
1. Create a new IAM user in AWS
To start, log in to your existing AWS account, or create a new one if you don’t have it yet.
Once you’re logged in, click this link to open the IAM users dashboard and then click the Add users button:
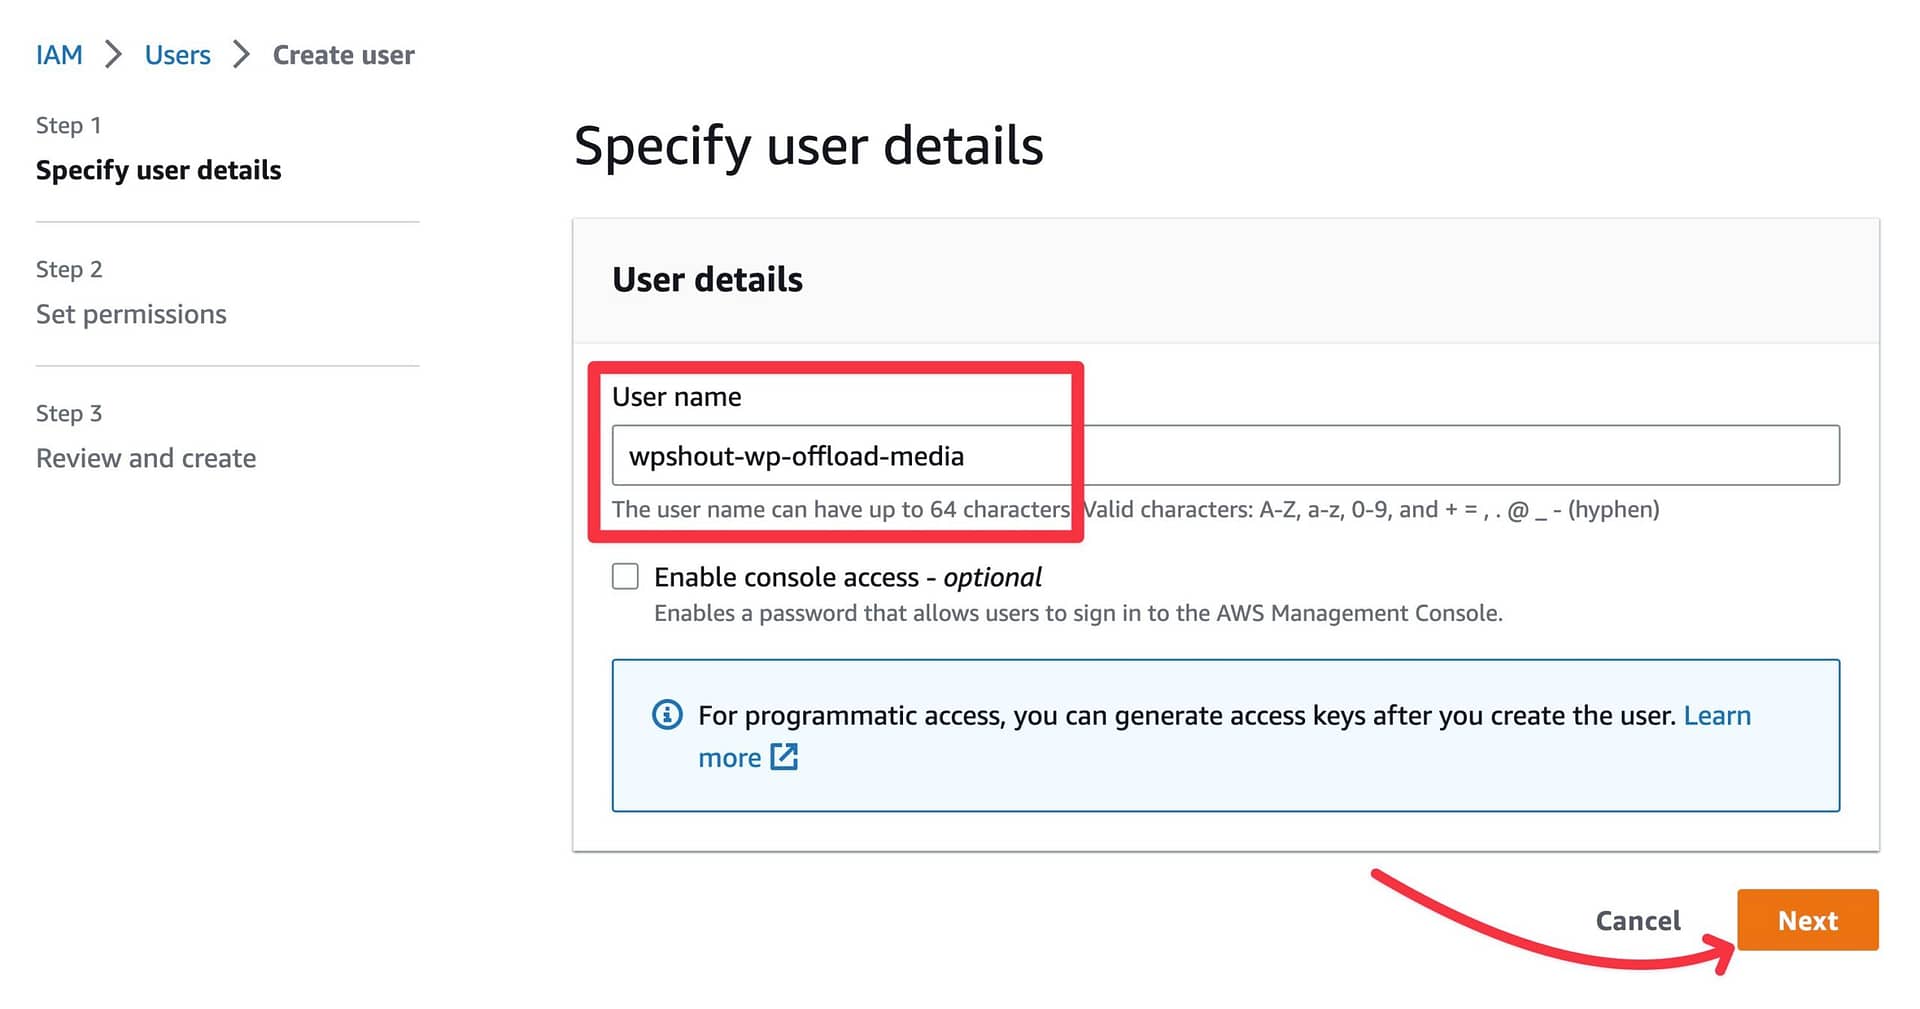
On the next screen:
- Give your user a unique name to help you remember it – e.g.
[site-name]-wp-offload-media. - Click Next.
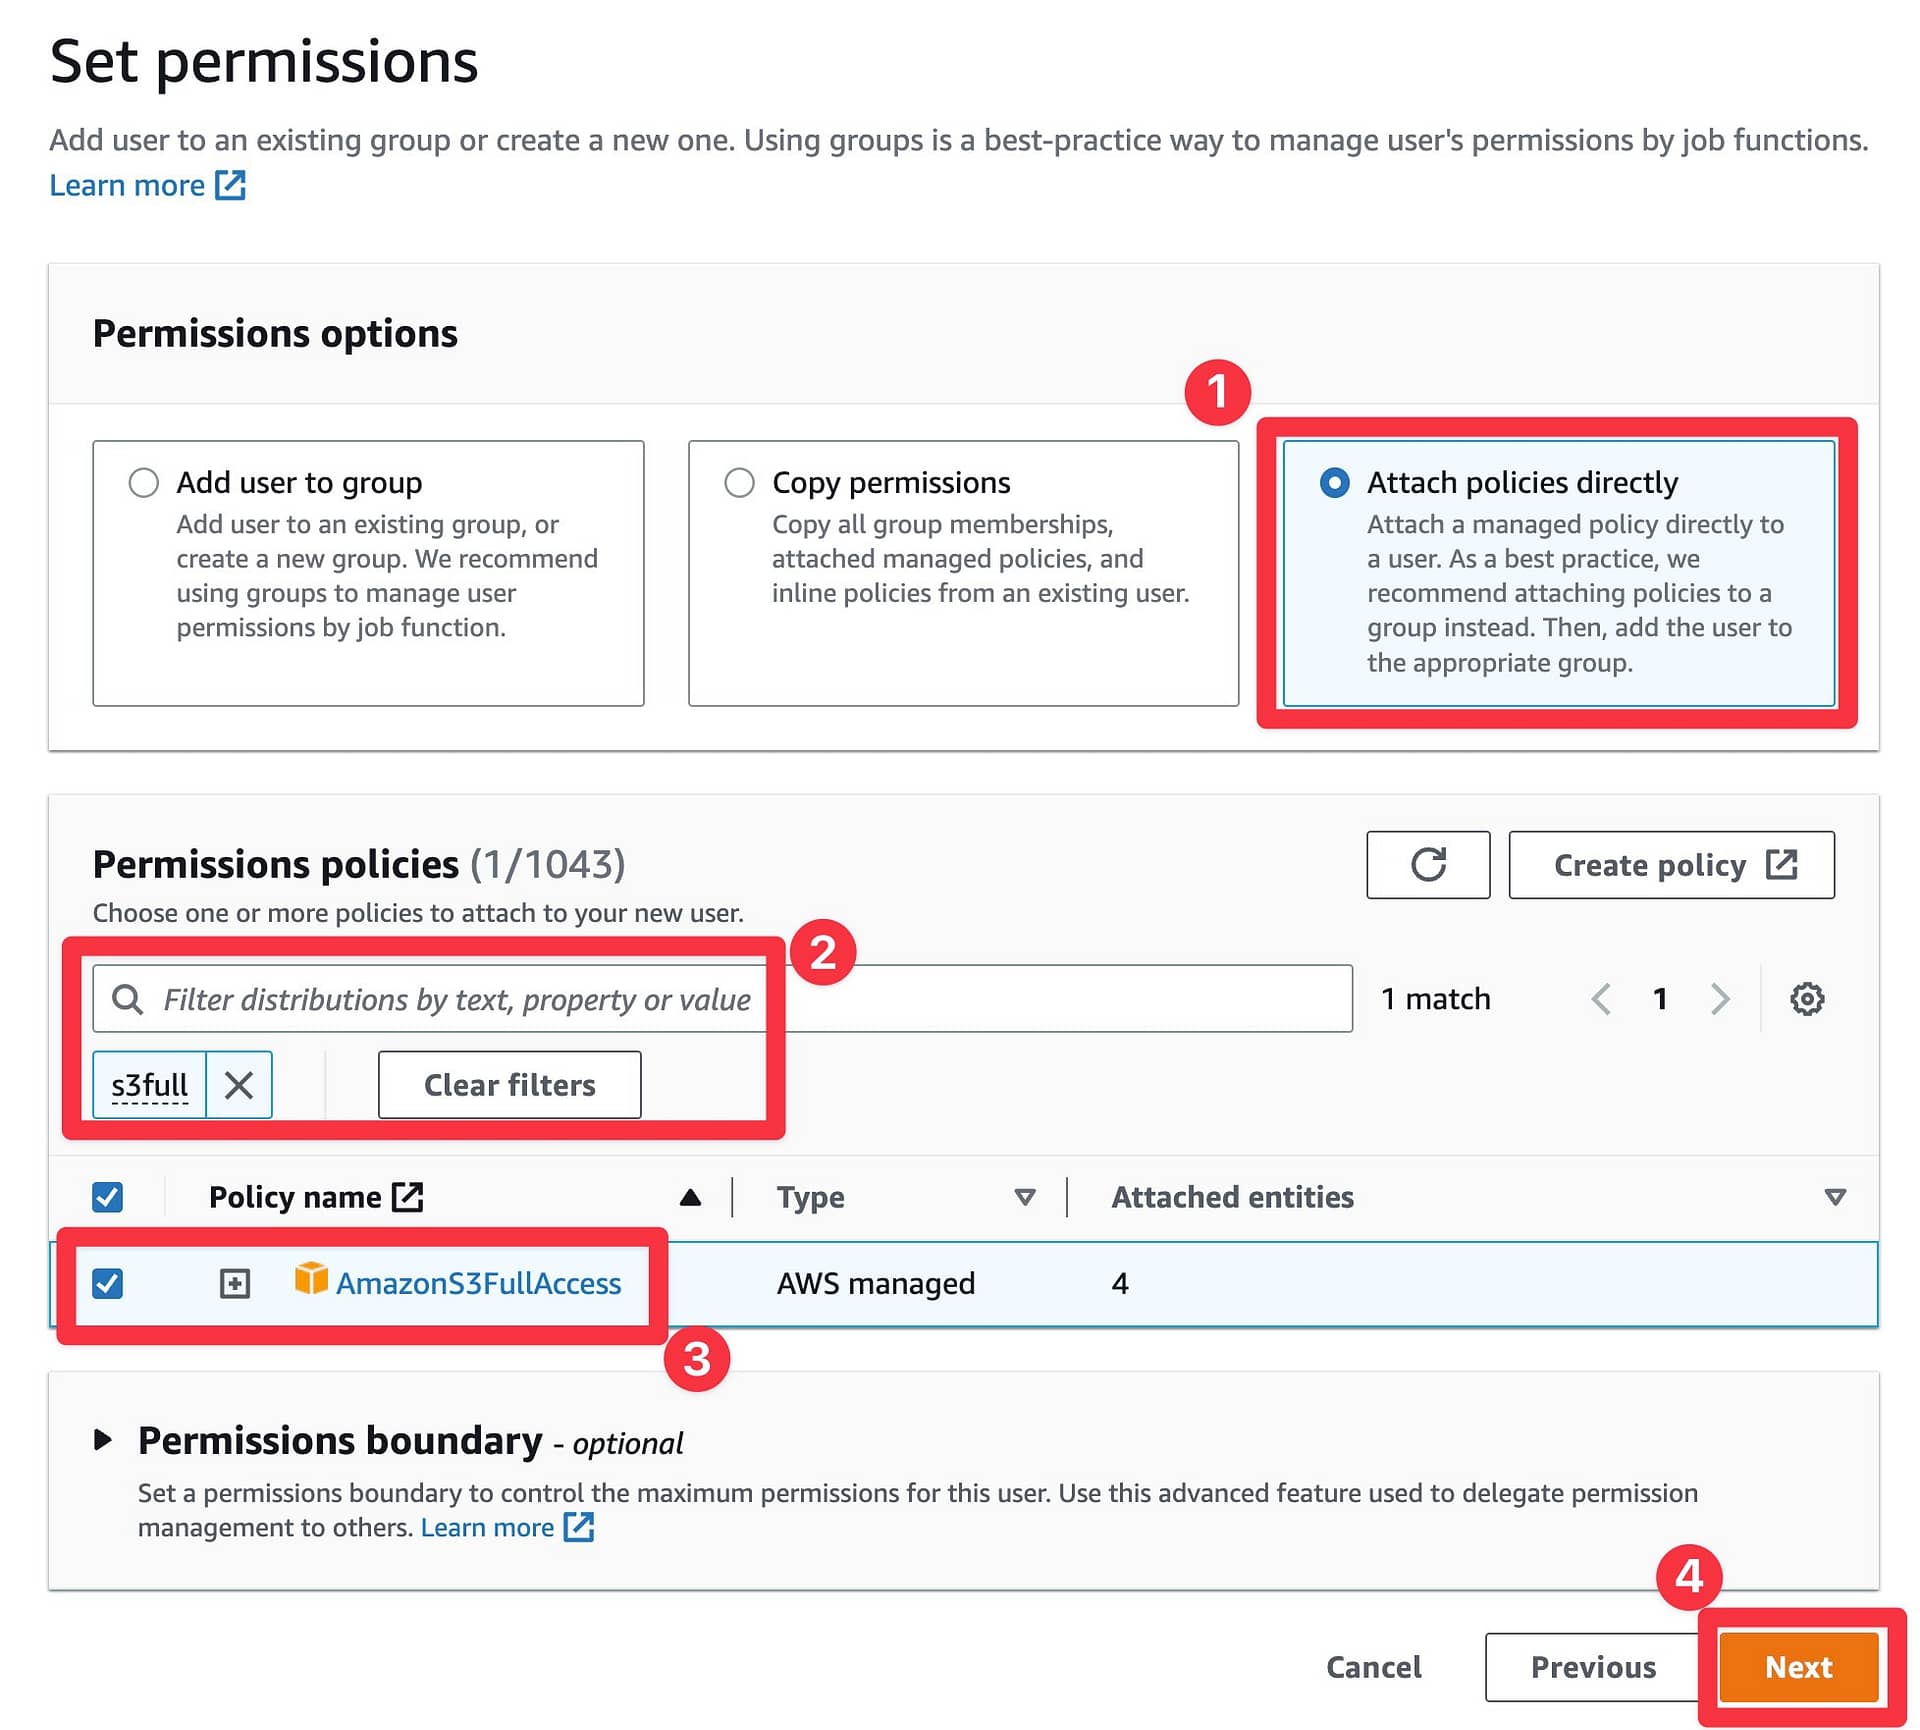
2. Attach proper policy to IAM user
Now, you need to attach a permission policy to this user so that it’s able to access S3:
- Choose the option for Attach policies directly, which should display a Permissions policies search below.
- Search for
s3fullin the Permissions policies box. - Check the box next to AmazonS3FullAccess (which should be the only policy that your search returned).
- Click Next.
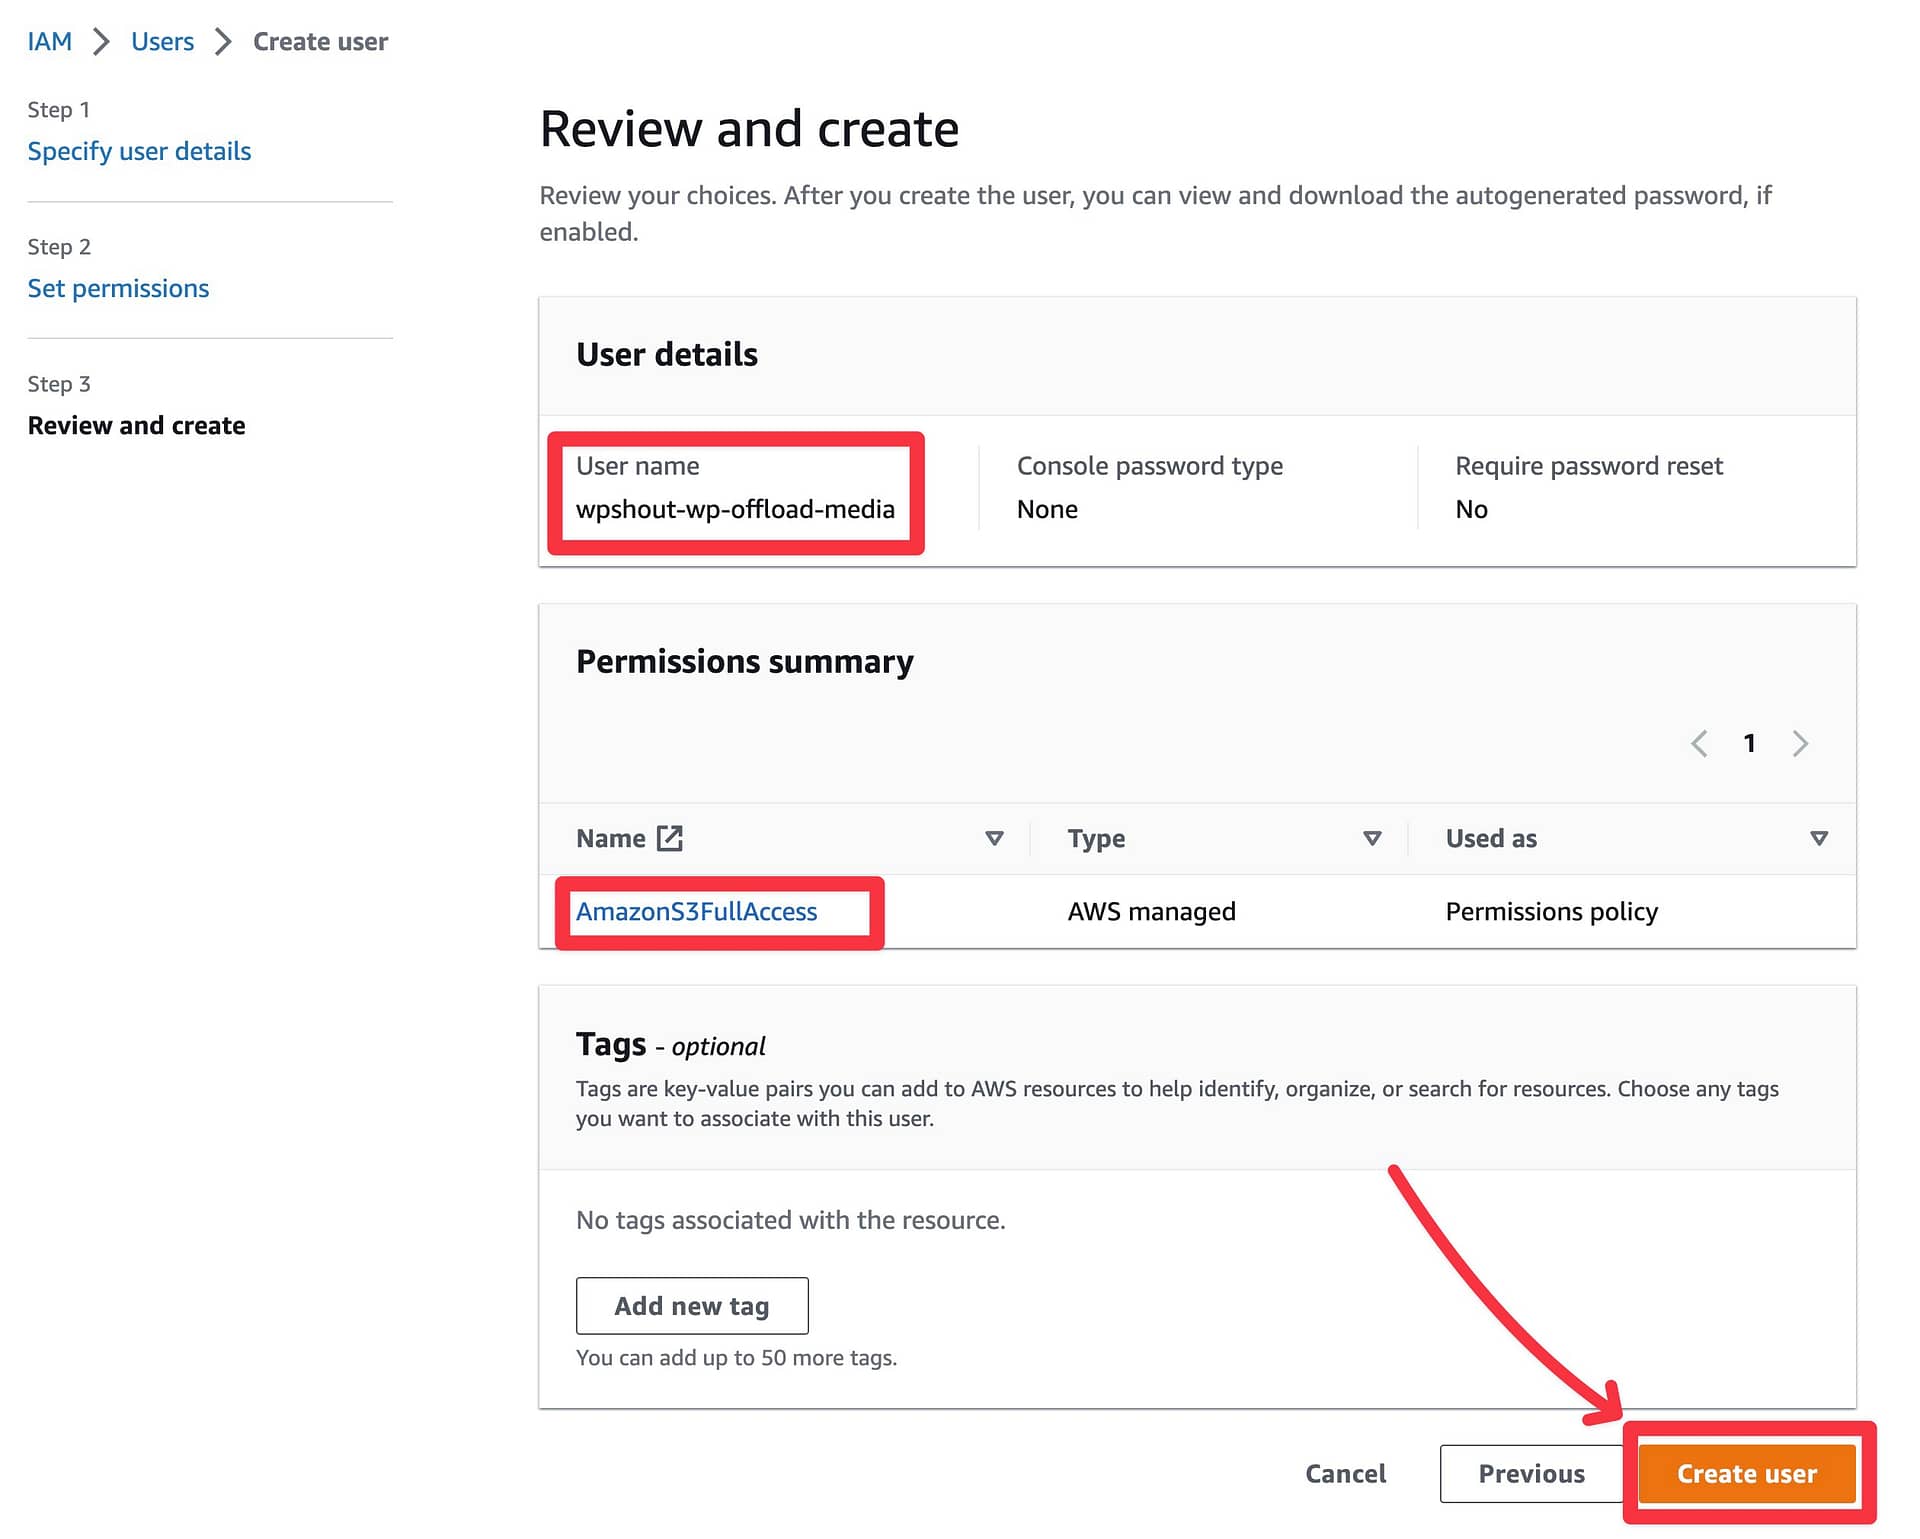
On the next screen, verify that the information is correct and then click the Create user button.
3. Create an access key for your user
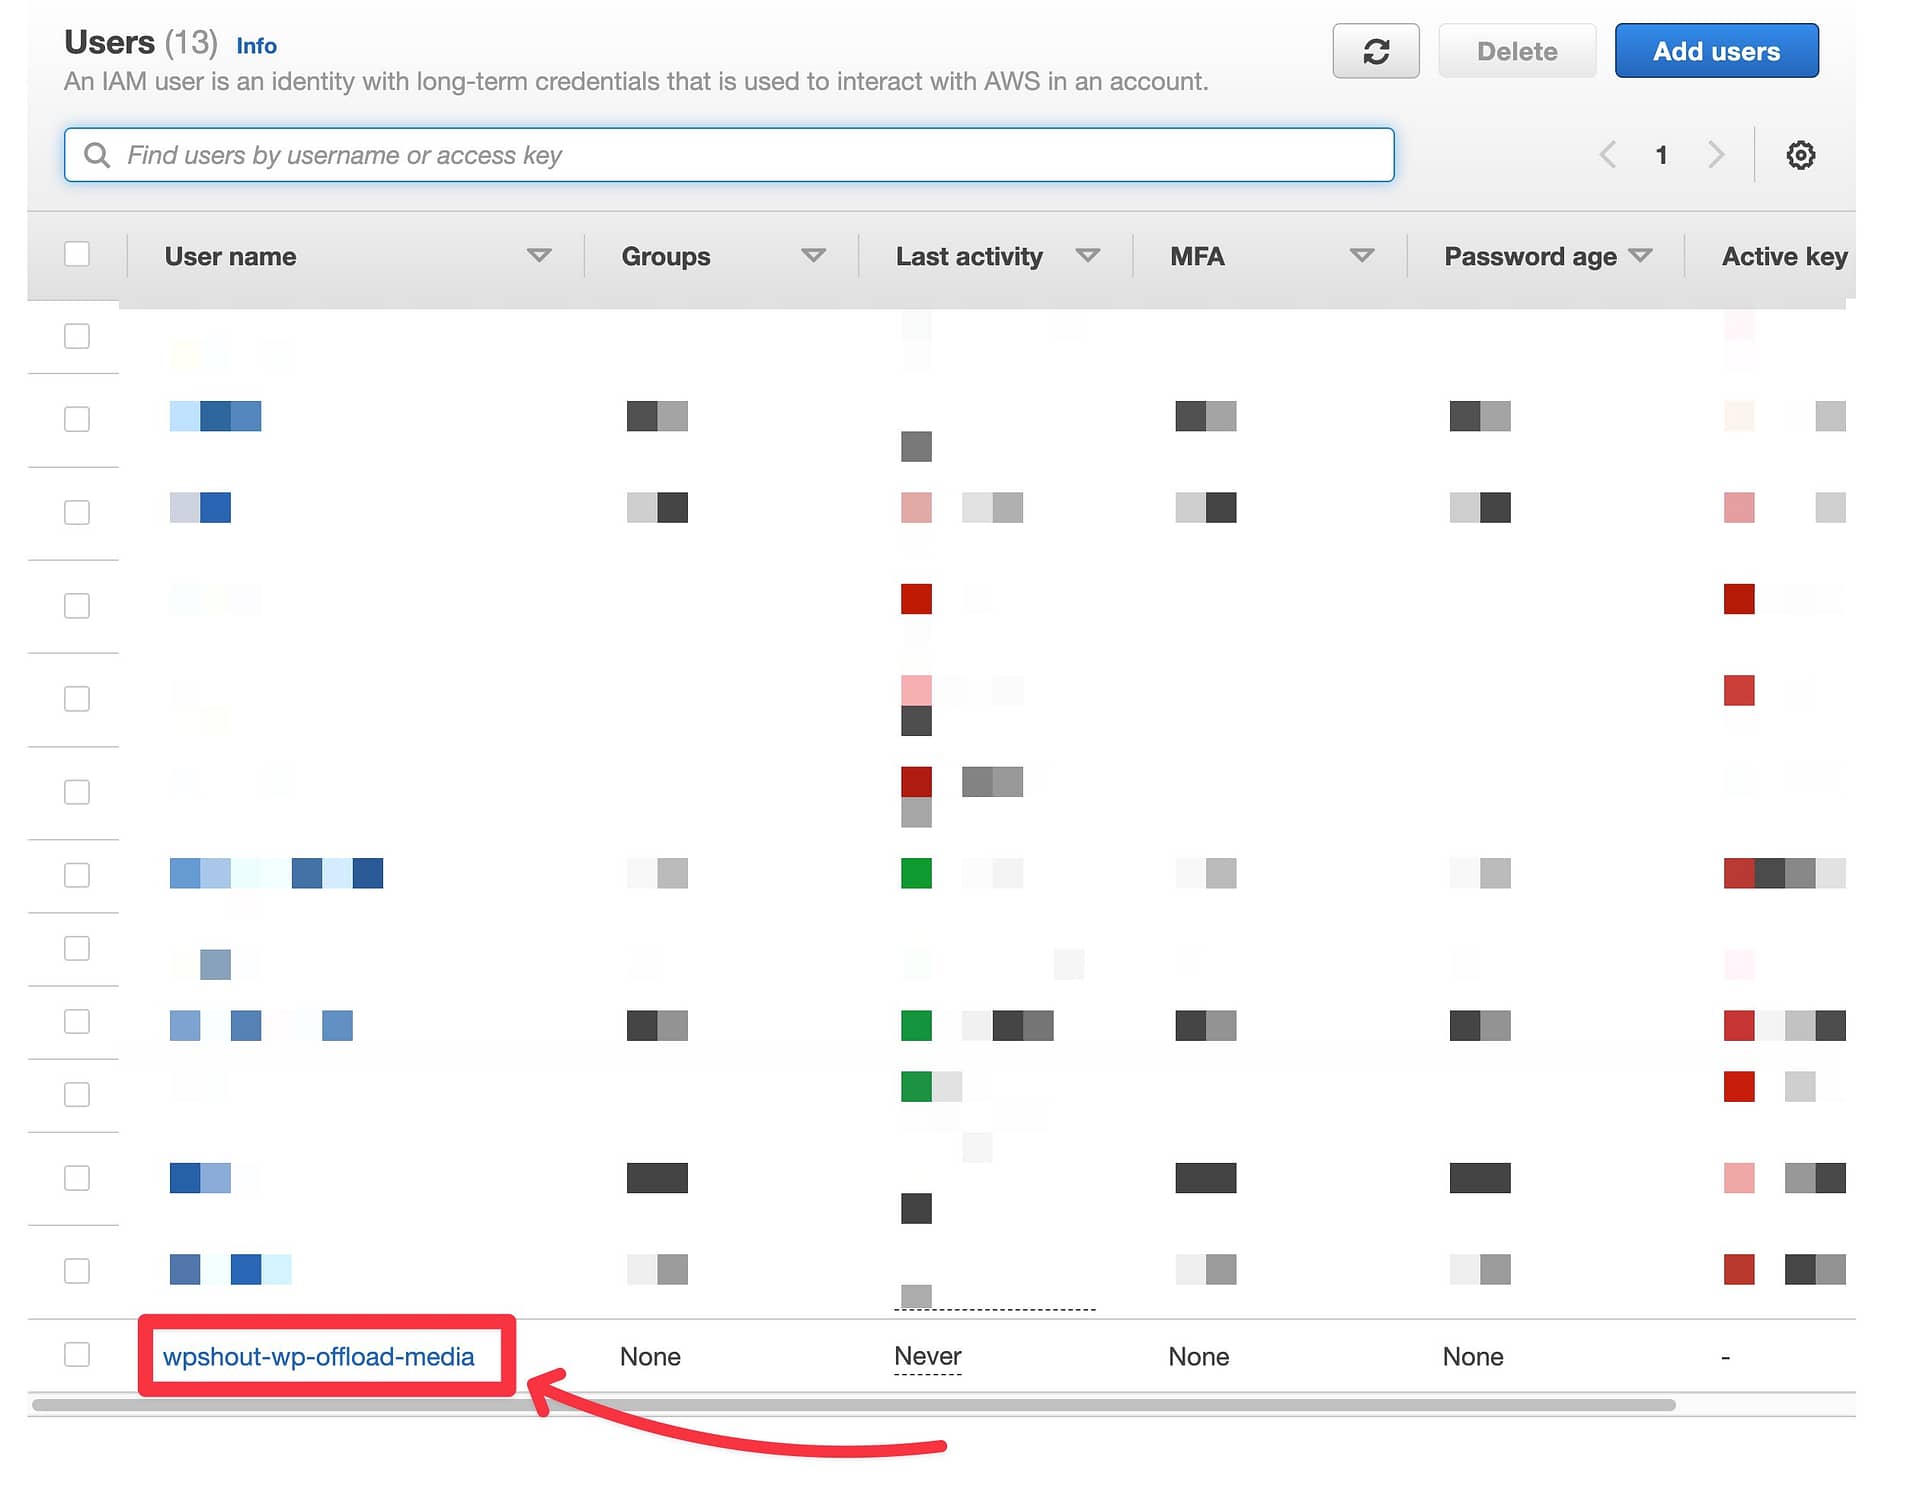
Now, go back to the main IAM users list and select the user that you’ve just created.
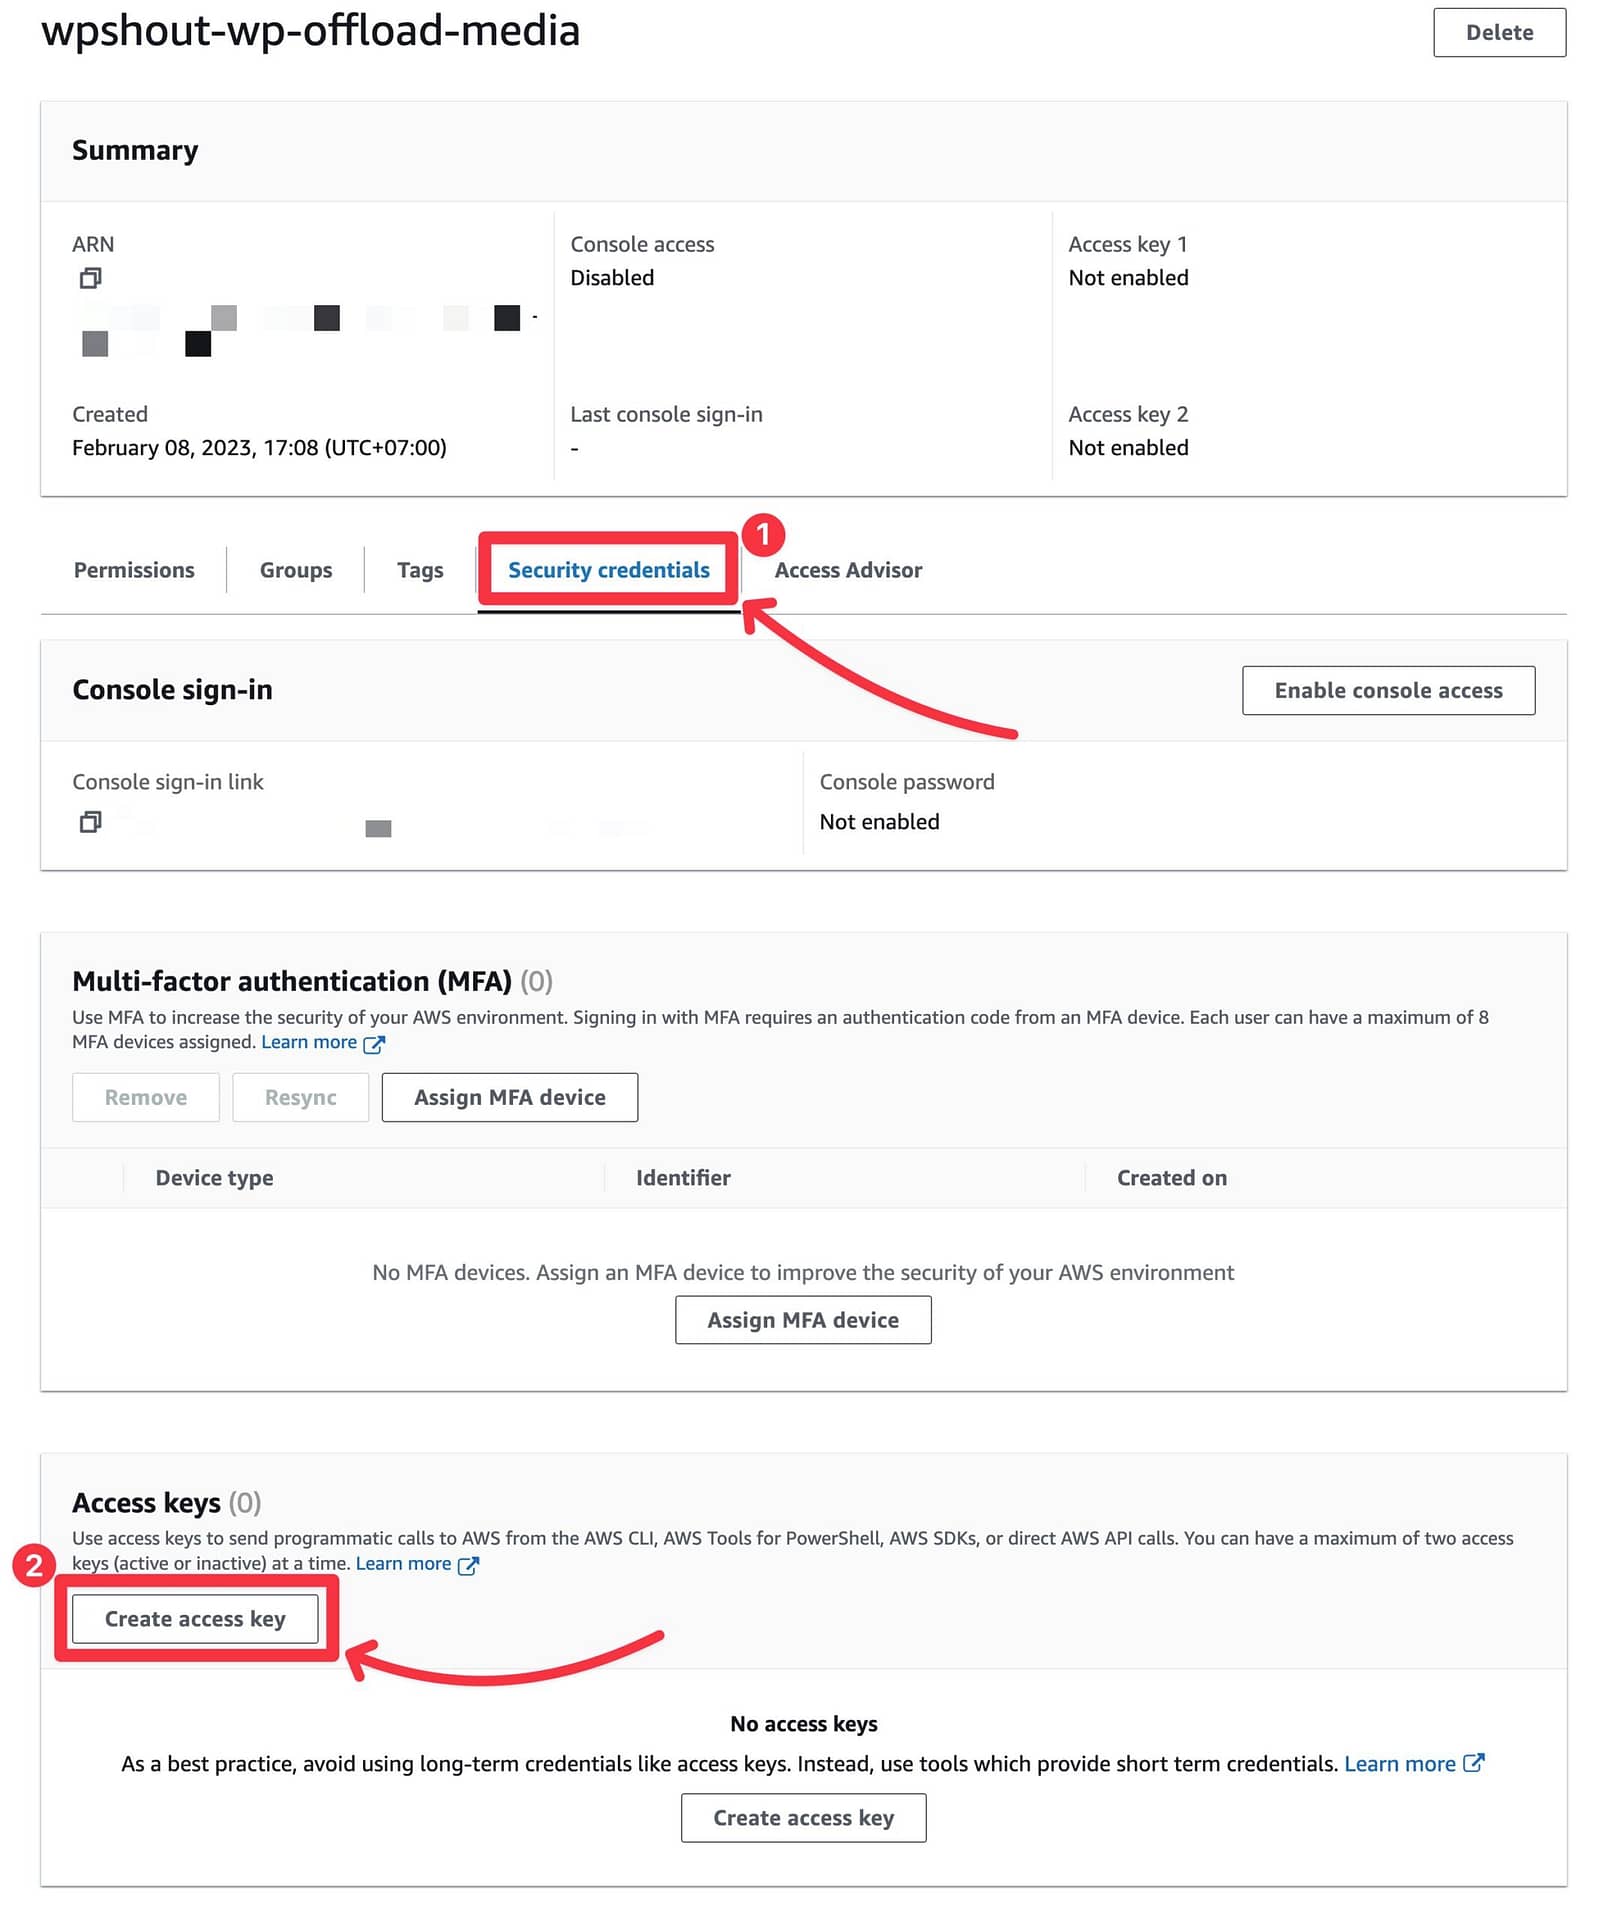
Next up:
- Go to the Security credentials tab in the user’s settings.
- Scroll down to the Access keys box.
- Click the Create access key button.
On the next screen, choose the Application running outside AWS option and then click Next.
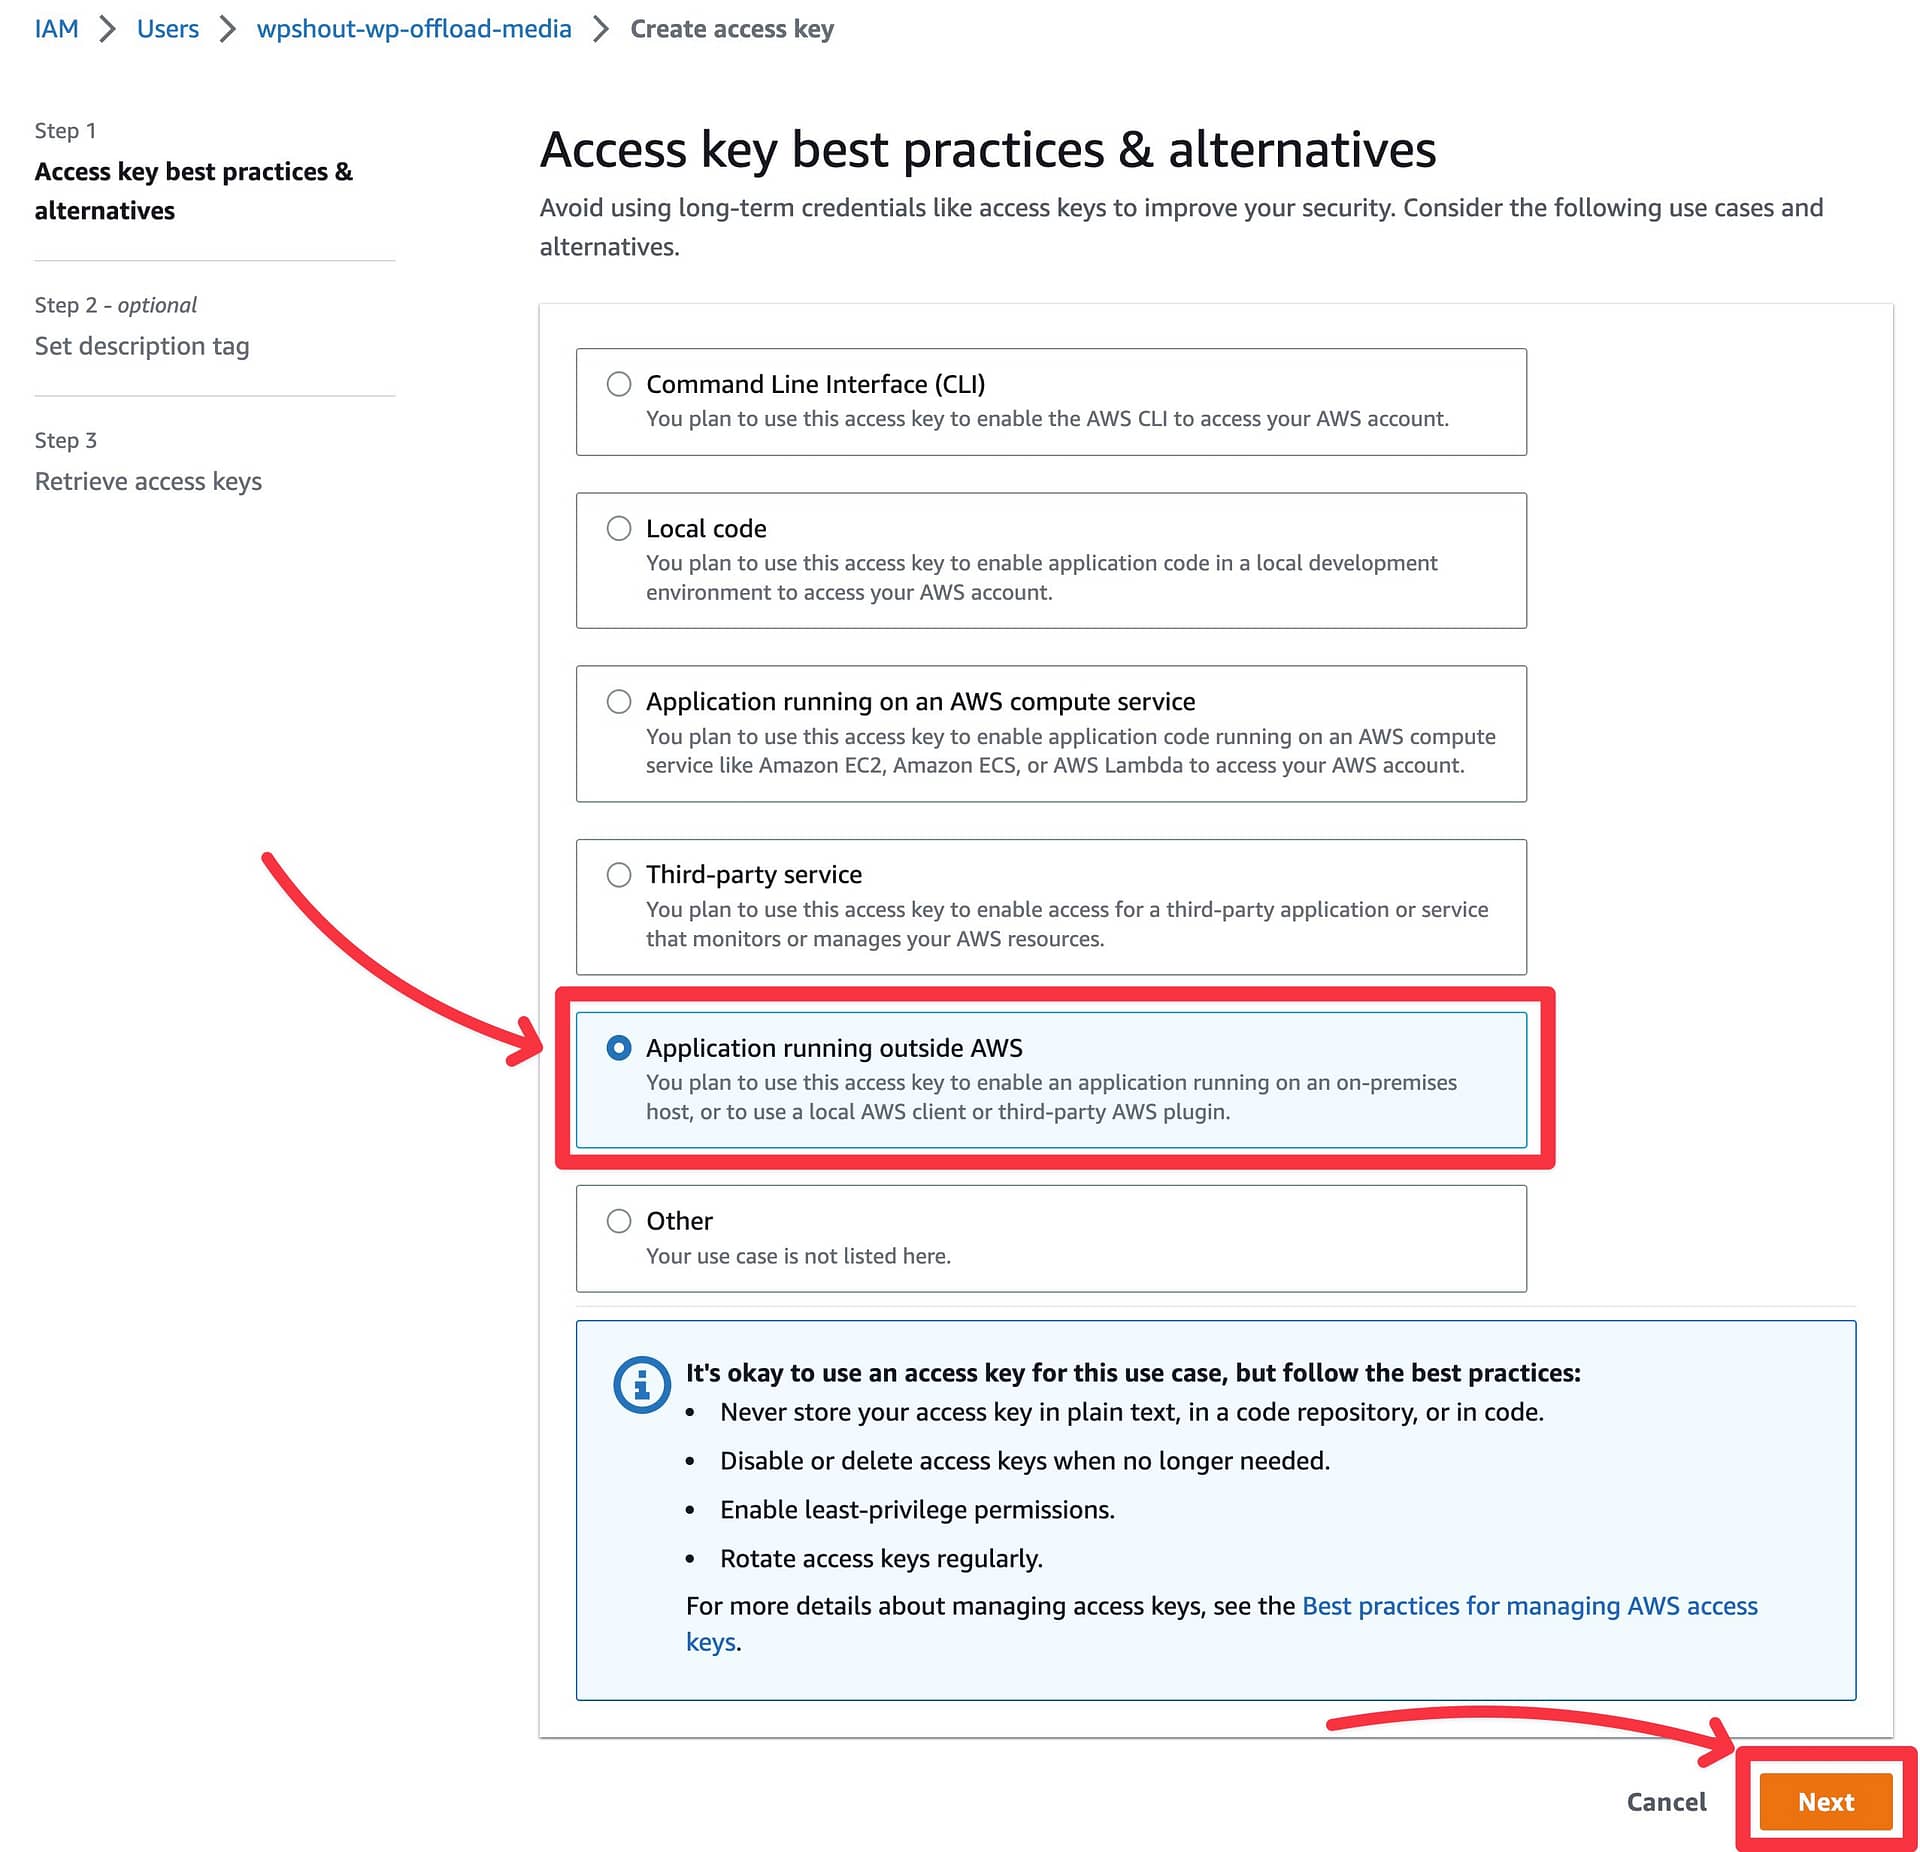
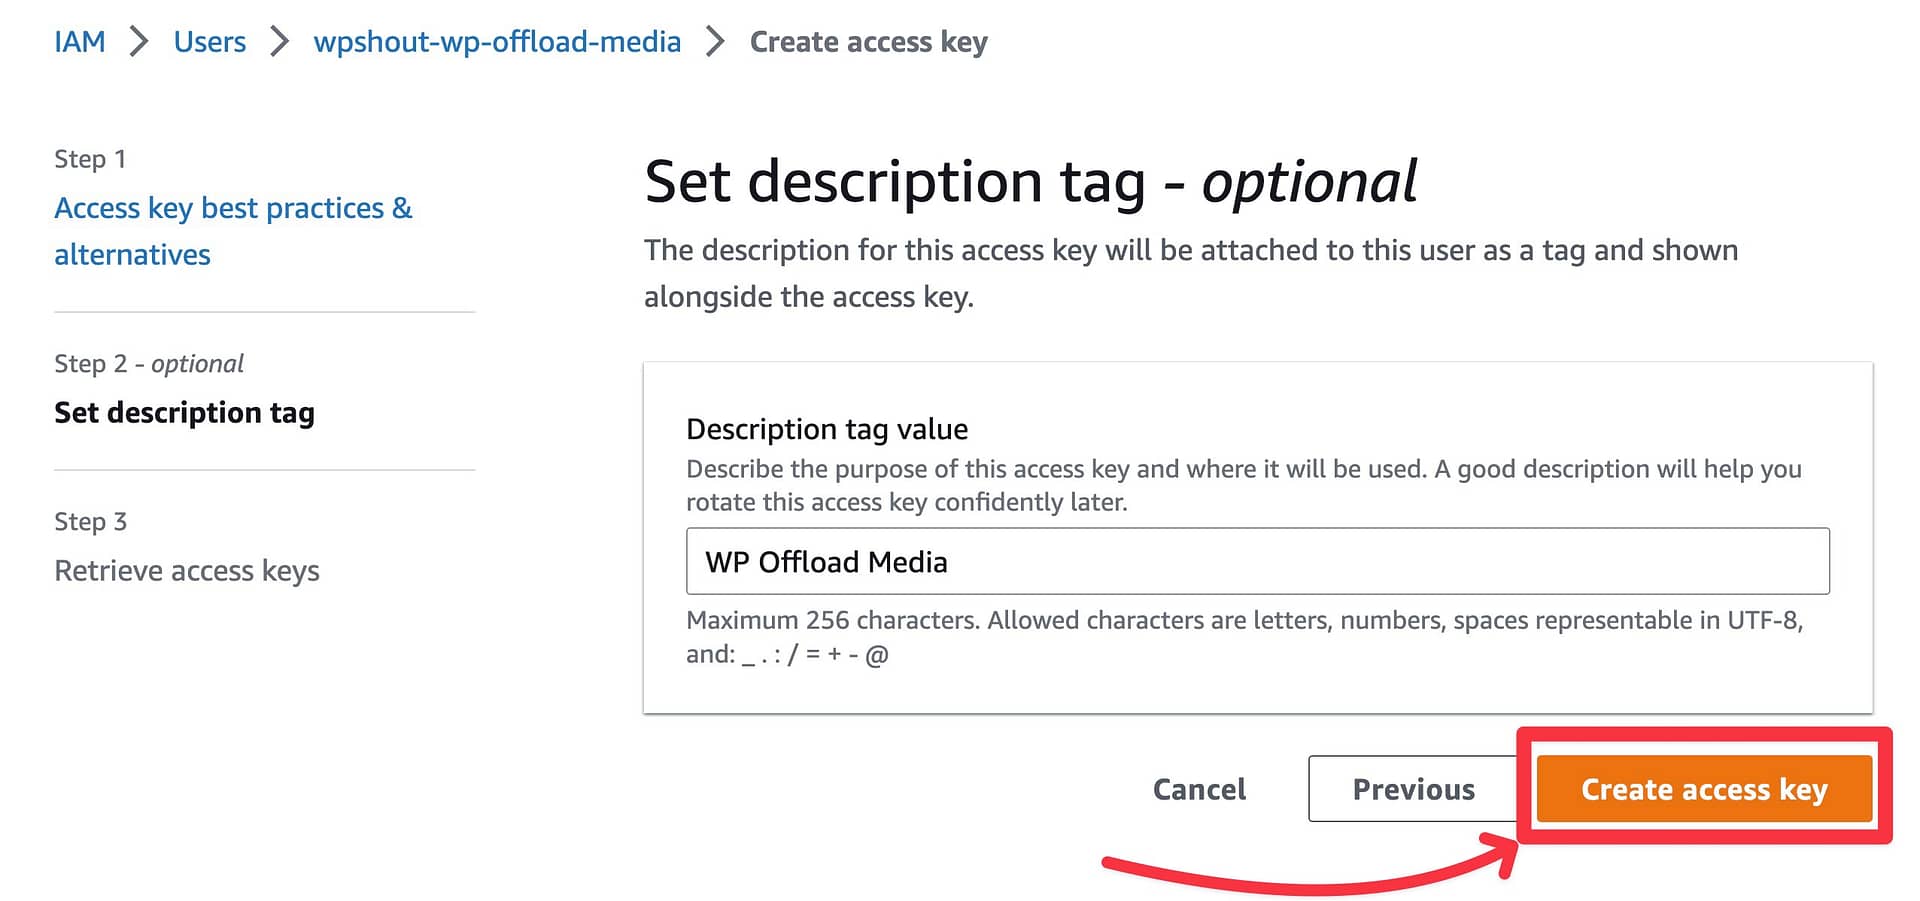
Then, add a description – e.g. WP Offload Media – and click Create access key.
AWS will now show you two pieces of information:
- Access key
- Secret access key
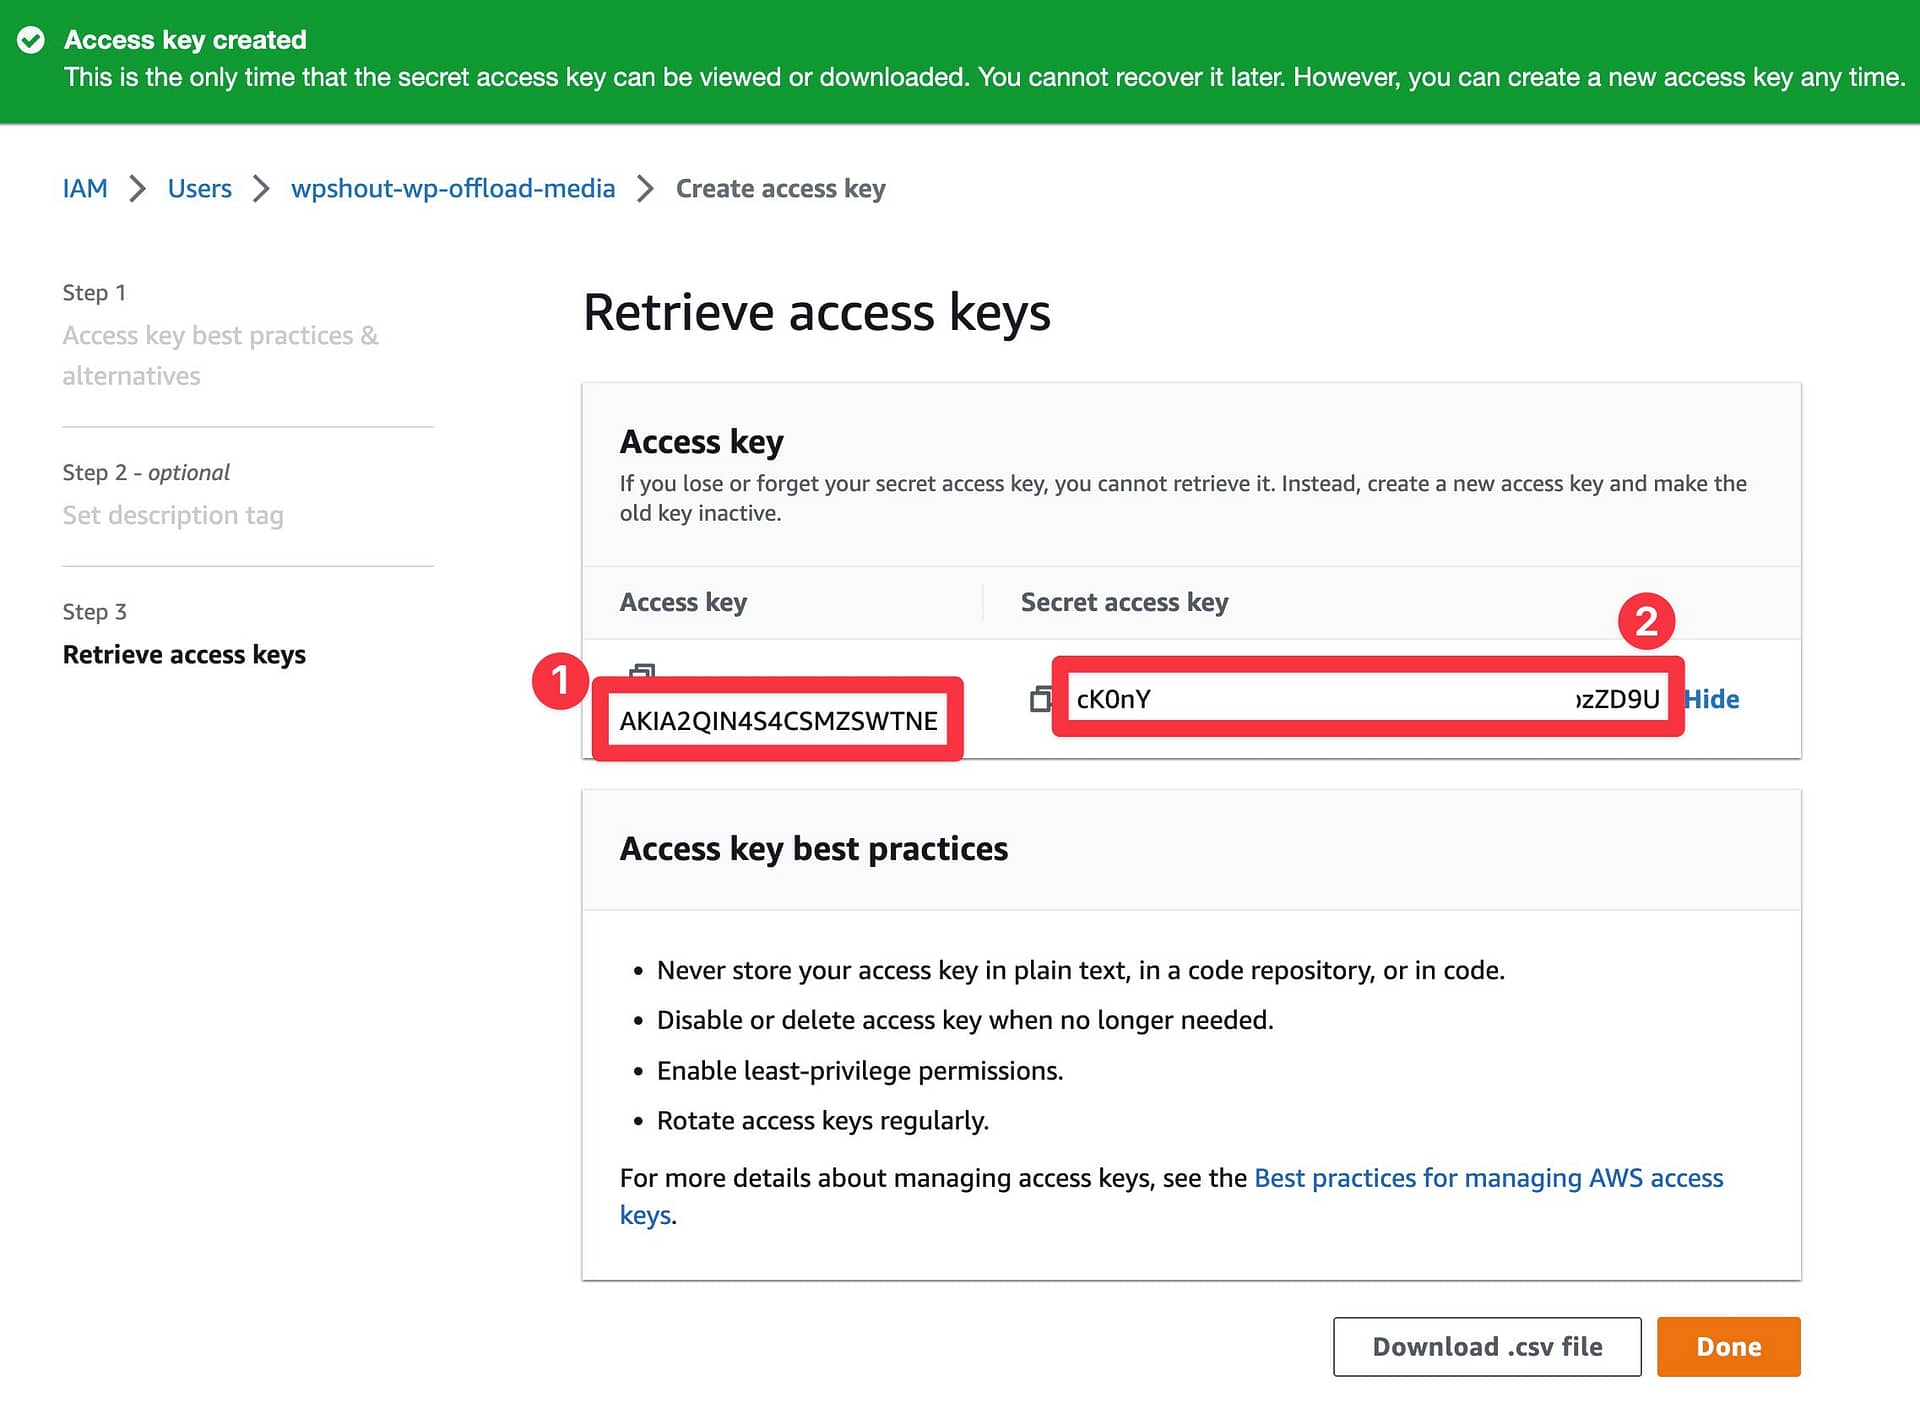
Copy both of them to a safe spot because you’ll need them in a second and AWS will not show them to you again after you leave this page.
Don’t worry, though – if you do accidentally lose your access key, you can just repeat these steps to create a new one.
Once you’ve copied them to a safe place, click Done.
4. Add access keys to WP Offload Media settings
Now, open your WordPress dashboard.
If you haven’t already installed and activated the WP Offload Media plugin yet, you’ll want to do that now.
Then, go to Settings → WP Offload Media.
Choose Amazon S3 as your provider.
Then, choose your Connection Method.
I recommend adding the access keys to your site’s wp-config.php file using the code snippet that the plugin provides. However, if you’re okay with a less secure method, you can also choose the I understand the risks… option to add your access keys to the plugin’s settings (which will save them in your database).
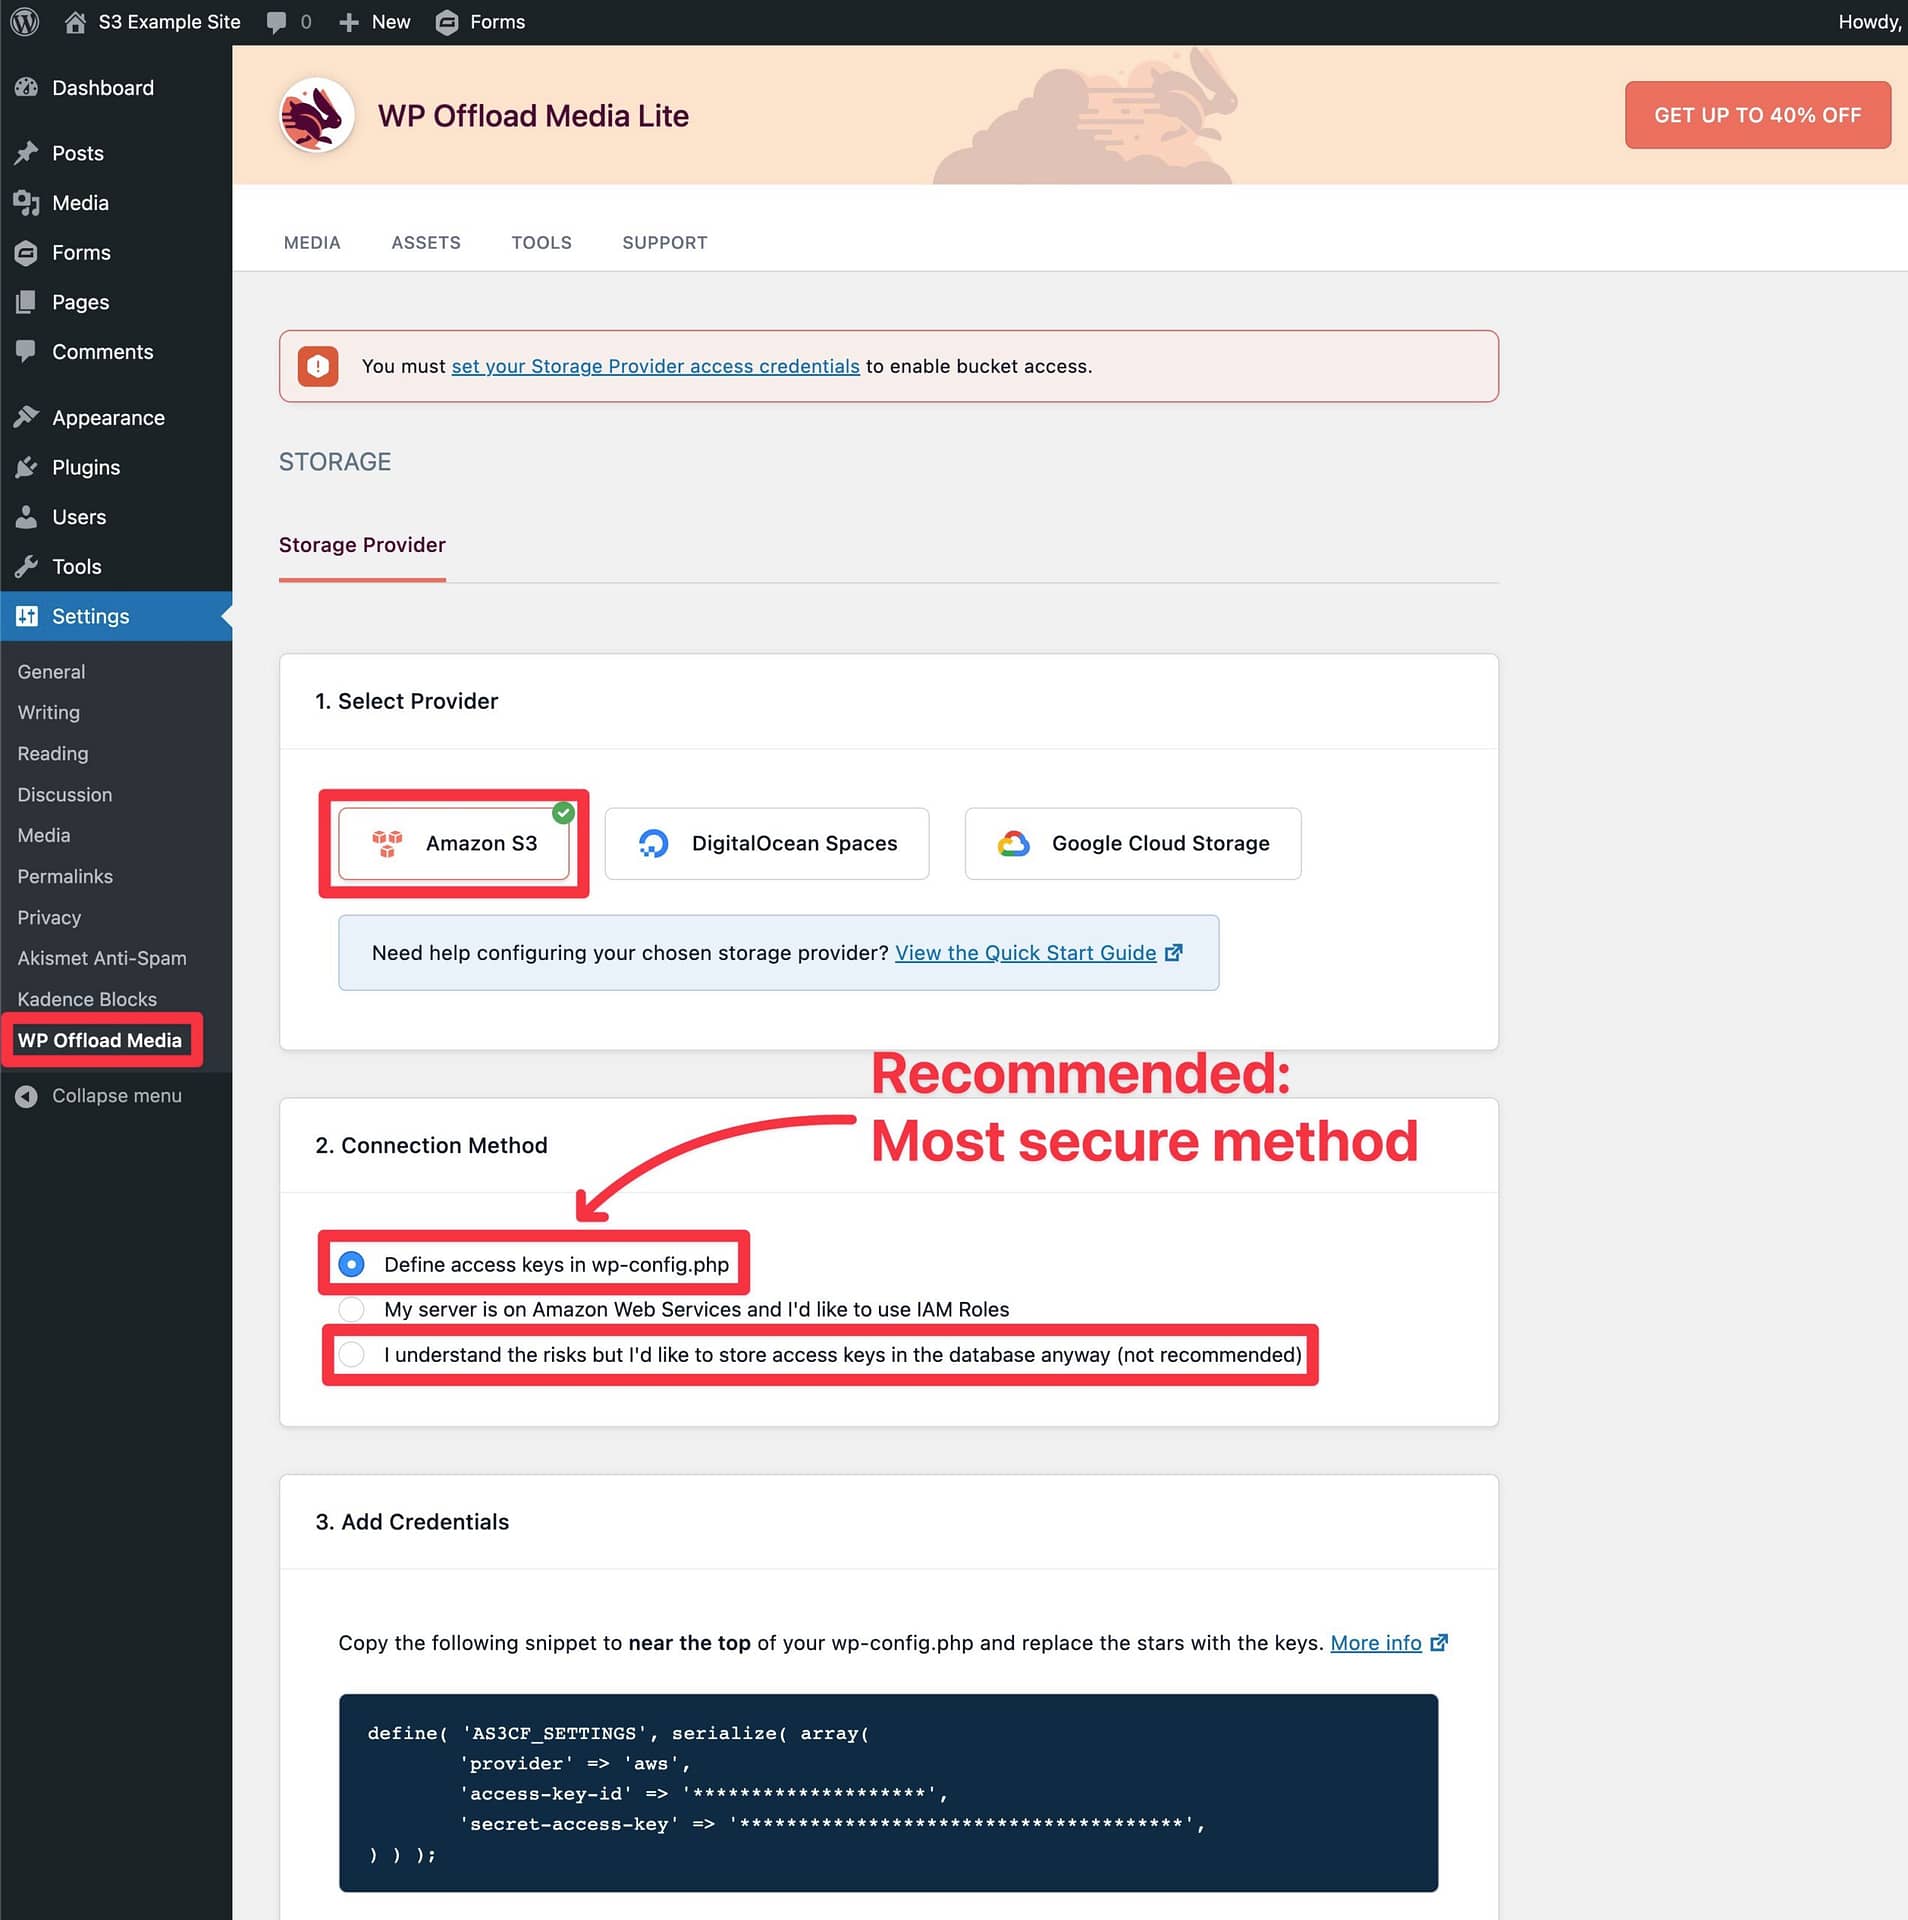
Here’s how to add the access keys to your wp-config.php file:
- Take a backup of your site just in case anything goes wrong.
- Connect to your server using FTP or something like cPanel File Manager.
- Edit the wp-config.php file.
- Add the following code snippet near the top of the file, making sure to replace the asterisks with your actual access key and secret access key.
define( 'AS3CF_SETTINGS', serialize( array(
	'provider' => 'aws',
	'access-key-id' => '********************',
	'secret-access-key' => '**************************************',
) ) );
Here’s what it might look like:
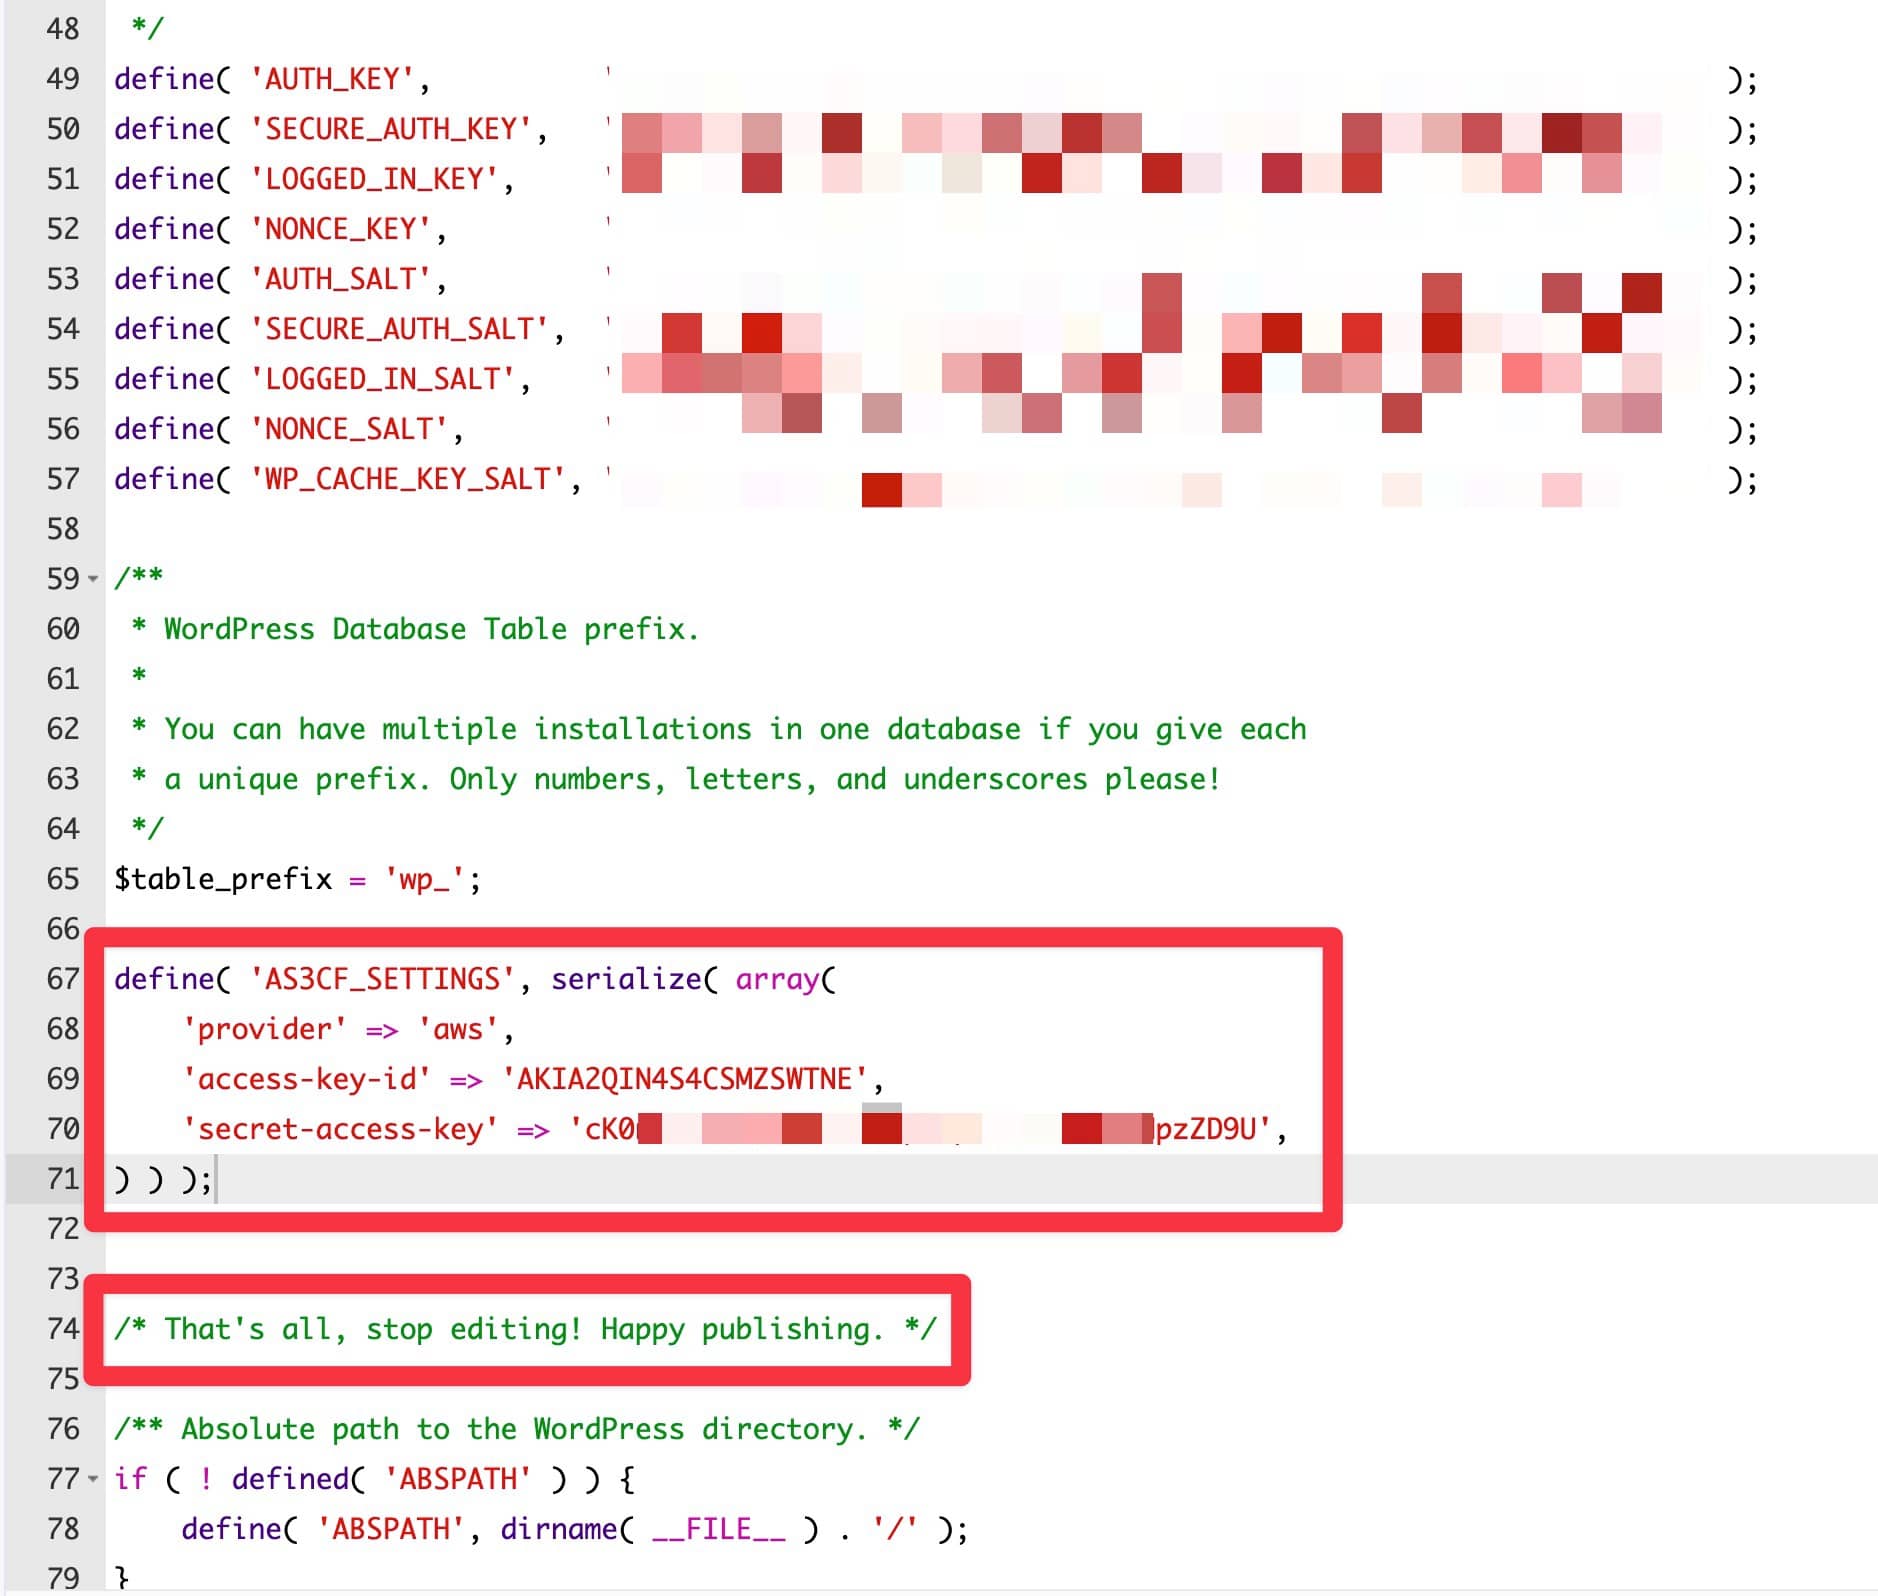
Once you’ve saved the wp-config.php file (and reuploaded it if needed), click the Save & Continue button in the plugin’s settings. It also might automatically detect the change and reload the page without requiring you to click anything.
5. Create an S3 bucket for your site (or select an existing one)
Now, you’ll see an option to select an existing bucket from your AWS account or have the plugin create one for you.
For this tutorial, I’ll choose the Create New Bucket option, but you’re free to choose an existing bucket if you’ve already created one.
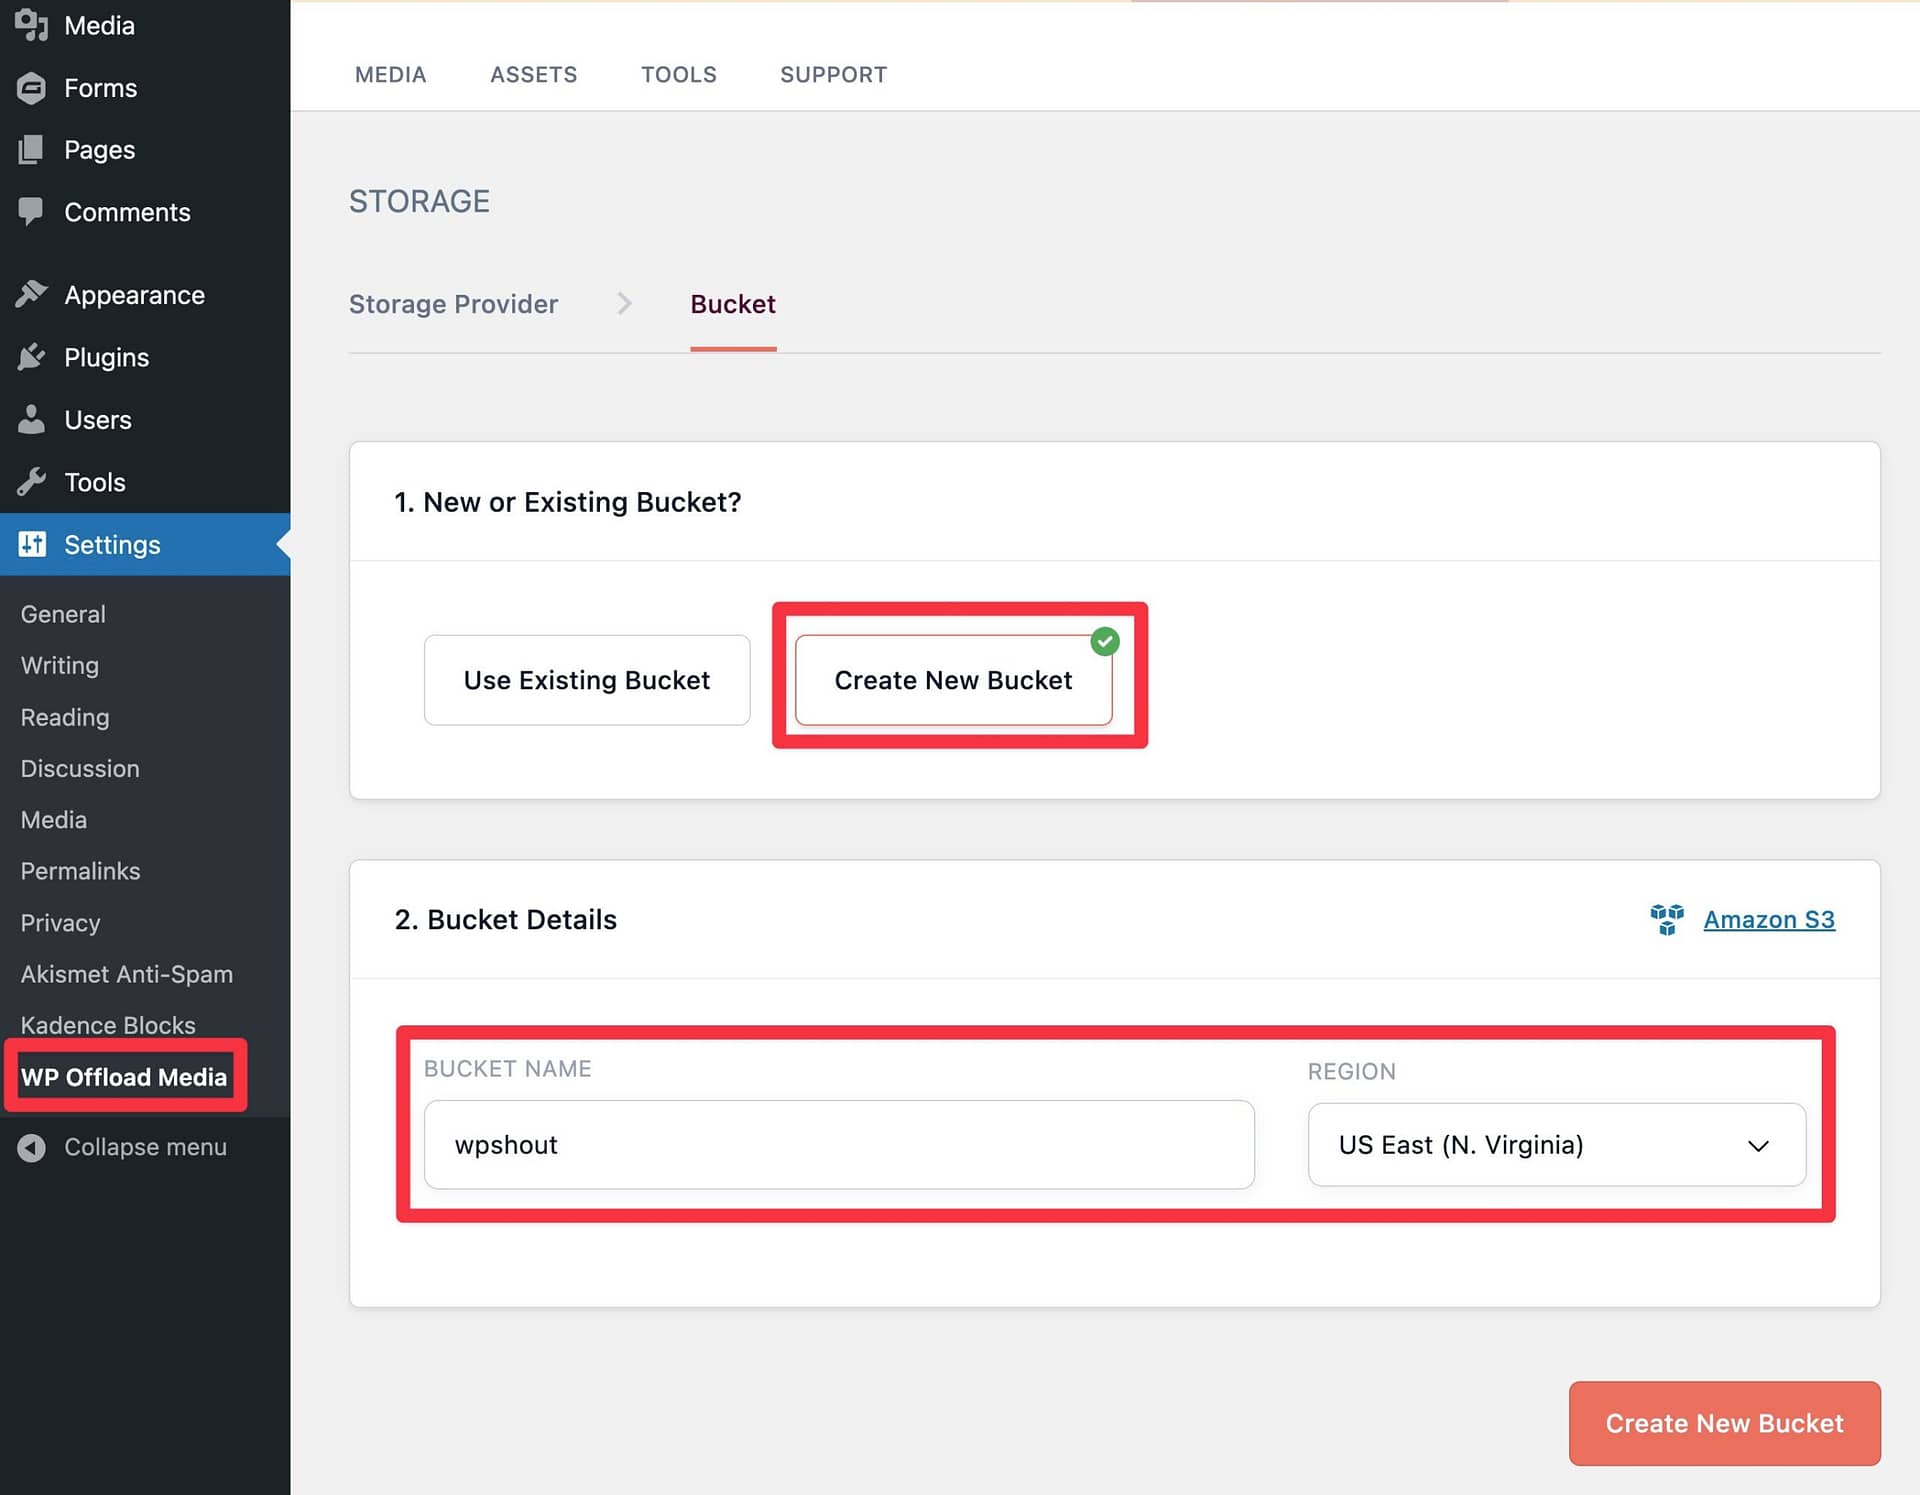
Then, click the Create New Bucket button.
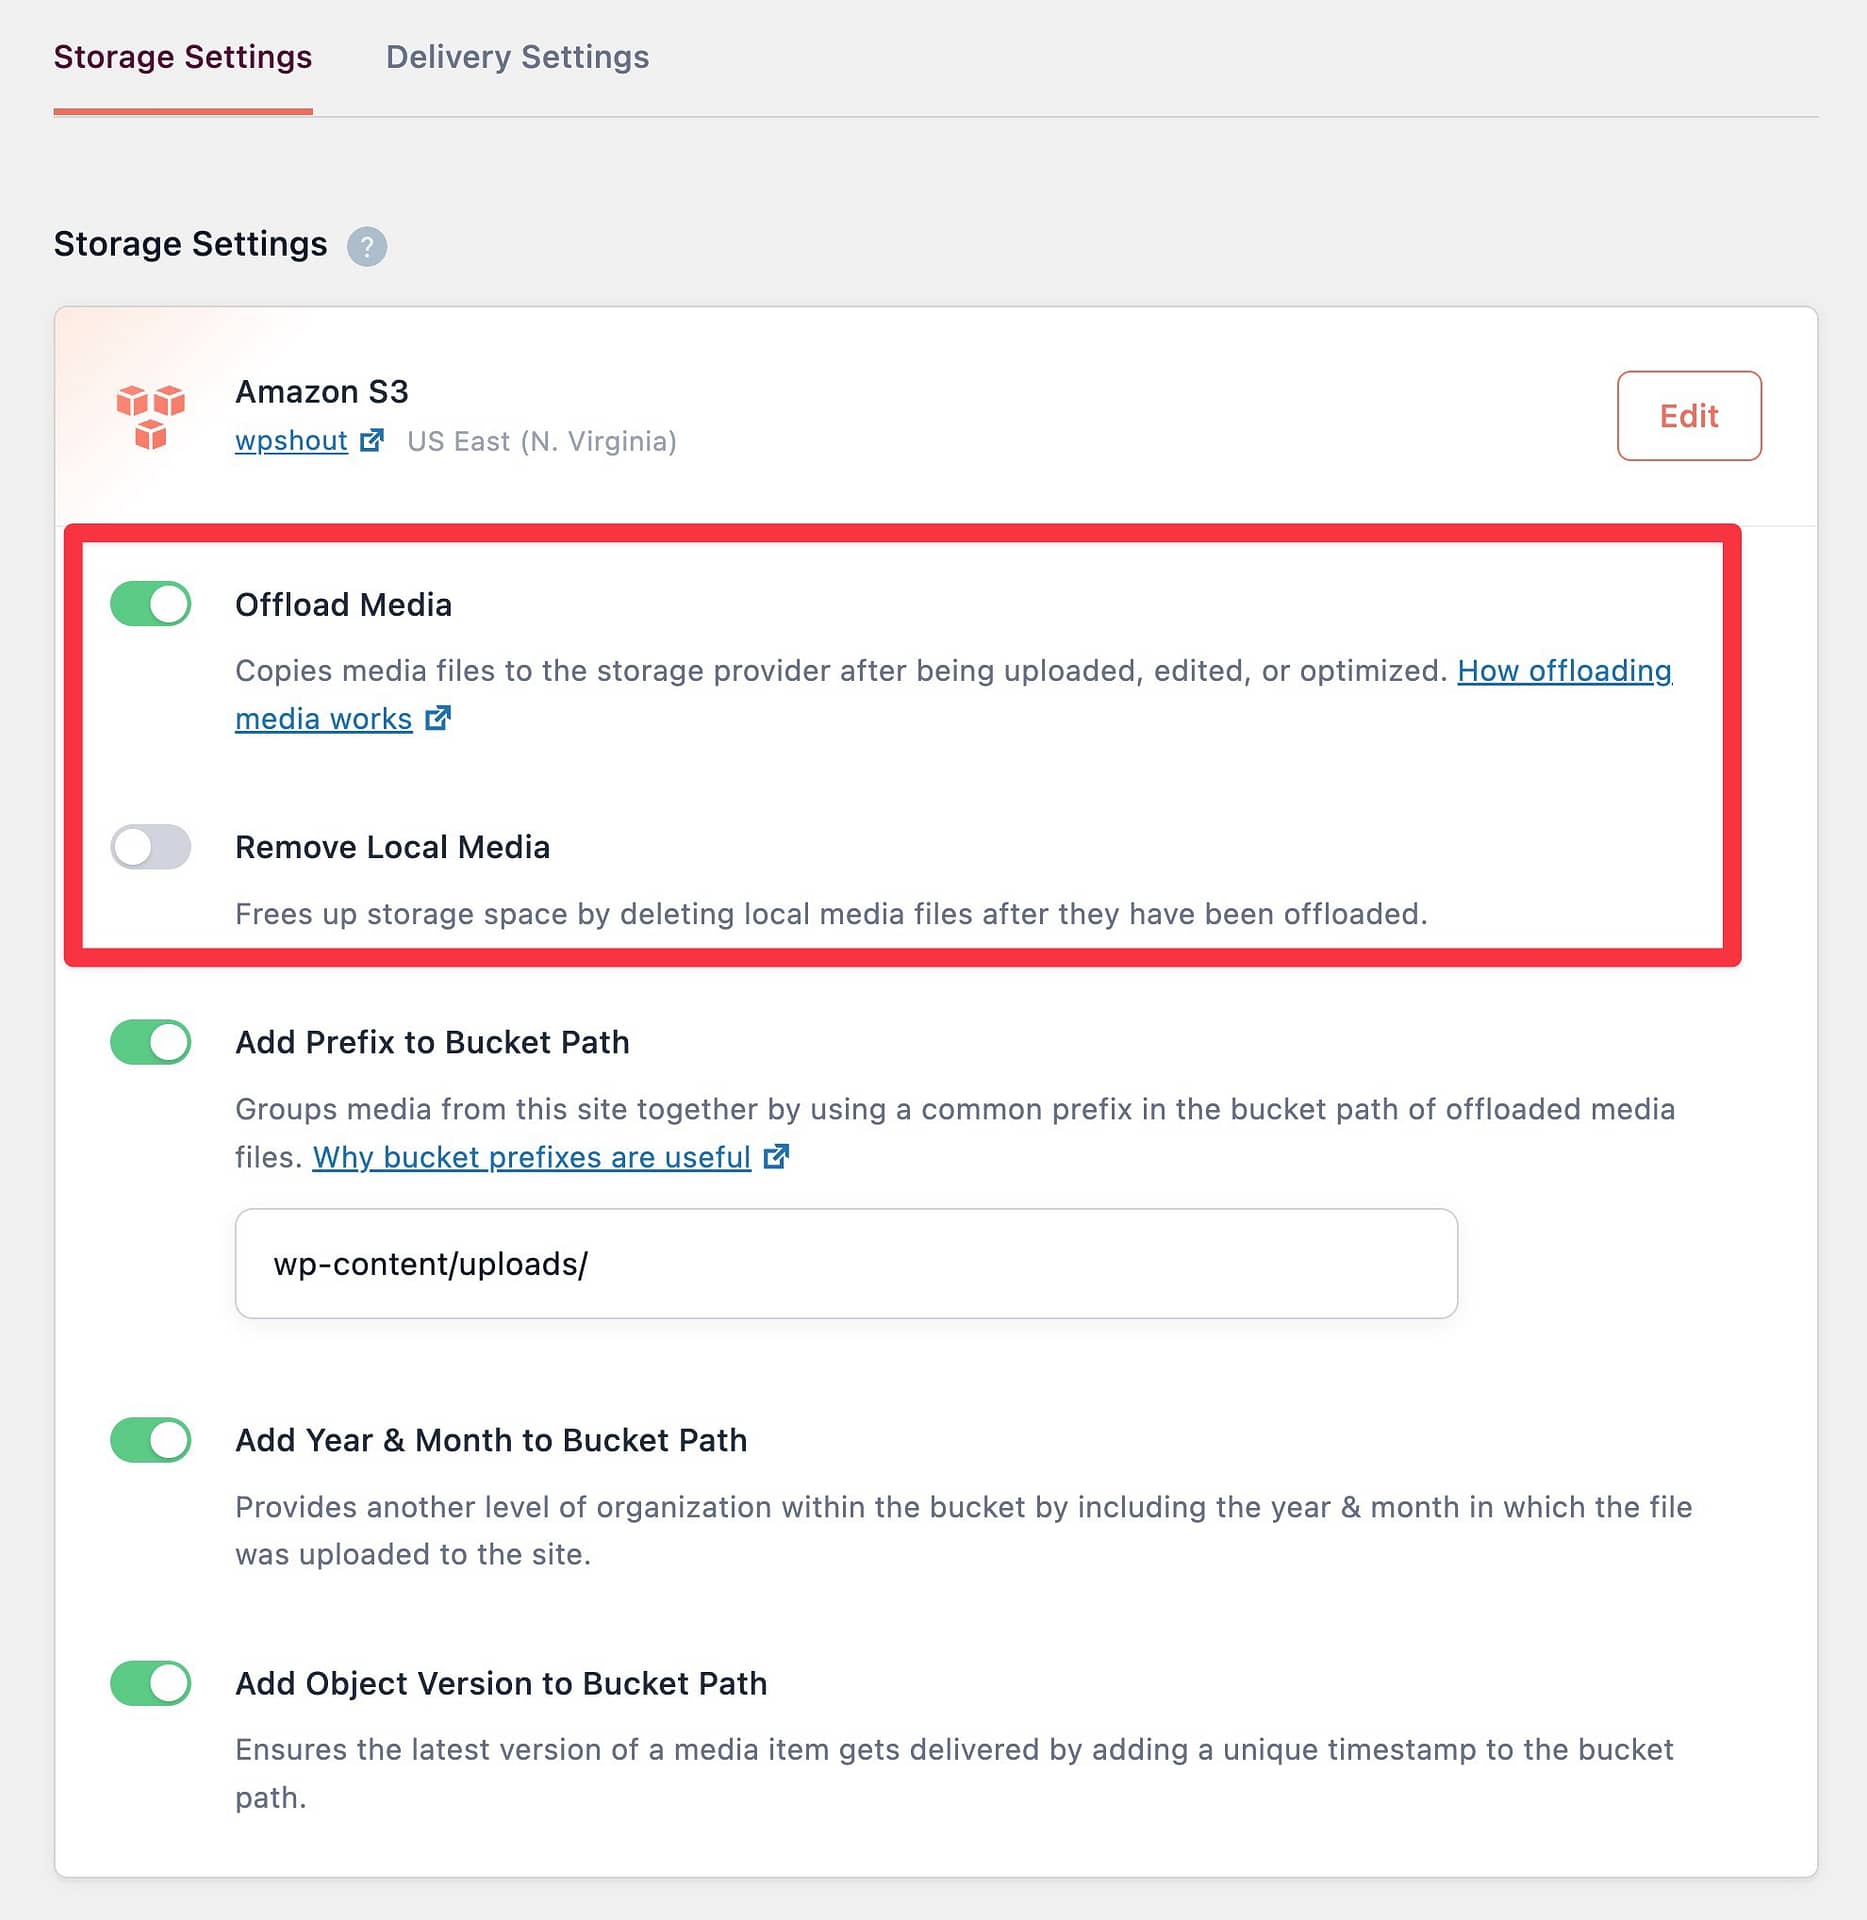
6. Configure how to offload WordPress media to S3
Now, you’ll see a bunch of settings that let you control how to offload media.
The defaults should be fine for the most part, but you’ll want to pay special attention to two settings:
- Offload Media – make sure this is enabled.
- Remove Local Media – enable this if you want to delete the local version of your media after it’s been offloaded. If you leave it disabled, the file will exist on both your site’s server and the S3 bucket.
7. Set up a content delivery network (CDN)
Unlike Optimole, using WP Offload Media does not automatically serve your media via a CDN. Instead, your media will be served directly from the S3 bucket, which isn’t optimal for performance.
If you’d like to use a content delivery network, the plugin does include a feature to let you rewrite your media URLs to serve from the CDN instead of the S3 bucket.
You can do this from the Delivery Settings tab. Click the Edit button next to Delivery Settings to view the option.
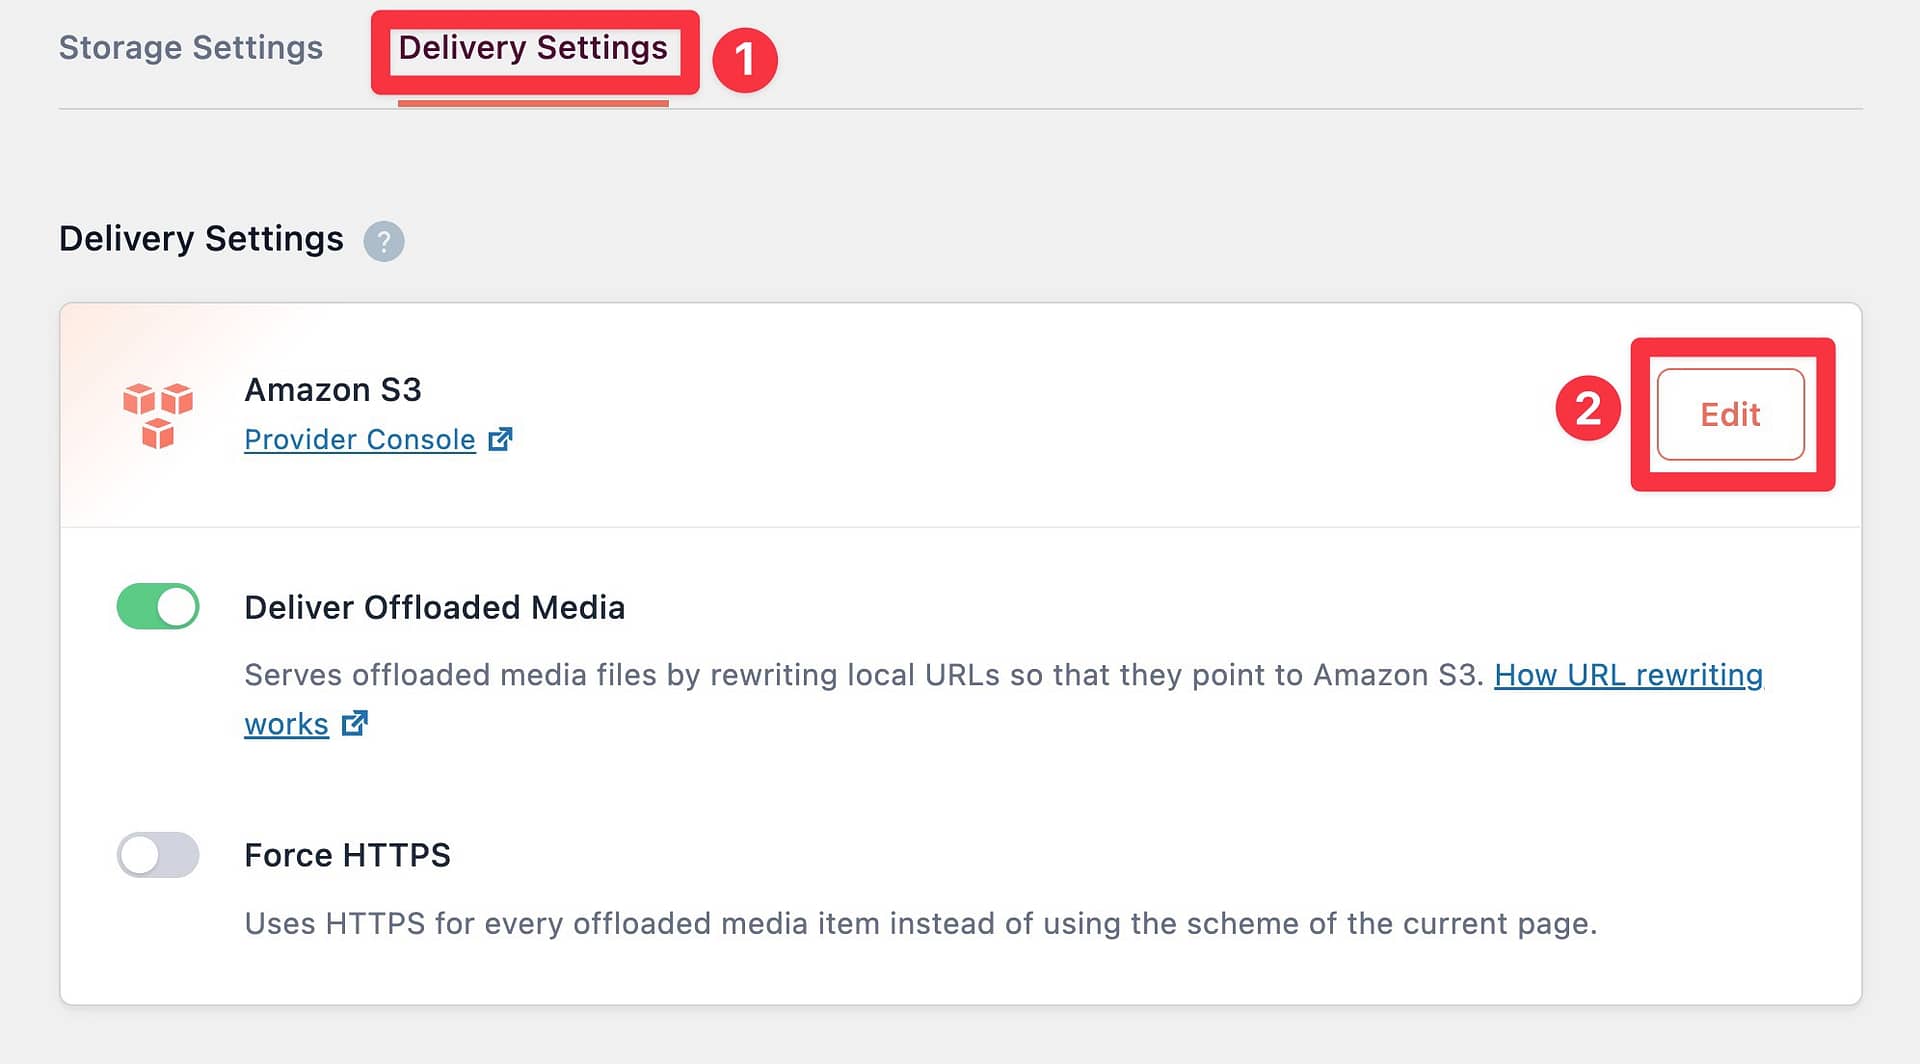
However, setting up a CDN is outside the scope of this article. If serving your S3 media from a CDN is important to you, you can consult WP Offload Media’s documentation or use Optimole for a simpler CDN setup.
Offload your WordPress media to S3 today 
There you have it – two different methods to offload WordPress media to S3.
Both methods get the job done, but they go about it in different ways.
If you want the simplest way to achieve the benefits of offloading your images, Optimole is probably the best option because the setup is quick and painless.
On the other hand, if it’s important to you to have access to your own S3 bucket (or if you primarily want to offload long-form videos), WP Offload Media might be a better option.
Do you still have any questions about how to offload WordPress media to S3? Let us know in the comments.