
To display your website, a user’s browser will send HTTP requests to your server. However, if you have multiple unoptimized files, the server must process many requests. Since these can significantly increase your page loading times, you’ll want your website to make fewer HTTP requests.
Fortunately, it’s possible to reduce them, which is what this post is all about.
Below, we’ll explain why you should minimize HTTP requests. Then, we’ll show you how to do this and speed up your website. Let’s get started!
An introduction to HTTP requests
Whenever a user visits your website, their browser has to download resources from your server. To communicate with it, the browser sends requests with HTTP (Hypertext Transfer Protocol).
Websites comprise different forms of data, and the files for HTML, CSS, images, and videos are all stored on a server – rendering this content on a browser requires HTTP requests.
Here are the steps involved when someone browses the Internet:
- A user visits a web page on a browser.
- The browser sends HTTP requests to the website’s server.
- The server processes the requests and returns the relevant resources.
- After the loading process is complete, the website is available to view and interact with.
It’s important to note that rendering a website doesn’t require just one HTTP request. Each individual image file, plugin stylesheet, JavaScript script, web font, and so on will usually have its own. Therefore, if your site is unoptimized, it could negatively impact loading times.
Why you might want your WordPress site to make fewer HTTP requests
As you’re building a website, it’s important to minimize unnecessary files. Then, a visitor’s browser doesn’t have to request as many resources from the server. Since your site will make fewer HTTP requests, it will load much faster.
As a rough rule, a higher number of HTTP requests leads to slower page speeds. If there are more resources to download before rendering the page, users will have to wait a long time to view the content.
For example, a website with only 50 requests will generally load faster than one with 70 requests. This is because there are fewer resources to process and download.
The real story is slightly more complex, as not all HTTP requests are created equal. One large, slow-loading HTTP request could have a bigger effect than five small fast-loading HTTP requests. But as a rough rule – fewer HTTP requests = faster-loading website.
By reducing HTTP requests on your website, you’ll improve your Core Web Vitals, especially your Largest Content Paint (LCP) score. In turn, this can improve user experience (UX) since visitors will see content more quickly.
How to test your website’s HTTP requests
As we mentioned earlier, HTTP requests are part of rendering. However, not every HTTP request is the same. Before you start reducing them on your website, you’ll need to know exactly which ones to target.
To do this, you can use a performance analytics tool like GTmetrix. Start by entering your website’s URL and hit Test your site:

You’ll receive a performance report containing information about your page size and the total number of requests. To view this data, scroll down to Page Details:
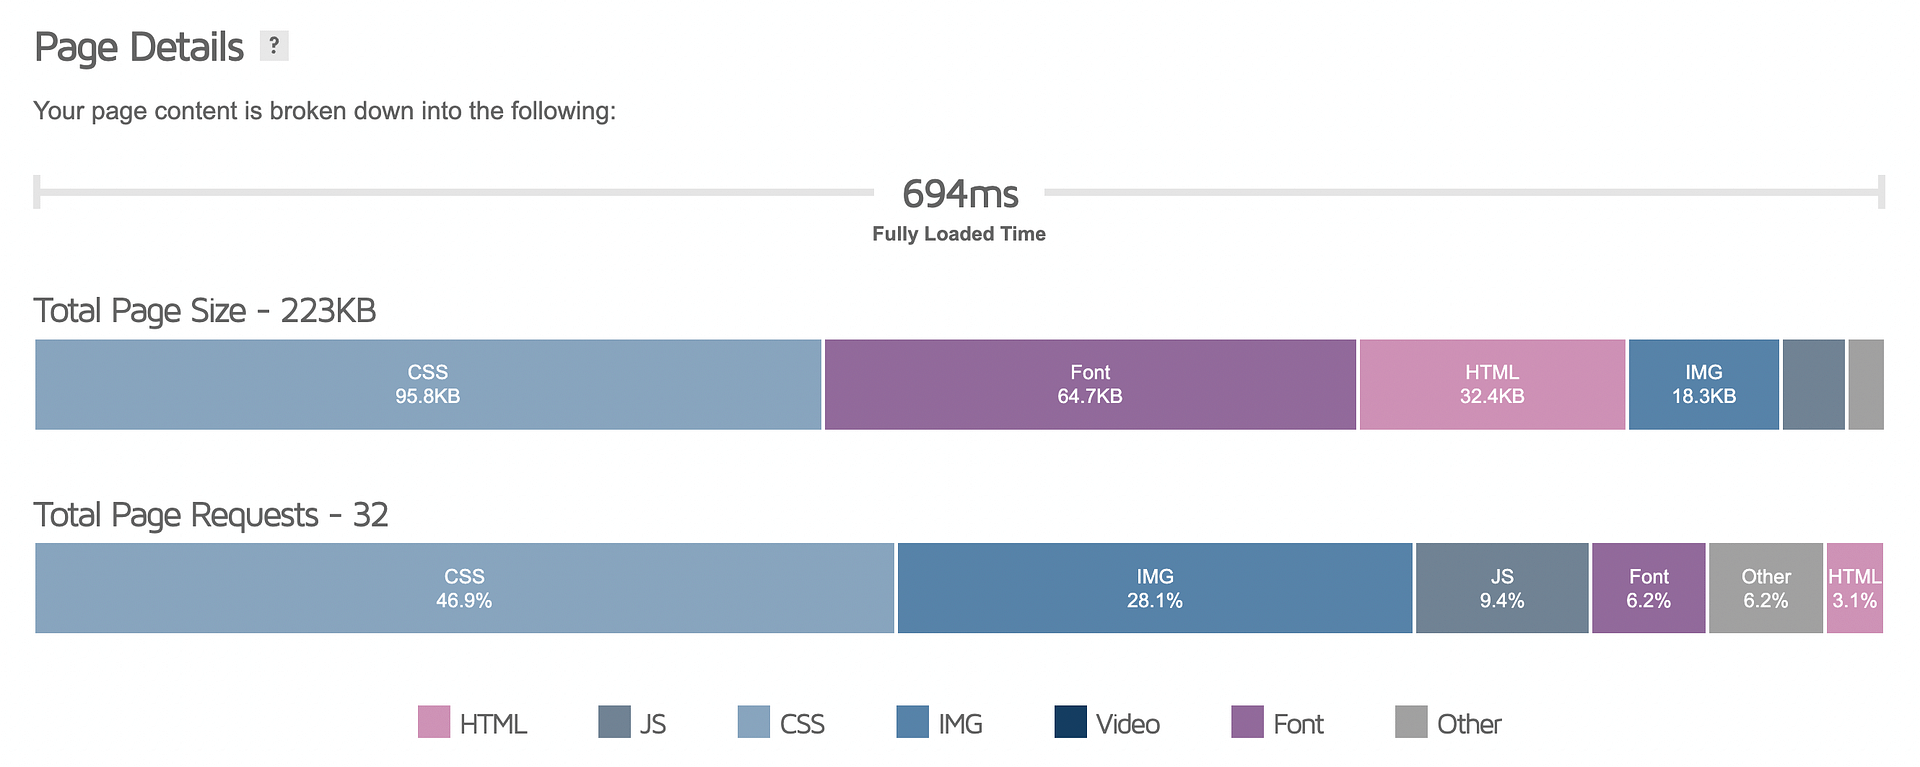
You can also view individual requests by clicking on the Waterfall tab. This will show you how long each file took to download:
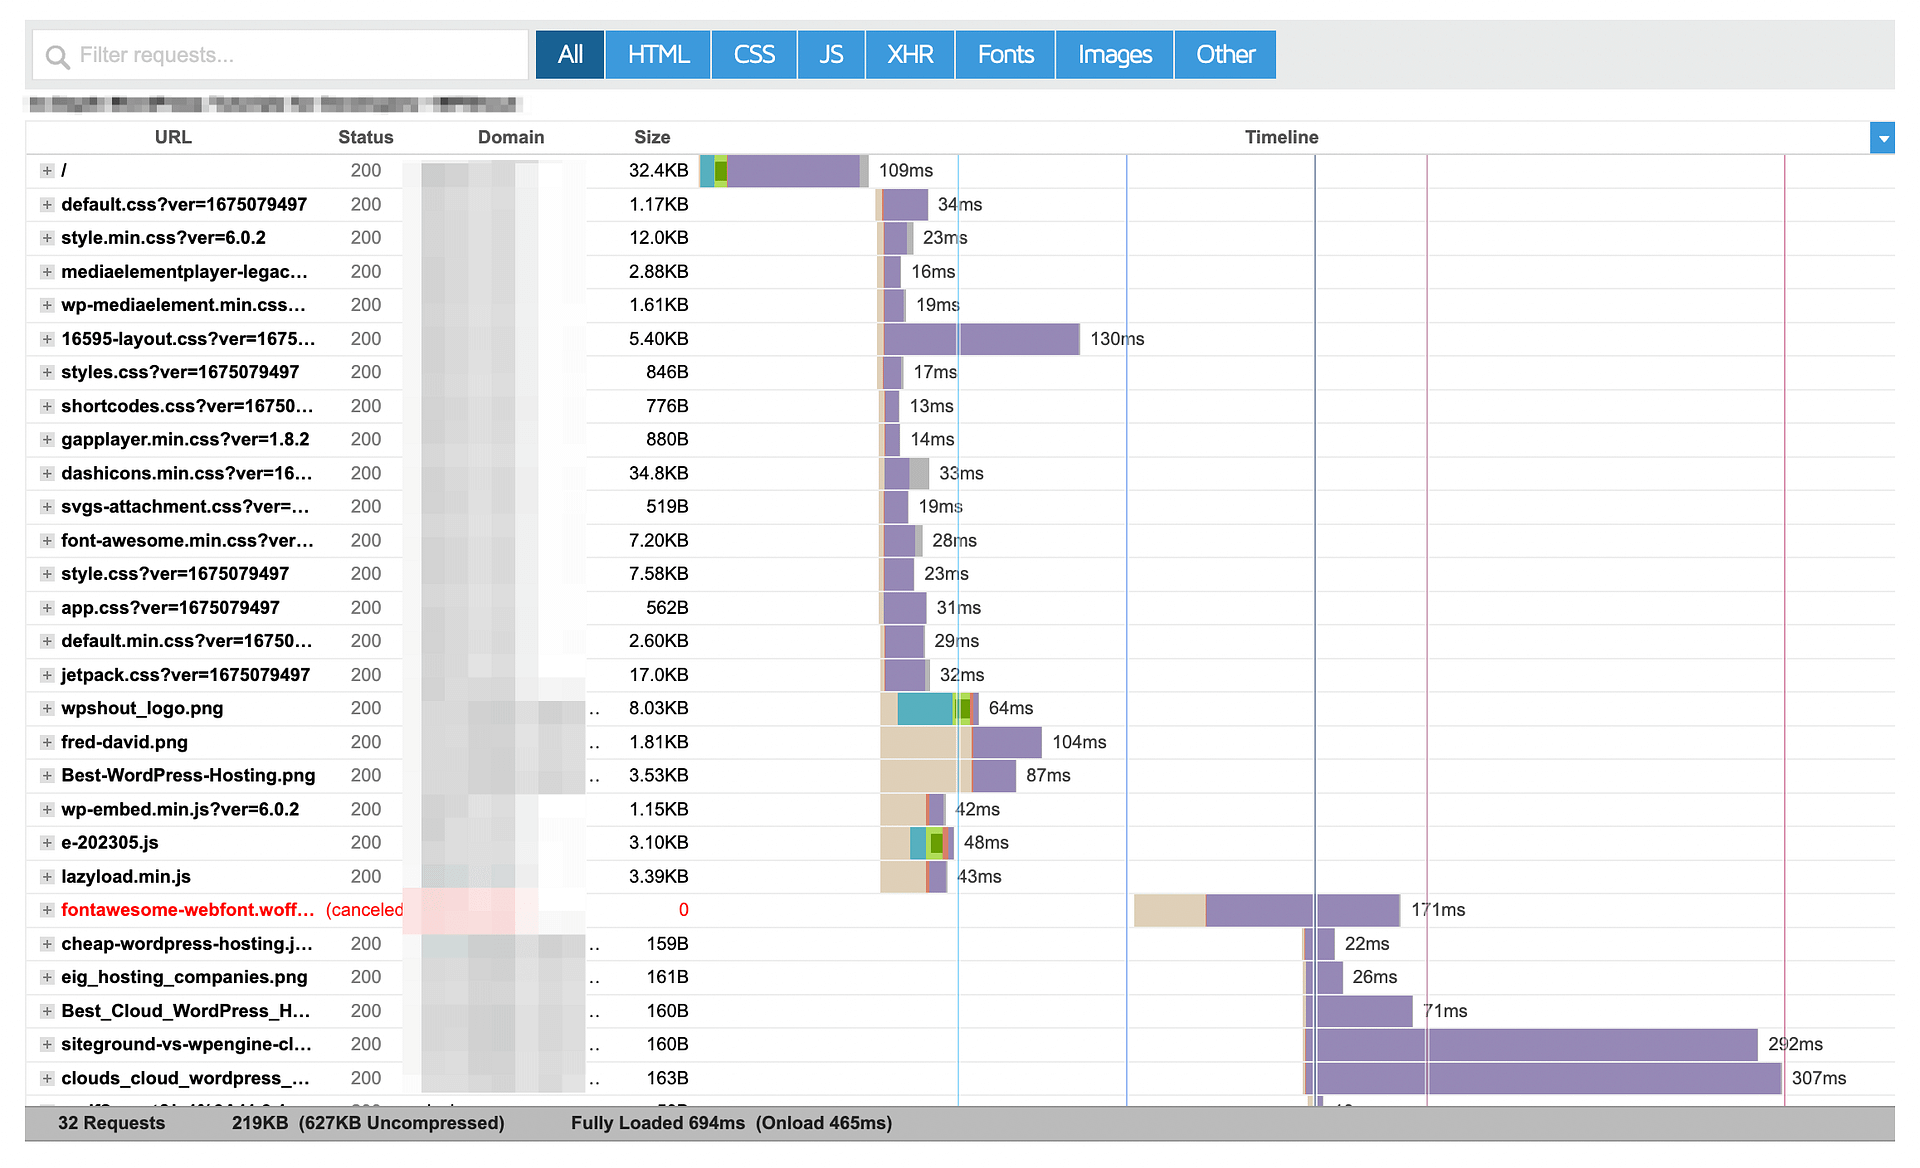
Using this Waterfall chart, you’re able to identify which elements on your site cause unnecessary HTTP requests. Once you find the problem, you can implement the right solution and speed up your website.
As you can see in the chart above, each HTTP request has a different size and takes a different amount of time to load.
If you want the biggest return on your efforts, try to focus on eliminating the largest and slowest HTTP requests.
You should also focus on removing third-party HTTP requests (resources that your site loads from someone else’s server, such as the Google Analytics scripts). These third-party requests require extra DNS lookups and have other performance disadvantages.
How to make fewer HTTP requests in WordPress and speed up your site (11 tips)
Once you’ve tested your website, it’s time to reduce its HTTP requests.
Below, we’ll go over 11 different ways to make fewer HTTP requests and optimize the HTTP requests that remain. A few of these tips won’t necessarily eliminate HTTP requests, but they will optimize the requests to make them load faster, which is still important for speeding up your site.
- DELETE UNNECESSARY PLUGINS
- DEFER RENDER-BLOCKING JAVASCRIPT AND/OR DELAY JAVASCRIPT EXECUTION
- CONDITIONALLY LOAD SCRIPTS
- MINIMIZE THIRD-PARTY REQUESTS
- OPTIMIZE YOUR IMAGES
- IMPLEMENT LAZY LOADING
- USE A SYSTEM FONT STACK
- COMBINE CSS AND JAVASCRIPT
- USE CSS SPRITES TO COMBINE IMAGES
- MINIFY YOUR SITE’S CODE
- DISABLE EMOJIS
1. Delete unnecessary plugins
You may have multiple plugins installed on your website. Even when you’re not actively using them, unnecessary plugins can increase HTTP requests and slow down your web pages.
To analyze your plugin requests, search for “plugins” in the GTmetrix Waterfall report. This will only display HTTP requests that originate from your wp-content/plugins folder:
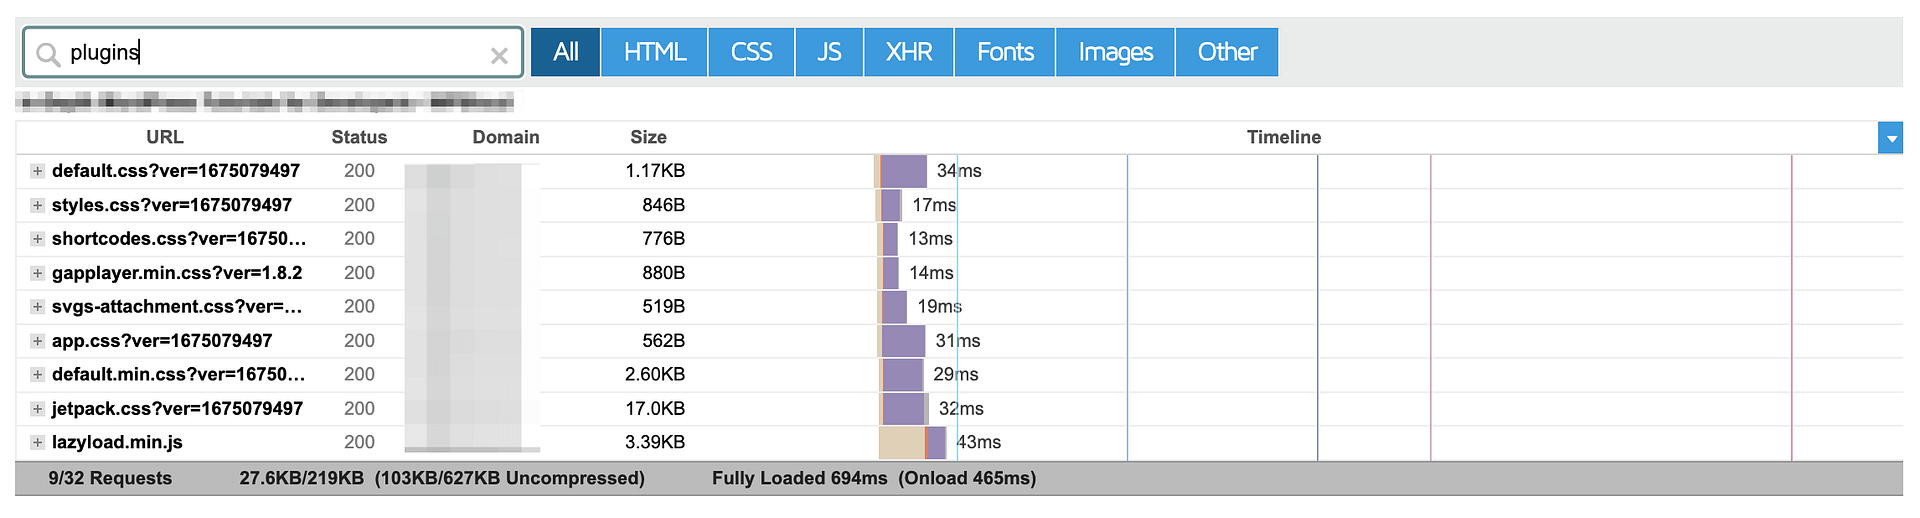
You’ll see which plugin created the request by hovering your mouse over a result. To optimize your site, go through the list, looking for unnecessary plugins. If a certain tool isn’t actively contributing to your website, consider deleting it.
2. Defer render-blocking JavaScript and/or delay JavaScript execution
If you want to make fewer HTTP requests and optimize your HTTP requests, focusing on JavaScript is another great tactic.
There are two main ways to optimize how your site’s JavaScript loads:
- Defer render-blocking JavaScript
- Delay JavaScript execution
Defer render-blocking JavaScript
Deferring render-blocking JavaScript won’t remove HTTP requests by itself, but it will make sure your site’s JavaScript loading isn’t blocking more important HTTP requests.
During the loading process, a browser may run into a render-blocking resource. These CSS or JavaScript files pause the rendering until the resource is processed. If you have these unnecessary files, they could lengthen the time to display your content.
Adding defer or async attributes to these files will inform the browser to execute them later. With defer attributes, the scripts are downloaded during HTML parsing and then executed. Async attributes will run the script as soon as it’s available.
To implement this, you can use a feature-specific plugin like the free Async JavaScript plugin.
Or, many general performance/caching plugins also offer this feature, including WP Rocket and FlyingPress.
You can also set this up manually in your site’s code, if you feel comfortable doing that.
To implement a defer attribute, you’ll simply need to open your functions.php file and find the <script> tag for the resource. Here, insert a defer attribute:
<script src="resource.js" defer></script>Here’s what an async attribute looks like:
<script src="resource.js" async></script>Generally, it’s best to use async attributes. However, you’ll need to use defer attributes when the script relies on another script.
Delay JavaScript execution
If you want to make fewer HTTP requests for the initial page load, another popular tactic is to delay some/all of your site’s JavaScript execution until user interaction.
When you set this up, your site will wait to load the files until a user does some interaction, such as clicking, scrolling, or so on.
By moving these HTTP requests to later in the visit, you can make fewer HTTP requests for the initial load and greatly speed up user experience-focused metrics like Largest Contentful Paint.
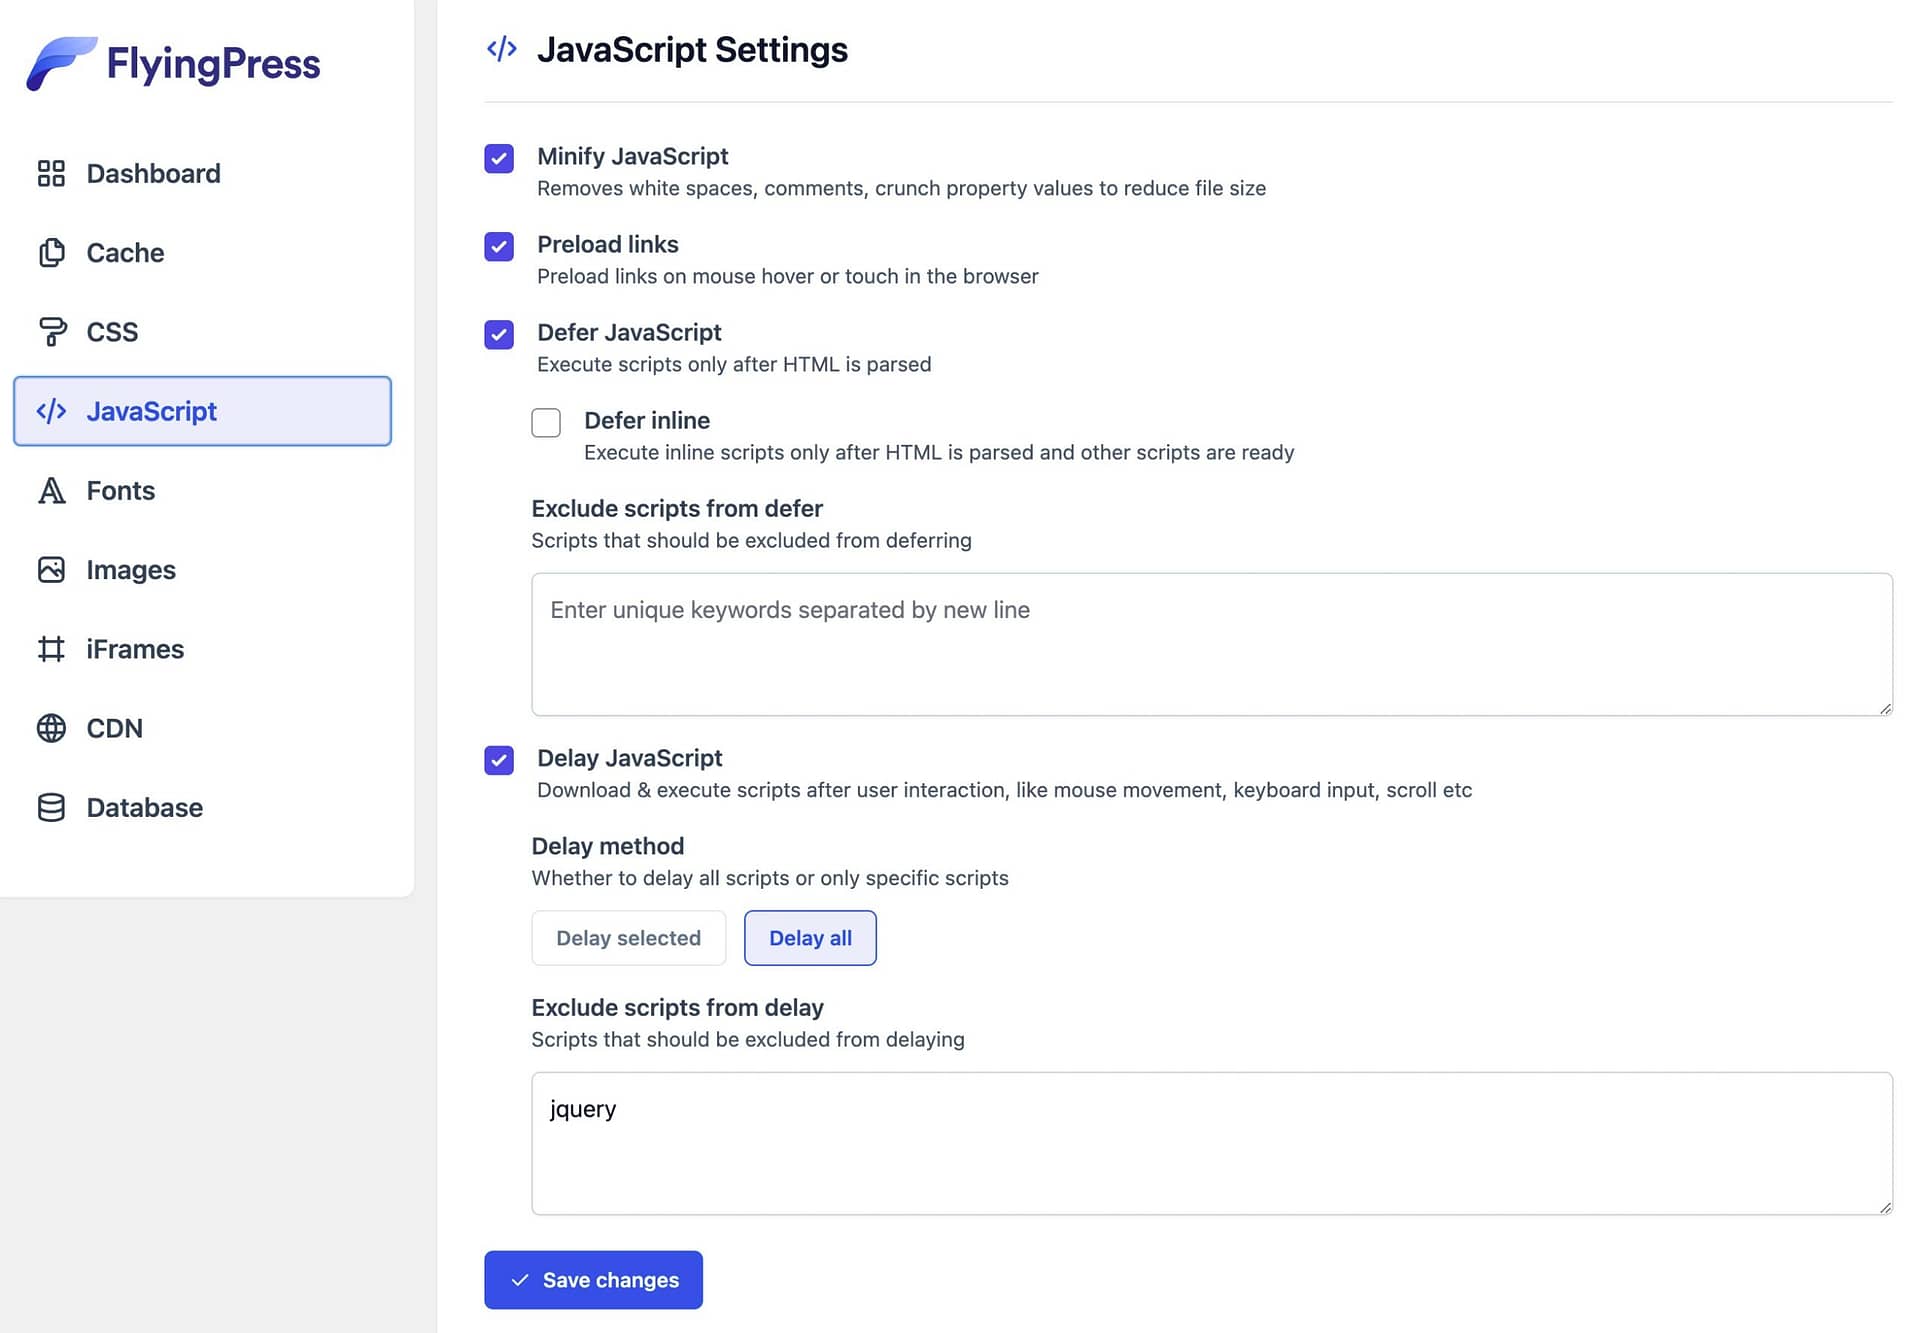
To set this up, you can use one of these performance plugins:
Here’s what it looks like in FlyingPress – you can either delay all of your scripts except for selected scripts or only delay selected scripts:
3. Conditionally load scripts
Some plugins unnecessarily load scripts throughout your site. For example, a plugin may only handle the forms on your Contact Us page but add scripts to another area. In this case, we recommend conditionally loading the plugin’s scripts.
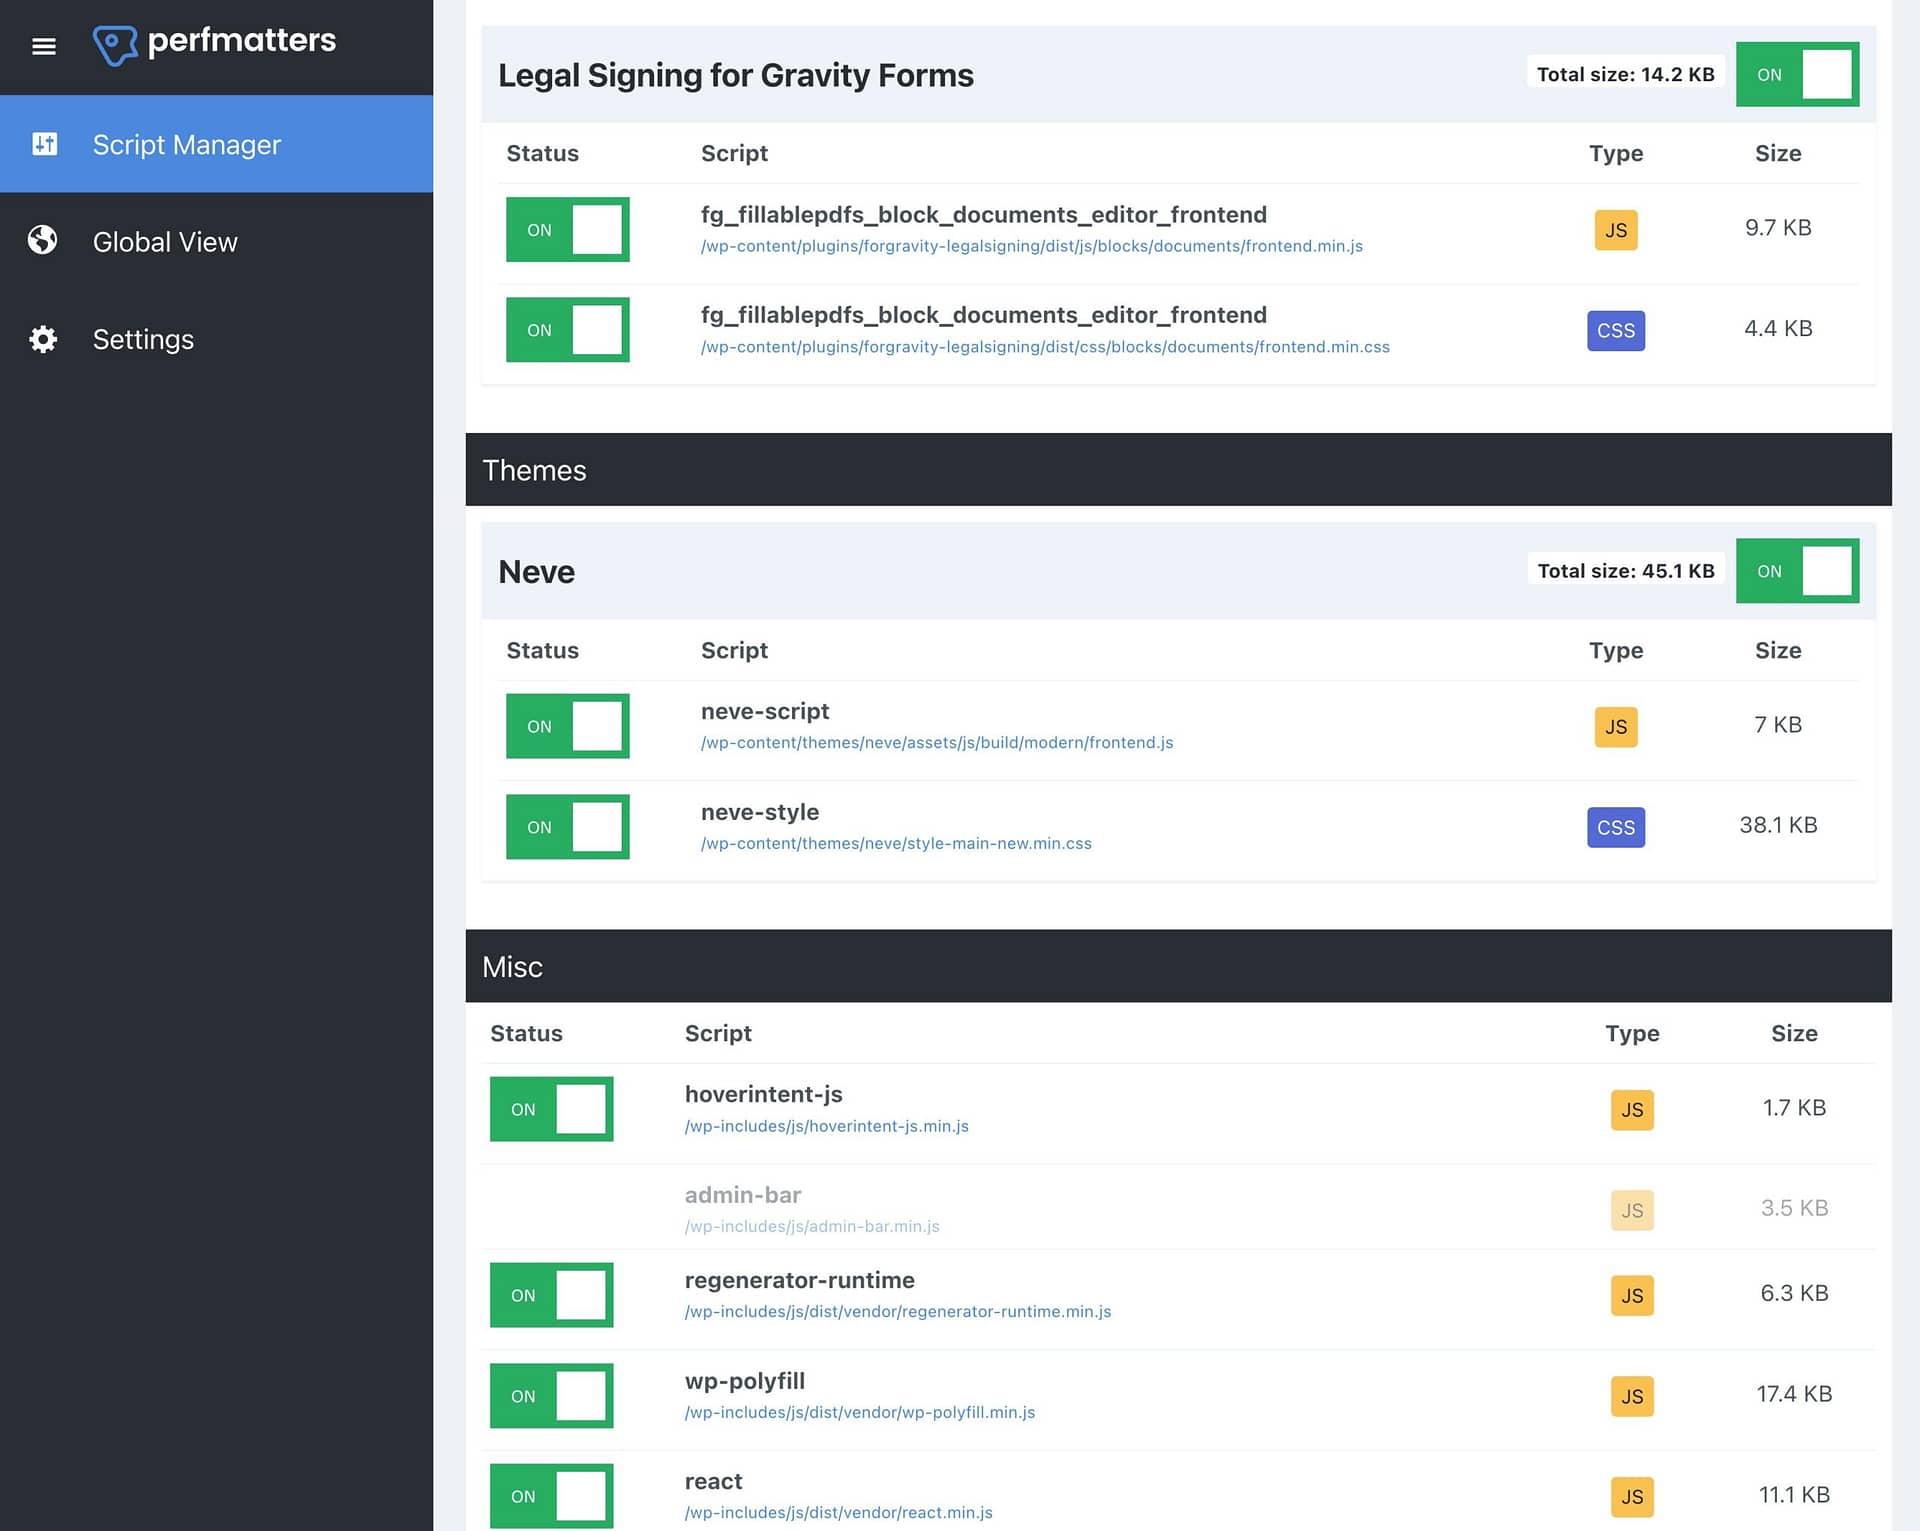
To conditionally load your plugins, consider installing a tool like Perfmatters. It comes with a built-in script manager for disabling plugins or individual scripts on specific pages or posts:
For a free option, you can also consider the Asset CleanUp plugin.
Conditionally load your plugins and then run your website through GTmetrix again. If you still notice an excess of HTTP requests, it’s time to continue to the next method.
4. Minimize third-party requests
As your website loads, a visitor’s browser may need to pull data from a third-party platform, which requires additional HTTP requests. Plus, since you’re relying on a third-party server, these requests can significantly slow down your website.
Here are some examples of third-party scripts:
- Embedded YouTube videos
- Google Analytics tracking scripts
- Google Fonts
- Third-party ads
Like render-blocking resources, you can apply async or defer attributes to the third-party scripts.
For services like Google Analytics and Google Fonts, you can also consider hosting them locally using plugins like these:
5. Optimize your images
Just like with plugins, removing unnecessary images from your website is important. Since every image requires its own HTTP request, you’ll want to minimize the number of photos on your site.
Then, all of your images need to be optimized. Although this won’t decrease the number of HTTP requests, it’ll reduce their size. This can effectively improve page loading time.
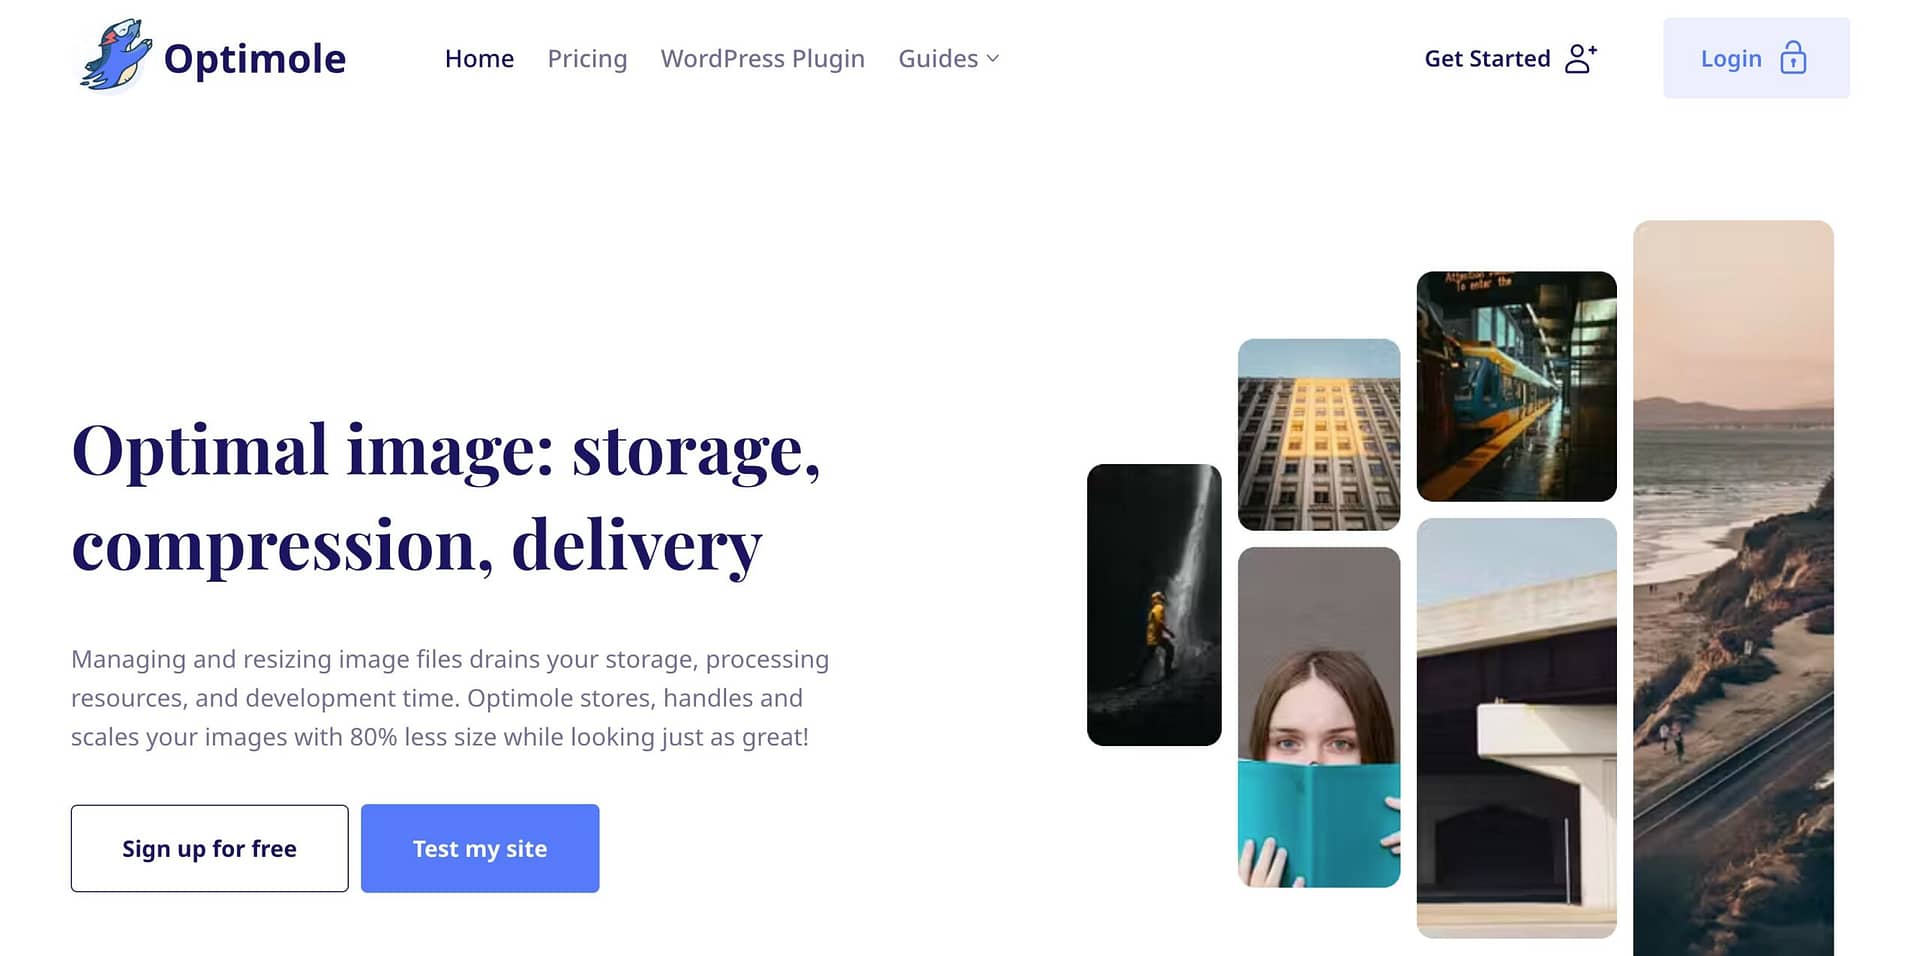
One of the best image optimizers is Optimole. This freemium plugin offers an all-in-one suite of image optimization features including:
- Serving adaptive images that are optimized for each user’s device.
- Compressing images.
- Resizing images.
- Converting images to optimal formats.
- Serving images via its built-in content delivery network (CDN).
As you upload new images, Optimole will compress and resize them. Therefore, you won’t have to worry about large image files requiring excessive resources.
6. Implement lazy loading
It’s also a good idea to implement lazy loading. This prevents any below-the-fold images and videos from loading until a visitor scrolls down the page.
This moves those HTTP requests to later in the user’s visit, which lets you make fewer HTTP requests for the initial load and speed up your Largest Contentful Paint time.
WordPress 5.5 added built-in lazy loading for images using native browser lazy loading.
However, not all browsers support native lazy loading yet. Additionally, using a dedicated lazy loading plugin gives you more control over lazy loading functionality on your site.
For example, you might want to exclude the first few images from lazy loading to avoid negatively affecting your Largest Contentful Paint times.
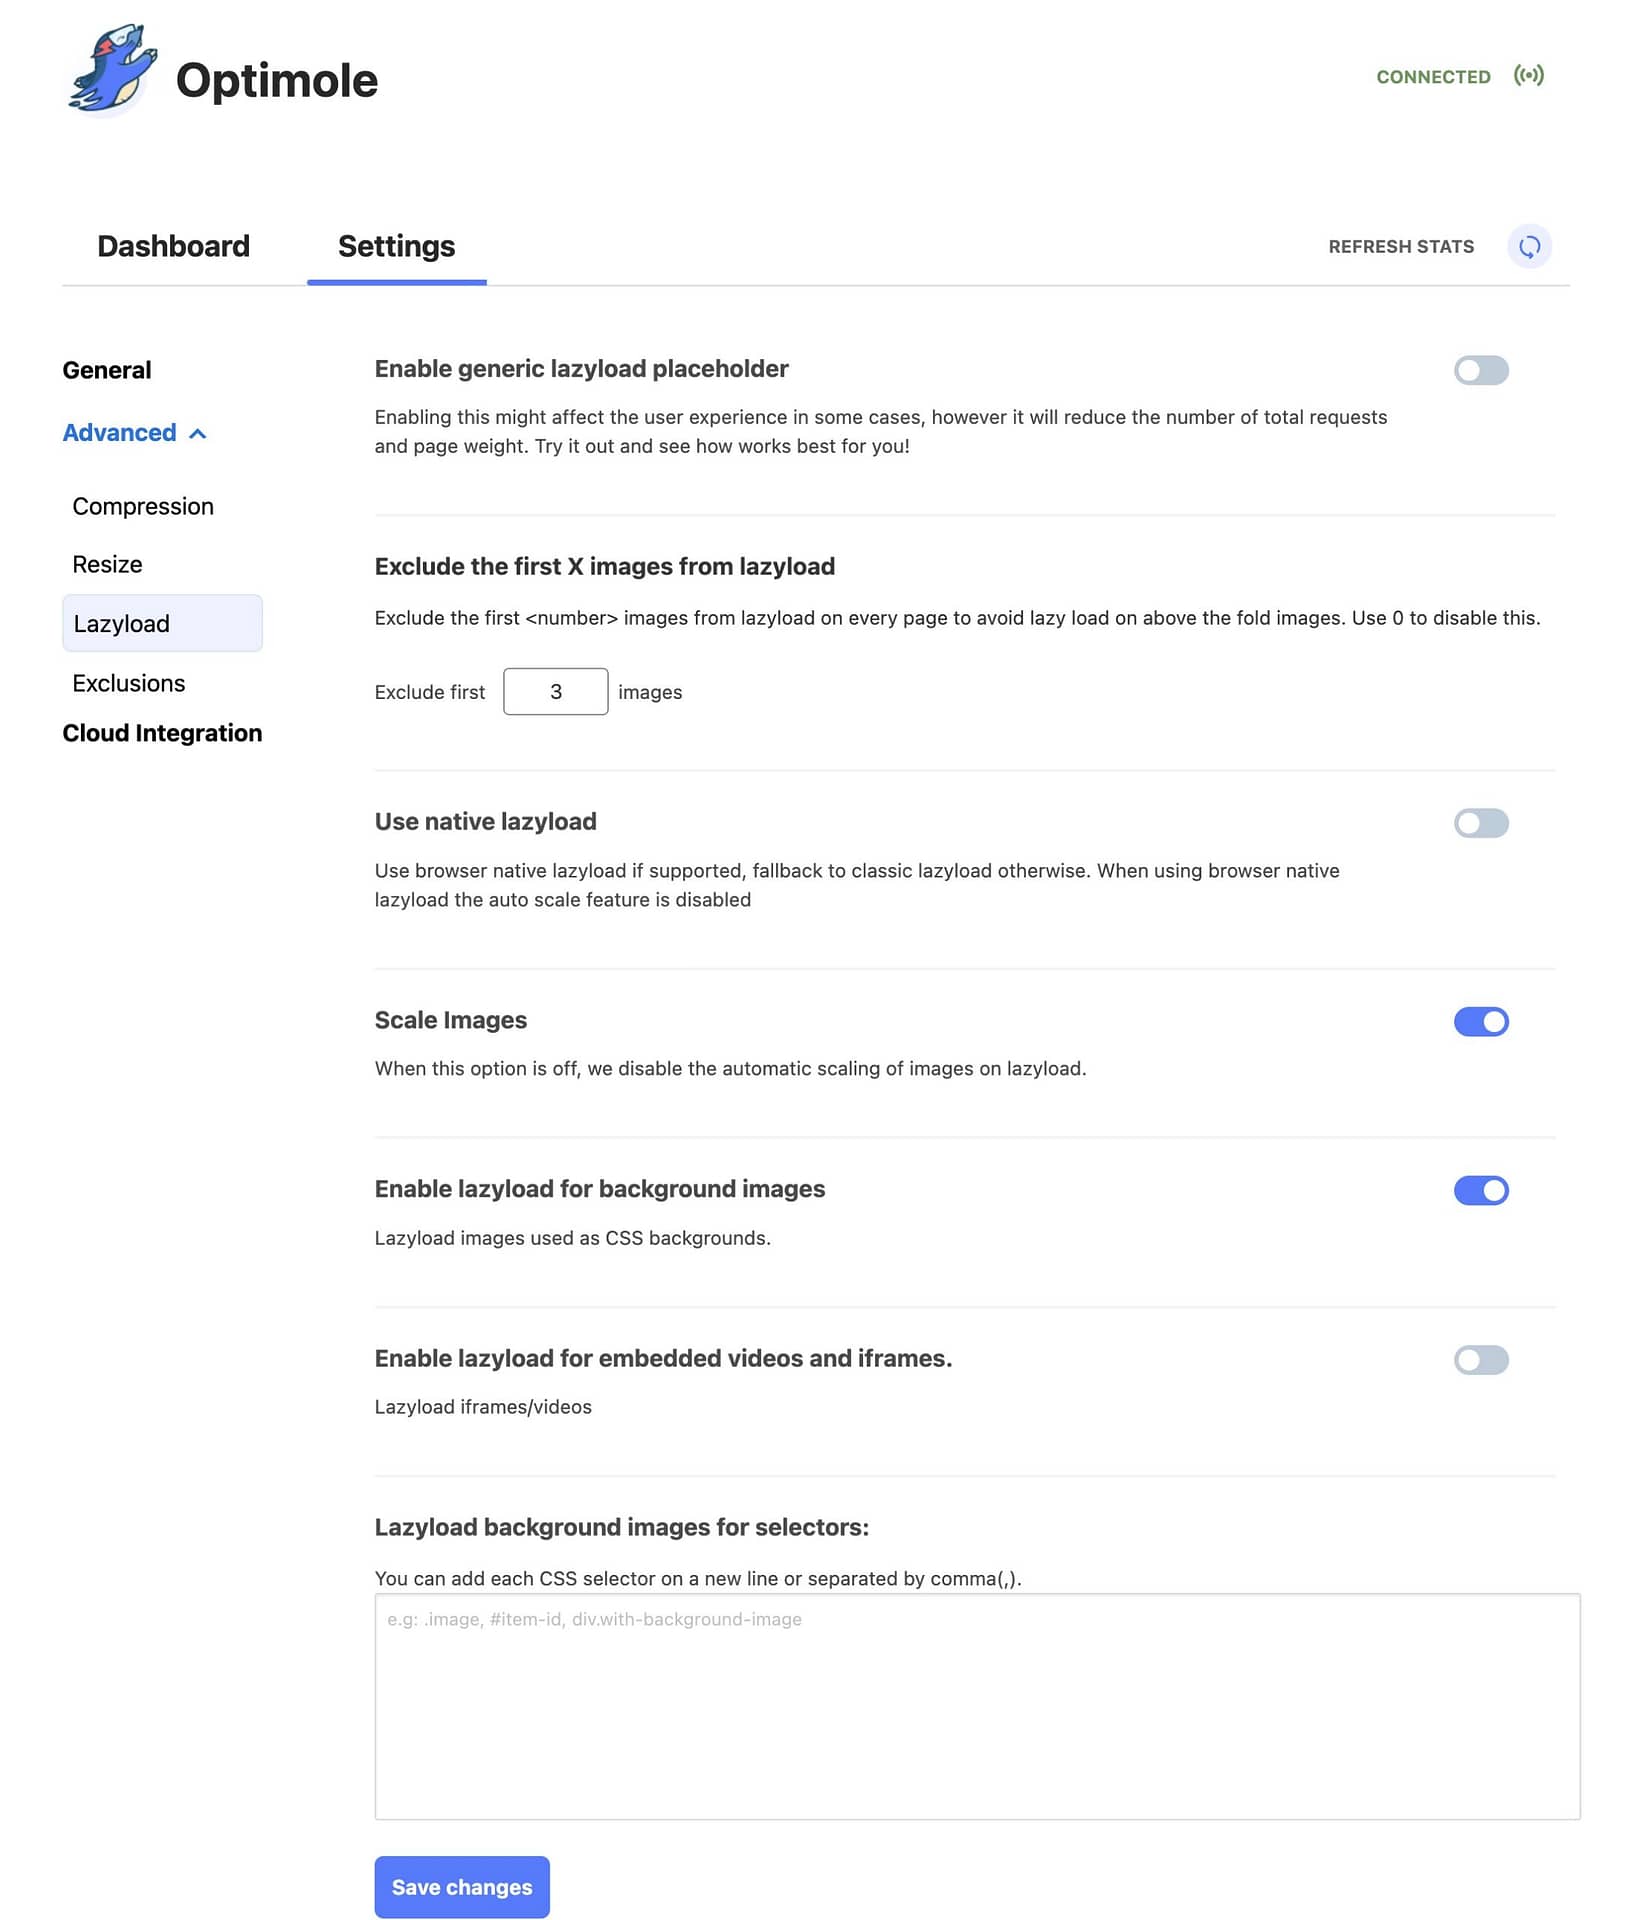
If you use the Optimole plugin from the previous section, it also includes a built-in feature to lazy load your site’s images optimally.
You can also further adjust lazy loading behavior from the plugin’s settings.
7. Use a system font stack
You might use a variety of custom fonts to make your website unique. However, each new font will add another HTTP request as your site loads.
For this reason, it’s best to limit the number of custom fonts you’re using.
Alternatively, you can stick to a system font stack, which uses the native fonts from a visitor’s operating system.
Certain themes, like Neve, GeneratePress, or Astra, let you revert to system fonts. However, you can also change your font stack with CSS.
8. Combine CSS and JavaScript
Another way to make fewer HTTP requests for CSS and JavaScript files is to combine separate CSS and JavaScript files into a single stylesheet or file.
With the Autoptimize plugin, you’ll be able to aggregate site files easily in just a few steps:

Under Settings > Autoptimize, enable the plugin to optimize JavaScript and CSS code. Then, check the boxes next to Aggregate JS-files and Aggregate CSS-files:
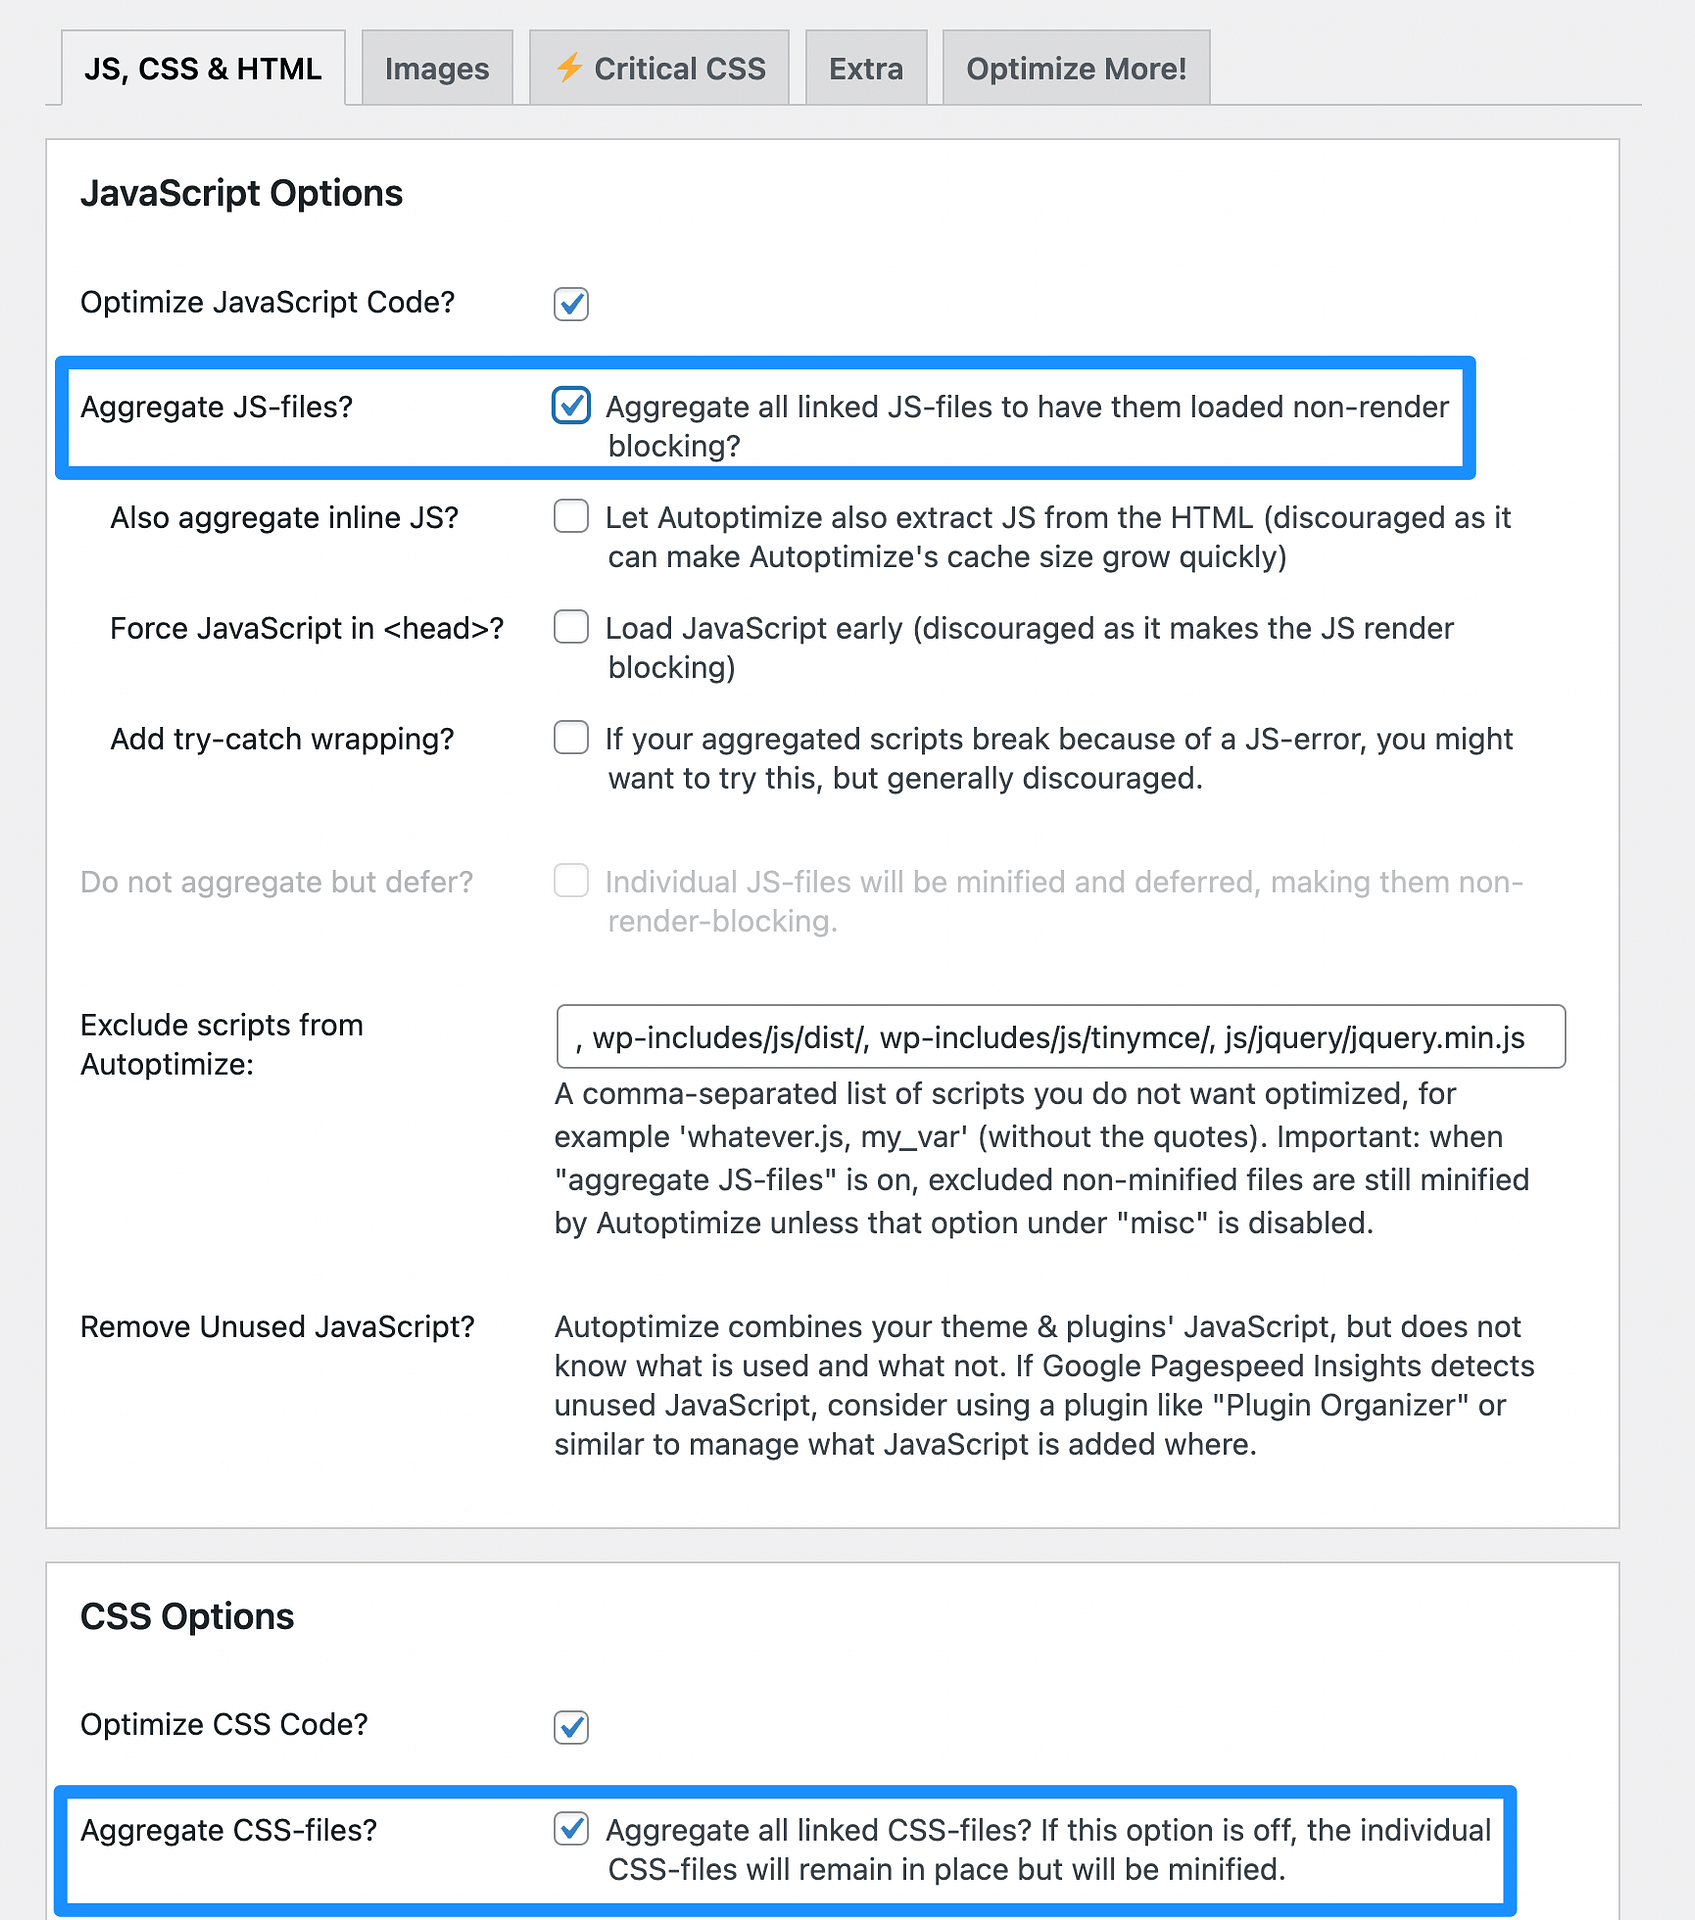
This will compile your CSS into one file and JavaScript into another. Instead of sending many requests for multiple files, Autoptimize enables your site to make fewer HTTP requests.
Note – while combining CSS and JavaScript is a surefire way to reduce HTTP requests, it might not have any real-world performance impact depending on your web host.
If your host uses HTTP/2 or later (which most hosts do nowadays), it can actually be better to not combine files because HTTP/2 supports multiplexing (which means it can download multiple files from the server without multiple server requests).
If you’re not sure if your host uses HTTP/2, you can reach out to support.
9. Use CSS sprites to combine images
On a typical WordPress site, every image is an individual file. If there are multiple photos on a page, the browser sends several HTTP requests. However, a CSS sprite will combine these images into one file.
The CSS Sprites Tool is free software for creating and customizing CSS sprites. To get started, drop your images into the upload box:
Once you’ve generated the CSS sprite, add it to the WordPress Media Library. Then, you can use the generated HTML and CSS code to place each image on your website.
10. Minify your site’s code
Minifying your site files won’t help you make fewer HTTP requests, but it will help you optimize the unavoidable HTTP requests for your site’s HTML, CSS, and JavaScript code.
As you’re writing code, you might include characters and white space that improve readability. Since they aren’t necessary for processing a request, you can remove them.
The easiest way to minify your WordPress site’s code is with a plugin such as the Autoptimize plugin we mentioned earlier.
Most WordPress caching plugins also include code minification features, including WP Rocket, FlyingPress, WP Fastest Cache, and more.
Or, if you’re using Cloudflare’s CDN, you can also have Cloudflare minify your code for you.
Once you’ve minified your site’s files, HTTP requests will have faster execution times. With lighter code, you’ll speed up your website and minimize bulky requests.
11. Disable emojis
By default, the WordPress emojis add an extra HTTP request to your site. To get rid of one more HTTP request, you can disable WordPress emojis.
For the simplest option, you can just install the lightweight Disable Emojis plugin.
Alternatively, you can add this code to your child theme’s functions.php file or a code manager plugin like Code Snippets:
/**
 * Disable the emojis
 */
function disable_emojis() {
 remove_action( 'wp_head', 'print_emoji_detection_script', 7 );
 remove_action( 'admin_print_scripts', 'print_emoji_detection_script' );
 remove_action( 'wp_print_styles', 'print_emoji_styles' );
 remove_action( 'admin_print_styles', 'print_emoji_styles' );
 remove_filter( 'the_content_feed', 'wp_staticize_emoji' );
 remove_filter( 'comment_text_rss', 'wp_staticize_emoji' );
 remove_filter( 'wp_mail', 'wp_staticize_emoji_for_email' );
 add_filter( 'tiny_mce_plugins', 'disable_emojis_tinymce' );
 add_filter( 'wp_resource_hints', 'disable_emojis_remove_dns_prefetch', 10, 2 );
}
add_action( 'init', 'disable_emojis' );

/**
 * Filter function used to remove the tinymce emoji plugin.
 *
 * @param array $plugins
 * @return array Difference betwen the two arrays
 */
function disable_emojis_tinymce( $plugins ) {
 if ( is_array( $plugins ) ) {
 return array_diff( $plugins, array( 'wpemoji' ) );
 } else {
 return array();
 }
}

/**
 * Remove emoji CDN hostname from DNS prefetching hints.
 *
 * @param array $urls URLs to print for resource hints.
 * @param string $relation_type The relation type the URLs are printed for.
 * @return array Difference between the two arrays.
 */
function disable_emojis_remove_dns_prefetch( $urls, $relation_type ) {
 if ( 'dns-prefetch' == $relation_type ) {
 /** This filter is documented in wp-includes/formatting.php */
 $emoji_svg_url = apply_filters( 'emoji_svg_url', 'https://s.w.org/images/core/emoji/2/svg/' );

$urls = array_diff( $urls, array( $emoji_svg_url ) );
 }

return $urls;
}
After implementing all of these tips, you should have a site with fewer HTTP requests!
Make fewer HTTP requests on your website 
As a rough rule, the more HTTP requests your website has, the slower it loads. This can negatively affect your site’s user experience (UX), causing visitors to leave without reading your content or buying a product.
To speed up your website, you want to eliminate as many HTTP requests as possible and optimize the HTTP requests that remain so that they load as quickly as possible.
With the tips in this post, you can get both jobs done and create a fast-loading site for your visitors.
 However, remember that optimizing your site’s HTTP requests is only one part of the performance puzzle. You’ll also need quality WordPress hosting if you want your site to load fast – check out our best WordPress hosting roundup to see the top options.
Do you have any questions about reducing the number of HTTP requests in WordPress? Ask us in the comments section below!