Are you looking for ways to fix the WordPress internal server error?
The WordPress internal server error (also called the 500 internal server error) is one of those generic errors that doesn’t explain why the error occurred in the first place.
Luckily, we know from experience that the root cause is often a corrupt file located in a plugin or theme or the WordPress core.
 In this article, we will discuss the common causes of the 500 internal WordPress error and show you how to remove it from your site.
Let’s dive in.
What causes the 500 WordPress internal server error to appear?
When you open your website, the browser sends a request to your site’s server, where your site’s files and folders are stored. The server processes the request and then sends back the requested content along with an HTTP header status code. The code tells you the status of the request, so you could be seeing any of the following status codes: 500, 501, 502, 503, 504, and so on. Each code means something slightly different and has different root causes.
In this article, we are covering the 500 error. Its appearance indicates that there has been a server issue. Now, the root cause for this particular error could be corrupt core files, plugins, themes, and databases. It could also be caused by PHP memory limit, wrong file permission, and errors in CGI and Perl scripts.
It’s worth noting that in some 500 errors, you may see a different version of the error, like 500.11, 500.12, or 500.13. This can help narrow down the cause.
500.12 indicates that the application crashes on your web server, 500.12 means an application is restarting on the server, and 500.13 tells us that the server is busy.
 The 500 WordPress internal server error can appear in different ways. These are some of the variations of the error:
- Error 500
- 500 Internal Server Error
- HTTP 500
- Temporary Error (500)
- HTTP 500 – Internal Server Error
- The website cannot display the page – HTTP 500
- Currently unable to handle this request. HTTP ERROR 500
The 500 server error can appear sitewide on particular pages like the wp-admin page which prevents access to the WordPress dashboard. The error is also known to appear when uploading the images in the site library.
How to identify the cause & fix the 500 internal server error
Since we don’t know the exact cause that led to the error on your WordPress site, we will show you the common steps that people take to identify and fix the error.
Before you dive into the steps, take a backup of your entire website as a safety option. In the following tutorial, you will be asked to carry out risky steps that can break your website. So if you have a backup, you can try out the solutions below without fear and when things go wrong, you can restore your site to normal in a jiffy.
Now, let’s get started with the steps.
- Clear cache
- Check debug log
- Regenerate .htaccess file
- Deactivate plugins
- Switch themes
- Re-upload core files
- Increase PHP memory limit
1. Clear cache
Caching is a system that involves storing copies of a page on the browser so that the user can access the page quickly the next time he opens the page. Caching is implemented by browsers in hopes of providing faster access to websites.
One of the biggest downsides of caching is that it can show you outdated pages. This means that if the 500 WordPress internal error was a temporary glitch and it got removed from your website automatically, you might still see the error because of caching.
If the error persists, move on to the next solution.
2. Check debug log
WordPress has an inbuilt debugging tool that when enabled offers insight into what’s going wrong in your website. Turning this tool on could reveal the exact cause of the error.
To enable WordPress debugging you can use a plugin or manually insert a code to a WordPress file.
Check debug log with plugins
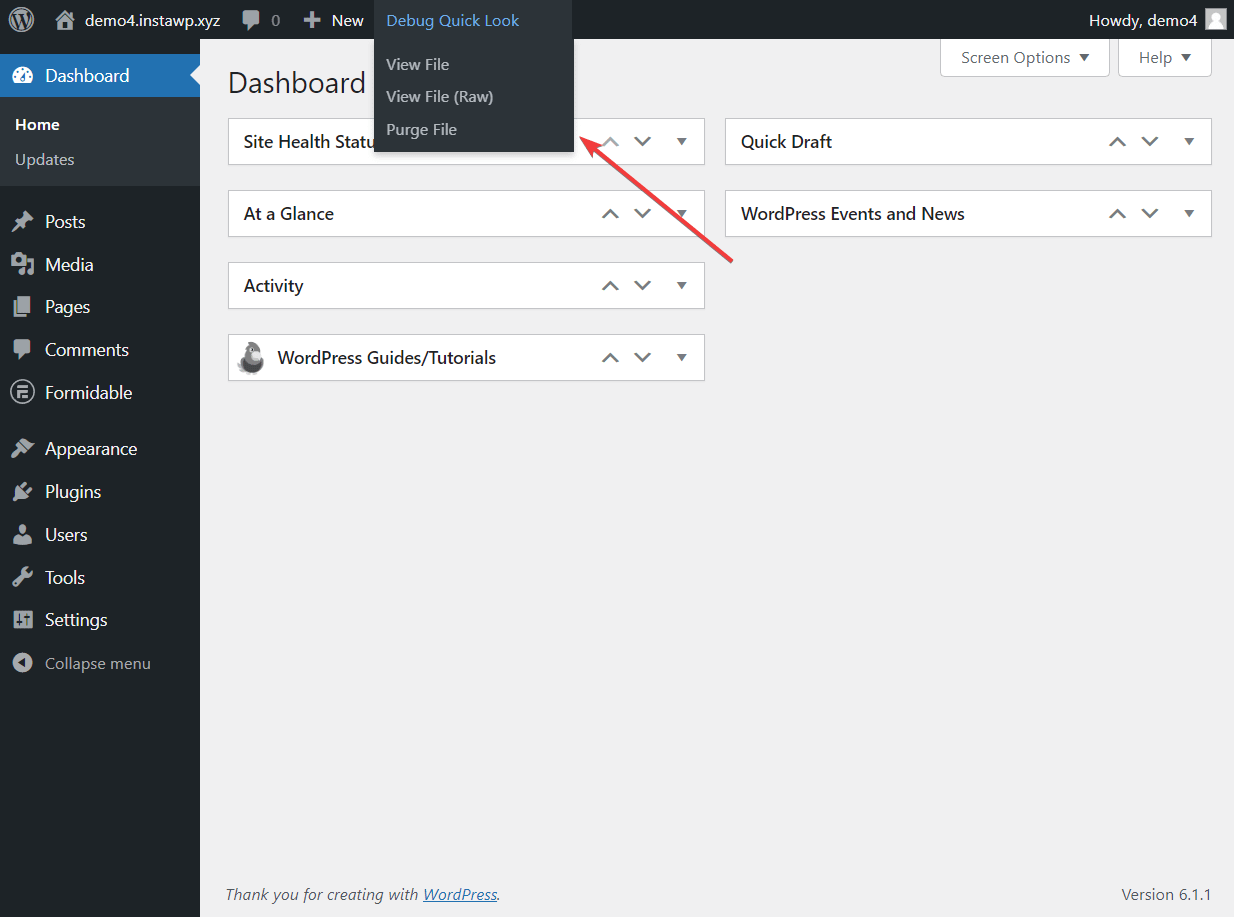
Debugging using plugins like WP Debugging or Debug Bar is easy. All you need to do is install any one of the plugins on your site and the debugging mode will be activated.
You should be able to can access the error logs on your WordPress dashboard.
Check debug log manually
To manually add the debugging code to your site, you will need to access the wp-config file. This can be done using an FTP client (like Filezilla) or via your hosting account cPanel.
If you want to use an FTP client then take the help of this guide. In this section, we will show you how to use cPanel.
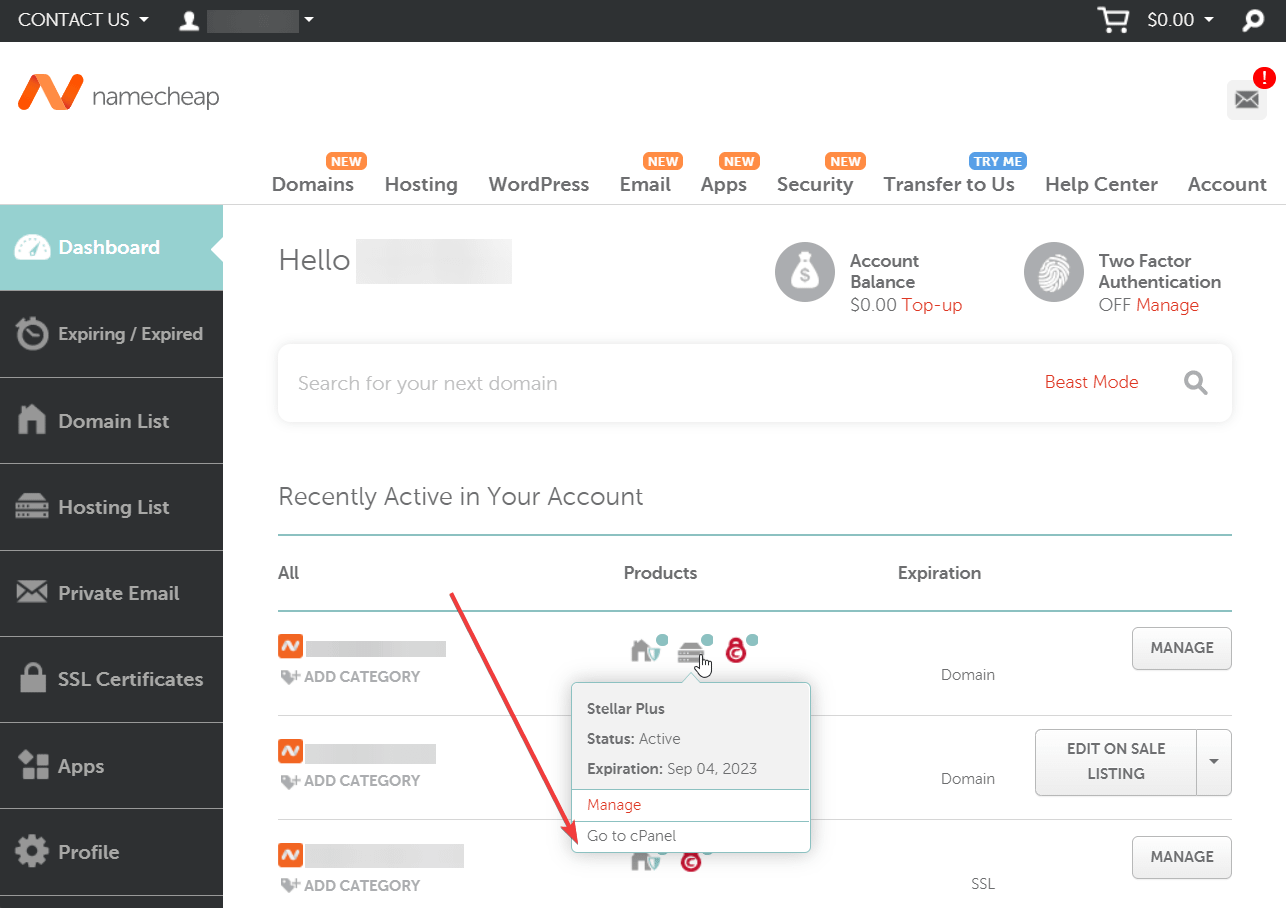
Step 1: Open your hosting account and go to cPanel. The location of the cPanel differs from hosting to hosting. Check your hosting’s help docs to locate your cPanel.
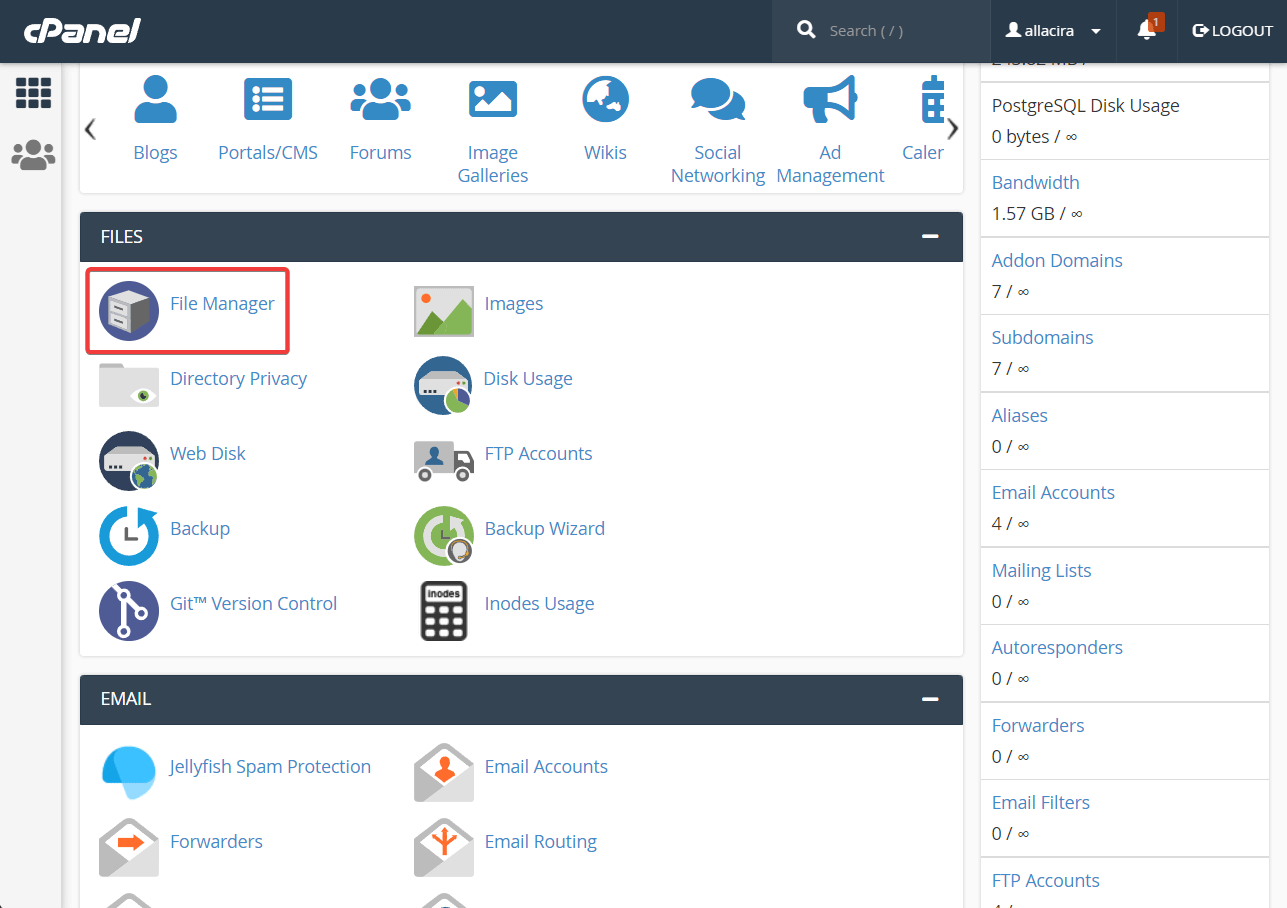
Step 2: On the cPanel, select the File Manager and open it.
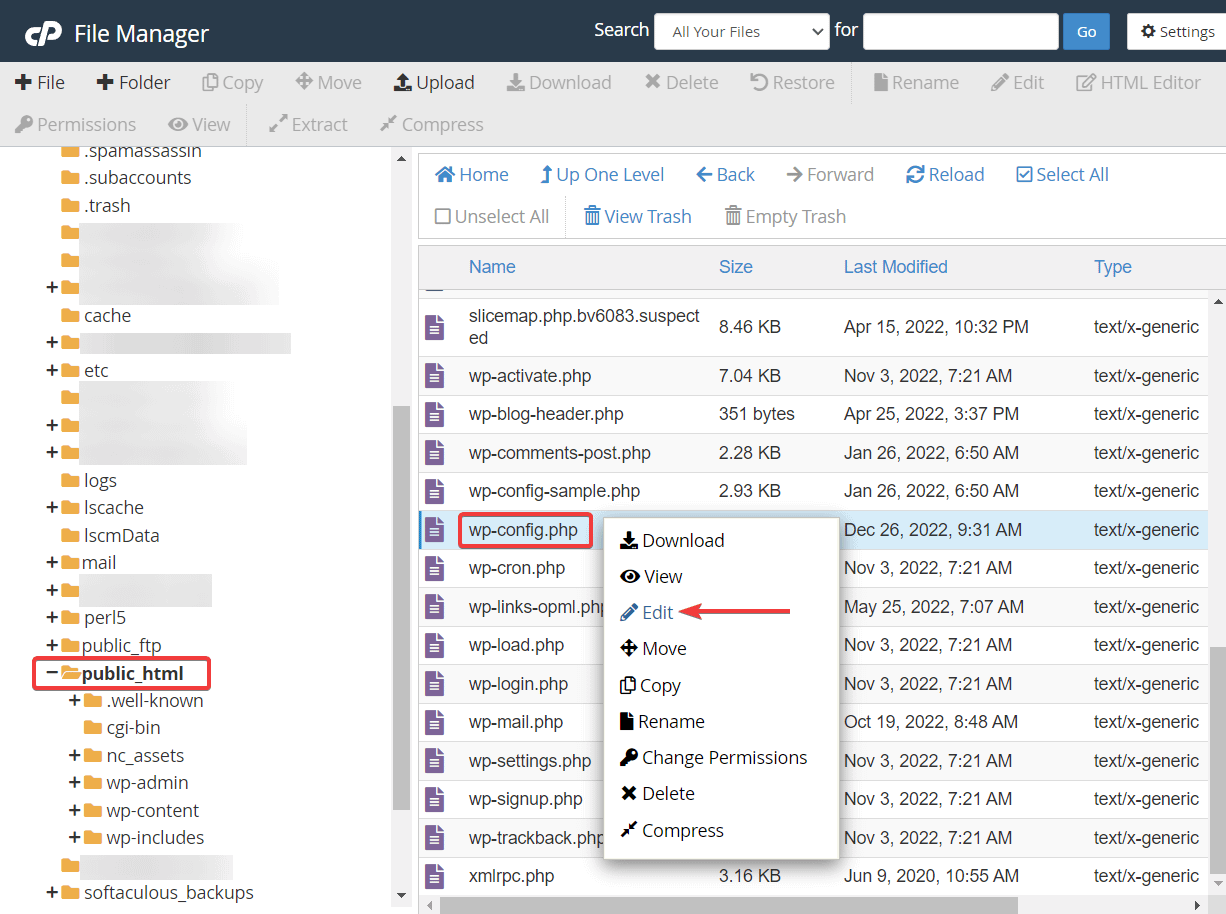
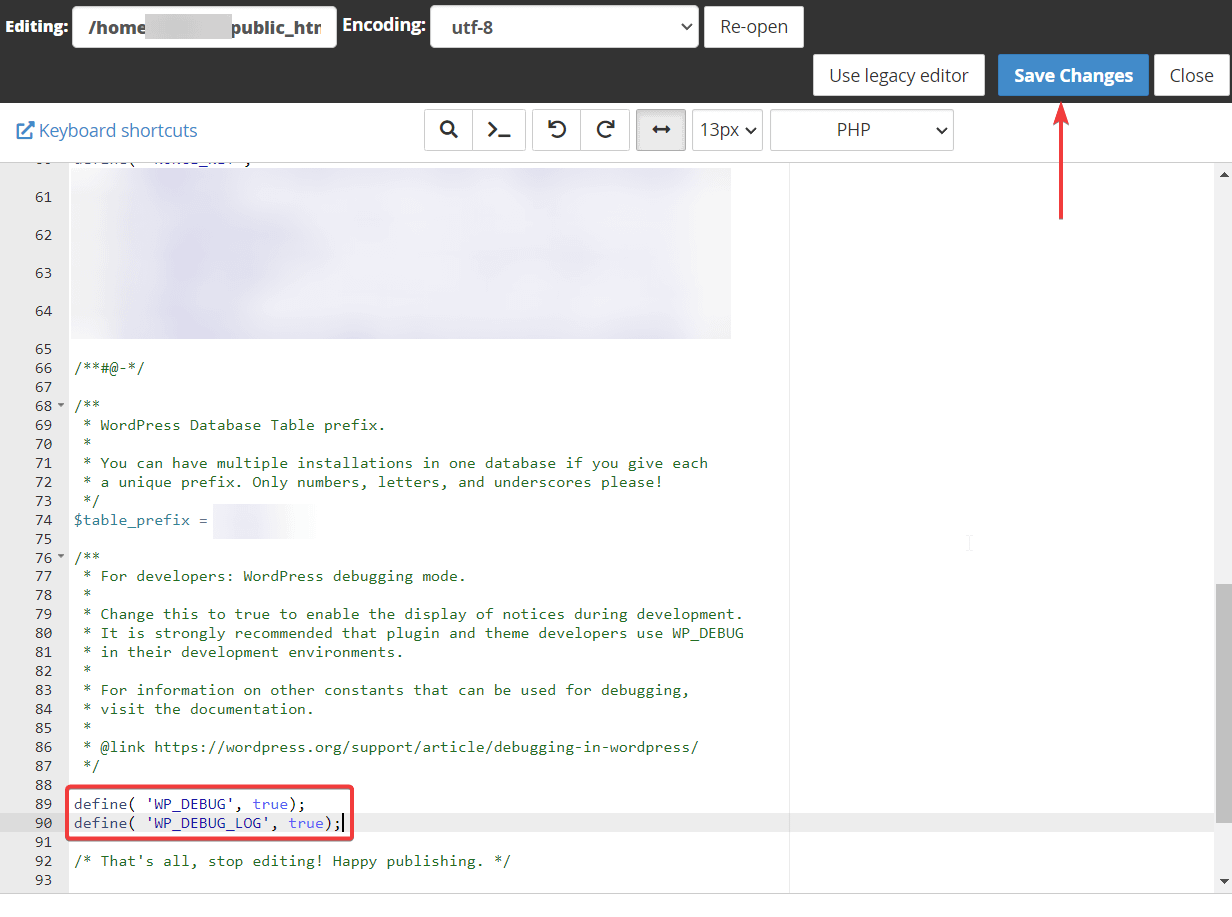
Step 3: Next, select the public_html folder and inside that folder search for the wp-config file. When you find it, right-click on the and select the Edit option. The file will open on a different page.
Scroll down to the end of the file and paste the following code right before this line: * That’s all, stop editing! Happy blogging. */:
Here’s the code:
define( 'WP_DEBUG', true);
define( 'WP_DEBUG_LOG', true);
Save the changes before exiting the file.
You can access the error logs by going to public_html → wp-content → debug.log. If you find it difficult to interpret the debug log, then seek help from your hosting provider.
3. Regenerate .htaccess file
The corruption of the .htaccess file is a very common reason for the 500 error to appear on your WordPress website.
You can fix the error by removing the old .htaccess file and generating a new one. Here’s how:
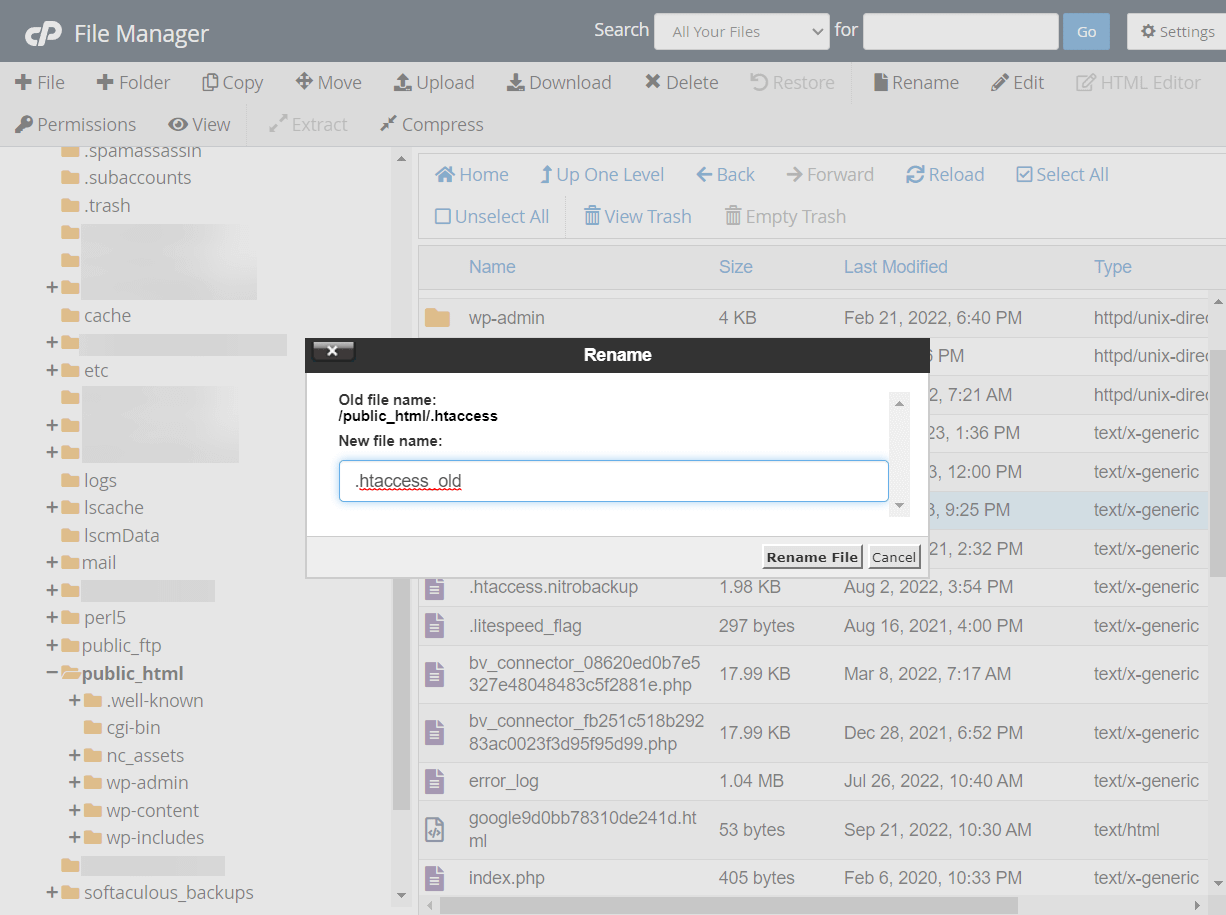
Open your hosting account, go to cPanel → File Manager, and select the public_html folder.
Inside public_html, look for the .htaccess file. Once you locate it, right-click on the file, select the Rename option, and insert a new name: .htaccess-old.
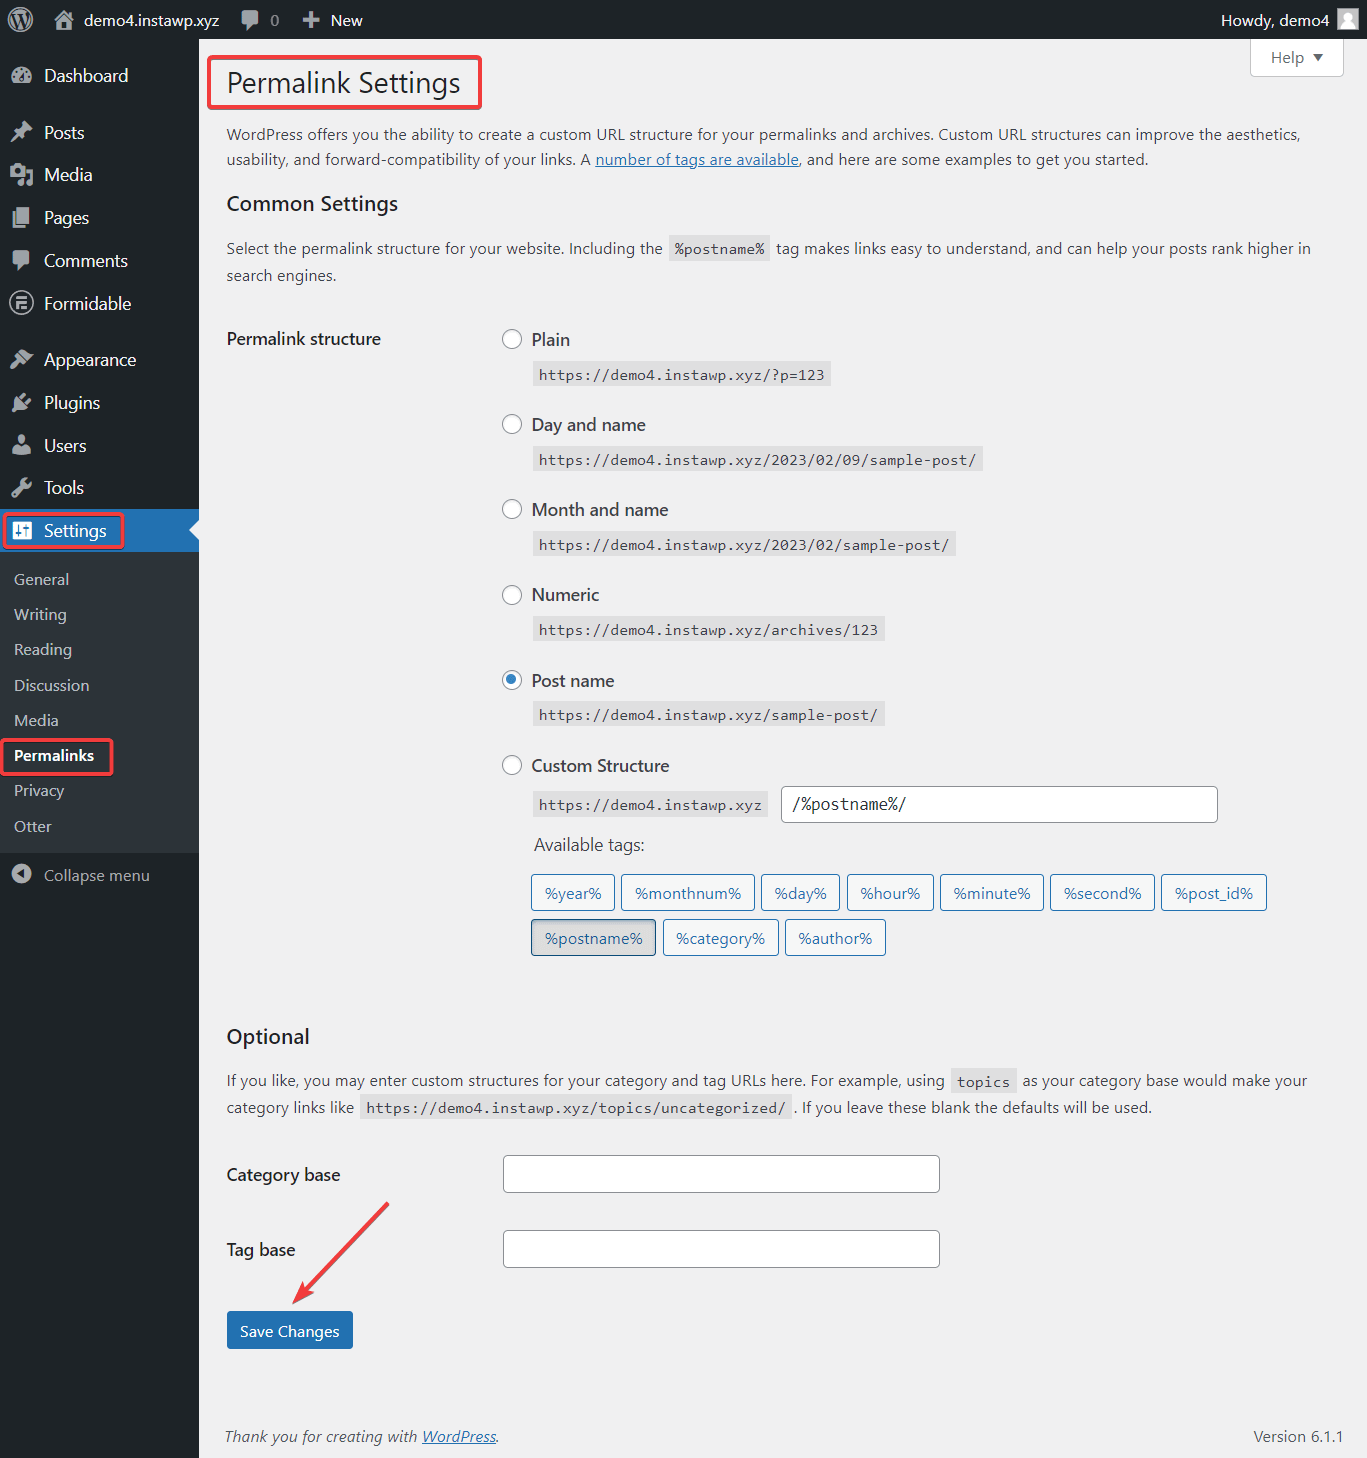
Next, open your WordPress dashboard and go to Settings → Permalink. Scroll down to the end of the page and hit the Save button. A new .htaccess file will be generated automatically.
If you can’t access your WordPress dashboard, you will need to create the file manually.
4. Deactivate plugins
Most WordPress sites that encounter the 500 WordPress internal server error are caused due to plugins installed on the website.
If you could identify the culprit plugin using the debugging tool, then deactivating the plugin should remove the error from your site.
We have covered how to deactivate plugins using FTP in a separate article. In this article, we will show you how to do it using the WordPress dashboard.
Navigate to Plugins → Installed Plugins.
Select all the plugins and choose the Deactivate option from the dropdown and hit the Apply button.
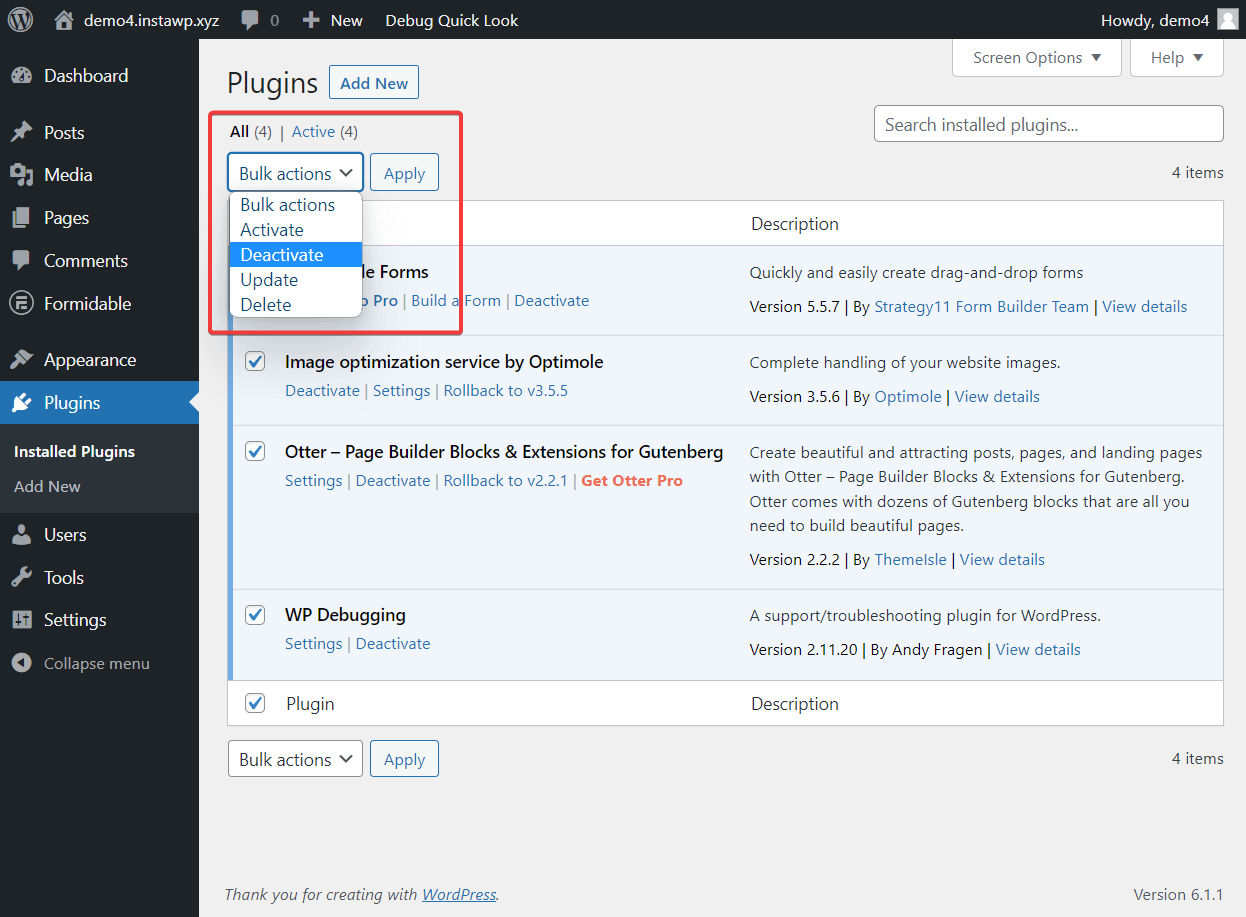
After deactivating the plugins, check whether the error is gone from your site. If it’s still there, then clear your cache and check again.
If the error persists, then it’s not any plugin’s fault. We recommend moving on to the next section.
But if the error is gone, that means one of your plugins is the culprit. To find the culprit plugin, start activating the plugins one by one. Keep checking the site every time you activate one of them. At some point, the error will return because of the plugin you turned on. Remove the culprit plugin from your WordPress site and find an alternative one.
5. Switch themes
Like plugins, themes can also cause the WordPress internal server error. Switching to an official WordPress theme will help understand whether your active theme is causing the error.
If you have access to your WordPress dashboard, then switching to a new theme is easy. If you don’t have access to the dashboard then you need to use FTP to switch themes from the backend of your website.
In a previous article, we covered how to use FTP to access the plugins folder. You need to follow the same steps to access the themes folder.
Open the theme folder, select the active theme of your site, and rename it to something else like “old-theme.” This will disable your current theme and your website will automatically revert to a default WordPress theme.
If switching to the default theme removes the internal server error from your website, it proves that your theme was the real culprit. Make sure to remove the theme from your WordPress website.
6. Re-upload core files
Like the plugins and themes, the core WordPress files could also cause WordPress internal errors.
The core files are some of the most important files on your website. Before you re-upload them, be sure to take a backup of your entire site.
Next, download WordPress on your local computer and unzip the file.
Open your hosting account and go to cPanel → File Manager → public_html. Select the Upload option to upload the WordPress folders from your computer.
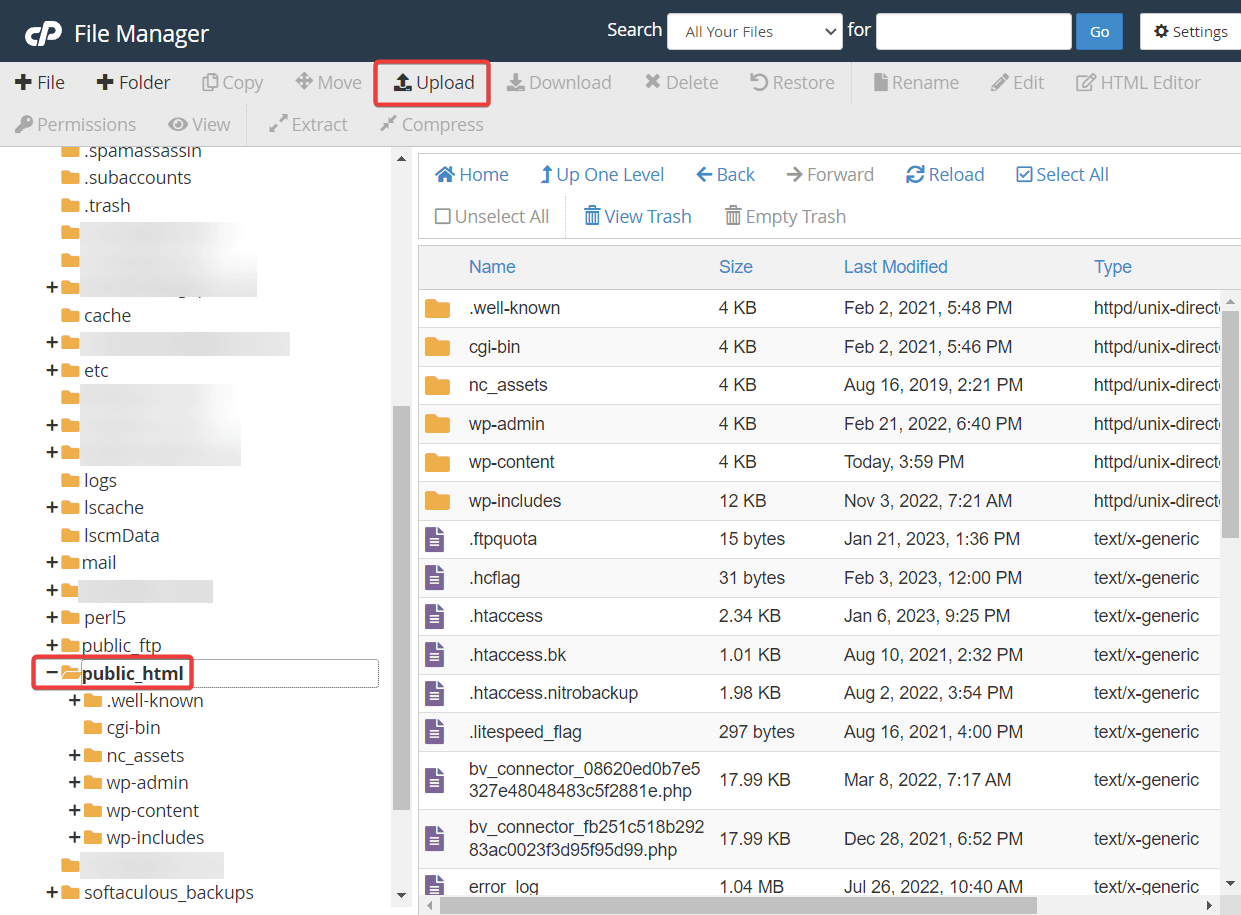
The File Manager will inform you that the folder already exists and ask you permission to overwrite them. Grant overwriting permission and let the folder upload. Check your website when the process is complete.
7. Increase PHP memory limit
The server error could be a sign that you have used up all your PHP resources and that the server can’t handle any new requests.
The good news is that you can remove the error from your site by increasing your PHP memory limit.
All you need to do is open your cPanel and go to Select PHP Version → PHP Options/Options.
Then change the value for memory_limit to something higher.
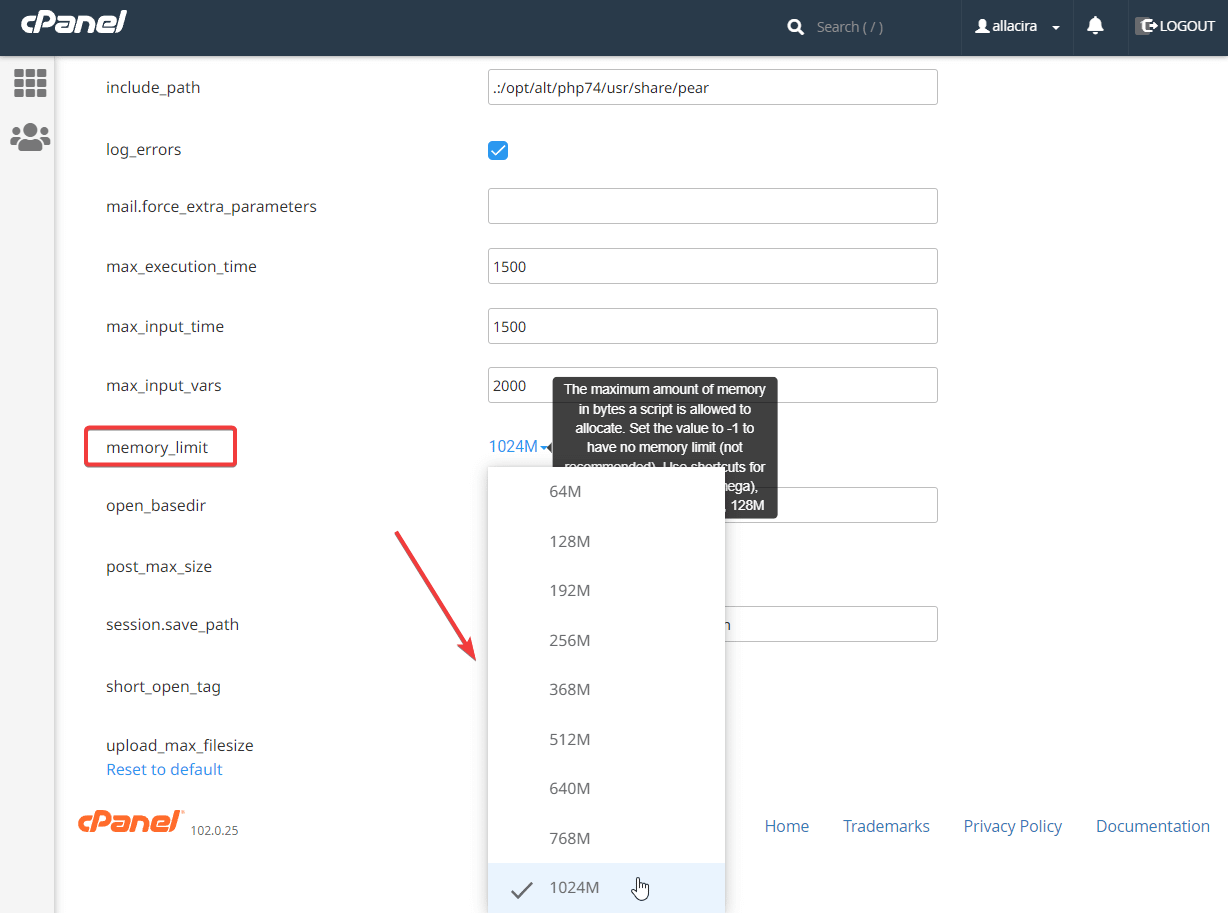
That’s our final solution. By now, you should have fixed the WordPress internal server error. But if that’s not the case, then please seek help from your hosting provider.
Conclusion 
Fixing the 500 WordPress internal server error is not difficult but it requires time to find the cause.
 To identify the cause and remove the error from your site, you need to take the following steps:
- Clear the cache to ensure it’s not a temporary glitch
- Check to debug log to find what’s wrong on your site
- Remove the corrupt .htacess file and generate a fresh file
- Deactivate plugins and themes to find the culprit software
- Re-upload WordPress core files
- Increase PHP memory limit
If you have any questions about how to fix the 500 server error, let us know in the comment section below.
