Are you a freelancer or creative professional looking to attract clients? A portfolio website is essential for showcasing your work, testimonials, and services. By using Divi and Divi Quick Sites, you can create a stunning portfolio website that helps potential clients understand your capabilities at a glance. This guide will walk you through the steps to build a high-quality portfolio website that stands out to clients and organizations.
Why Do You Need a Portfolio Website?
Having a portfolio website is like having your digital storefront, especially if you’re a creative professional looking to showcase your skills. Here’s why you need one:
- Showcasing Your Work: A portfolio website allows you to display your projects, skills, and expertise in one place. Whether you’re a designer, writer, developer, or photographer, it’s the perfect platform to highlight your best work. Employers or clients can easily browse through what you’ve done and get a sense of your style and capabilities.
- Personal Branding: A website gives you control over your brand. It’s a professional space where you can tell your story, share your values, and show your uniqueness. You can customize the design, colors, and layout to reflect your personality and the type of work you want to be associated with.
- Credibility and Professionalism: A well-designed portfolio instantly gives you credibility. It shows that you’re serious about your work and have taken the time to present it professionally. This can be the deciding factor in competitive industries that sets you apart from others.
- Accessibility and Convenience: Your portfolio is always accessible online, 24/7. Potential employers, collaborators, or clients can check it out anytime. It saves you the hassle of sending files or directing people to scattered links.
A portfolio website is a powerful tool that puts your work front and center, helps you build a professional identity, and creates endless growth opportunities. It’s essential for anyone looking to make a mark in their industry.
Fundamental Aspects of Your Portfolio Site
To create an effective portfolio website, ensure these essential elements are included:
- Bio: Write a brief introduction about yourself, including your background, skills, and expertise. Let visitors know who you are and what makes you unique.
- Work Showcase: Highlight your best projects with descriptions, images, and links. The Divi Filterable Portfolio Module makes it easy to display your work in a visually stunning way.
- Resume: Include a downloadable or viewable version of your resume for potential clients or employers.
- Contact Form: Use the Divi Contact Form Module to make it easy for visitors to reach you directly from your website.
- Testimonials: Showcase feedback from satisfied clients to build trust and credibility. The Divi Testimonial Module makes adding and managing testimonials simple.
How to Make a Portfolio Website in 6 Steps
I won’t promise you overnight success or a one-size-fits-all solution. Creating a portfolio website requires dedication, and your journey might differ. However, by following these steps, embracing the learning curve, and staying flexible, you can craft a standout portfolio website that truly represents you in no time.
1. Set up Your Website
Before setting up your portfolio website, you must have a few things at your disposal, i.e., your domain, hosting provider, and WordPress.
Domain
Your domain name serves as your website’s address on the web, e.g., elegantthemes.com. It is important to have an eye-catching domain name to attract clients and increase your revenue.
You can purchase and host your domain through a domain registrar like Namecheap. However, if you choose Siteground for web hosting, you can get your domain with them directly to make it easier to manage.
WordPress Hosting
Every website needs a hosting platform to store your site and make it accessible online. Since we are using WordPress, choosing a quality WordPress hosting provider is important.
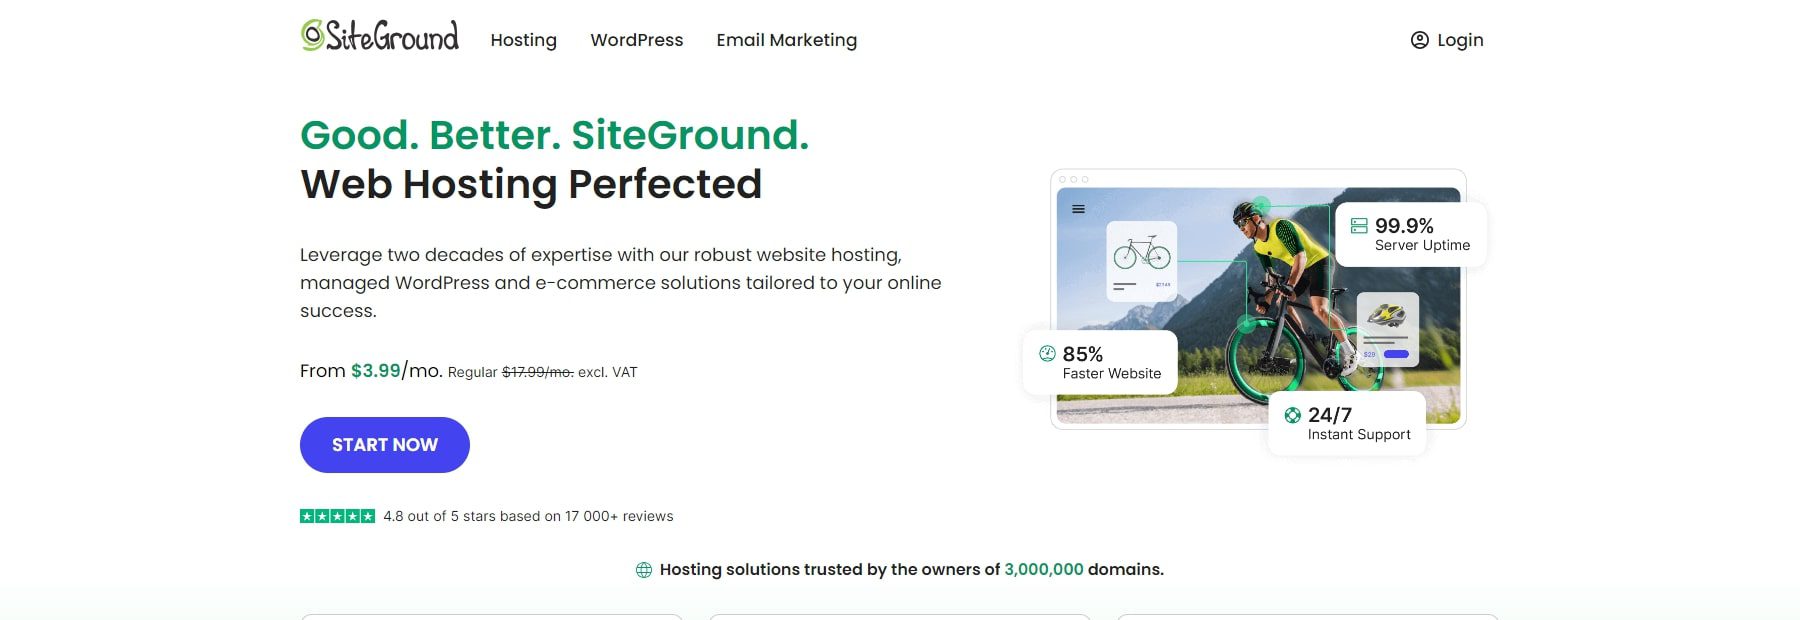
Siteground is the perfect all-in-one solution because you can setup your domain, hosting, and WordPress installation all in one place. Hence, we recommend starting your website development with this platform if you don’t have a hosting provider.
Check out the video below for setting up your domain and WordPress hosting.
NOTE: Many WordPress hosting providers, like SiteGround, offer an easy one-click WordPress installation when you sign up. If this option isn’t available, you can manually install WordPress through your hosting provider’s dashboard.
2. Choose Your Theme or Website Builder
Divi is an all-in-one website-building platform trusted by millions. It offers an intuitive drag-and-drop editor, stunning pre-built layouts, and complete customization options that let your creativity shine. You can effortlessly transform your ideas into a beautiful portfolio website using this platform.
When it comes to portfolio websites, Divi connects all the dots:
- It offers 132 layout packs with 370 layouts. The theme features customizable sections that highlight your work, skills, testimonials, and call-to-action elements to attract potential clients.
- The Divi Builder enables you to design personalized layouts effortlessly using its intuitive drag-and-drop interface. You can fully customize your website’s fonts, colors, spacing, and more.
- The theme includes a testimonial module, allowing you to showcase client feedback, reviews, or testimonials on your website.
- The Divi portfolio module lets you display projects or work samples with ease. After setting up your website, you can use this module on a portfolio or project page.
Discover more Divi tools for your portfolio site in the Divi Marketplace. You’ll even find child themes like the Molite Creative Portfolio Layout, designed specifically for creatives, artists, and freelancers.
If you prefer a faster solution, consider using Divi Quick Sites to build your portfolio in minutes with pre-designed templates.
Purchase, Download, and Install Divi
Purchase Divi from Elegant Themes with two flexible pricing options: an annual license for $89 or a lifetime license for $249. Once you’ve made your purchase, follow these steps to download and install it on your WordPress website:
- Go to Appearance > Themes in your WordPress dashboard.
- Select Add New, then Upload Theme.
- Locate the Divi .zip file you downloaded and click Install Now.
- After installation, click Activate to set Divi as your active theme.
Now that your theme is installed, you’re ready to start building your site! Whether you want to dive straight into the Divi Builder tutorial or use Divi Quick Sites to generate a fully designed website in minutes, the choice is yours.
3. Build Your Website
Launch Onboarding Wizard
After activating the Divi Theme in WordPress, you’ll be greeted by Divi’s onboarding wizard, which will guide you through the setup process. Simply click the button to log in and activate your Divi license.
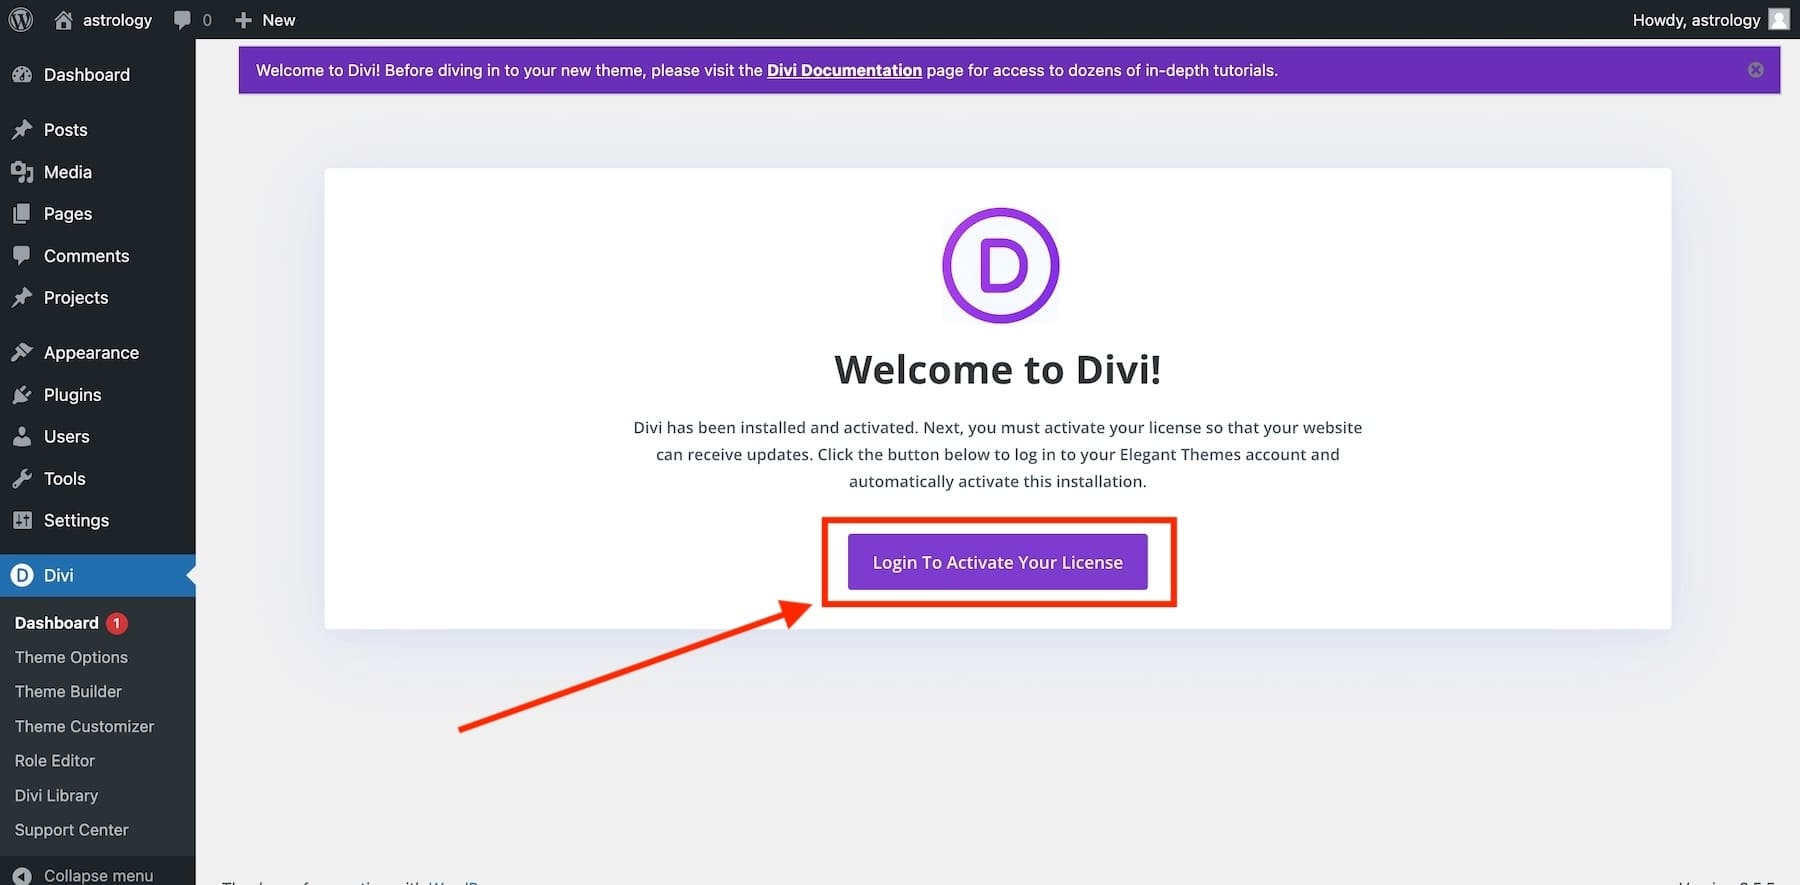
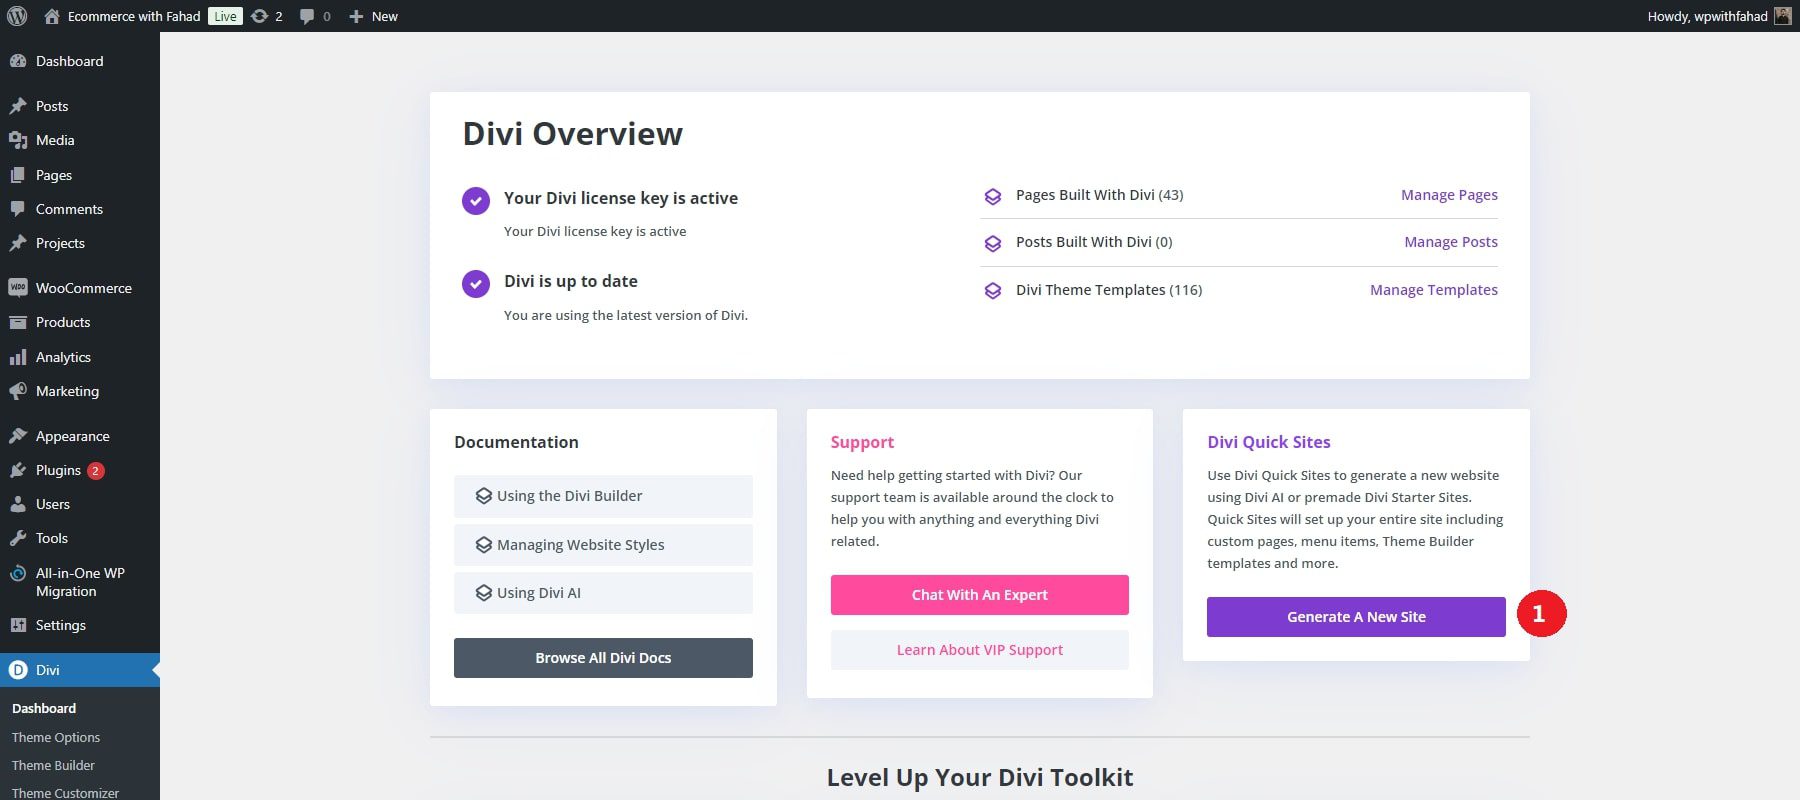
Once your license is activated, you can access Divi Quick Sites—a feature that lets you build a fully functional website in just a couple of minutes. To get started, head over to your Divi dashboard and click ‘Generate a new site.’
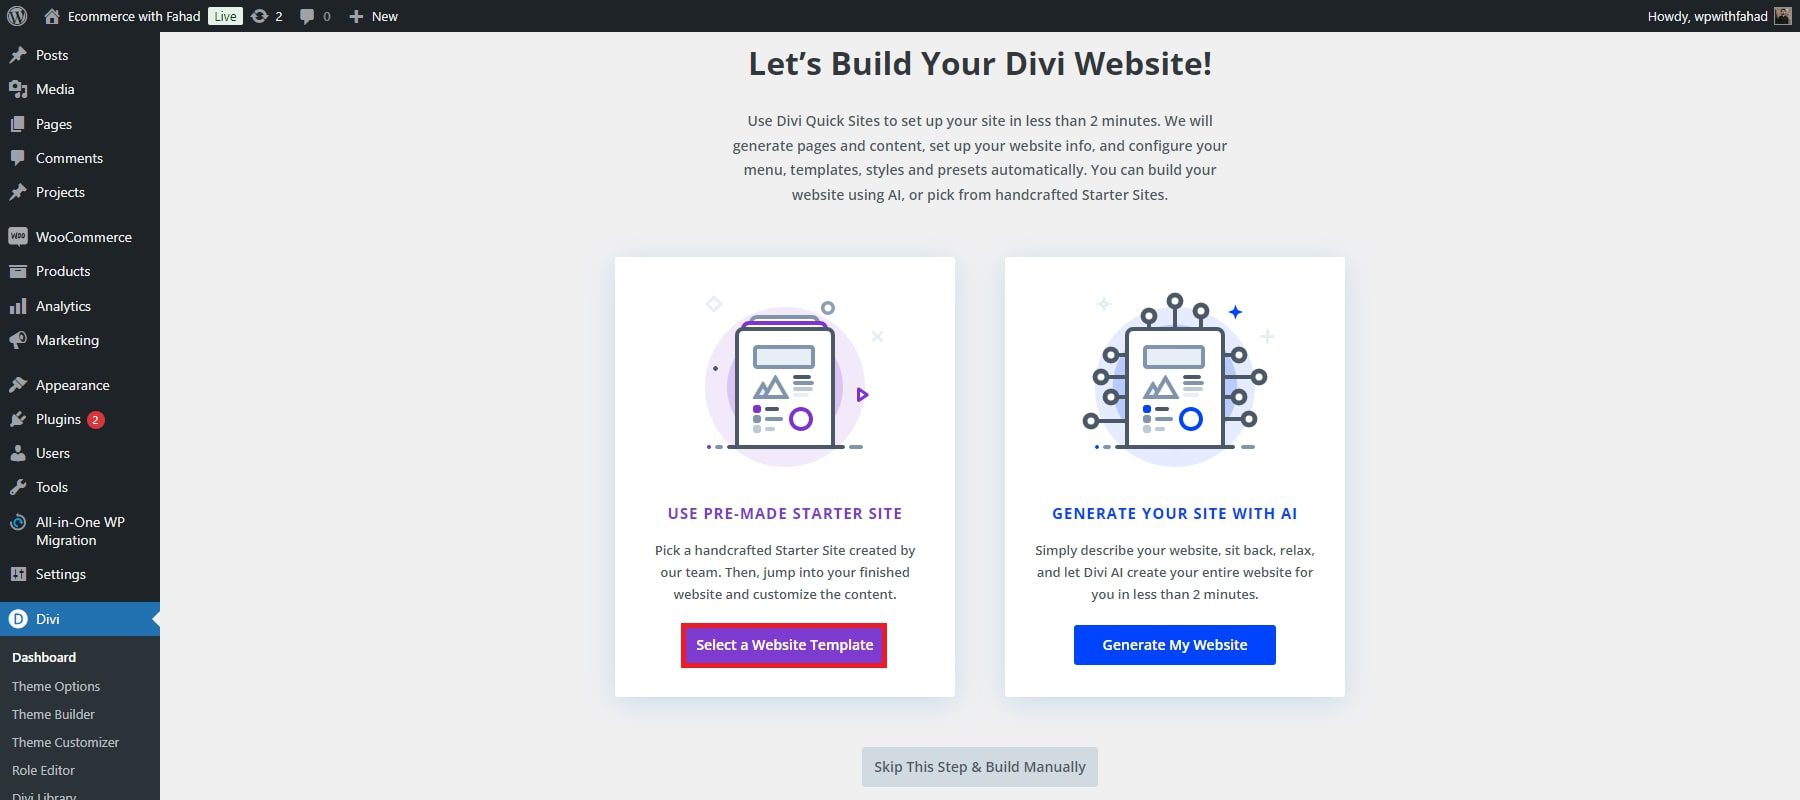
Generate Your Site with the Portfolio Starter Site (or with AI)
Now, you can choose whether to build your portfolio website using a pre-made starter template or Divi’s AI website builder. Since Divi offers a stunning Portfolio Starter Site, simply click ‘Select a Website Template.’
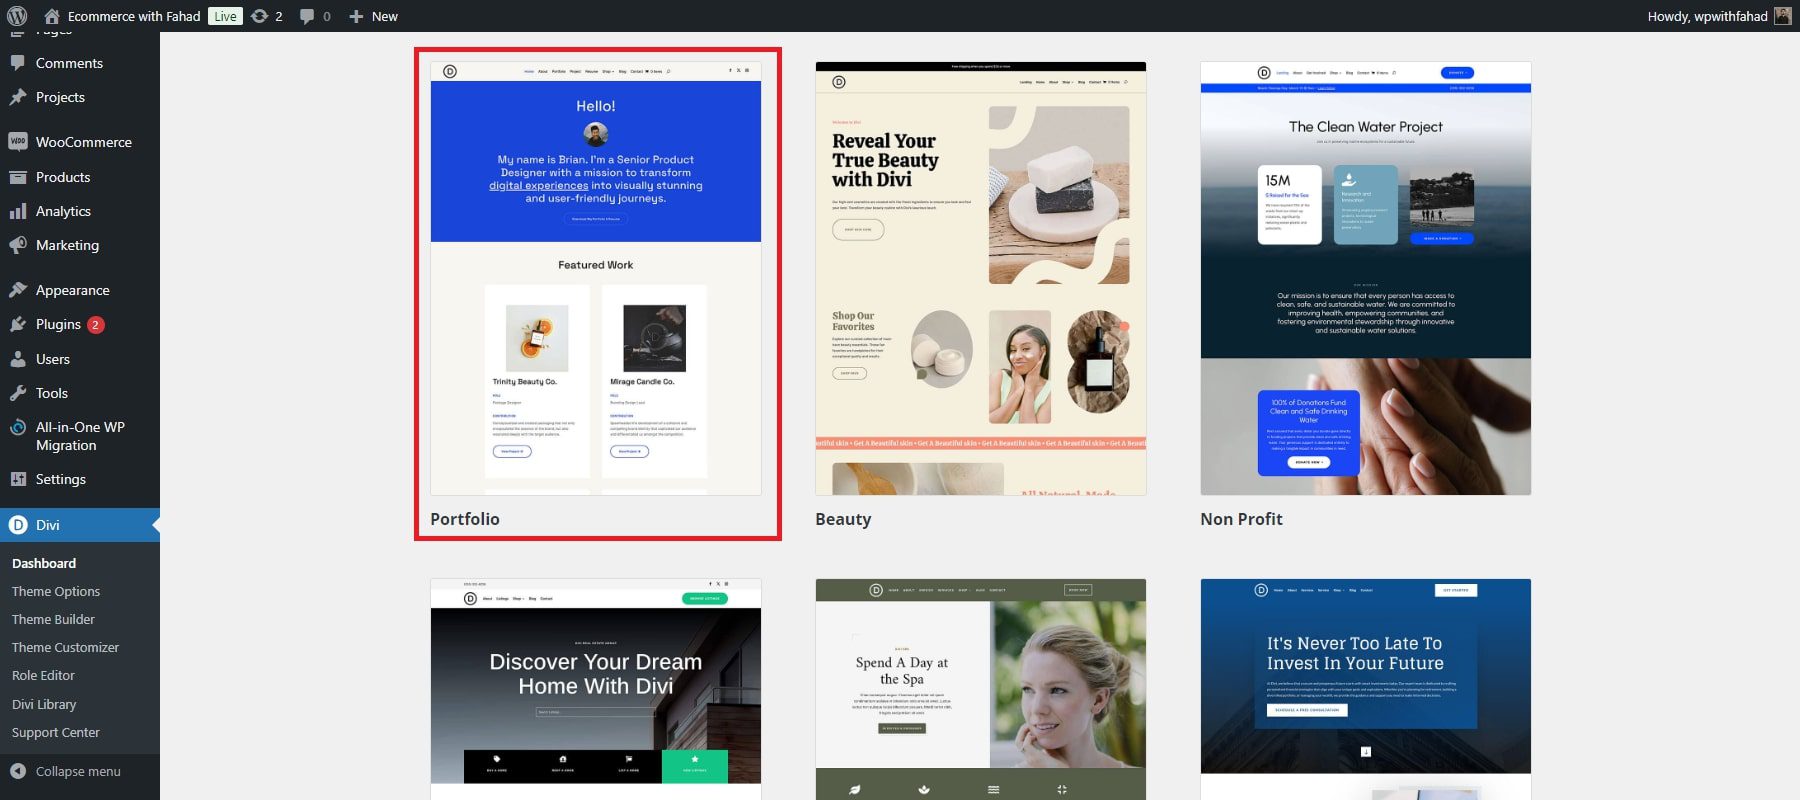
Once the Starter Site templates appear on your screen, select the Portfolio Starter Site. Don’t worry if the template doesn’t perfectly match your branding—you can fully customize the colors, fonts, text, and images later to fit your style.
Complete the Divi Quick Sites Form and Final Setup
Divi Quick Sites will prompt you to enter details about your website and the pages you want to include. Simply complete the form:
- Enter your Site Name, Slogan, and Logo.
- Upload your logo so Divi can automatically place it on your site (if available).
- Select the pages you want from the Starter Site, and add any additional custom pages if needed.
- Once you’ve filled out the form, click the ‘Generate & Publish My Website’ button.
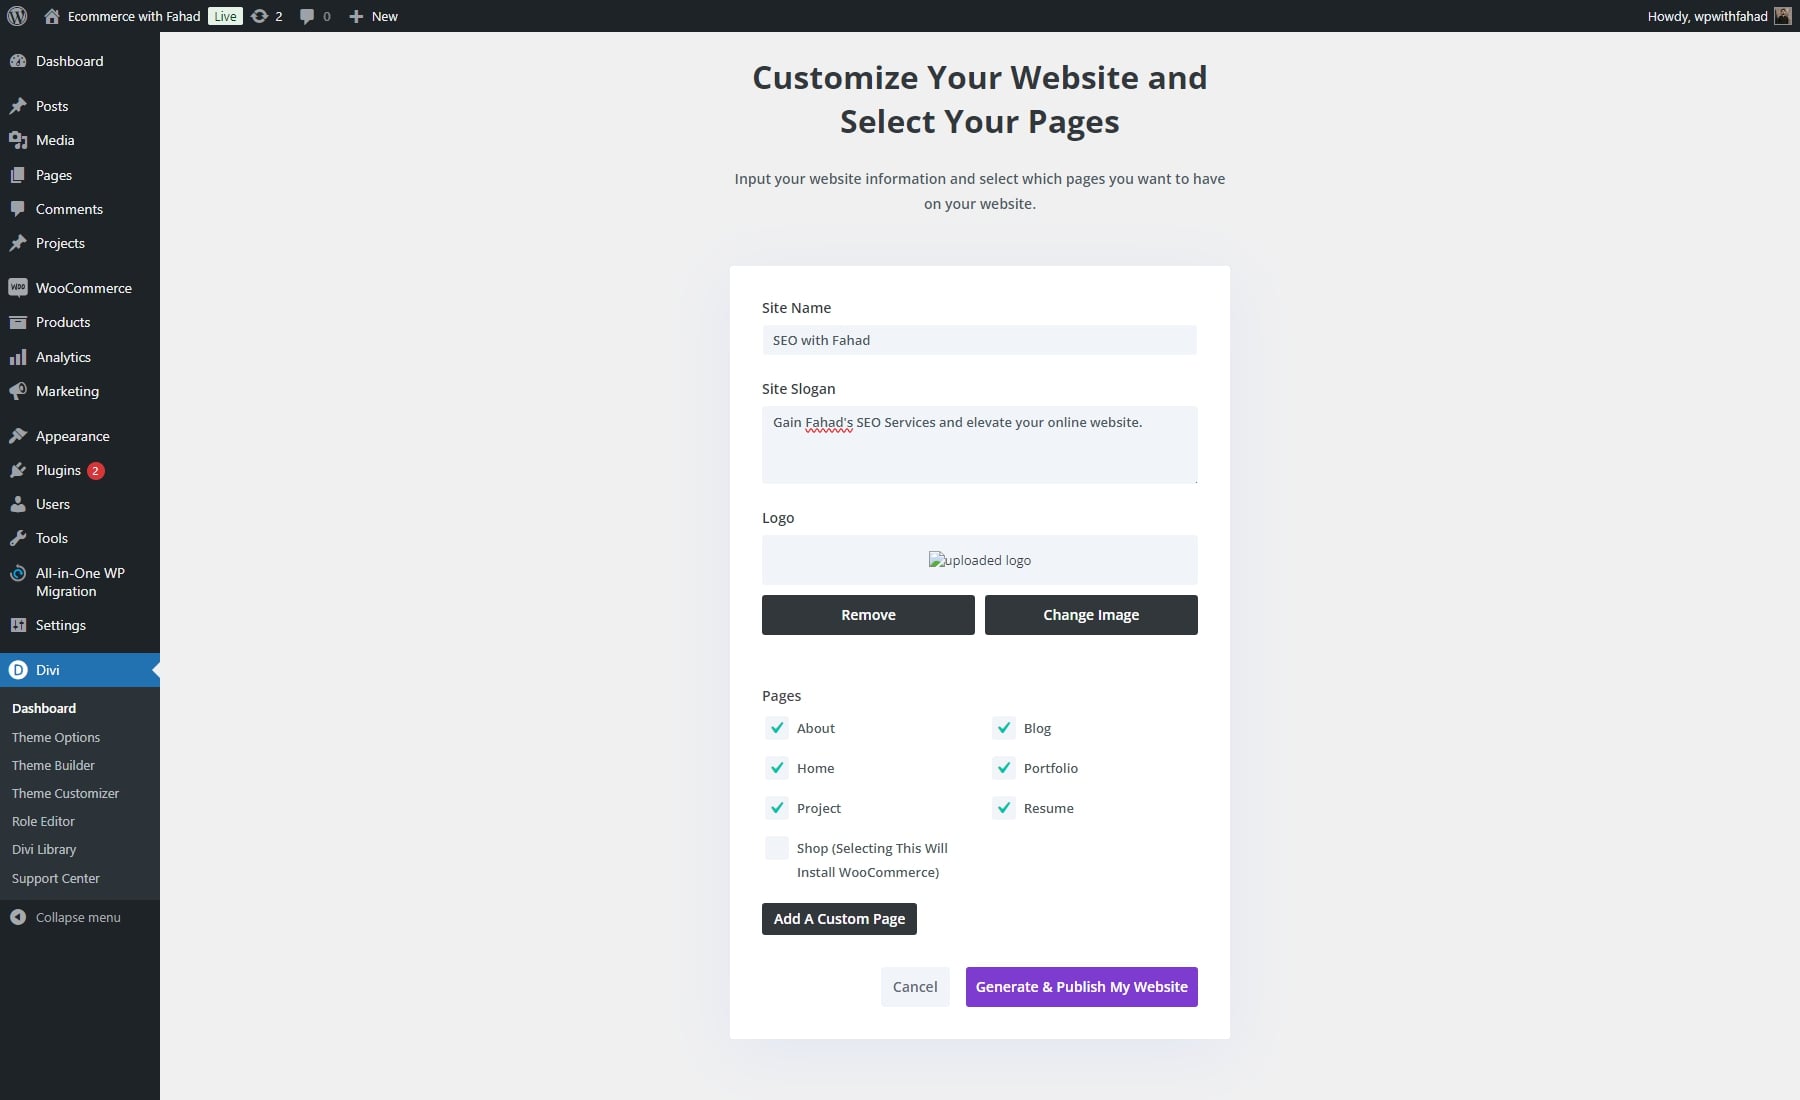
NOTE: If you select the Shop page, WooCommerce will be installed automatically, creating an online store with product pages, checkout, and more. However, since this isn’t necessary for a portfolio site, feel free to skip this option.
Your Website is Ready in Just a Few Minutes
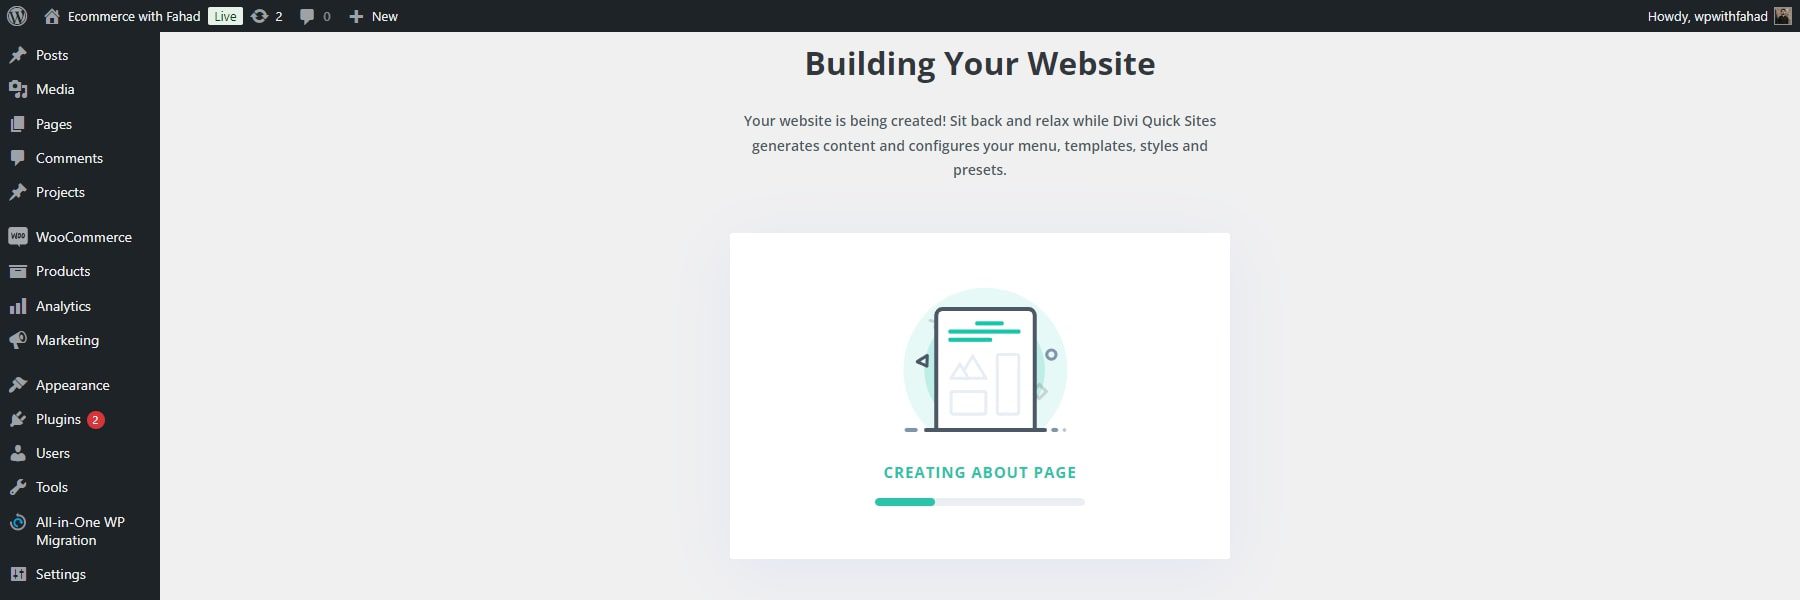
Divi Quick Sites will generate your entire website in under two minutes after you’ve provided the necessary details. Based on the information you entered, it will automatically set up everything, including pages, templates, styles, and navigation menus.
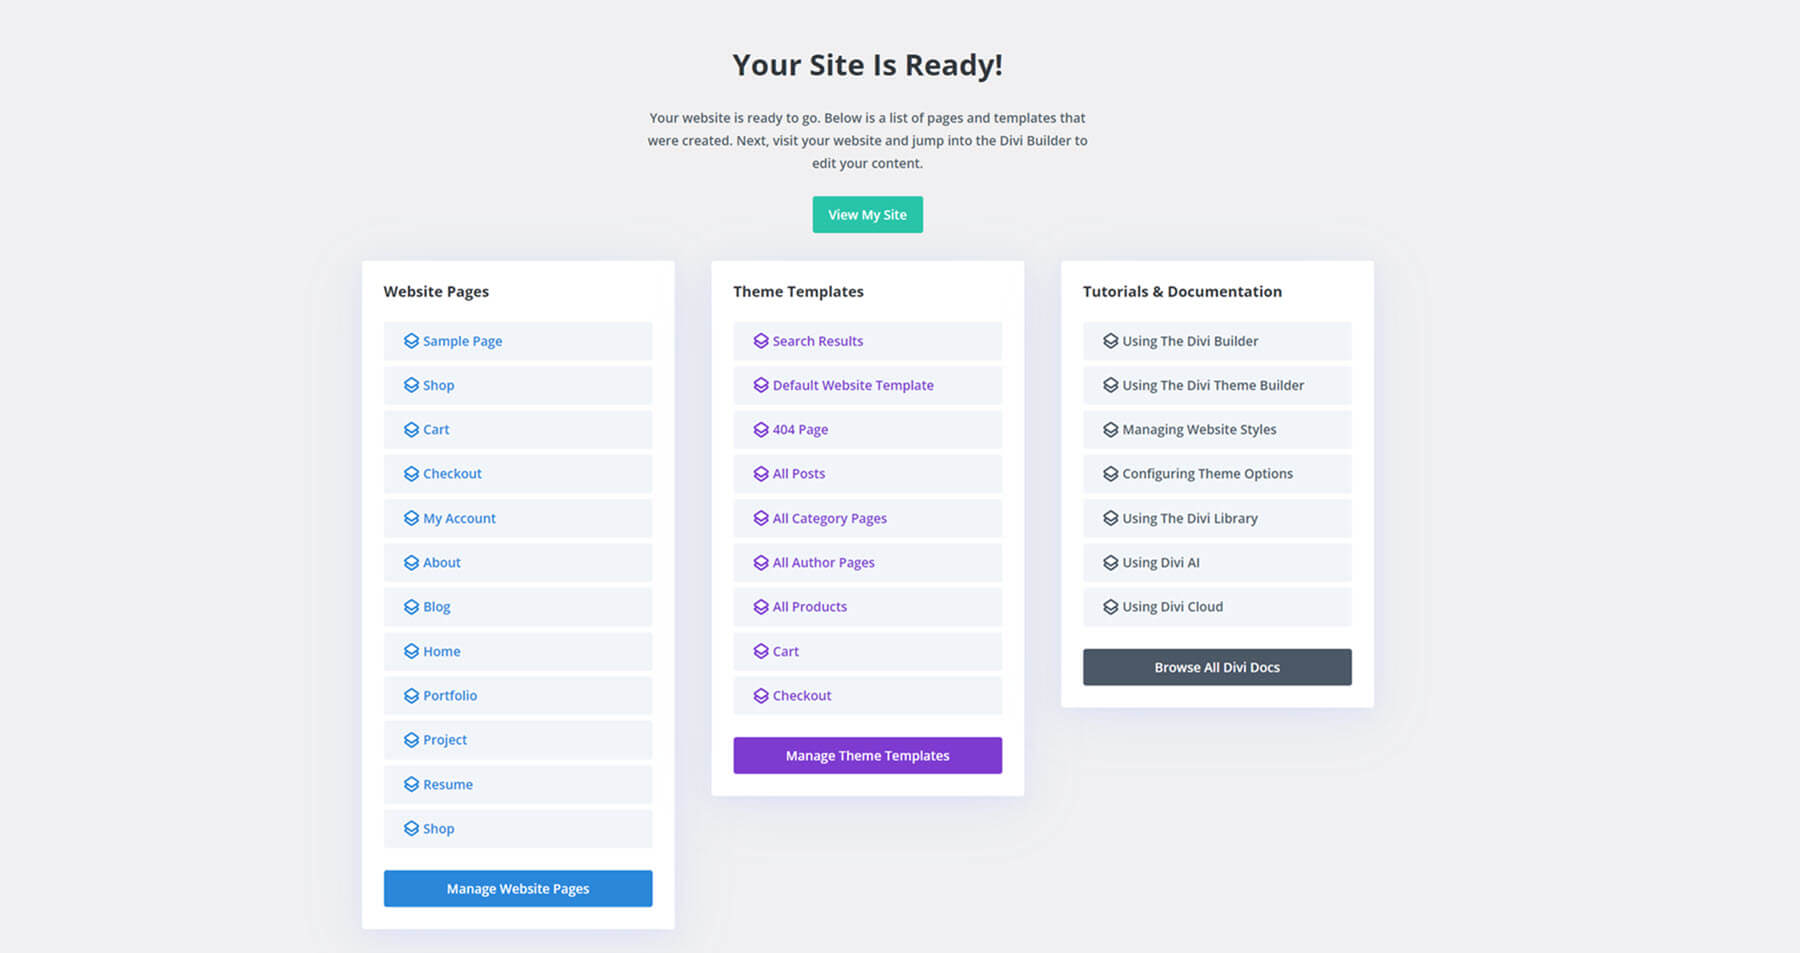
Once your site is ready, you’ll see a confirmation page stating, ‘Your Site is Ready!’ This page will also include a list of all the created website pages and theme templates, along with links to helpful Tutorials and Documentation to guide you as you begin customizing your new website.
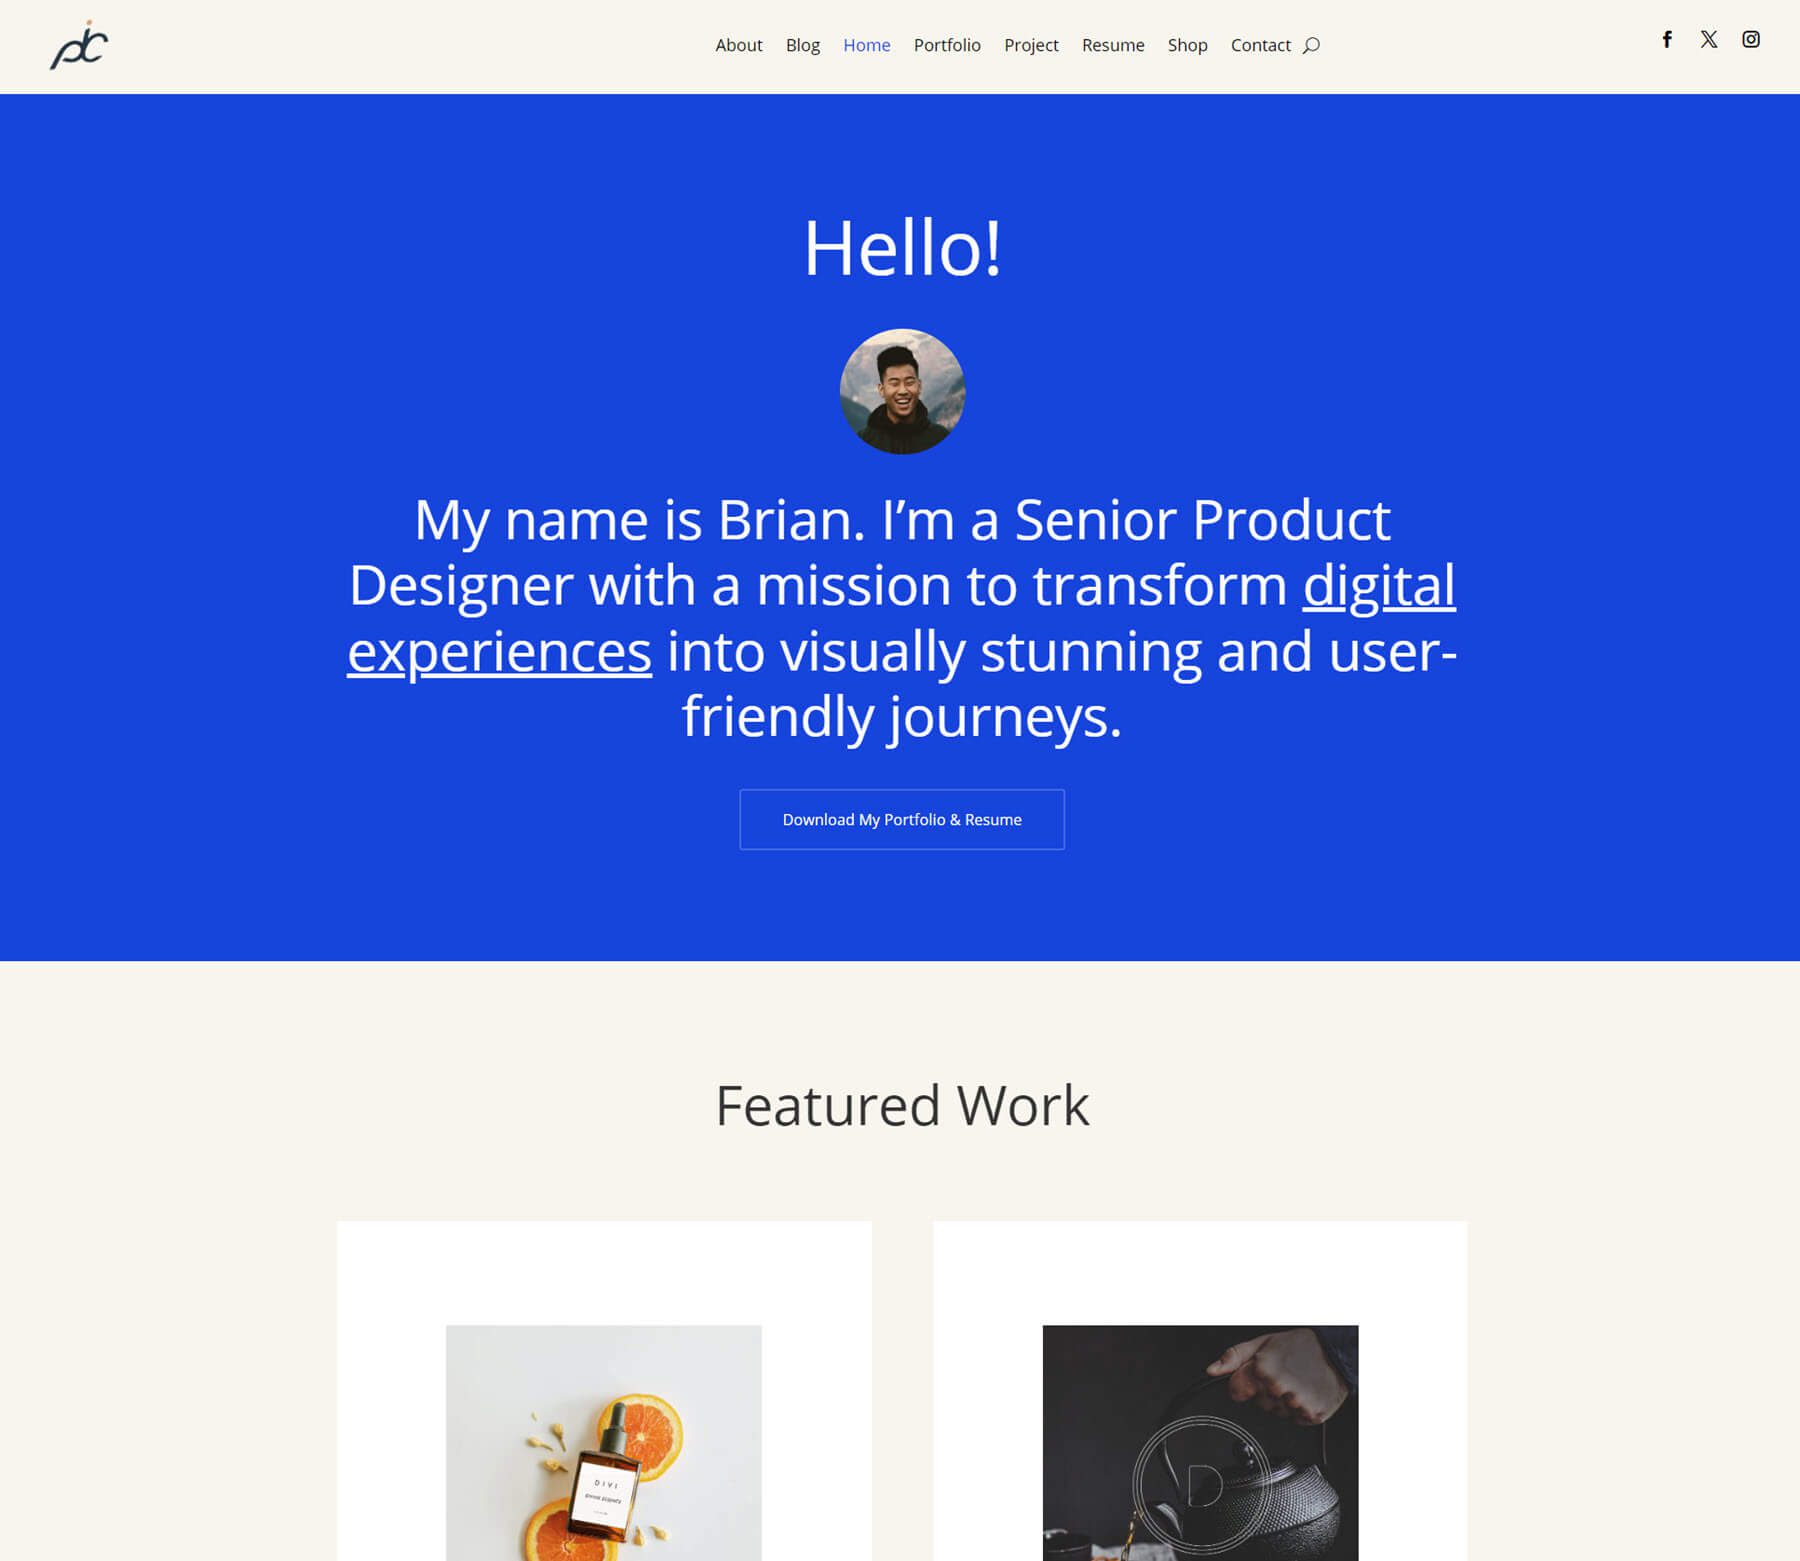
Here’s how the generated site looks when you click “View My Site”.
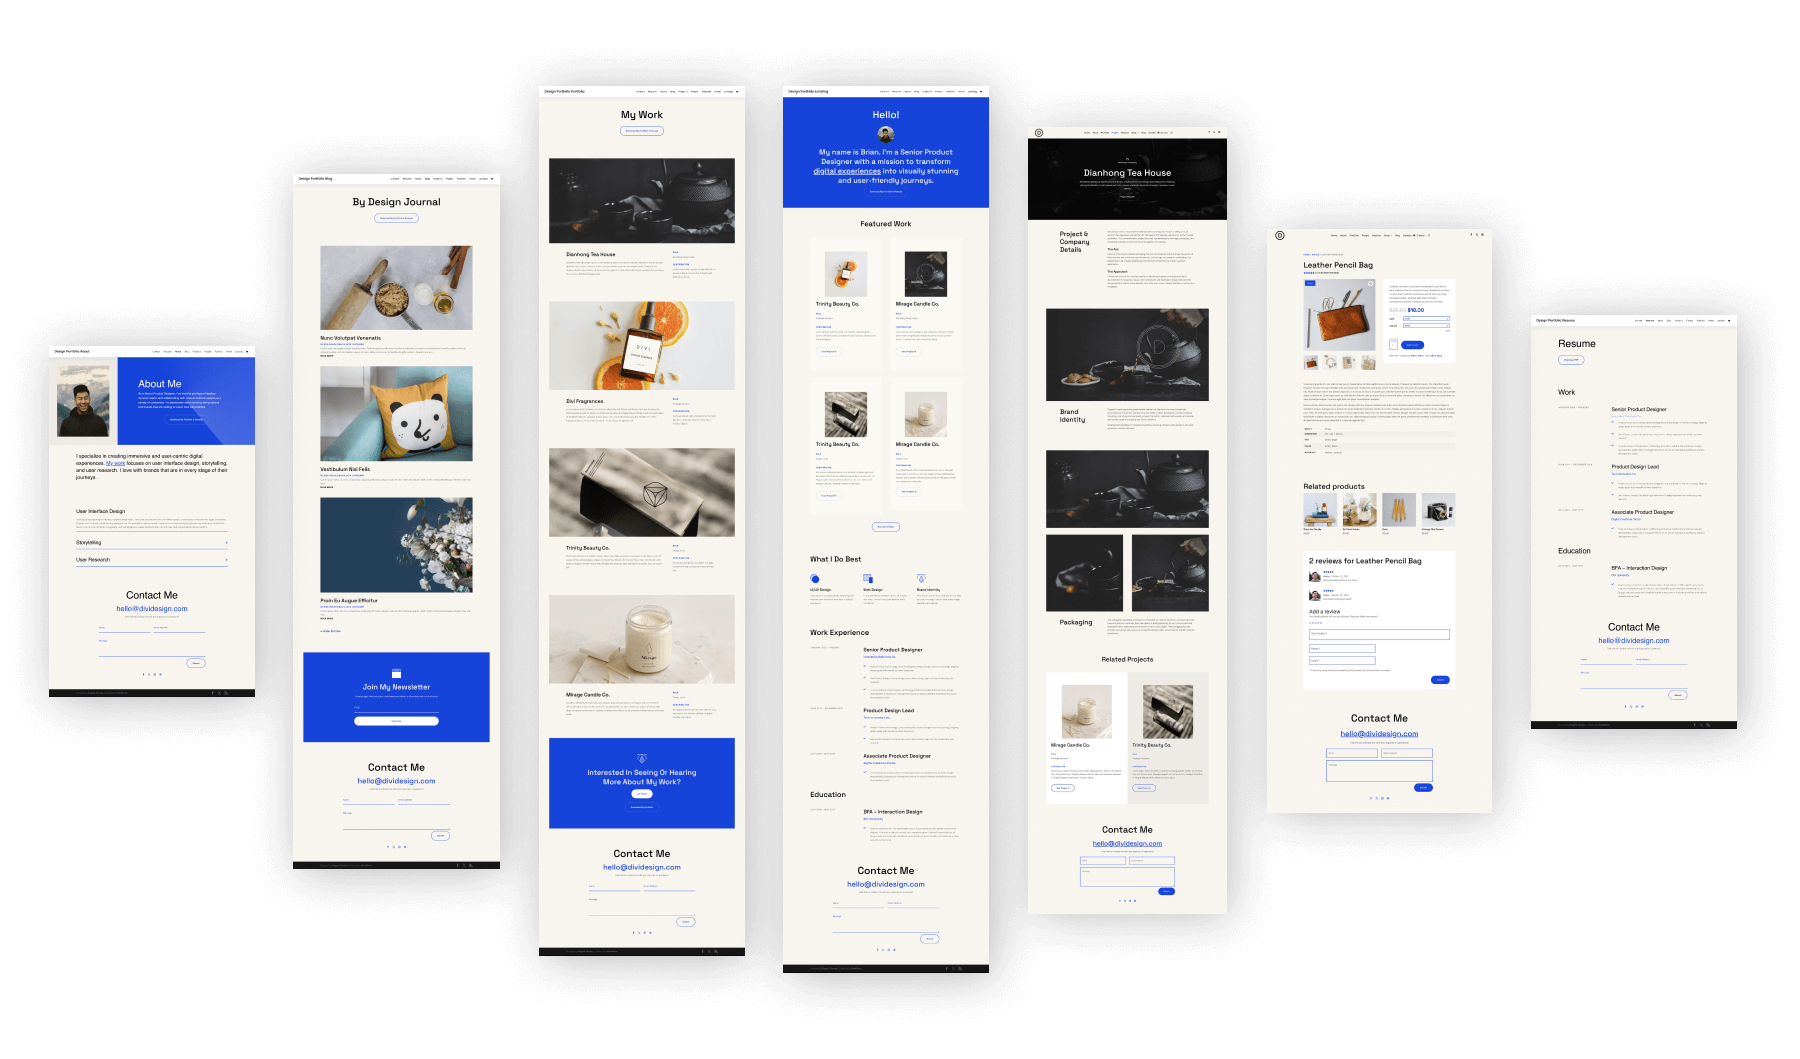
As per Divi Quick Sites, the core pages of the newly established portfolio website are as follows:
- About
- Blog
- Home
- Portfolio
- Project
- Resume
This doesn’t include the additional WooCommerce pages and templates created when selecting the “shop” page.
4. Edit and Customize Your Portfolio Website
Now that our pages are set up, we can customize them using the Divi Builder. While Divi Quick Sites is a fantastic way to kickstart the design of your site, it’s important to remember that some adjustments may still be necessary. This is especially true for branding elements like fonts and colors.
Edit Global Colors and Fonts
Each Divi Starter Site includes global colors, fonts, and presets, allowing you to customize styles to fit your brand easily. This feature ensures that any module within these layouts can be reused. The design will stay consistent when adding a new button, headline, or Divi module to a page or section.
Your portfolio website comes with pre-set global fonts chosen from the starter template. You can choose to keep these or add your own brand fonts. Global fonts can be easily customized using the Divi Builder.
Select any text module and open its settings. Navigate to the Design tab, scroll down to the Text section, and click on Font.
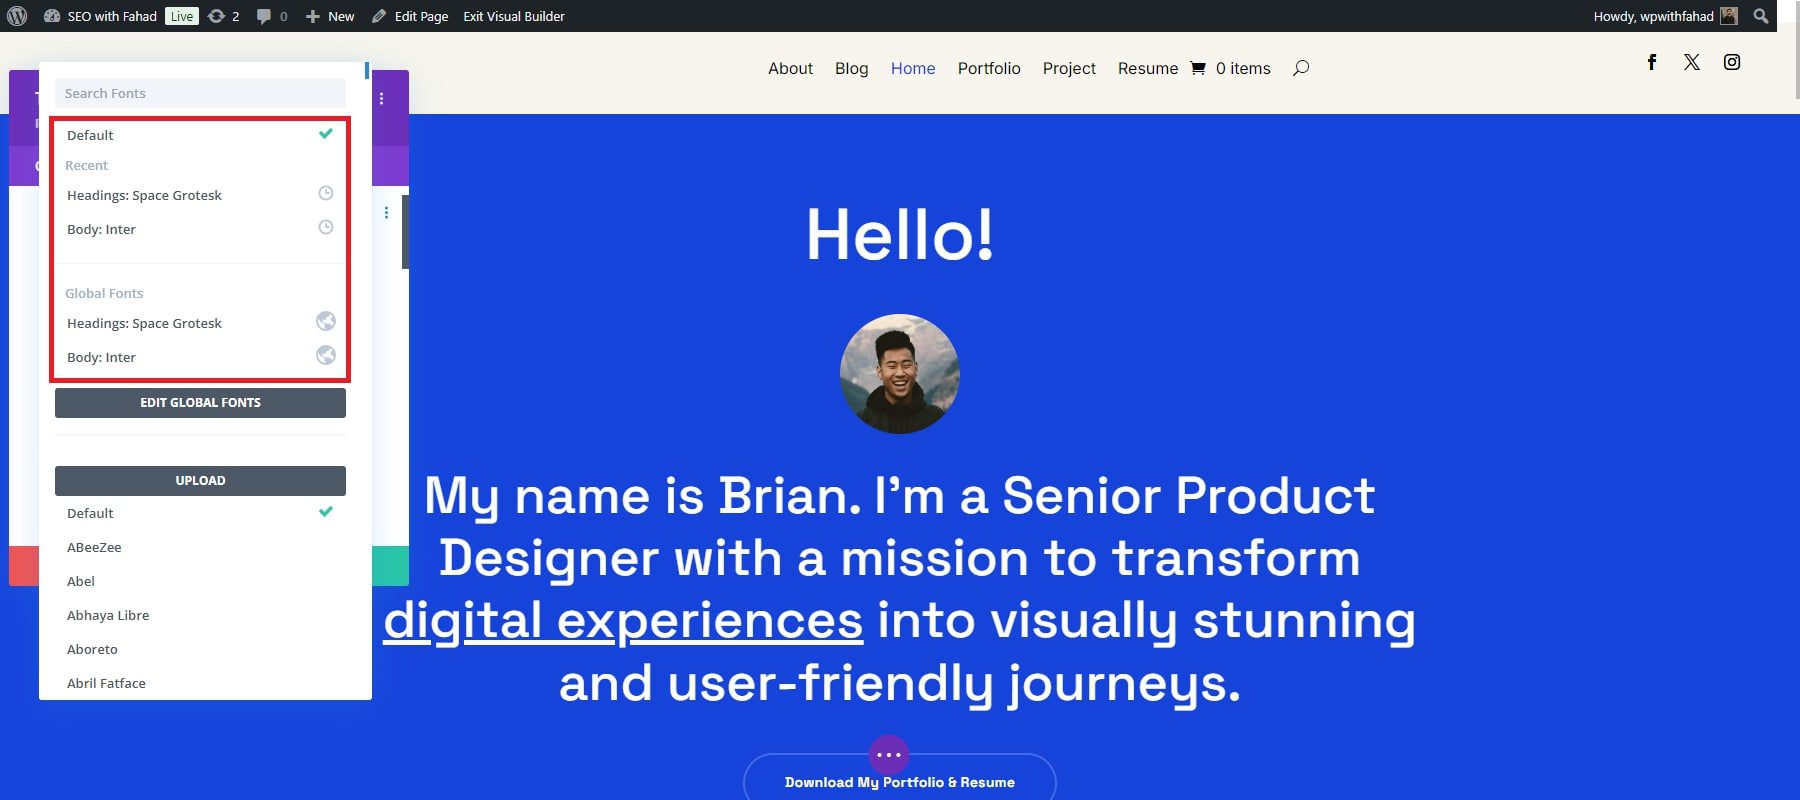
You can upload your own fonts or select from our library, which includes Google fonts.
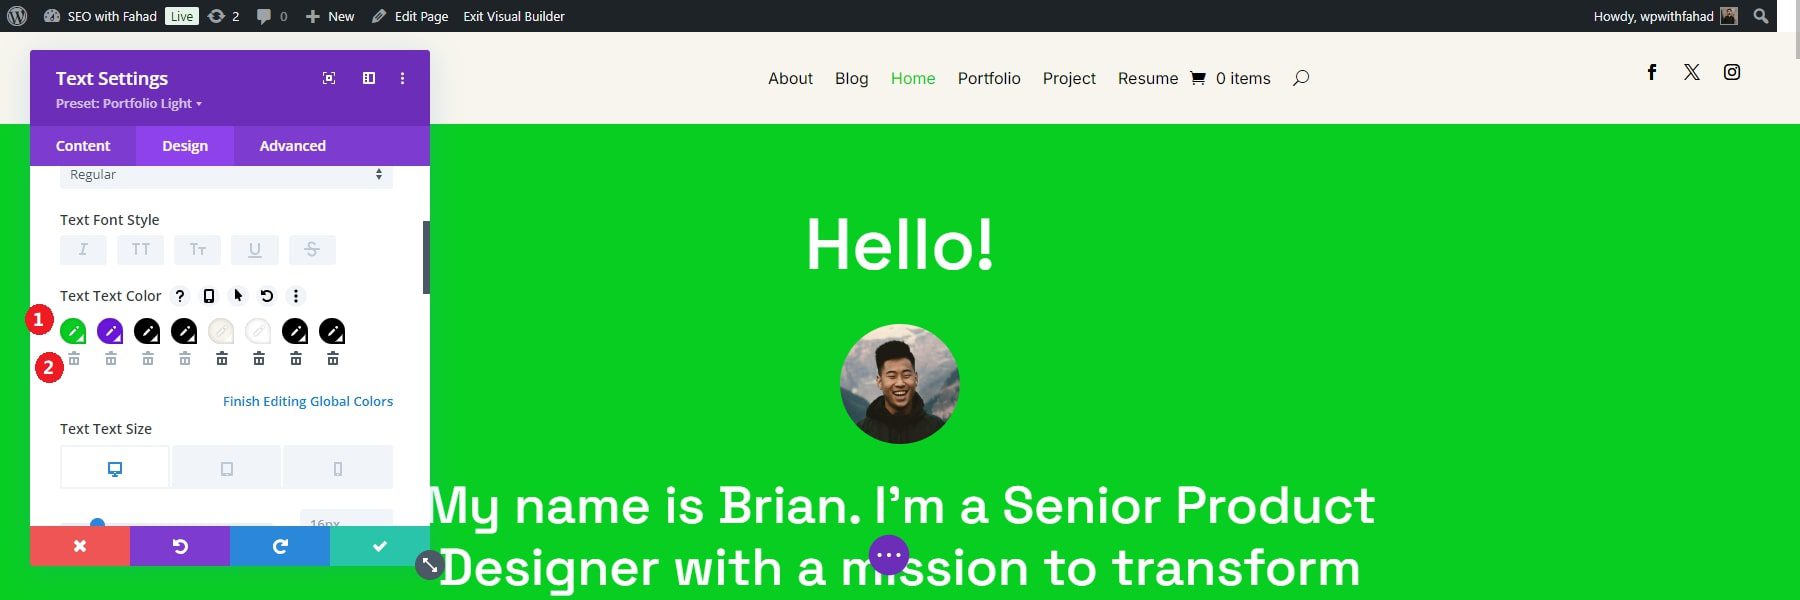
On the other hand, you can find the global colors by switching from saved to global in your text’s color settings.
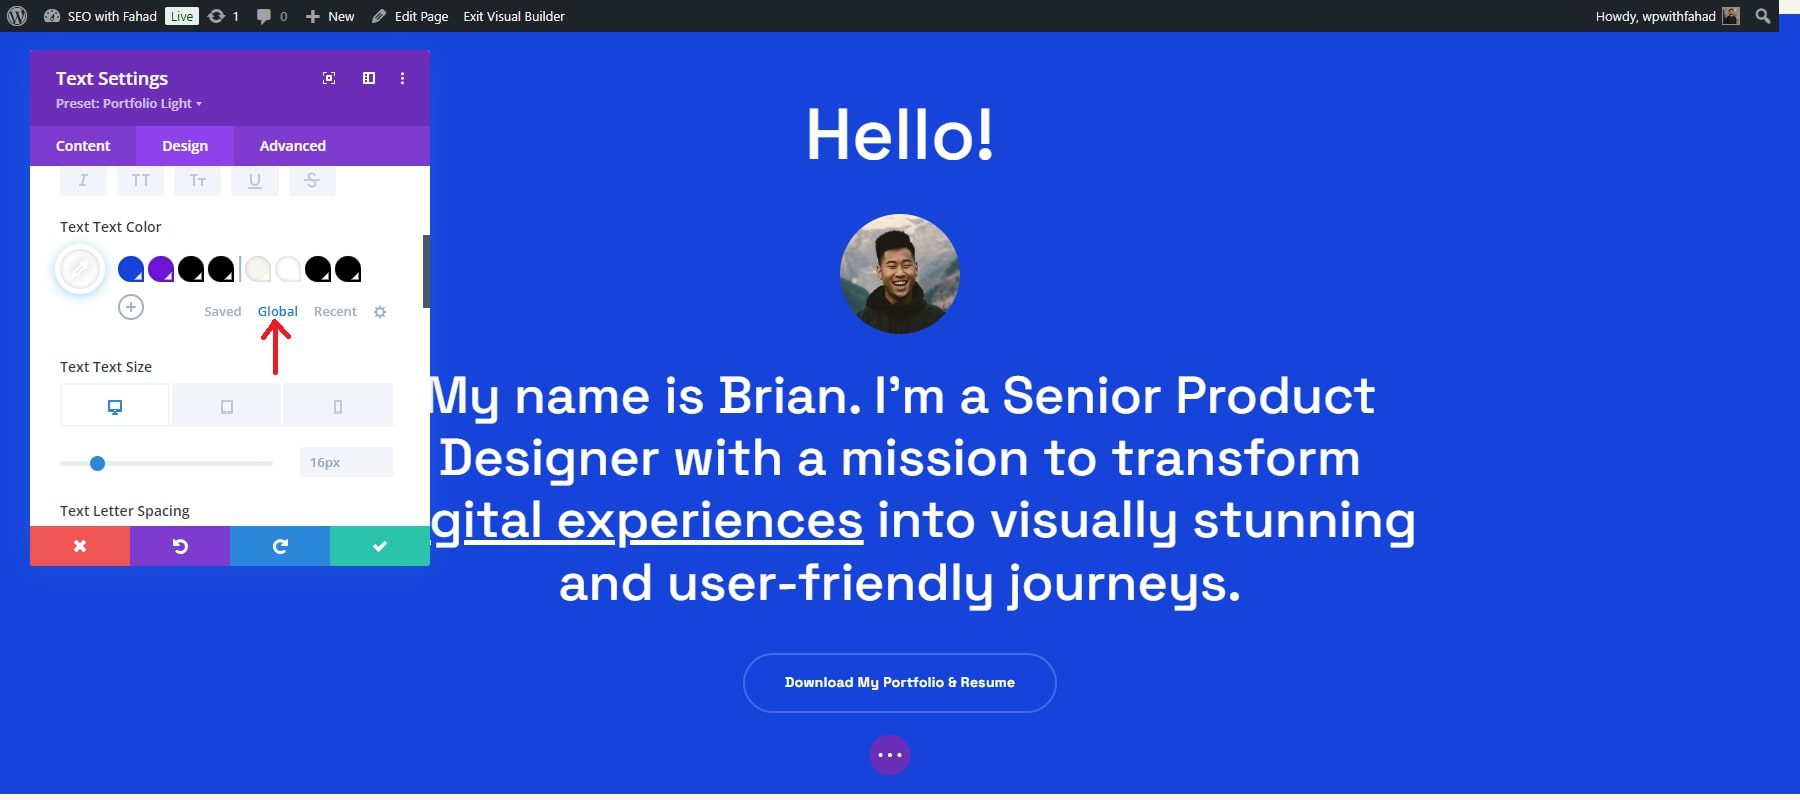
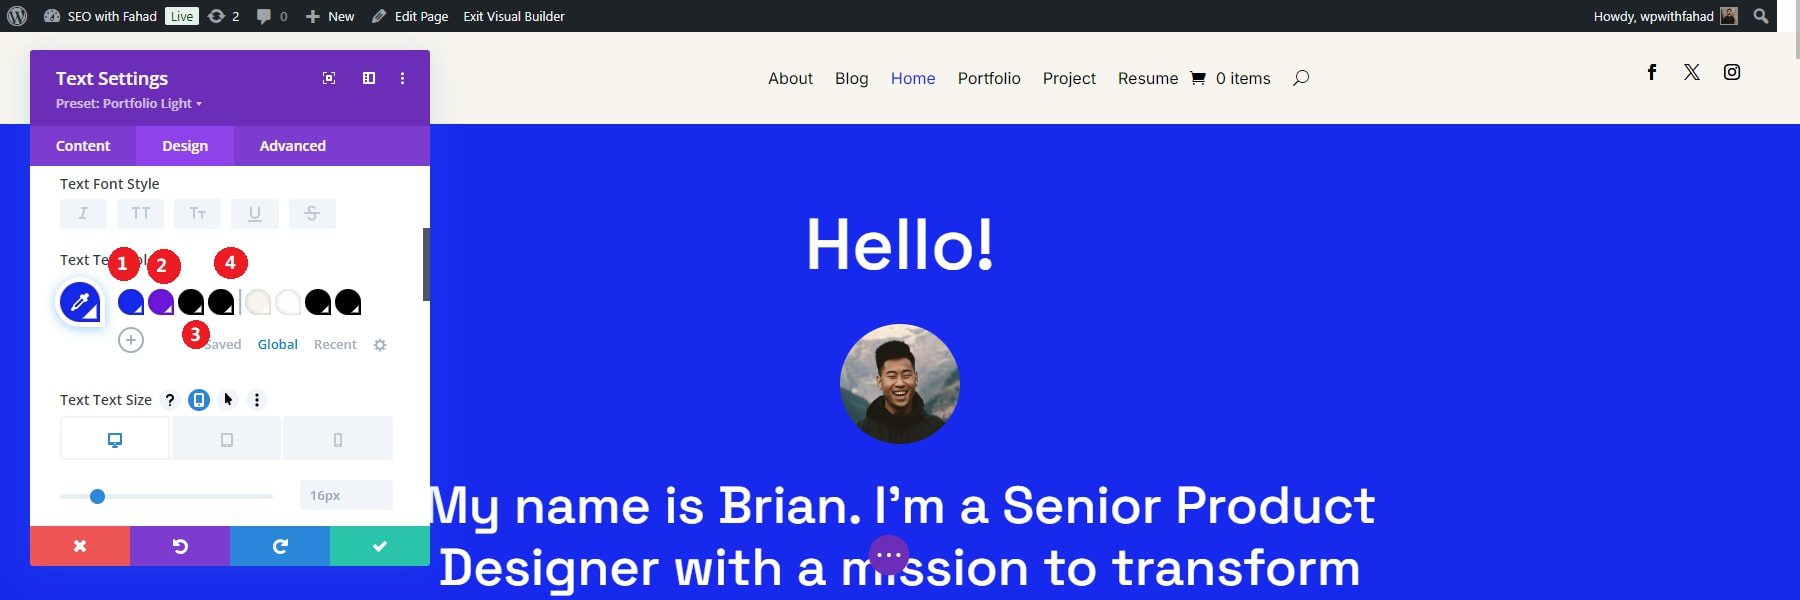
Once you click on the global option, you will be led to the global text colors added to your starter site. Eight global colors have been added to your starter site, but you can add more according to your preference. The main global colors of a module are as follows:
- Primary color
- Secondary color
- Heading text color
- Body text color
Once you click on any of your website’s global colors, you will have a wide range of color options to adjust your selections. You can also enter your custom color hex codes. In our case, we have changed our primary color to green, which will be displayed on the homepage before we finalize it.
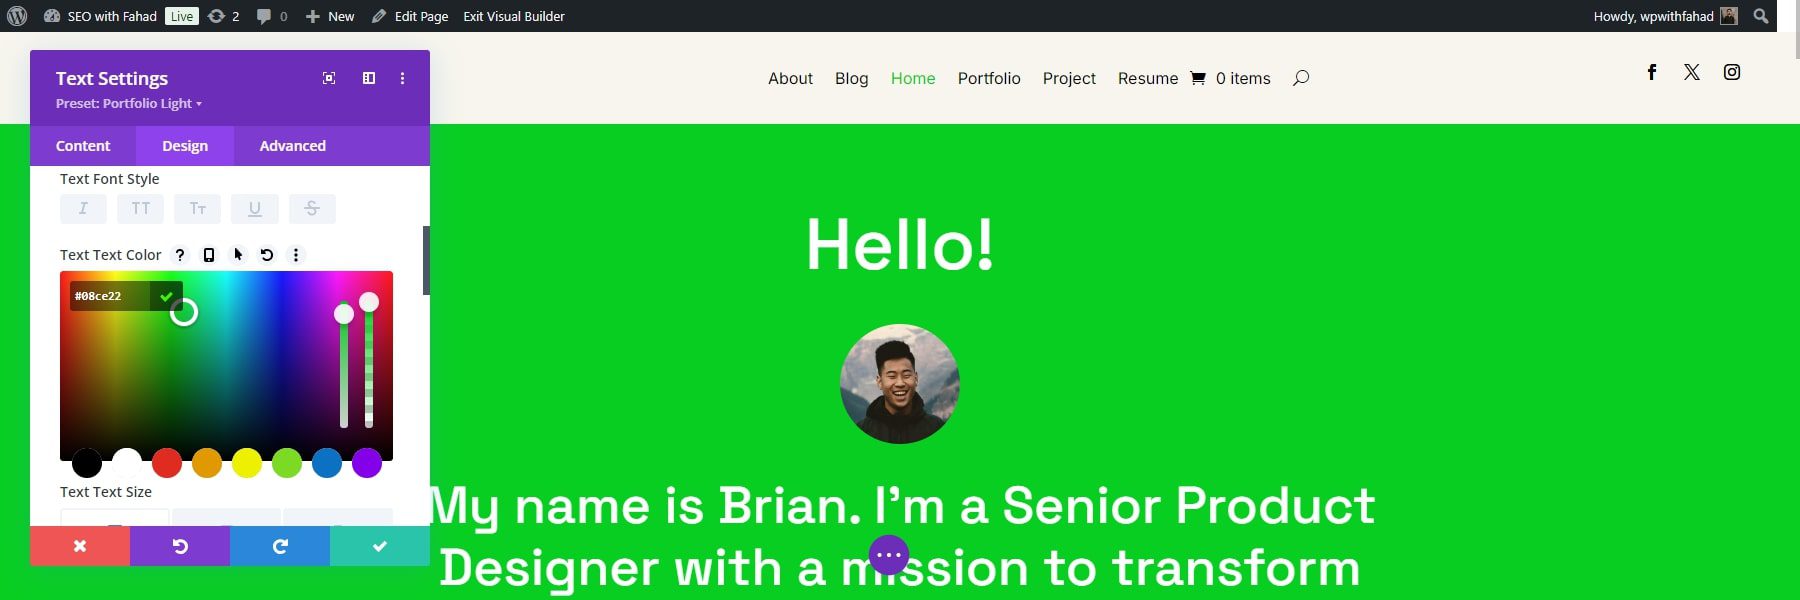
Click the green check button to save it. A dialogue box will appear once you click on the green check, requiring you to confirm your changes. For advanced changes, you can click on the settings icon next to the global tab.
![]()
Once you click on the icon, you can change your global colors individually by clicking on the pencil icon. You can also delete unnecessary ones by clicking on the trash icon below them.
Edit Global Presets
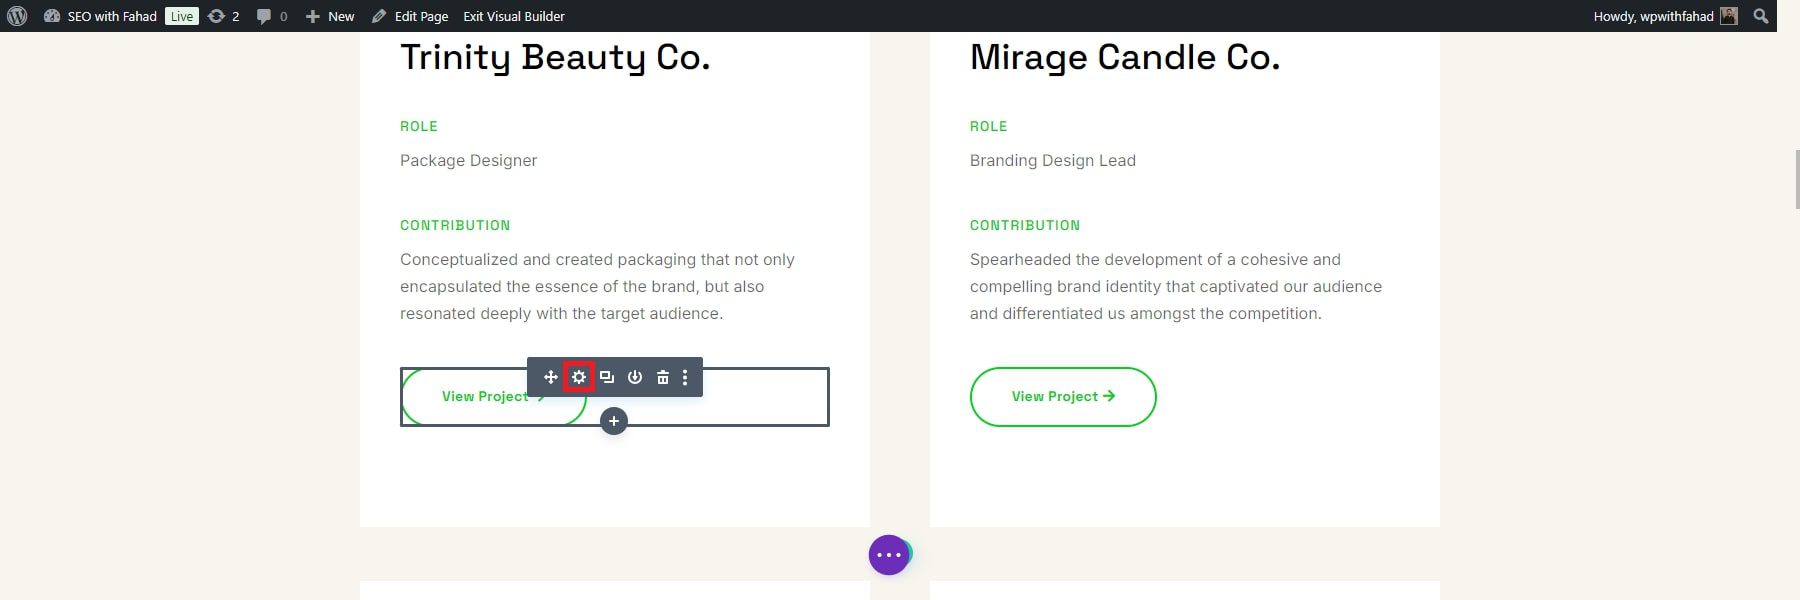
The global presets in every Divi Starter Site help maintain consistent design elements across your website, even when adding new sections or pages. Each module’s presets are located below the header section within the module. For your portfolio starter site, look for the button modules of your projects and select the settings icon to open the module.
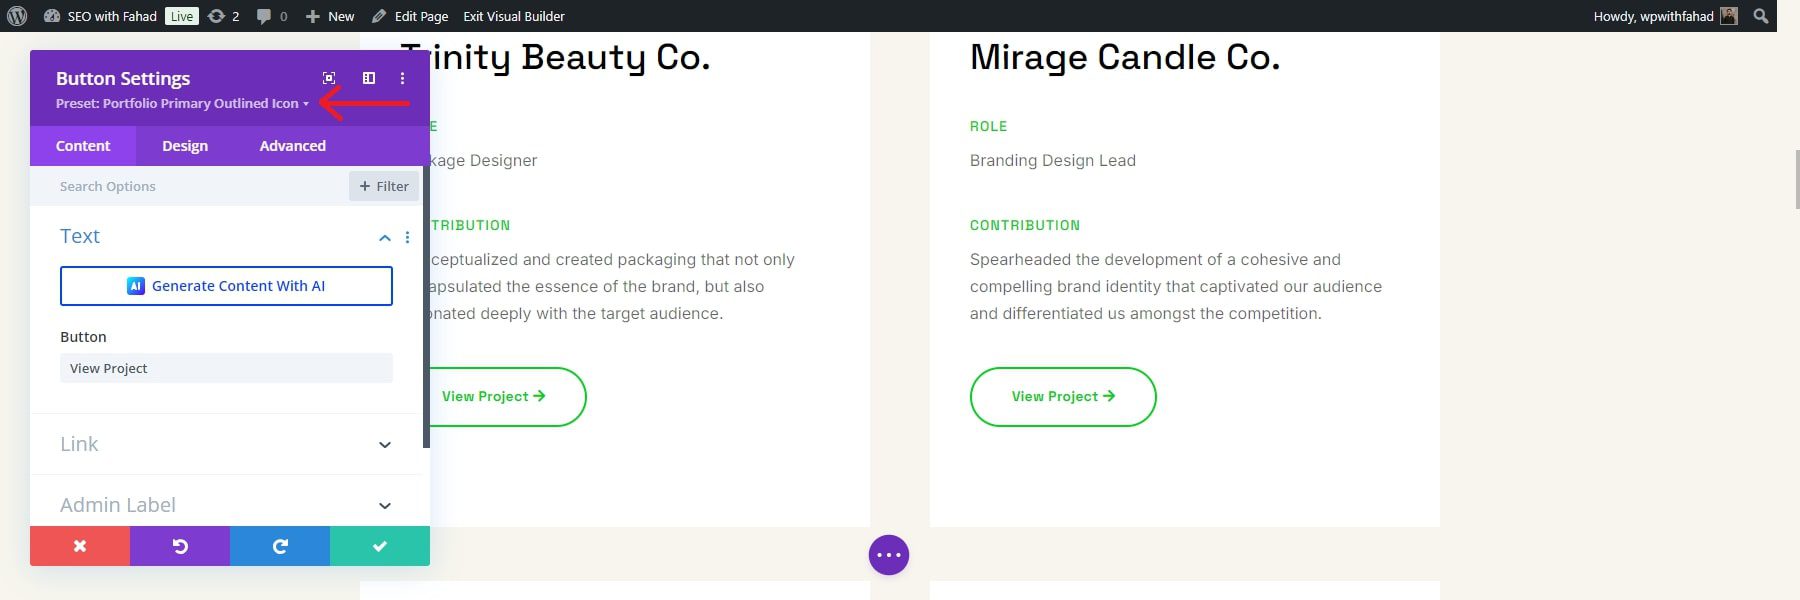
To change the presets of your button, click on the dropdown menu next to the selected preset.
Next, locate the module preset, such as ‘Portfolio Primary Outlined Icon’ in our example. Hover over the preset to reveal its menu, and then click the pencil icon to edit it.
![]()
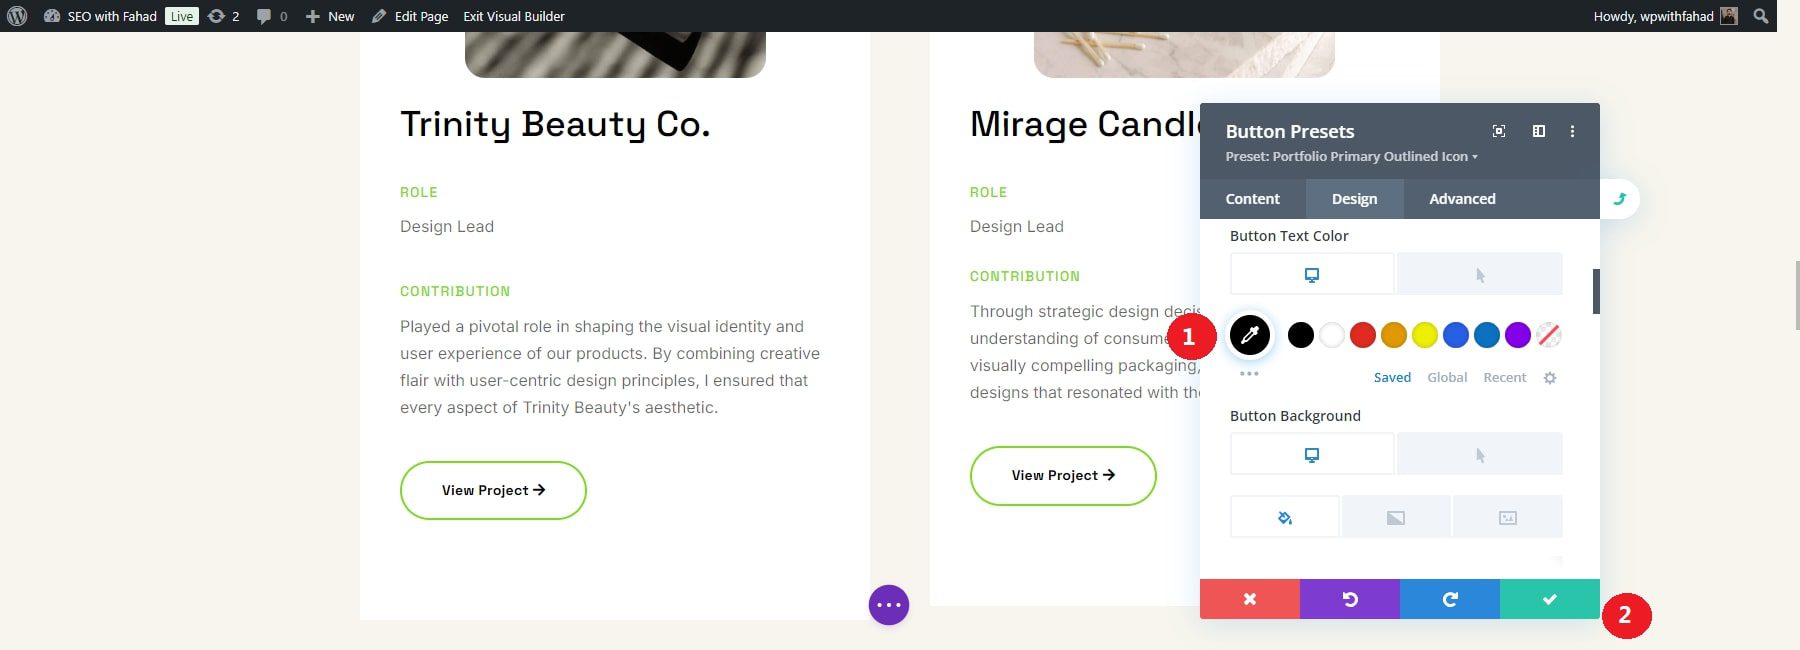
When editing Divi presets, the module’s header changes from purple to grey, indicating that design changes are in progress.
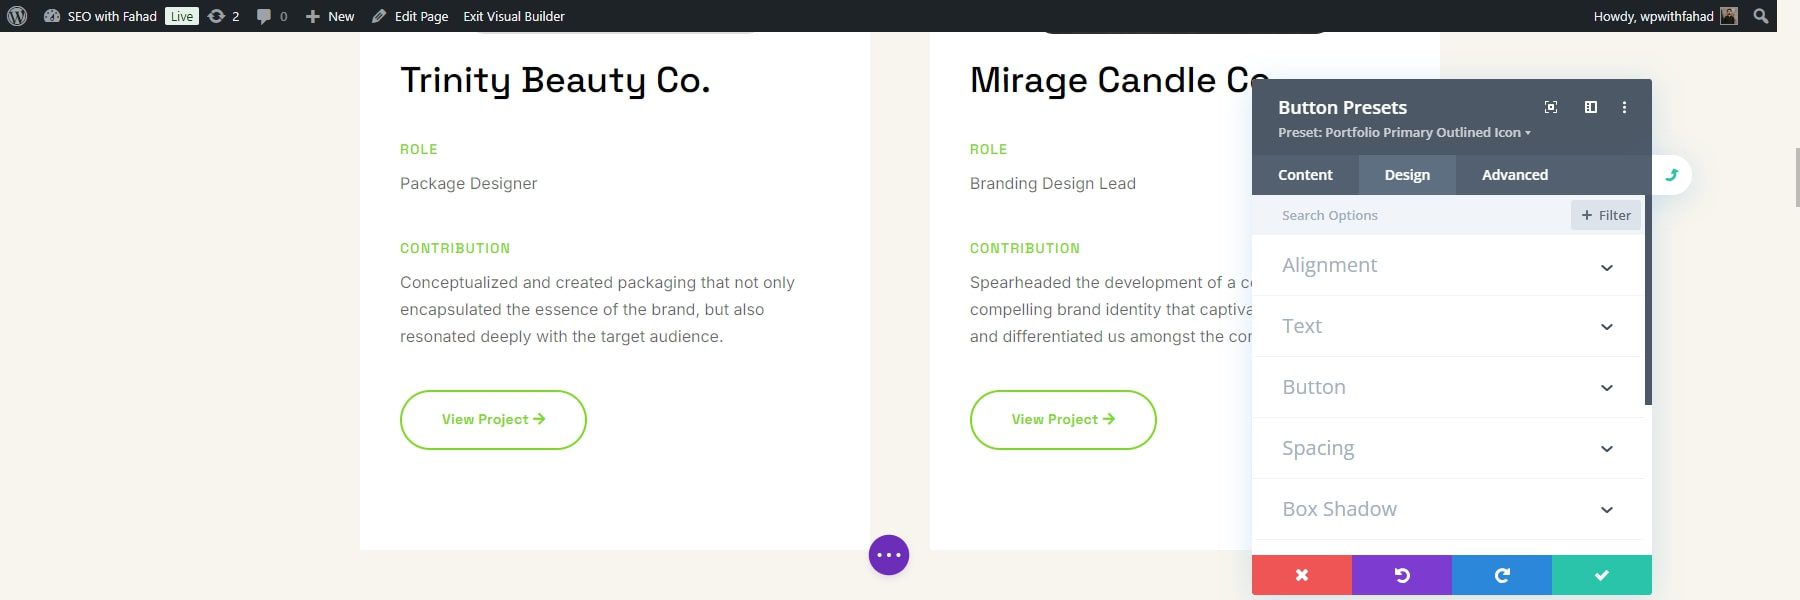
Make any desired design changes and save the module by clicking the green checkmark button. In our case, we have changed the text color from green to black. The color change will be displayed on the buttons’ text on our homepage before we confirm it. Click on the green checkbox for the confirmation.
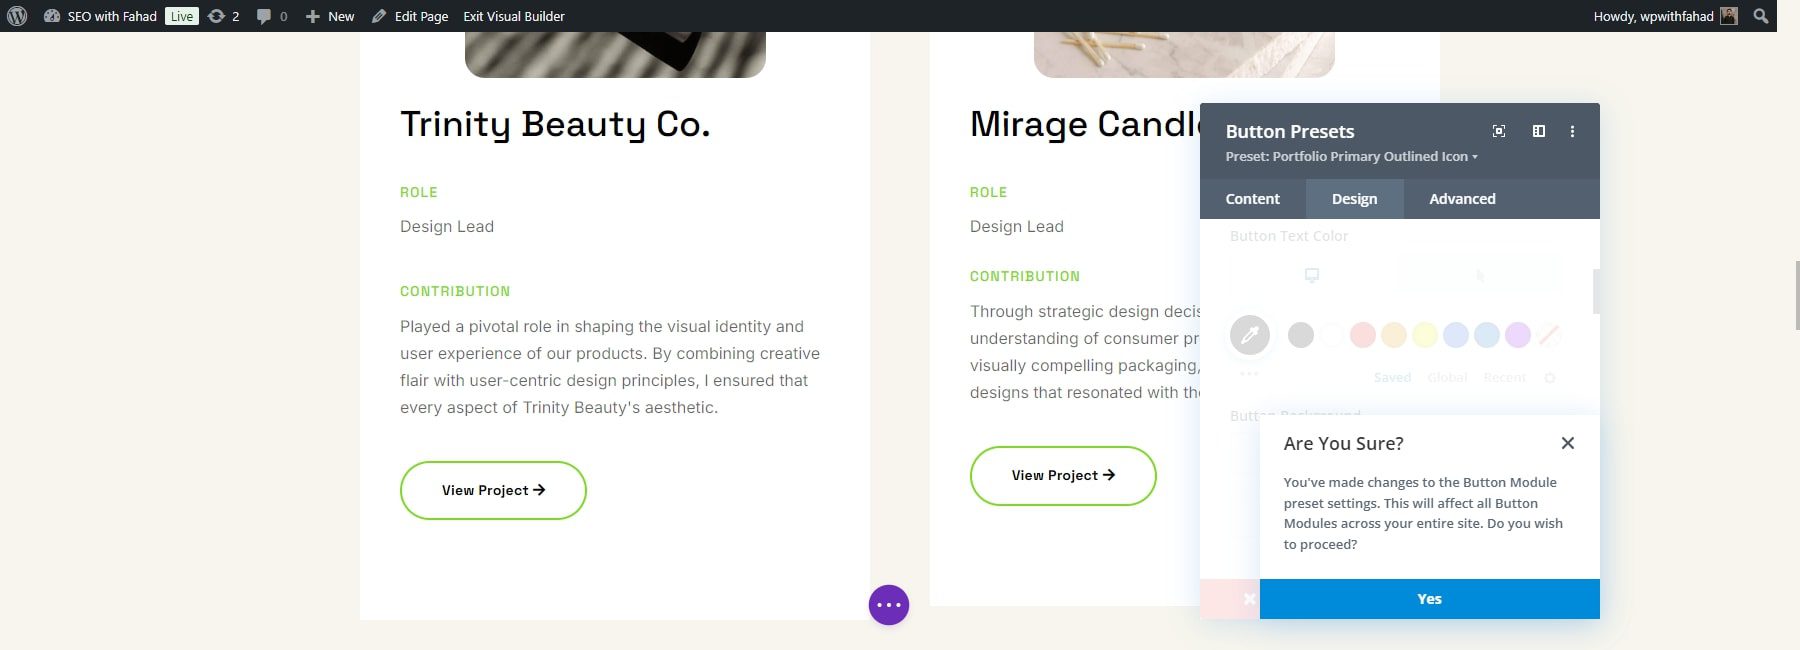
A confirmation dialog box will appear at the bottom, asking if you’re sure you want to change the preset. Click “Yes” to save the changes.
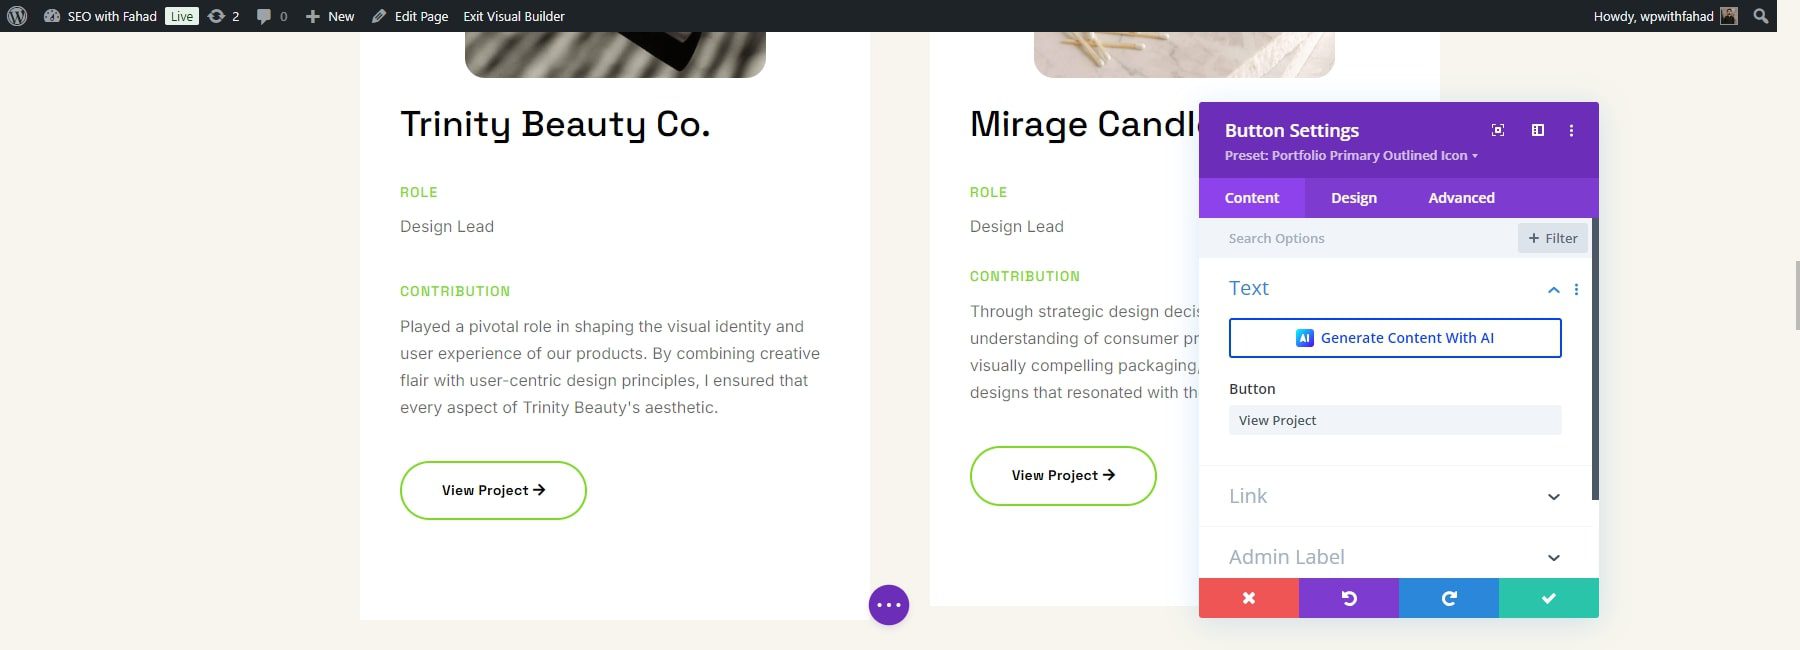
The module’s header will return to purple. Click the green save button one final time to confirm the preset.
Edit Your Starter Site Theme Builder Templates
Divi Quick Sites creates templates from the Starter site and incorporates them into your website. These templates are accessible through your WordPress dashboard by navigating to Divi > Theme Builder. The Theme Builder lets you personalize any template with the Divi Builder.
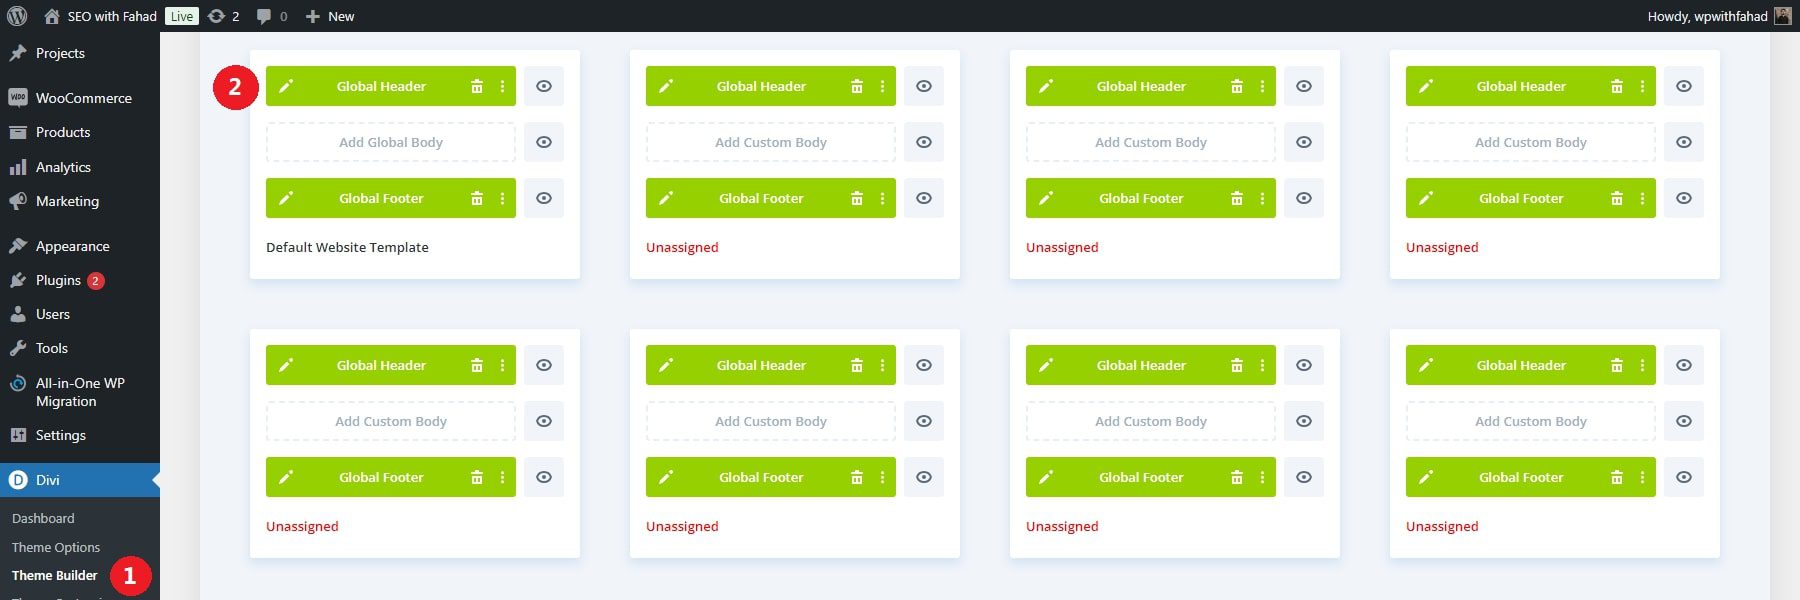
To edit the global header in the Default Header Template, click the pencil icon next to the global header, which will open the Divi Page Builder for modifying global elements. Now, you can adjust your menu settings, including the logo, font, text size, background color, and more. The global footer and other Theme Builder templates can be customized similarly.
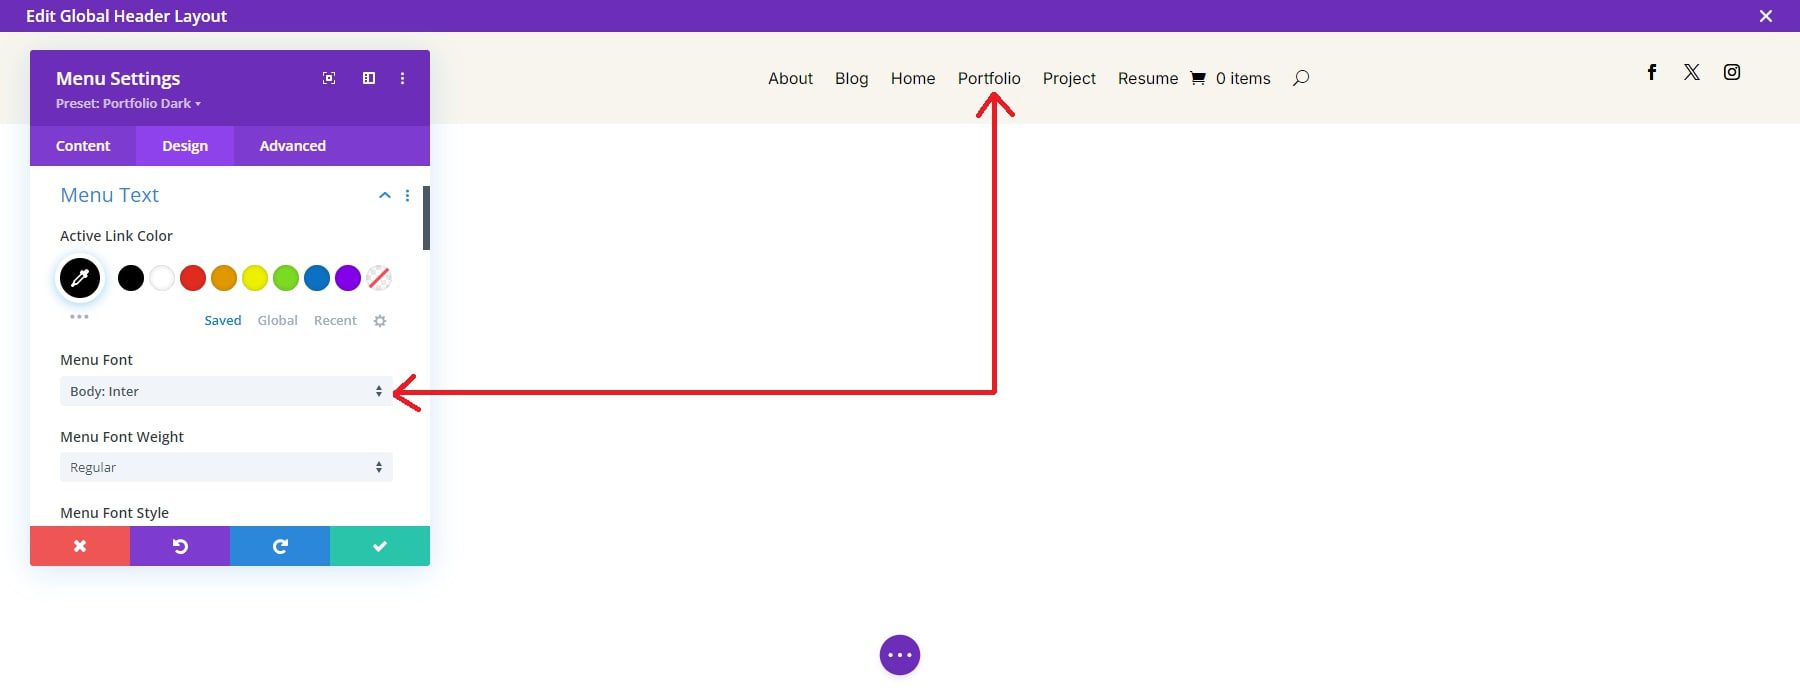
Remember that changes to the global header will be applied across all website pages. To learn more, explore the powerful features of the Theme Builder.
Add Portfolios to Any Page with Divi’s Portfolio Module
Divi has a Portfolio Module and Filterable Portfolio Module to add portfolio displays throughout your site. This allows you to display your work in an organized and visually appealing format. You can set how many projects or posts you want to display. You can also choose specific categories of portfolio items to display. This is useful if you have different types of projects (e.g., “Web Design,” “Photography”).
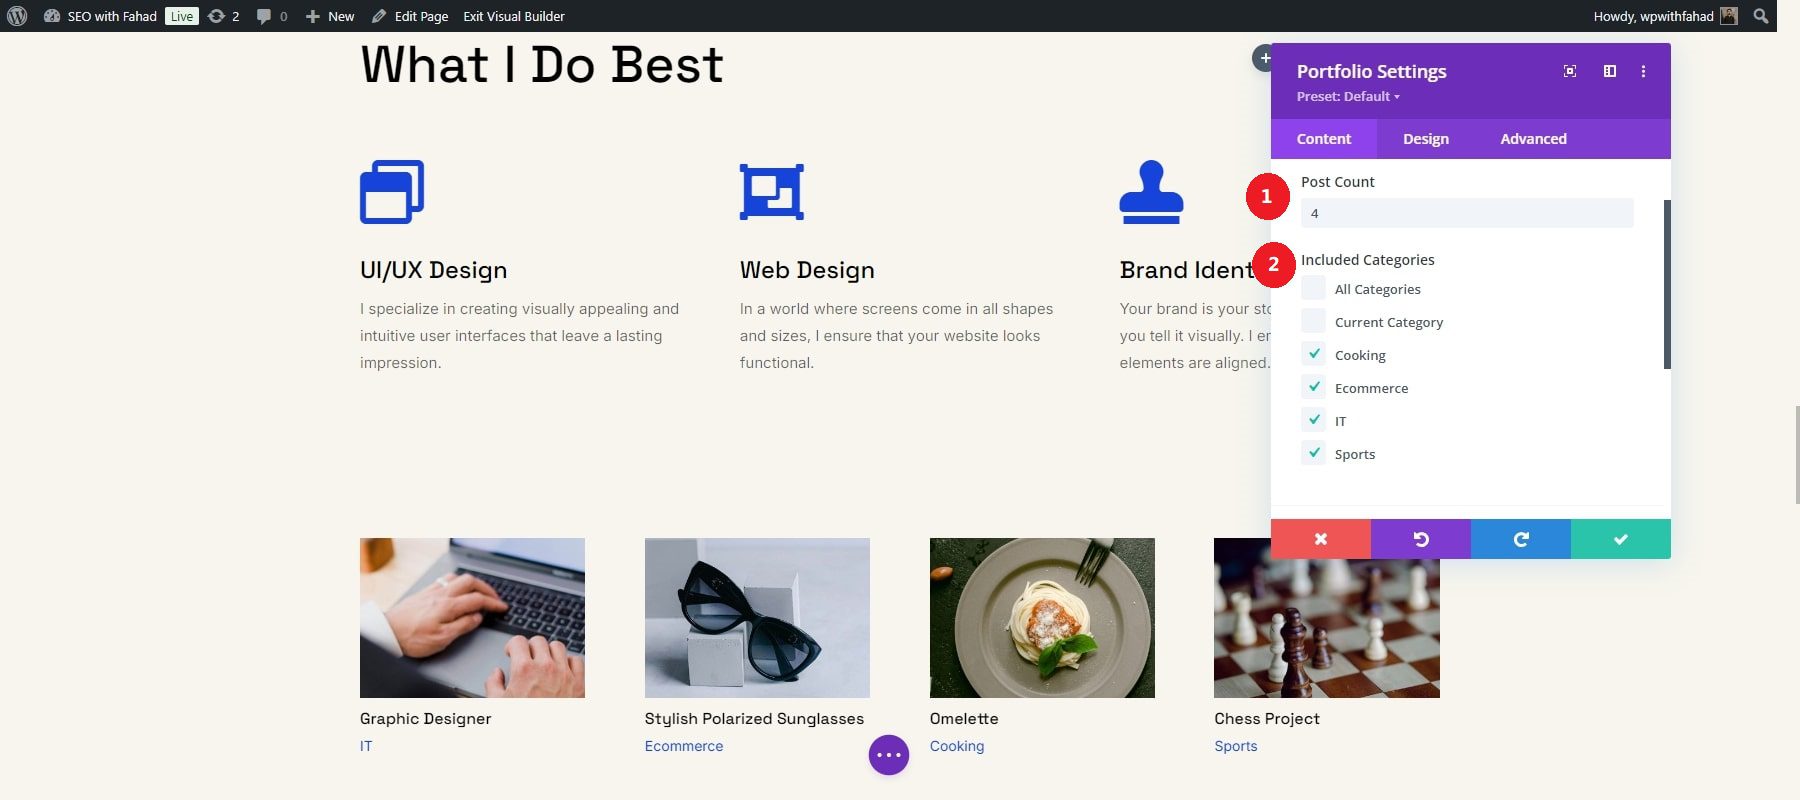
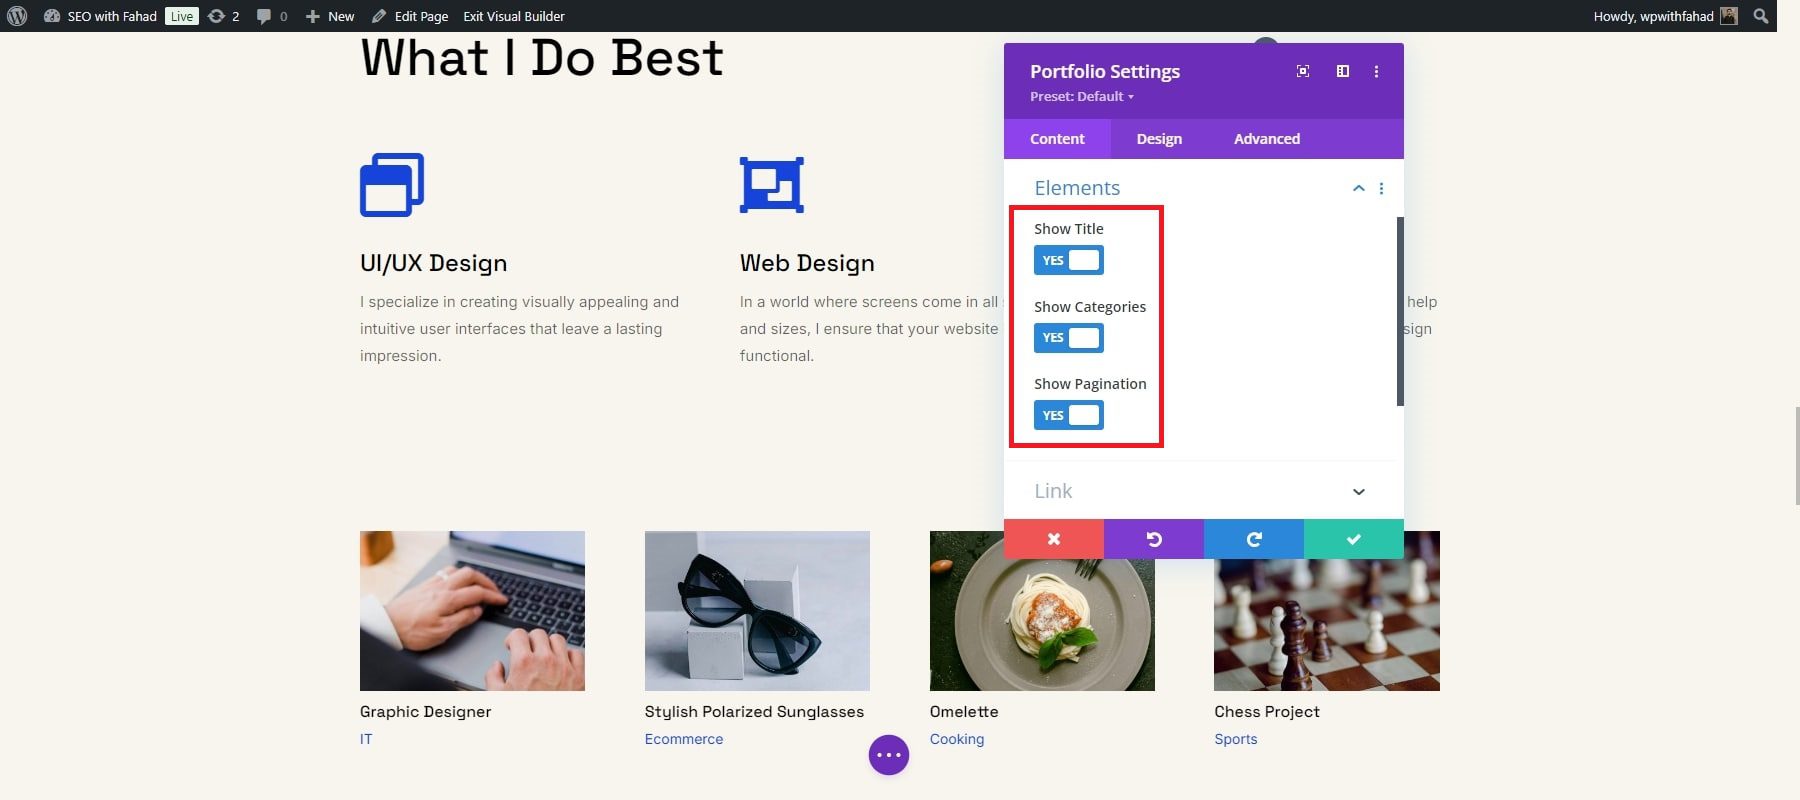
Moreover, you can decide how you want to display your projects. Divi allows you to show your project’s titles and categories. If you have a large portfolio, enabling pagination helps to divide the content into pages.
Edit Image Designs
You can use the Visual Builder and Divi AI to regenerate some photos on the page. First, activate the Divi Builder on the homepage. Then, hover over an image module and click on it. Once selected, click the grey settings icon to access the image module’s settings.
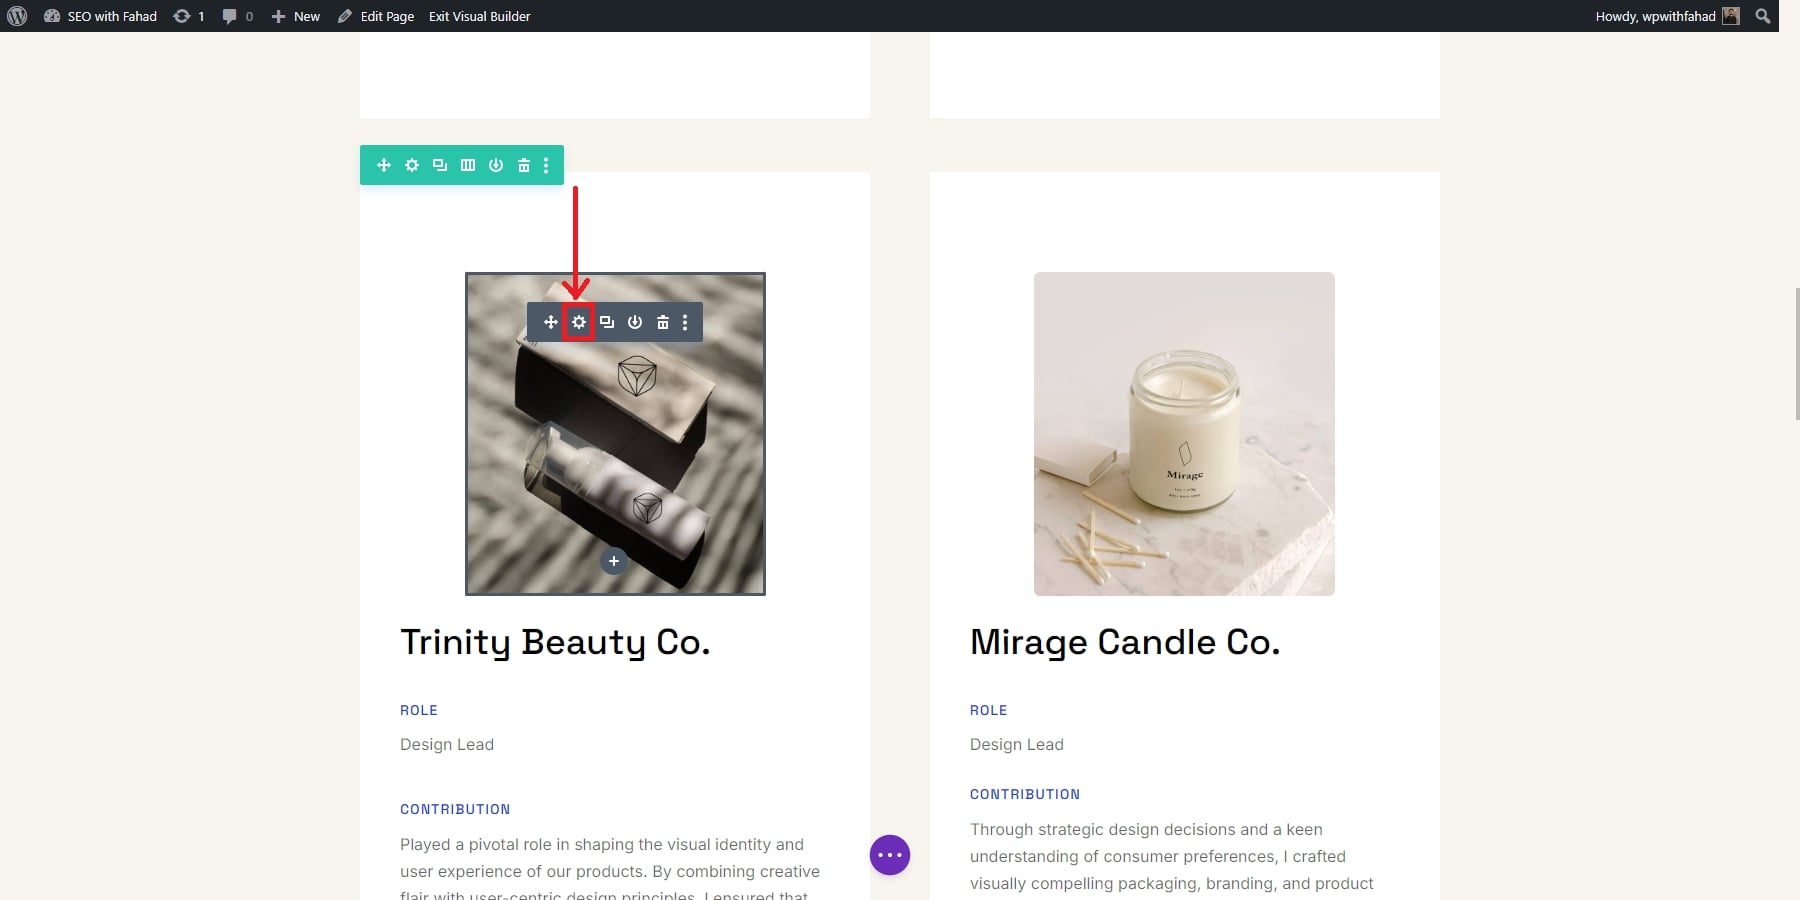
To regenerate the image using Divi AI, click on the AI icon found within the image preview in the module. This will allow Divi AI to modify the image for you.
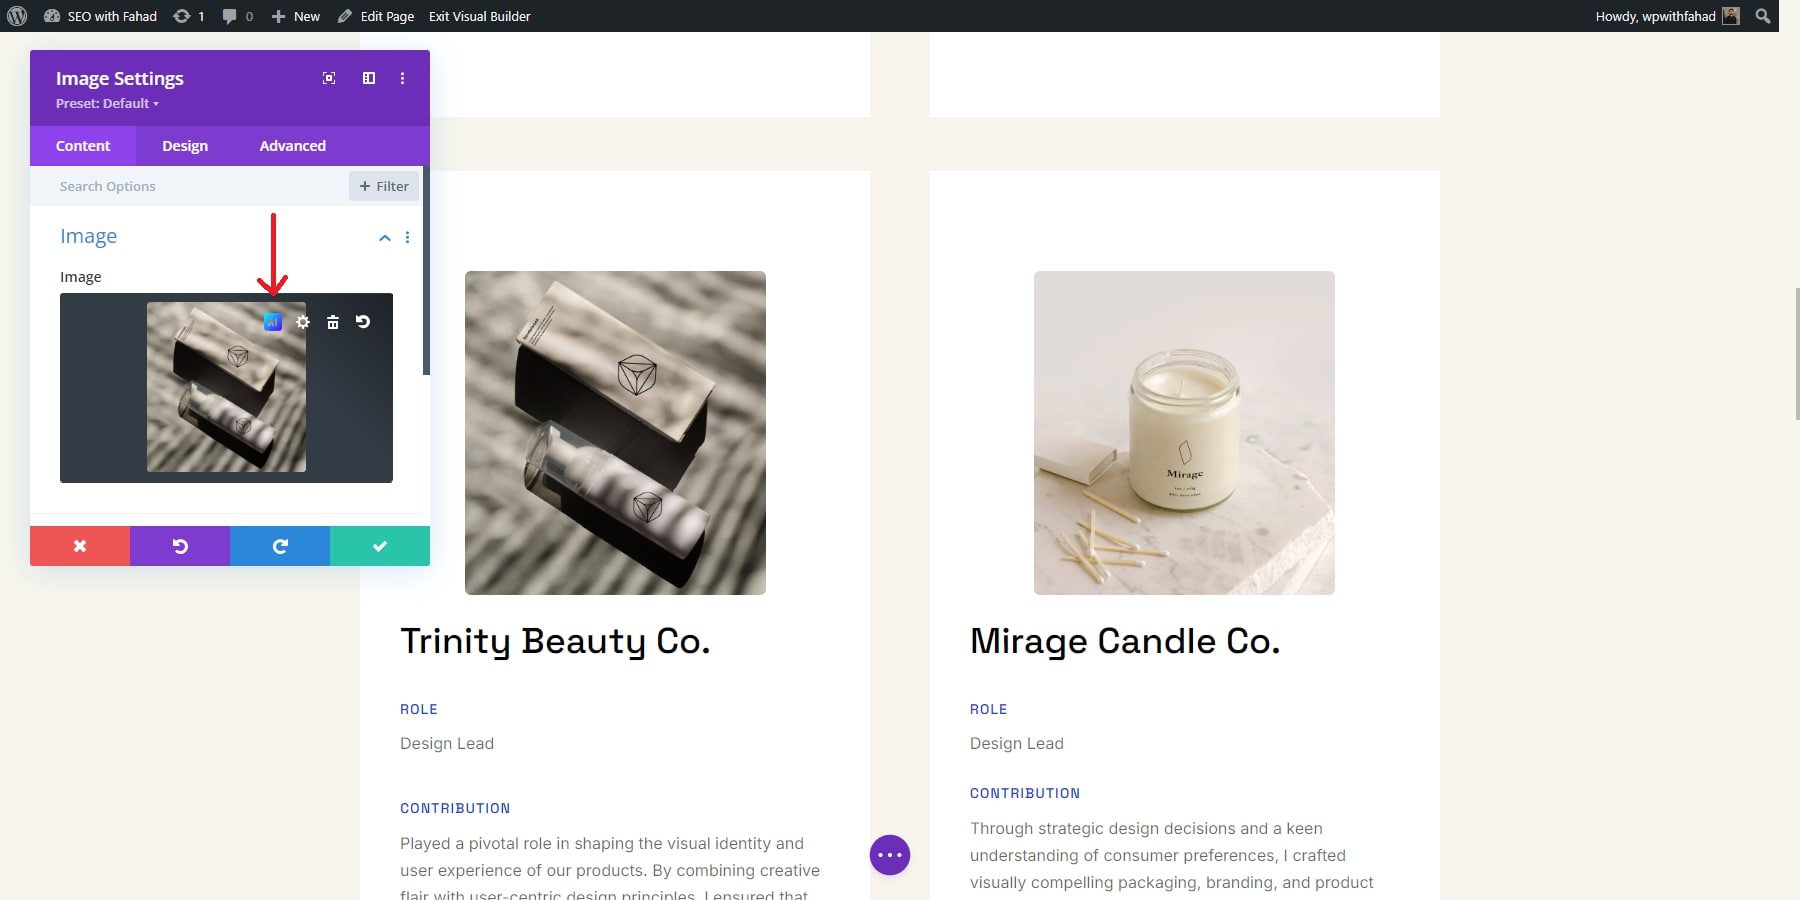
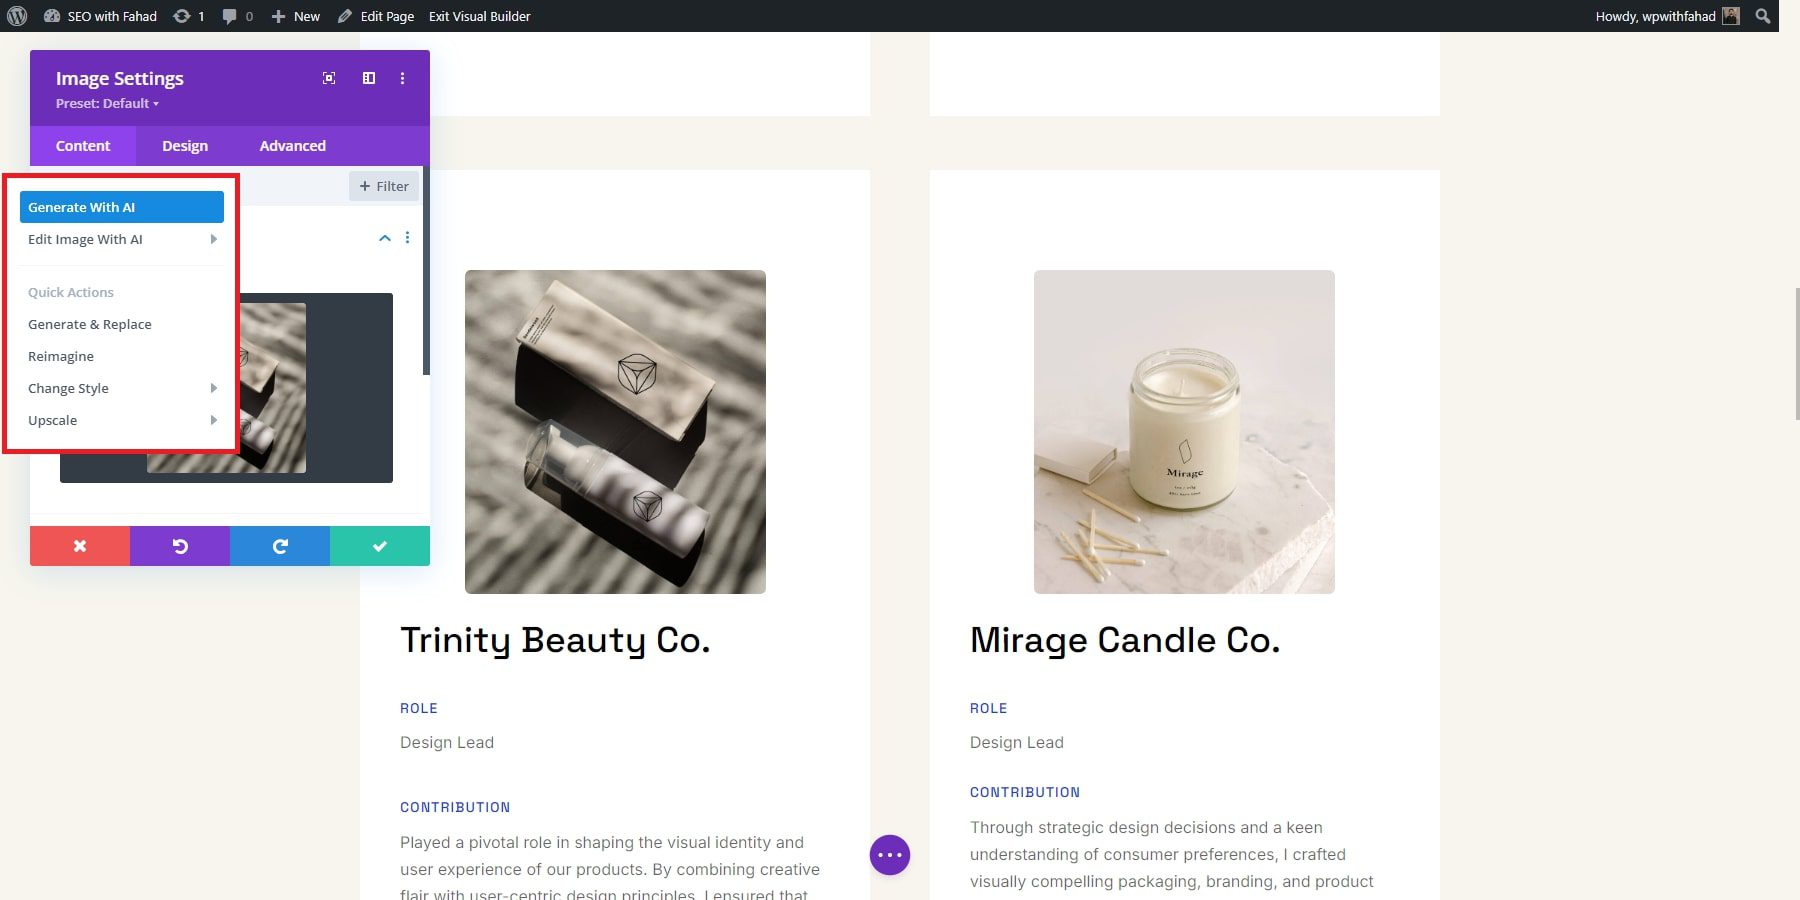
When you hover over the AI icon, several options will appear, such as generating with AI, editing images with AI, and some quick actions. You can use these to generate and replace an image, reimagine it, adjust its style, or upscale it. For this task, you’ll want to generate a new image. Simply click “Generate With AI” to open the Divi Image AI interface.
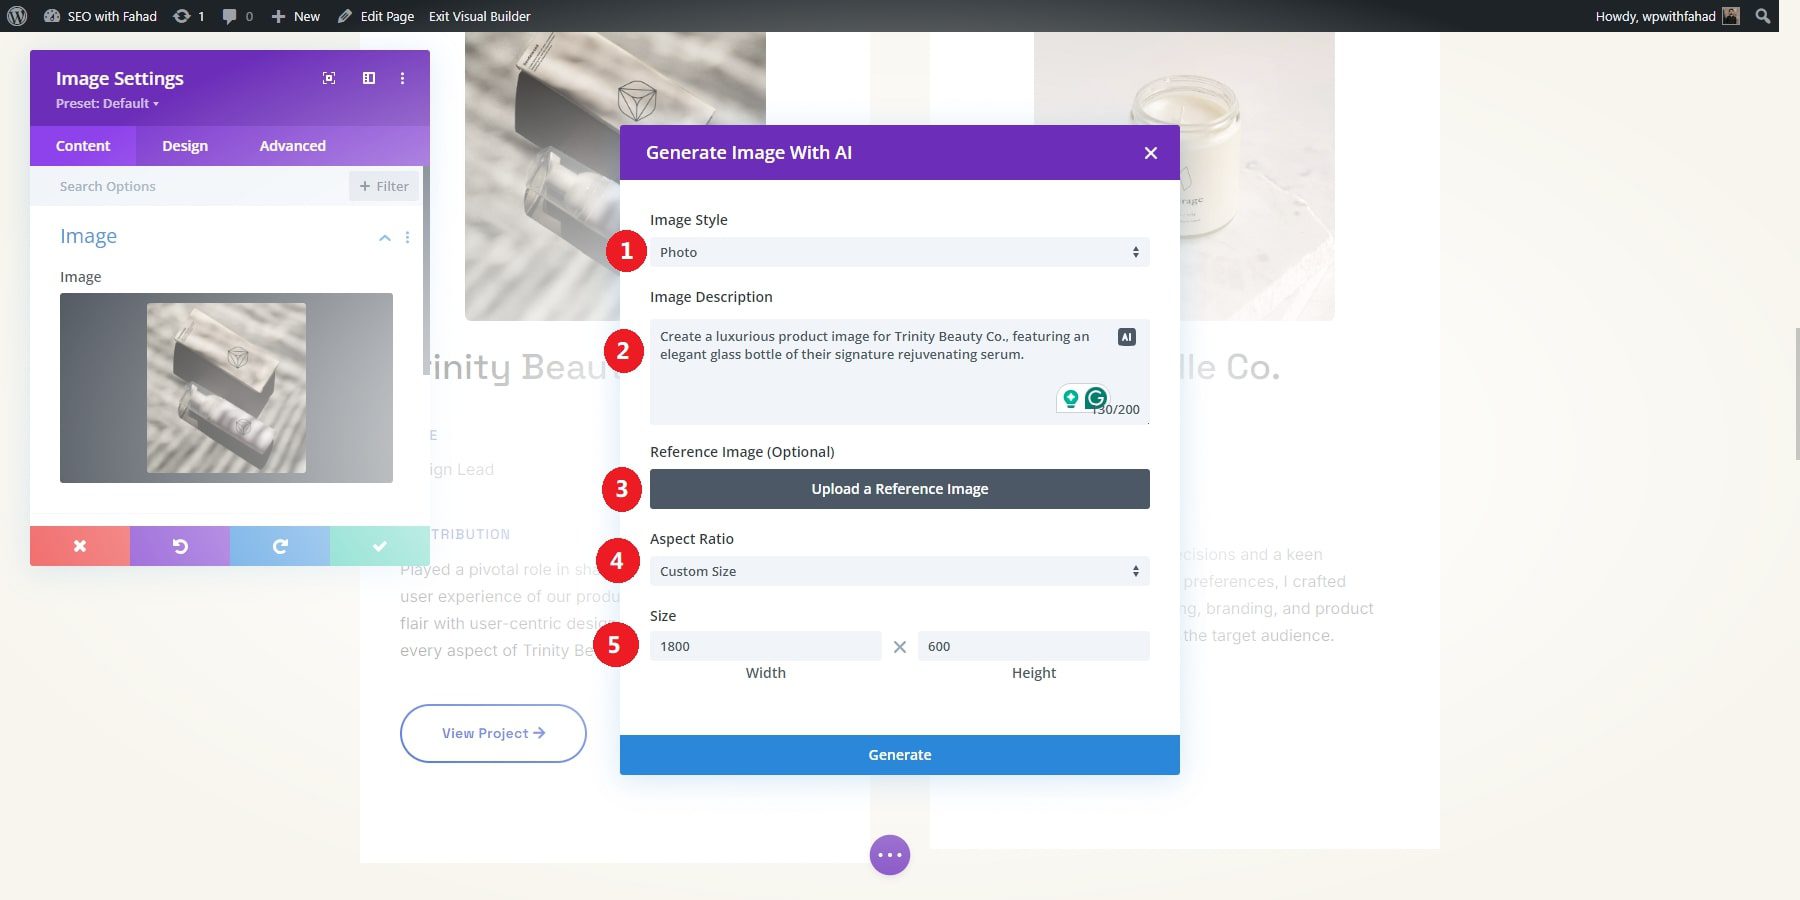
There are 12 different image styles, such as photo, vector, anime, and more. Since this is a portfolio website for a photographer, the photo style is the most fitting option. Next, describe the image you’d like to generate. We’ll use the prompt: Create a luxurious product image for Trinity Beauty Co., featuring an elegant glass bottle of their signature rejuvenating serum. Set the aspect ratio to your preference and select 1080 x 600 for the size. Once you’re ready, click Generate.
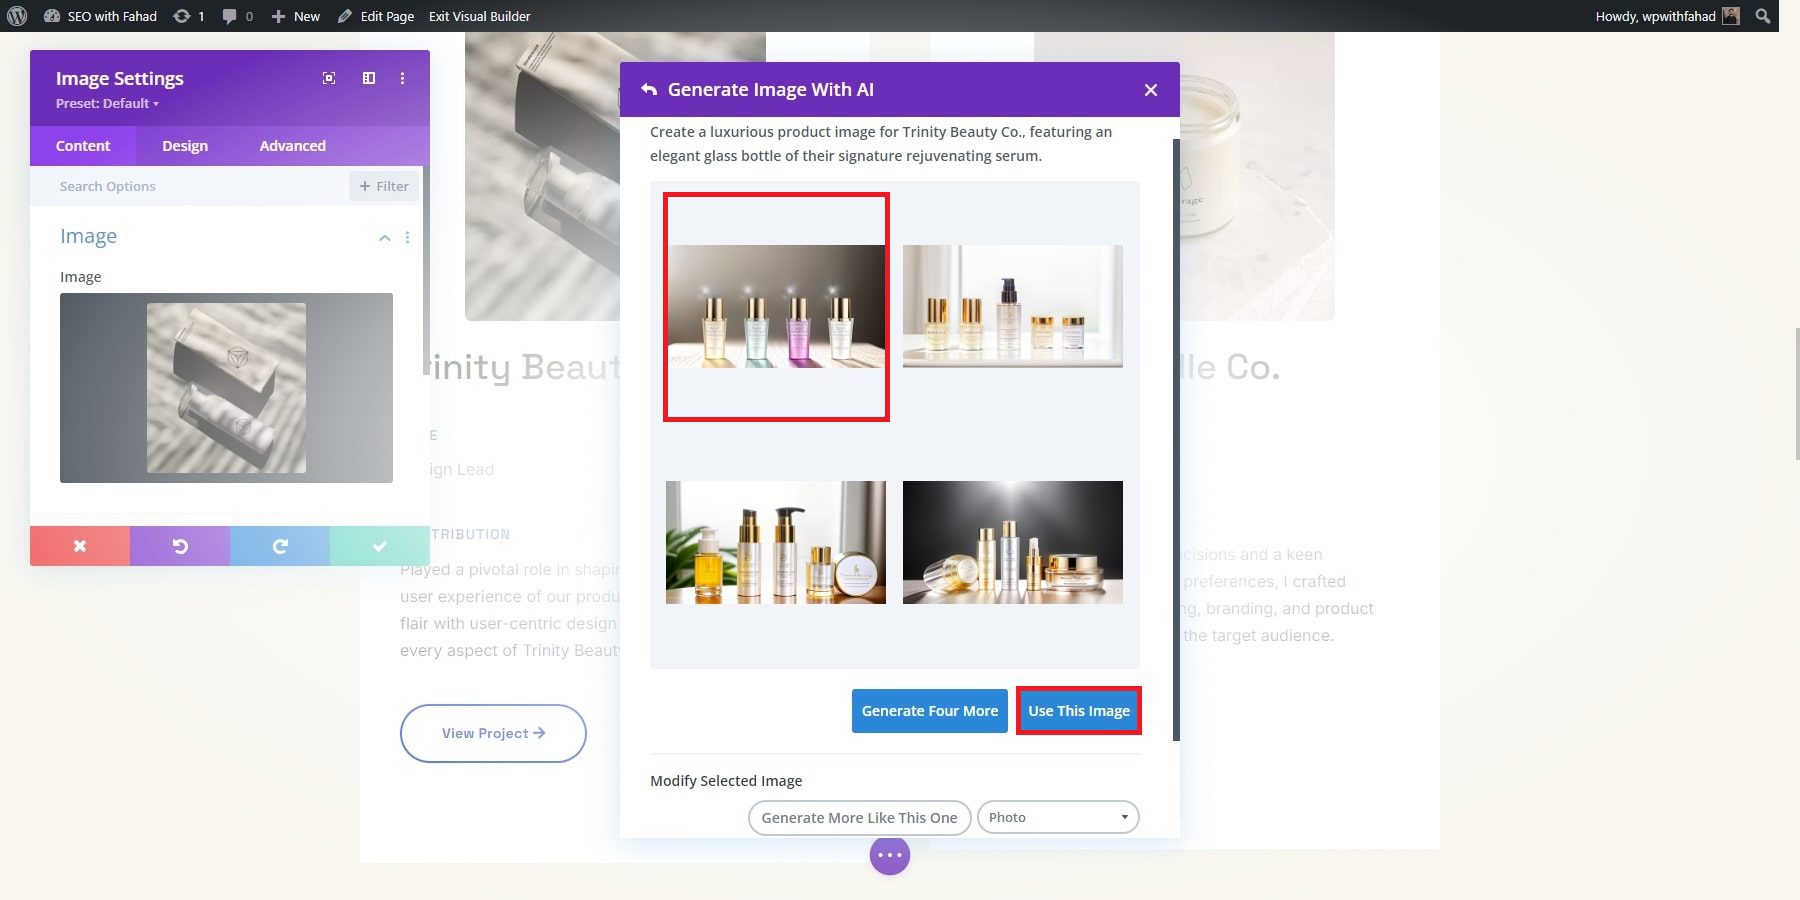
Divi AI will start creating your image based on the prompt. It will generate four images for you to review. From there, you can either generate four additional options, select an image to use, create more images similar to the one you chose, or write a new description. To use an image in the module, simply pick your favorite and click “Use This Image.”
5. Boost Your Portfolio Site with Plugins
Once your portfolio website is designed and customized, adding essential plugins can enhance its performance and functionality. These tools help you expand your site’s features without coding everything from scratch. Divi includes built-in optimization and marketing tools and integrates smoothly with top WordPress plugins for social sharing and email marketing. Here are a few tools to help you get started.
Email Marketing
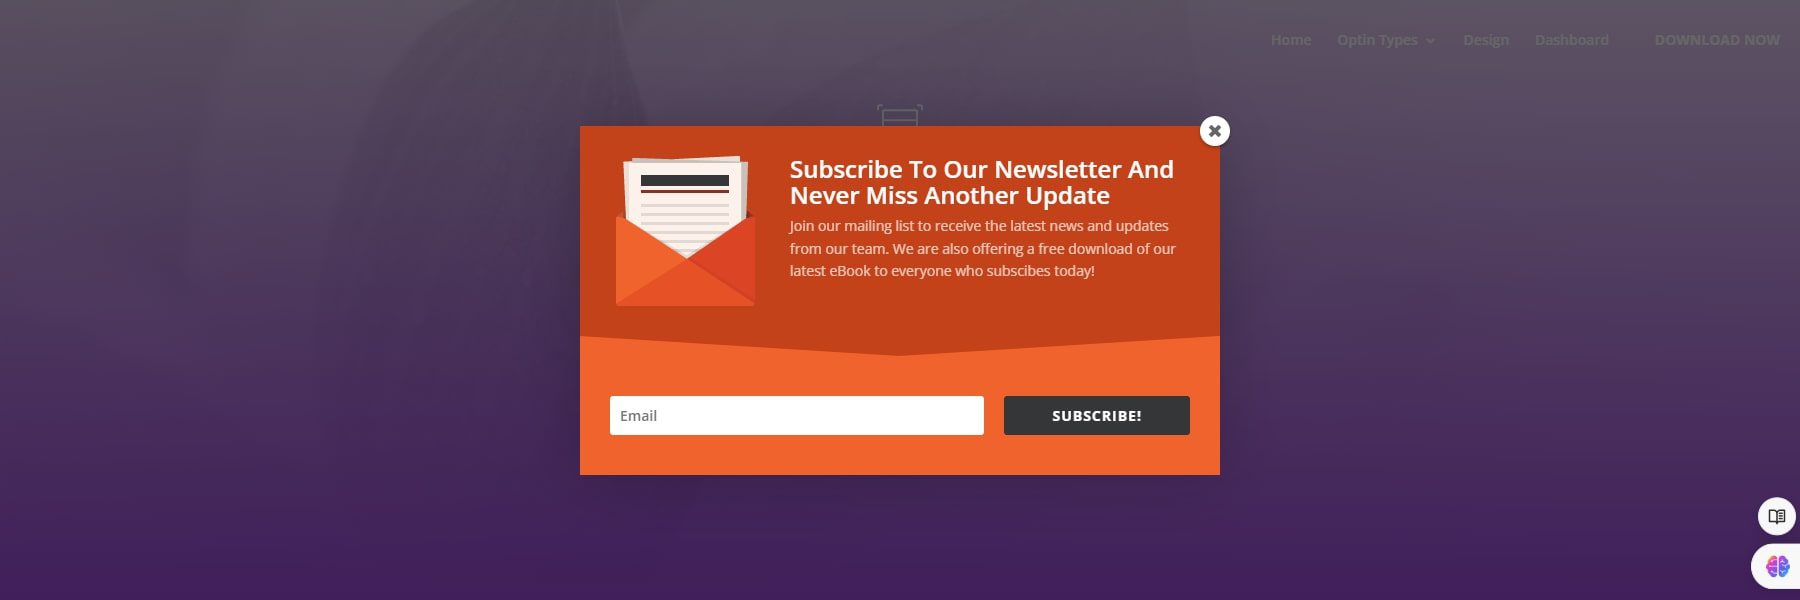
Bloom, an email opt-in plugin by Elegant Themes, helps you create visually appealing and strategically placed email signup forms. Options include pop-ups, fly-ins, and inline forms. Bloom also integrates with popular email marketing services like MailChimp, AWeber, and ConvertKit.
Social Media Sharing
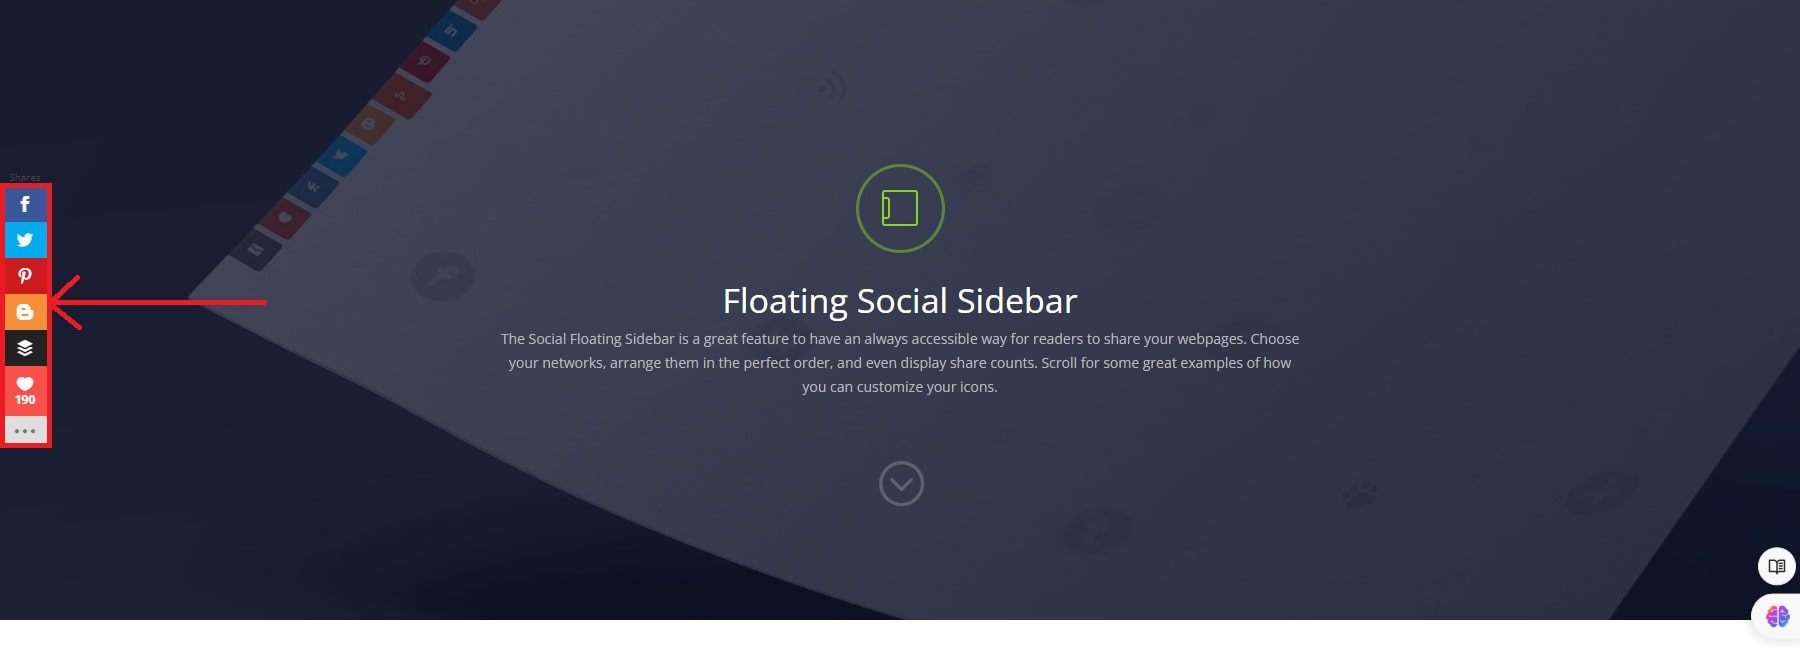
Monarch, also by Elegant Themes, offers a comprehensive solution to add share buttons to your site for social media sharing. You can choose from different placement options, such as a floating sidebar, inline buttons, or media sharing. Monarch supports over 20 social networks and allows customization of the button’s appearance.
Essential WordPress Plugins
Every WordPress site can benefit from essential plugins. Here are a few must-have examples you can use with WordPress:
- SEO Plugins (like Rank Math)
- Backup Plugins (like UpdraftPlus)
- Image Optimization Plugins (like EWWW Image Optimizer)
- Caching Plugins (like WP Rocket)
- Social Media Plugins
- Marketing Plugins
6. Final Steps
Thoroughly test all its features and have a solid backup plan. This will help you prevent potential problems with your portfolio website.
Additionally, test your website across browsers (like Chrome, Firefox, Safari, and Edge) and on various devices (desktop, tablet, and mobile) to provide a consistent user experience. This will help you catch and address any layout or functionality issues that may arise on different platforms.
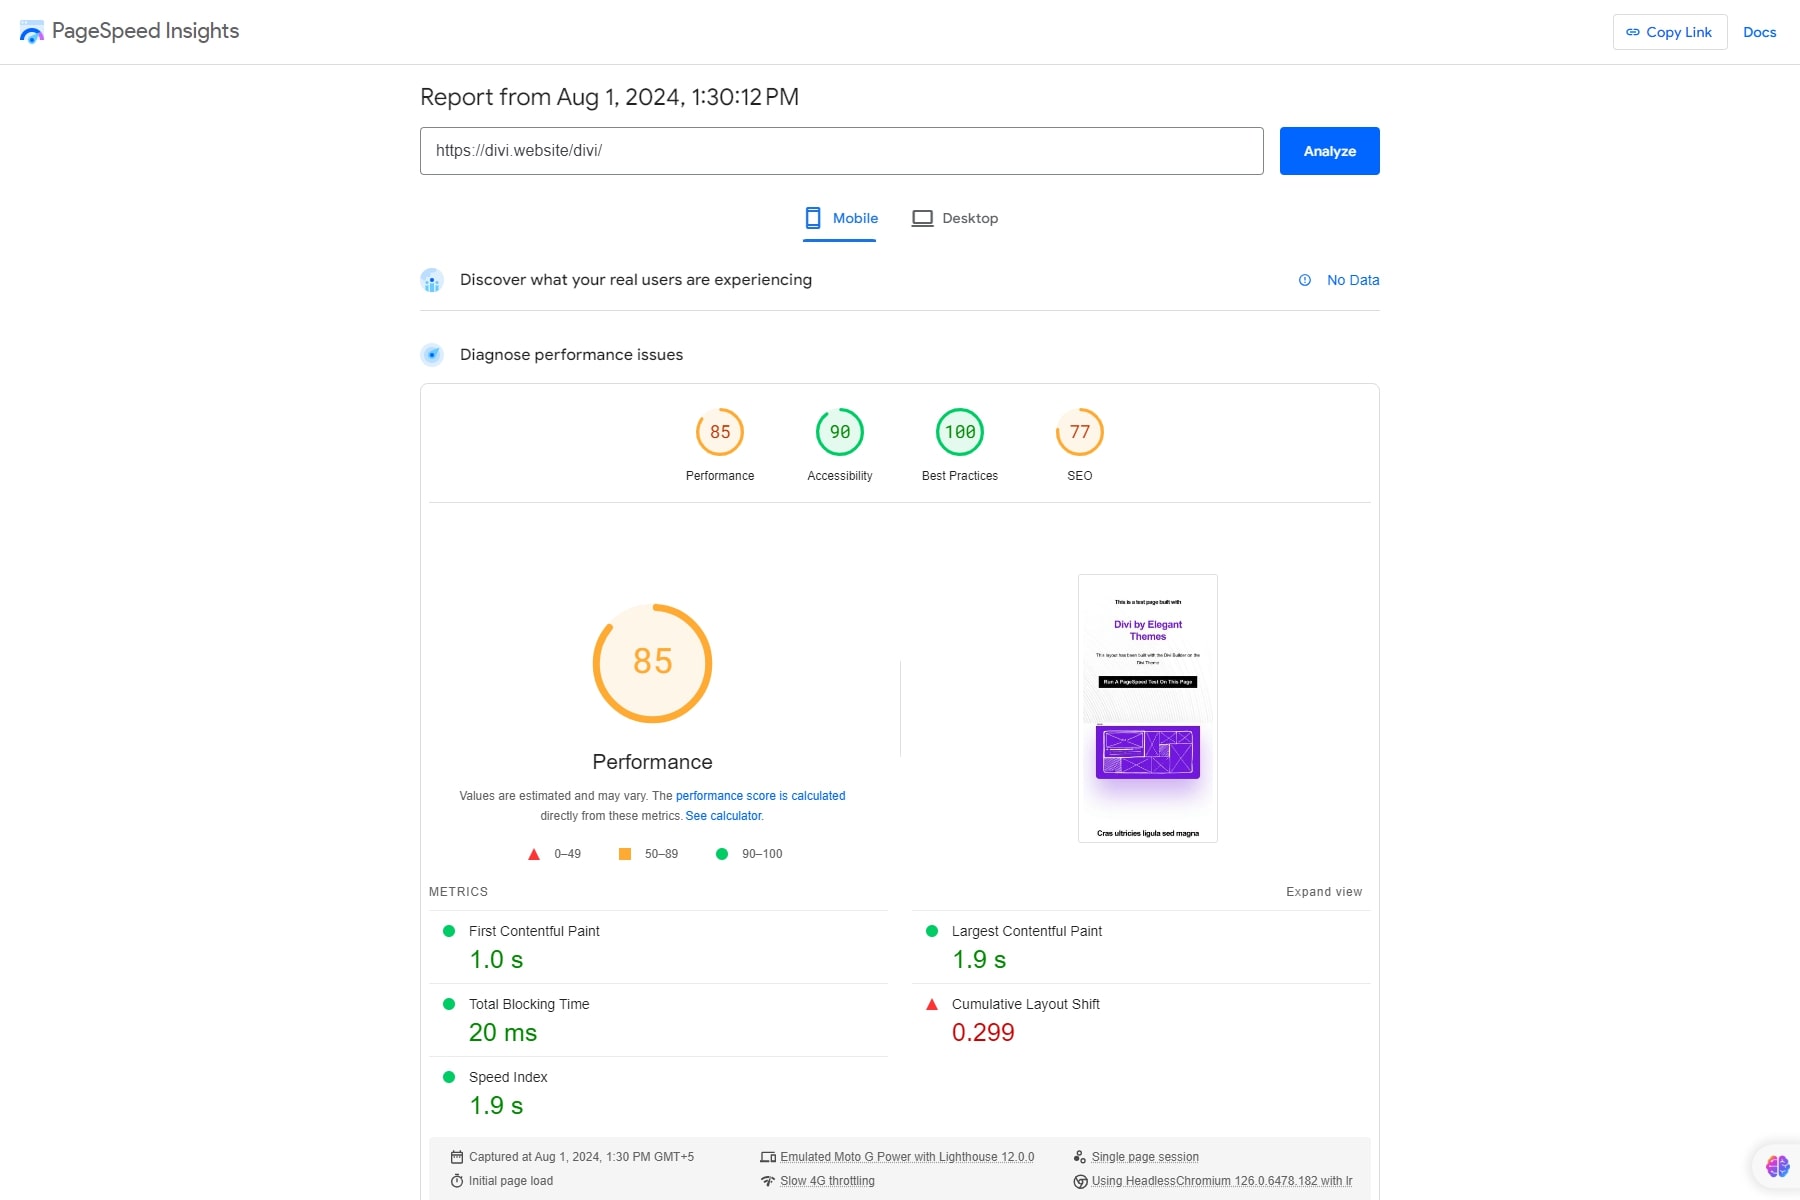
Evaluate your website’s performance and load times using Google PageSpeed Insights or GTmetrix. A fast-loading website offers a better user experience, so optimize images, streamline code, and make other performance improvements as needed.
Finally, don’t forget to create a full backup of your website, including its database and all files. This backup will serve as a restore point in case anything goes wrong during the launch. Plugins like UpdraftPlus can help create and store backups easily.
Divi Makes It Easy to Build a Portfolio Site
Your portfolio website is more than just a digital space—it reflects your brand, skills, and creativity. By focusing on design, functionality, and engagement, you transform your site from a simple showcase into a powerful tool that speaks for you when you’re not there to do so yourself. With the right elements in place, your portfolio can capture attention, inspire action, and open doors to new opportunities, all while staying true to who you are and what you bring to the table.
Interested in building your portfolio website? Start with Divi and explore our curated list of plugins and tools that could benefit your portfolio website.
| Products Mentioned | Starting Price | Description | ||
|---|---|---|---|---|
| 1 | Siteground | $2.99 per month | Hosting Provider and Domain Registrar | Visit |
| 2 | Divi | $89 per year | Theme and Page Builder | Visit |
| 3 | WP Rocket | $59 per year | Caching Plugin | Visit |
| 4 | Rank Math | $78.96 per year | SEO Plugin | Visit |
| 5 | Bloom | $89 per year (Available with an Elegant Themes membership) | Email Optin Plugin | Visit |
| 6 | Monarch | $89 per year | Social Media Plugin | Visit |
| 7 | UpdraftPlus | $70 per year | Backup Plugin | Visit |
Frequently Asked Questions (FAQs)
The post How to Build a Stunning Portfolio Website Quickly appeared first on Elegant Themes Blog.
