Creating a website with Divi is now easier and faster than ever before. With the release of Divi Quick Sites, users can automatically generate a complete website in 2 minutes. To do this, users have two options: generate their site with Divi AI or with Divi Starter Sites. In this post, we are going to explore how to use Divi’s new Starter Sites to jumpstart your project with a fully functional site with everything set up and ready to go. We’ll cover the impressive features and benefits of Divi Starter Sites, how to customize them to fit your brand, and more.
Let’s dive in and get started!
What is Divi Quick Sites?
Divi Quick Sites is a streamlined onboarding experience for Divi with a powerful website generator that can create an entire Divi website in just a few minutes. No need to build pages from scratch or import pages and templates manually. Simply supply your site information and description, and click a button! In seconds, you’ll have a complete website that you can edit and customize with Divi’s easy-to-use visual builder.
Two Ways to Generate Divi Quick Sites
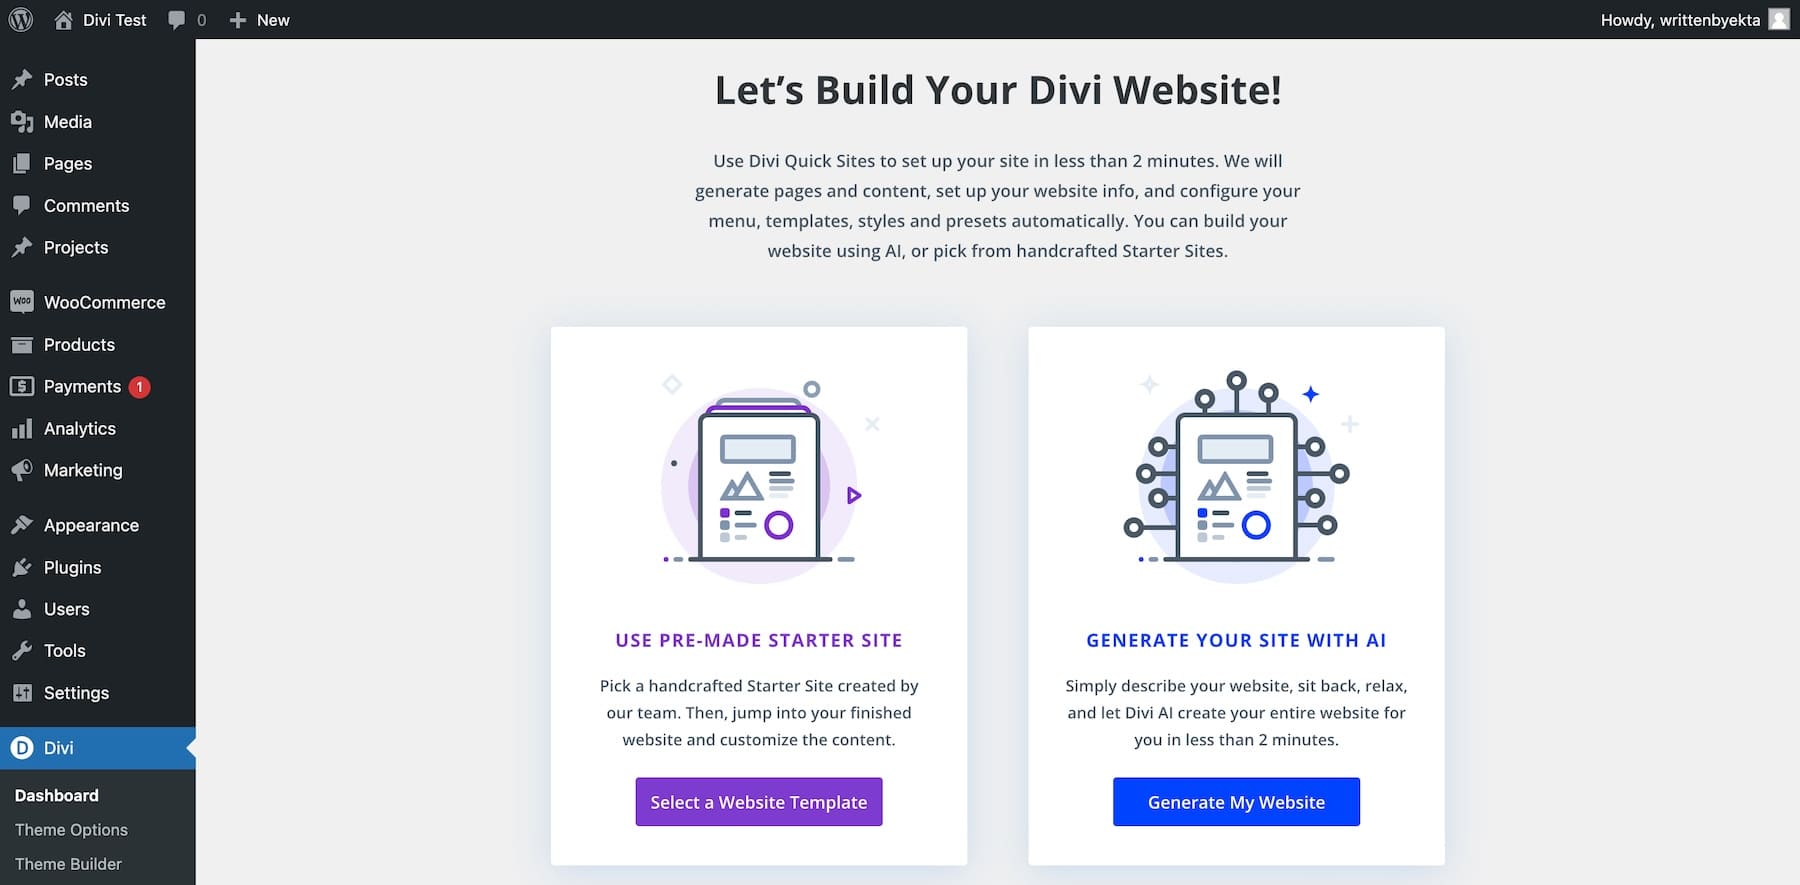
You can generate a website using Divi Quick Sites in two ways:
- Using A Pre-Made Starter Site: You can choose one of our Starter Sites to generate a fully designed, fully functional website to jumpstart your project like a Divi professional.
- Generate Your Site with Divi AI: You can choose to let Divi AI create an entire website from start to finish with real, usable AI-generate content tailored to your brand. Simply provide a description of what site you want, and Divi AI will create a website designed specifically for your brand, including AI-generated content (or copy), images, and design for every page.
Using a Starter Site vs Generating Your Site with AI
Both methods offer a streamlined solution to getting your website up and running. Whether you are using a pre-made starter site or Divi AI to generate your site, the overall process is the same, with a few minor differences.
The main difference between using a Starter Site and Divi AI is that Divi AI generates personalized designs and populates each page with real AI-generated content and images tailored to your brand from the start. That said, using a Starter Site ensures you get a website built by industry-leading web designers. Although Starter Sites are pre-designed, you can easily customize it to make it unique for your brand by adjusting global styles and adding your own content.
It’s important to remember that Divi AI isn’t limited to site generation. It is a powerful AI web design assistant inside the Divi Builder to generate and revise text, images, code, and more. In fact, some may find it best to use a Starter Site and customize the content using Divi AI afterward by adding and revising content and images on the fly within the Divi Builder.
In this post, we’ll concentrate on using pre-made Divi Starter Sites to create your website with Divi Quick Sites. If you want to learn how to generate your site with Divi AI, check out our detailed guide on Divi’s AI Website Builder.
Regardless of the method you choose, Divi Quick Sites is a game-changer for those looking to create high-quality websites with amazing speed and efficiency.
What Are Divi Starter Sites? (Detailed Overview)
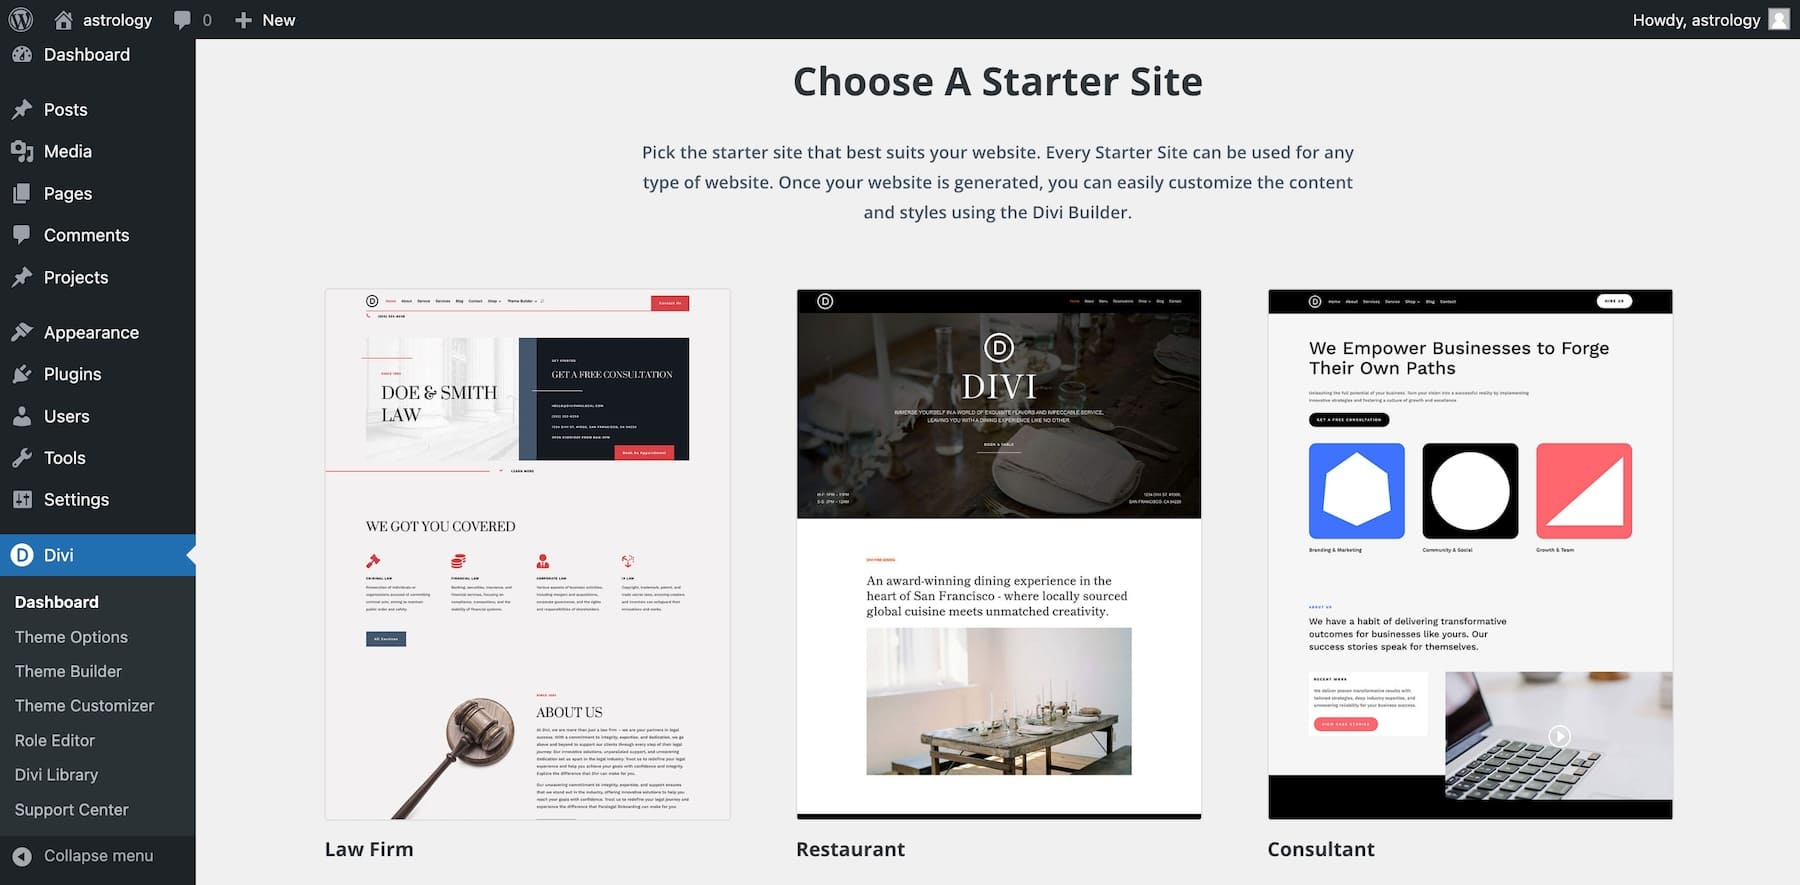
Divi Starter Sites are innovative pre-made websites available in Divi that can be used to quickly generate a complete Divi website in under two minutes. Each Starter Site is professionally designed by our expert team to provide a stunning and fully functional website with everything set up and ready to go.
Starter Sites drastically speed up the process of getting your Divi Website up and running. You won’t have to lift a finger once you choose a starter site to create your new website in Divi. It will automatically add all the pages, dynamic Theme Builder templates, global colors and fonts, hundreds of module presets, and more.
If you want to add an online store, your Starter Site will include WooCommerce (automatically installed) and all related WooCommerce pages and templates.
Plus, all Starter Site images are royalty-free, even for commercial use. A Divi Starter Site is the ultimate setup to streamline your workflow and make it easy to build Divi websites.
What Included in Divi Starter Sites
When you choose a Starter site for your website, you won’t have to build site elements such as headers, footers, menus, or presets by yourself. Everything is already included. Each Starter Site will have unique designs, layouts, and pages that cater to its niche. However, in general, each Starter Site will include the following:
Core Web Pages and Navigation Menu
Divi Quick Sites creates all the essential pages included in the Starter Site, including home, about, contact, etc., to streamline the initial setup and provide all the fundamental pages your website needs.
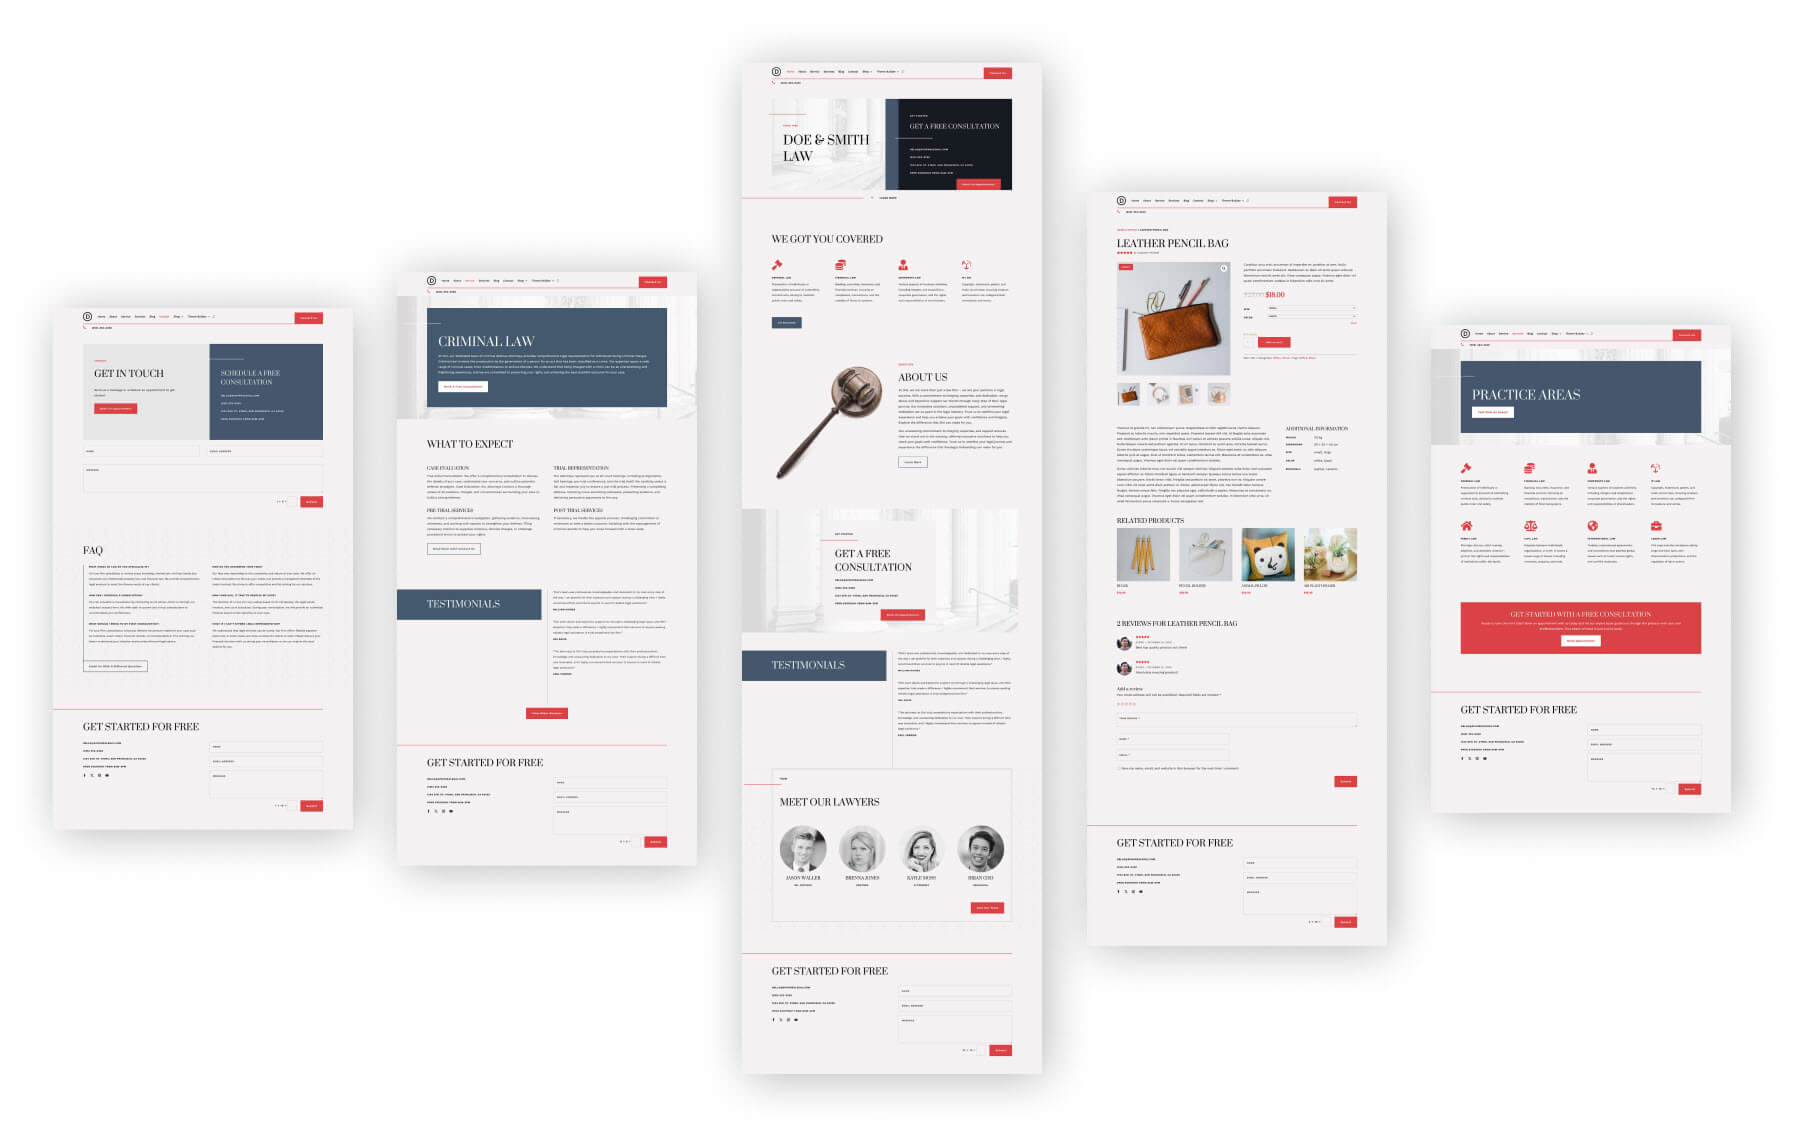
Example of Divi’s Law Firm Starter Site core pages
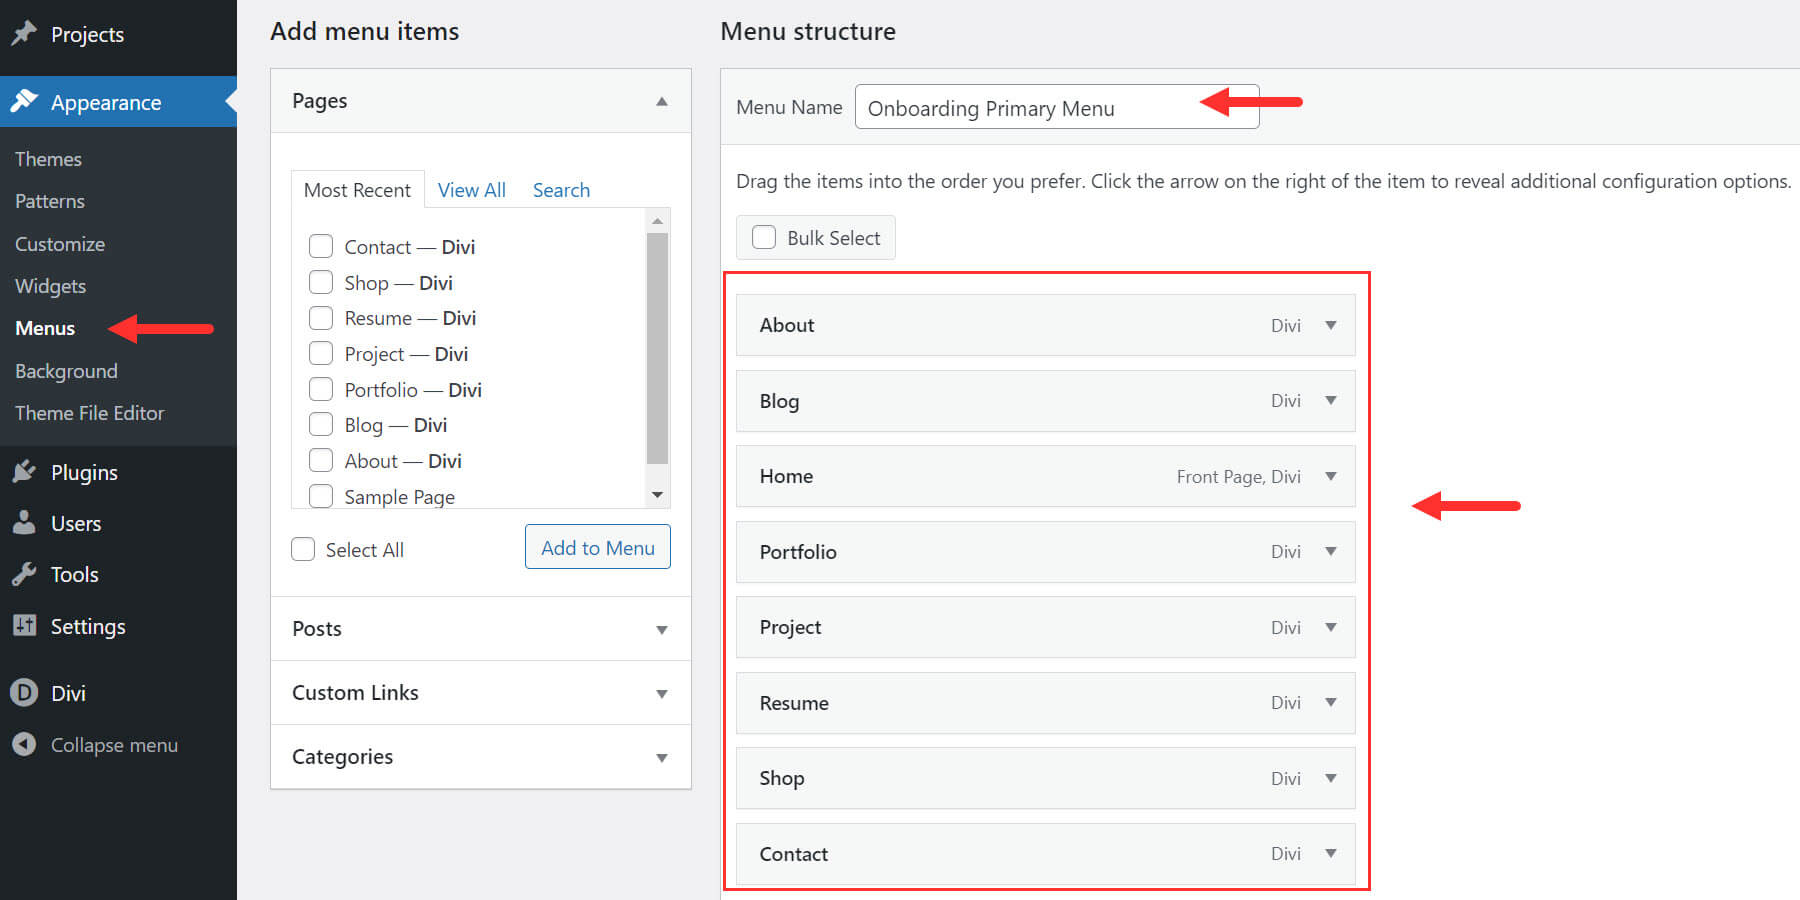
As an added bonus, you’ll also have a primary navigation menu created in WordPress for each of the core pages that will already be active on your custom header. So you can navigate your site right away on the front end.
WooCommerce Integration
When you select to include a Shop page for your Starter Site, WooCommerce will install automatically and pre-designed WooCommerce pages and templates will be added for a fully functional online store.
You can easily customize the content and design using the existing Divi WooCommerce modules used throughout the Starter Site.
Dynamic Theme Builder Templates
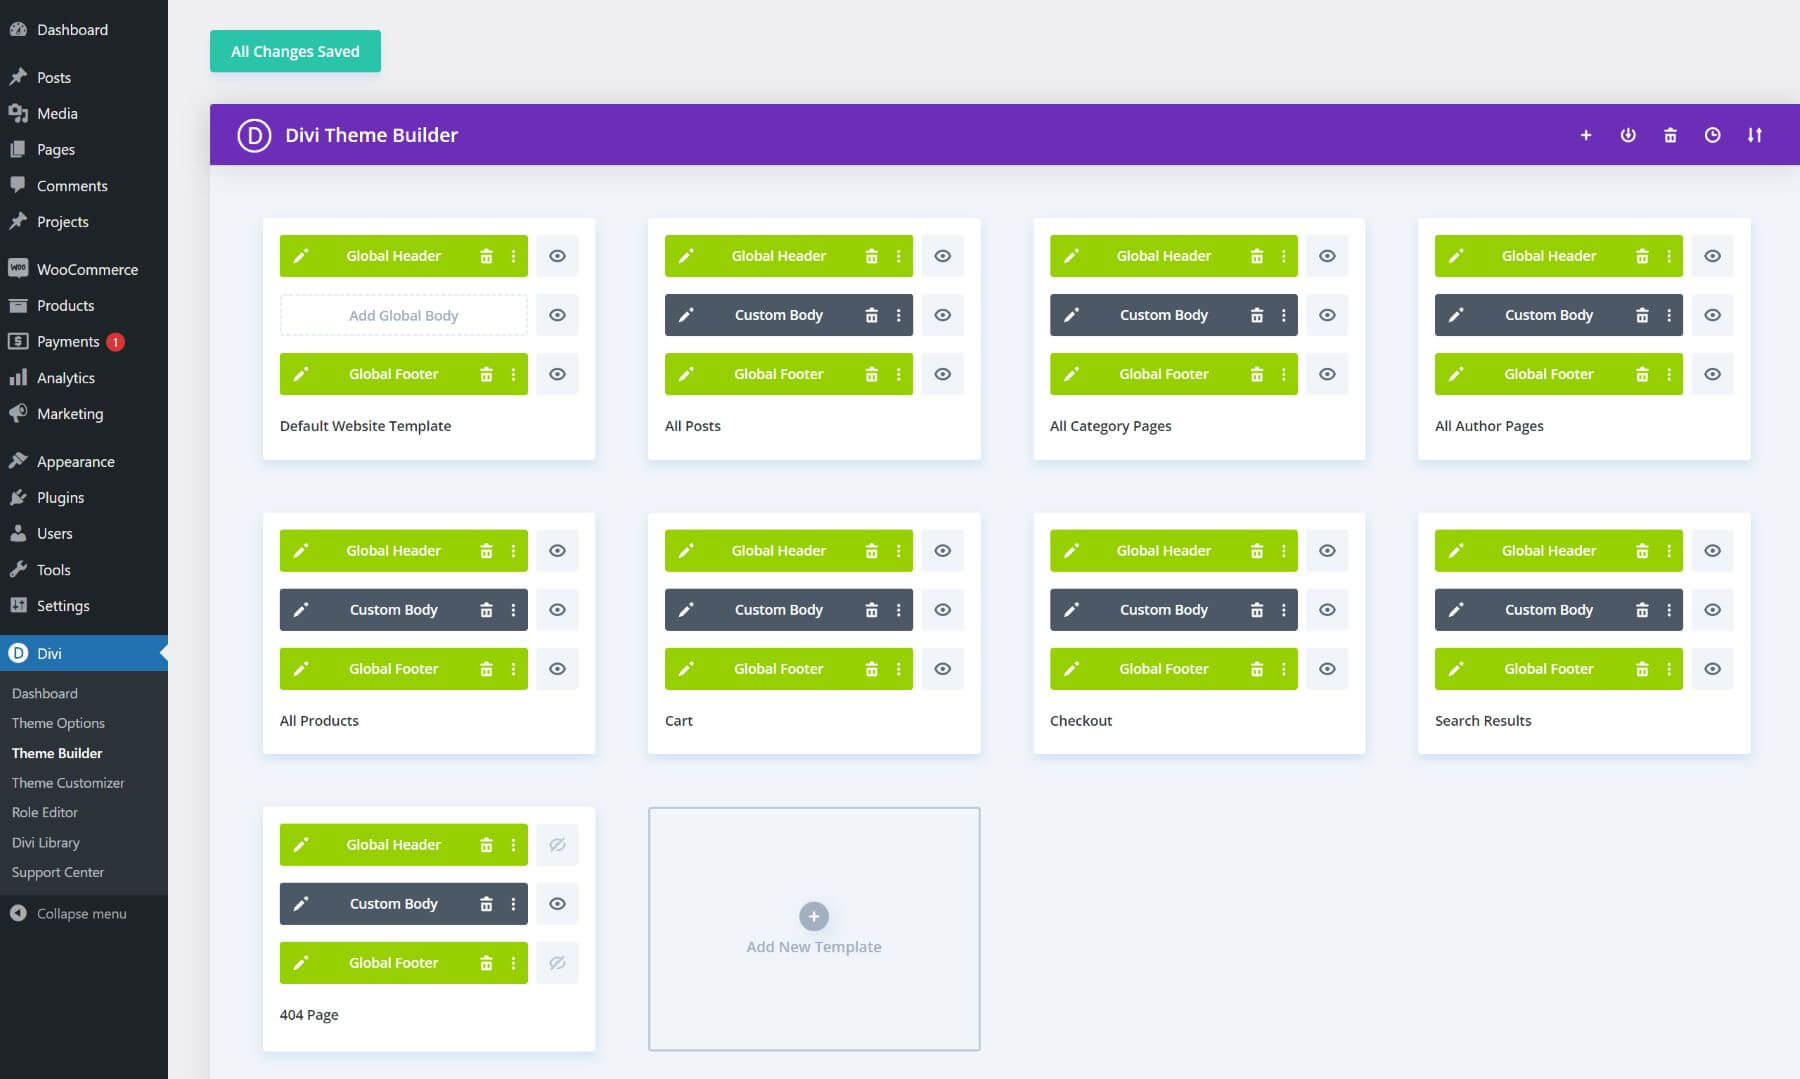
Divi Quick Sites replicates the selected Starter site design and generates all the Theme Builder templates to maintain a global look for your website brand. Here are some common Theme Builder templates included:
- Default Website Template: includes a custom Header and Footer template for your entire site.
- All Posts: Consistent and attractive blog layout for individual posts
- All Category Pages: displays all blog posts for a category dynamically
- WooCommerce Page Templates
- All Products: Stunning template for displaying your individual products
- Cart: an optimized WooCommerce Cart Page design
- Checkout: a streamlined WooCommerce Checkout Page design
- All Author Pages: Showcase contributors on blog author pages
- Search Results: Easy navigation with a search results page
- 404 Page: A user-friendly 404 page template.
Global Styles and Divi Presets
Each Starter Site is built with Global Styles and Divi Presets already in place. That means your site will have reusable components (sections, rows, modules, etc.) that share global colors, fonts, and layouts. This setup makes it a lot easier to keep your design consistent when adding new elements or editing fonts and colors site-wide.
It’s also great for beginners who don’t know how to set up global styles and presets on their own. Your Starter Site will do it automatically—all you need to do is make the changes.
Global Fonts and Colors
Customizing your Starter Site to match your brand is easy. You won’t have to waste time changing each color or font style for every element on every page. Your starter site will have Global colors and fonts already set. You can edit Global Colors or Global Fonts when editing an element in the Divi Builder. Updating a global color will update every instance it is used site-wide.
Global Presets
Divi Presets are preset designs that can be saved and assigned to elements (like a button) so that they share the same default design. So when you edit a preset design for that element, it updates all other elements with that preset. All modules used to build your Starter Site will come with global presets already created. This makes it easy for you to make style changes to all your headings, buttons, images, blurbs, etc. simply by editing the preset.
If you’ve ever built a website, you know how valuable these Starter Sites can be with all of these tasks taken care of for you.
Examples of Starter Sites You Can Use
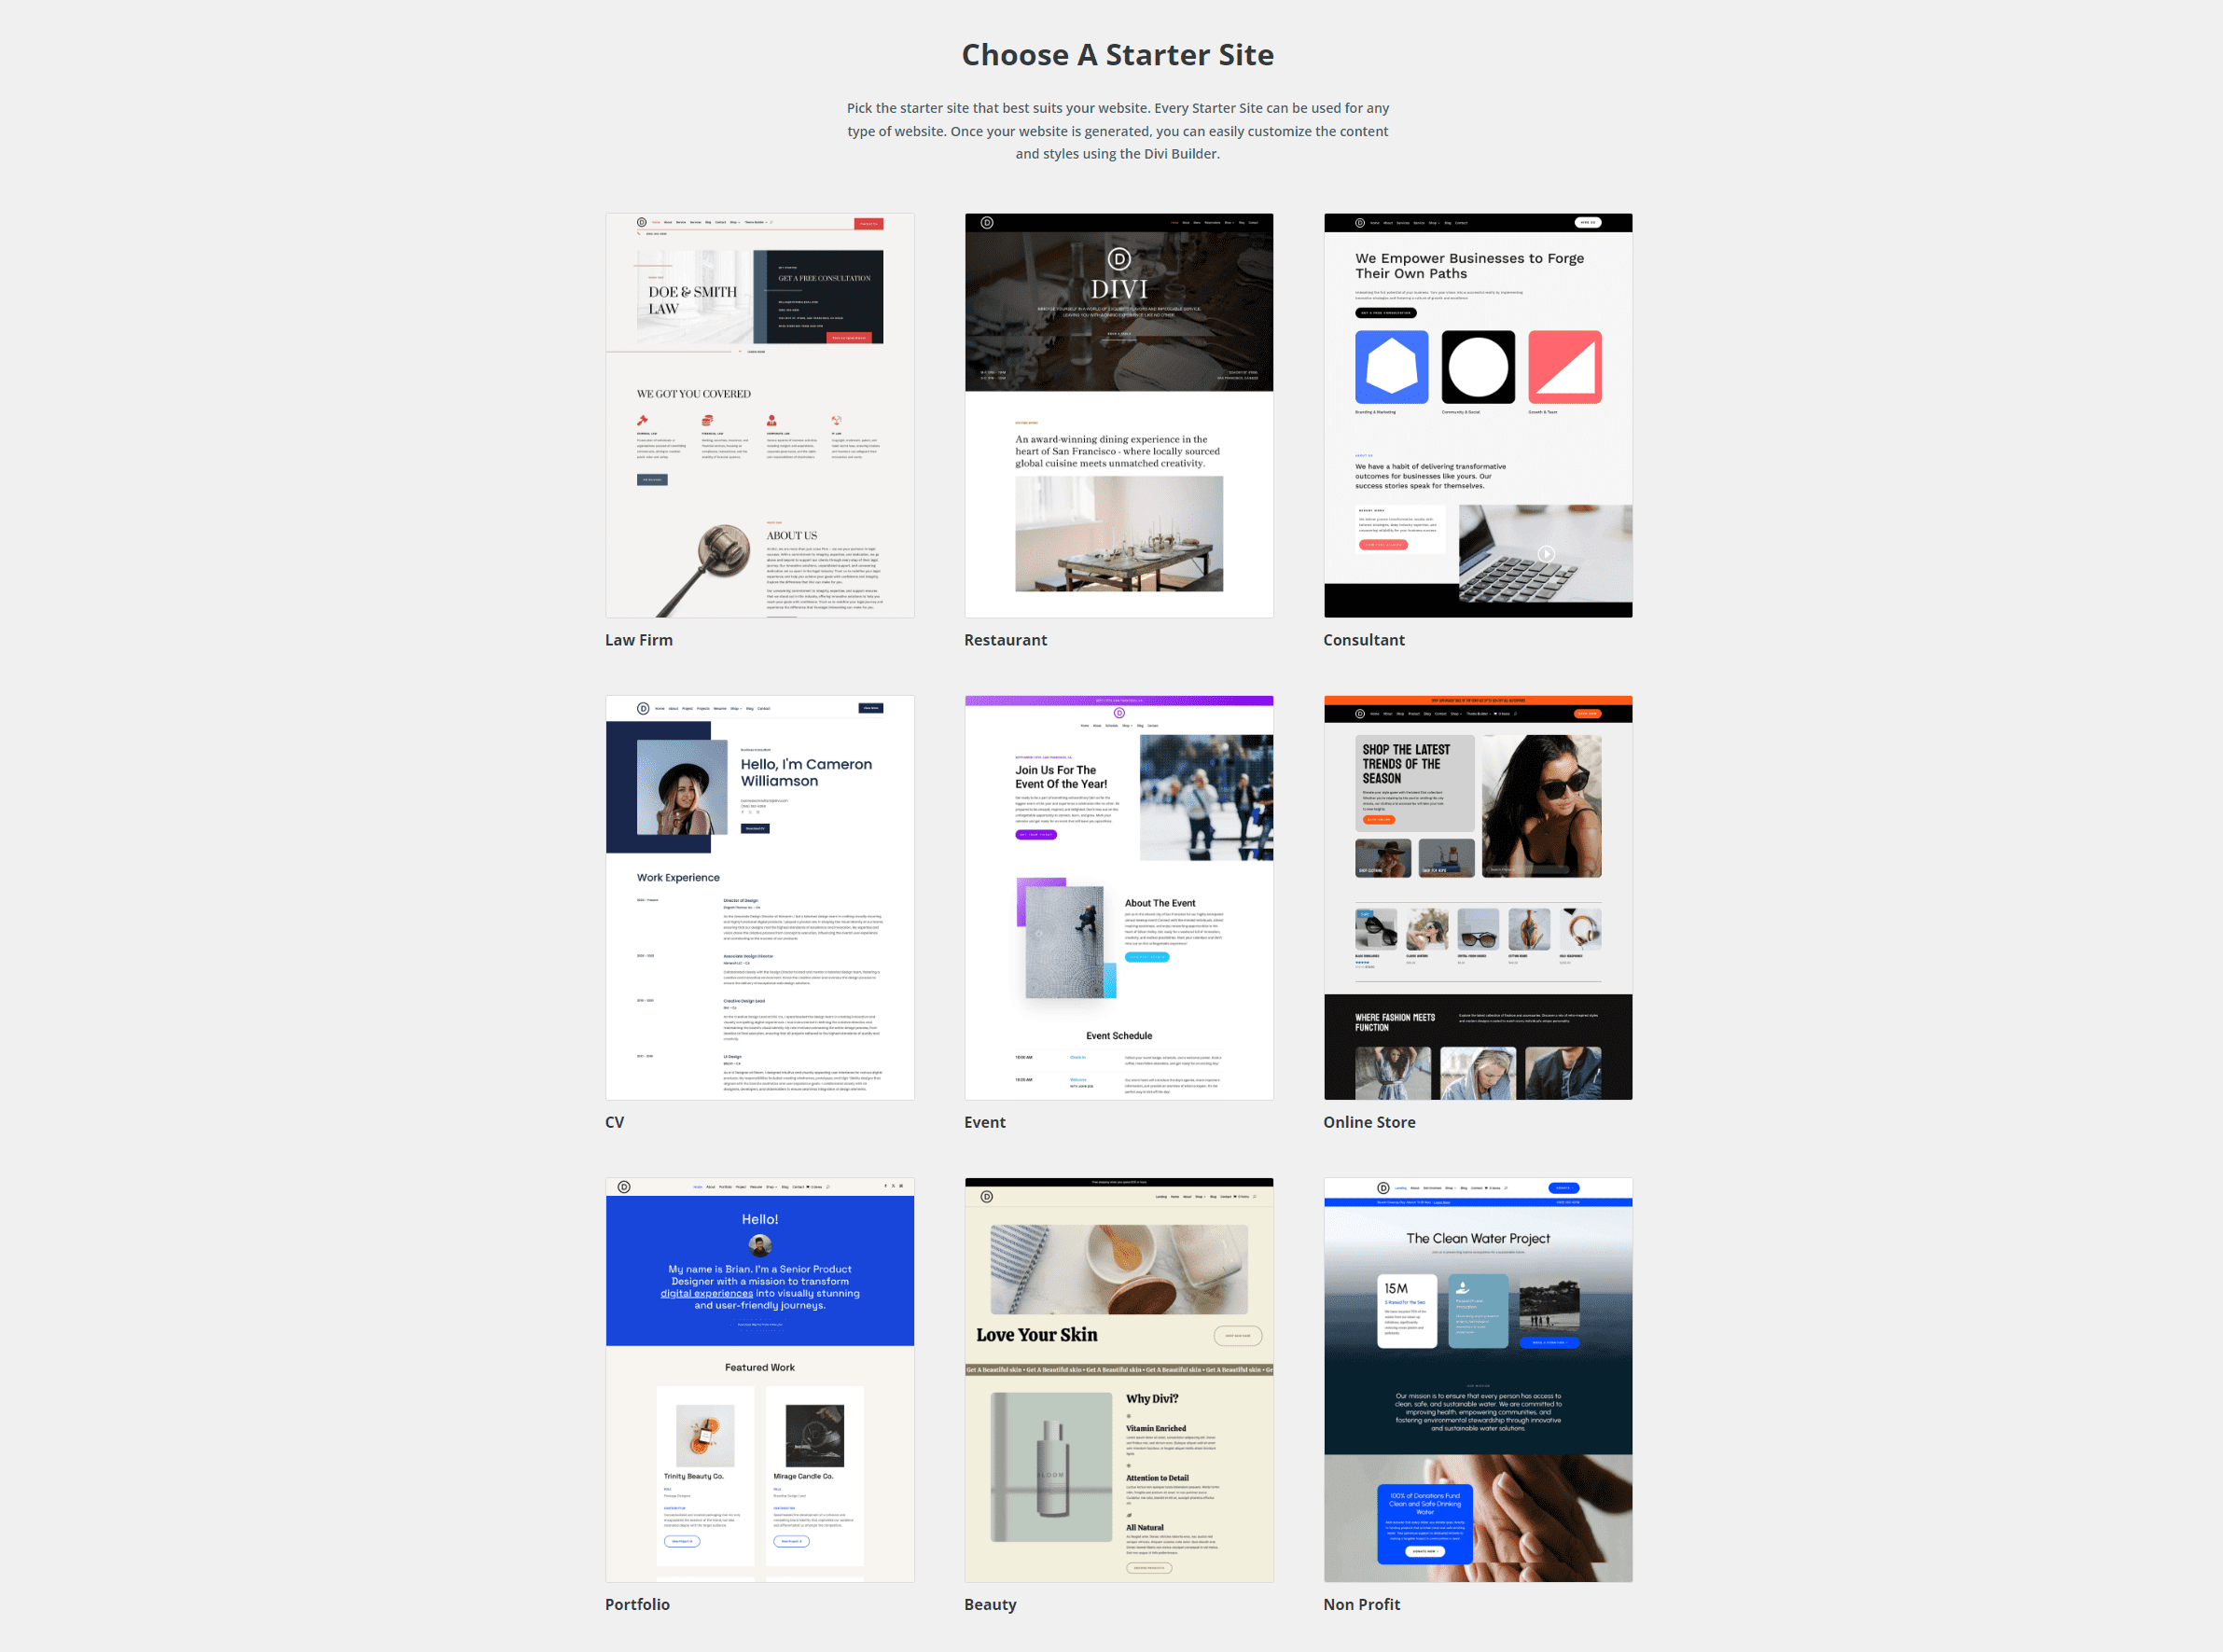
We’ve created Starter Sites for different industries and purposes, such as Law Firm for legal websites, Restaurant for hotel websites, Consultant for individual service providers, etc., but these can be customized for any industry. We’re also building new Starter Sites regularly to cover more industries.
Let’s look at some example Starter Sites that are available:
Law Firm
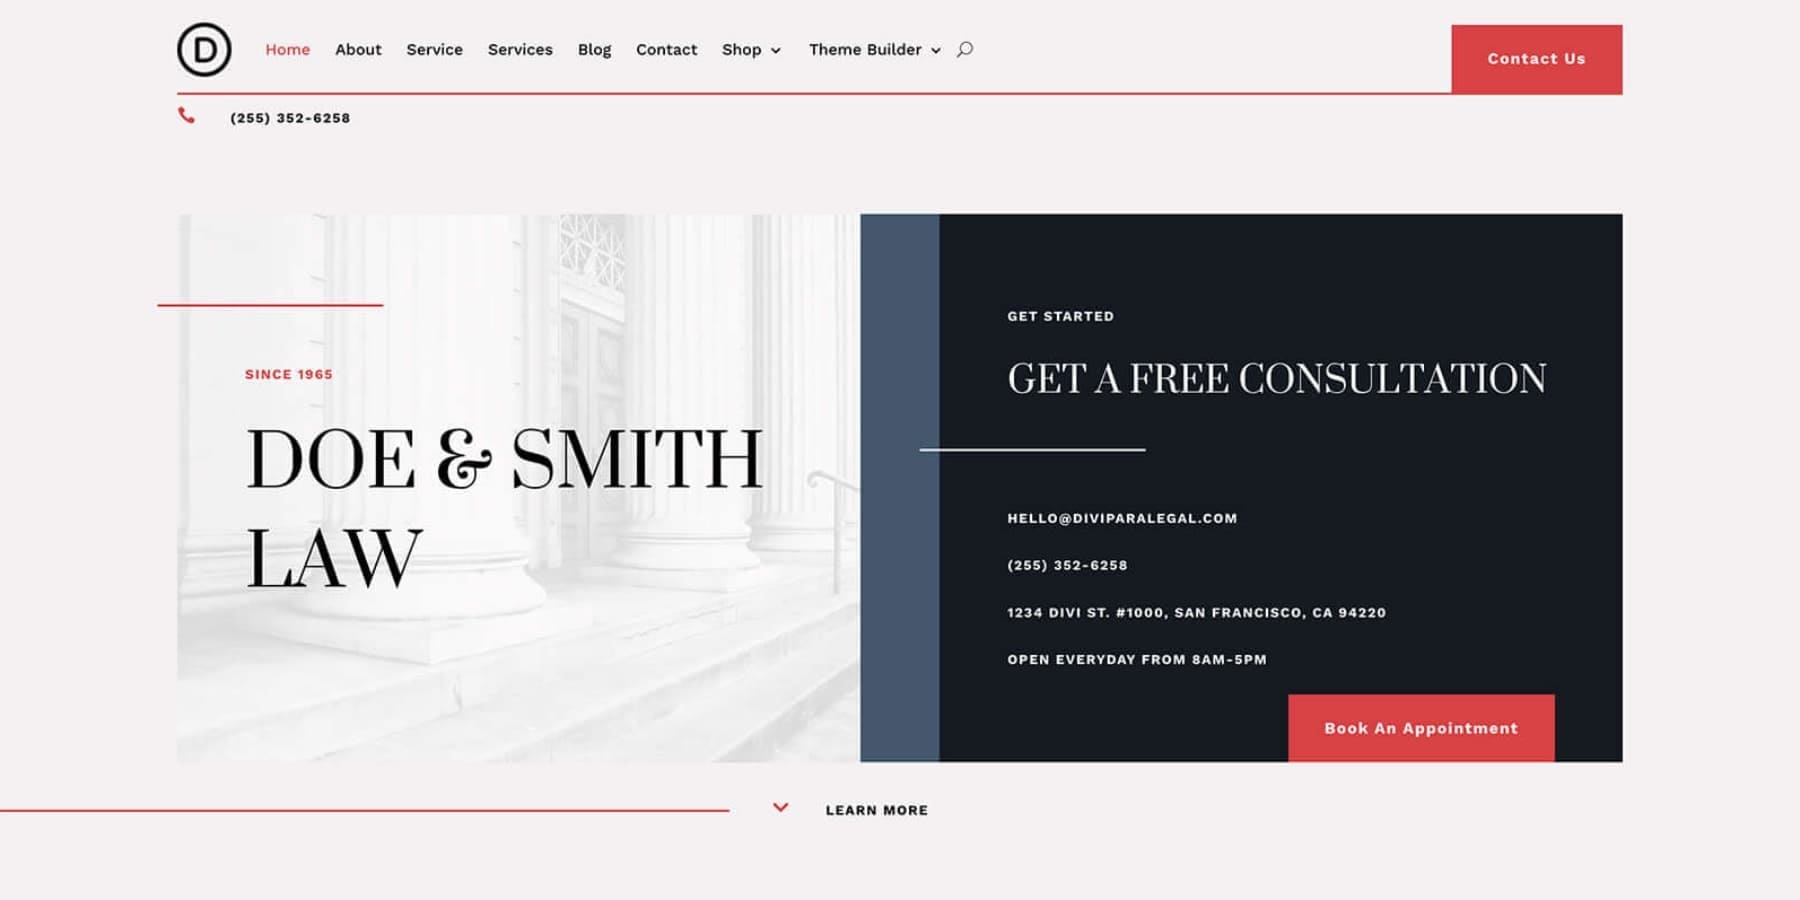
The Law Firm Starter Site is ideal for legal professionals who want to position themselves as experts in the industry. The website design is modern, with a minimal look, unique images, beautiful pages, and standout elements such as testimonials to build credibility and contact forms to receive client requests.
Online Store
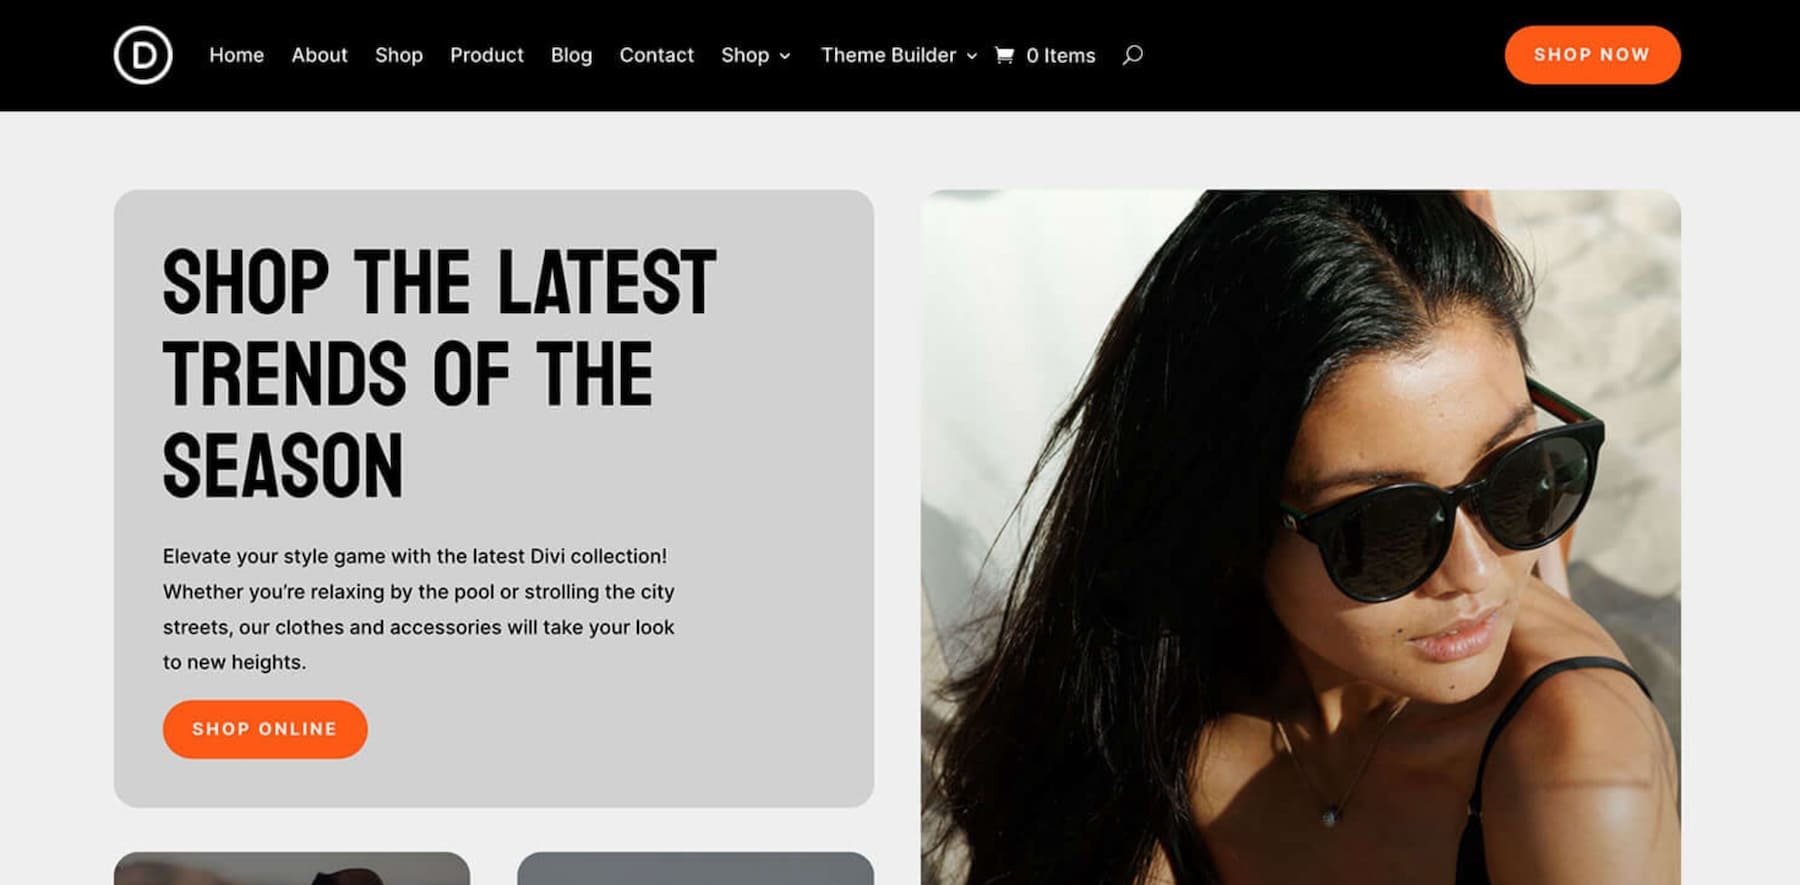
The Online Store Starter Site is suitable for e-commerce business owners who want to build an online store quickly. This Starter Site, combined with automatic WooCommerce installation and configuration, makes it easy to establish a trendy online shop without much effort.
Portfolio
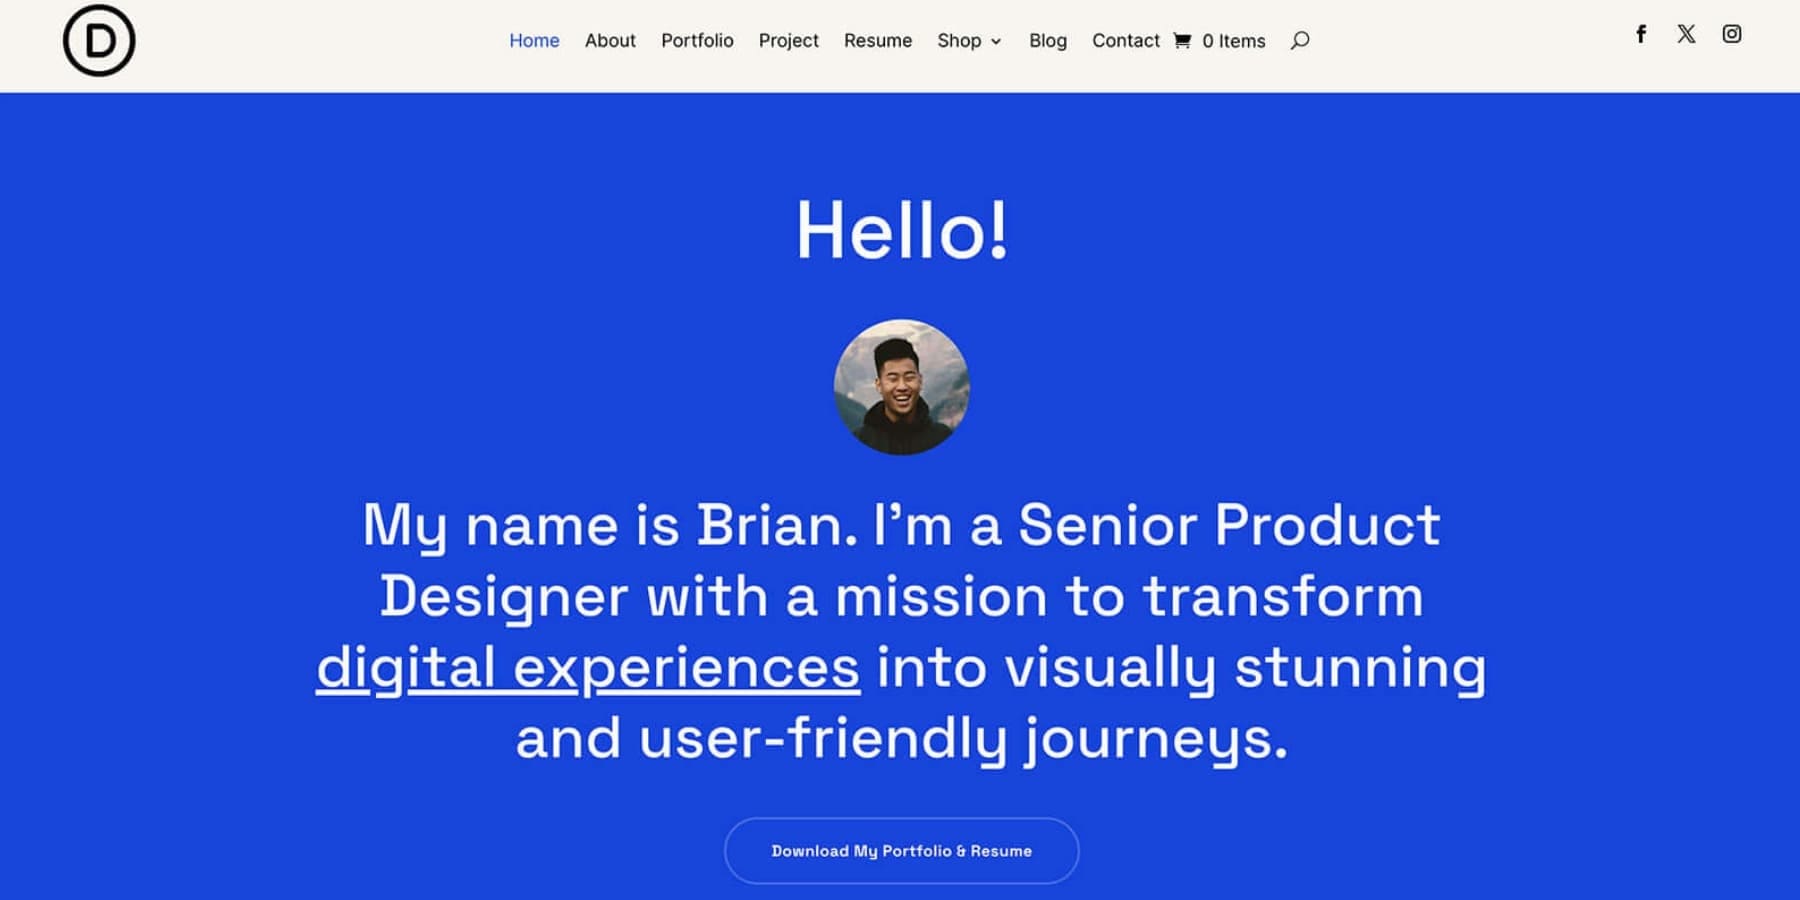
The Portfolio Starter Site is for individual service providers who want to build a striking online presence with a portfolio to showcase their work. The template includes relevant pages with a bold look that can be customized to suit your brand and build a stand-out online presence.
Event
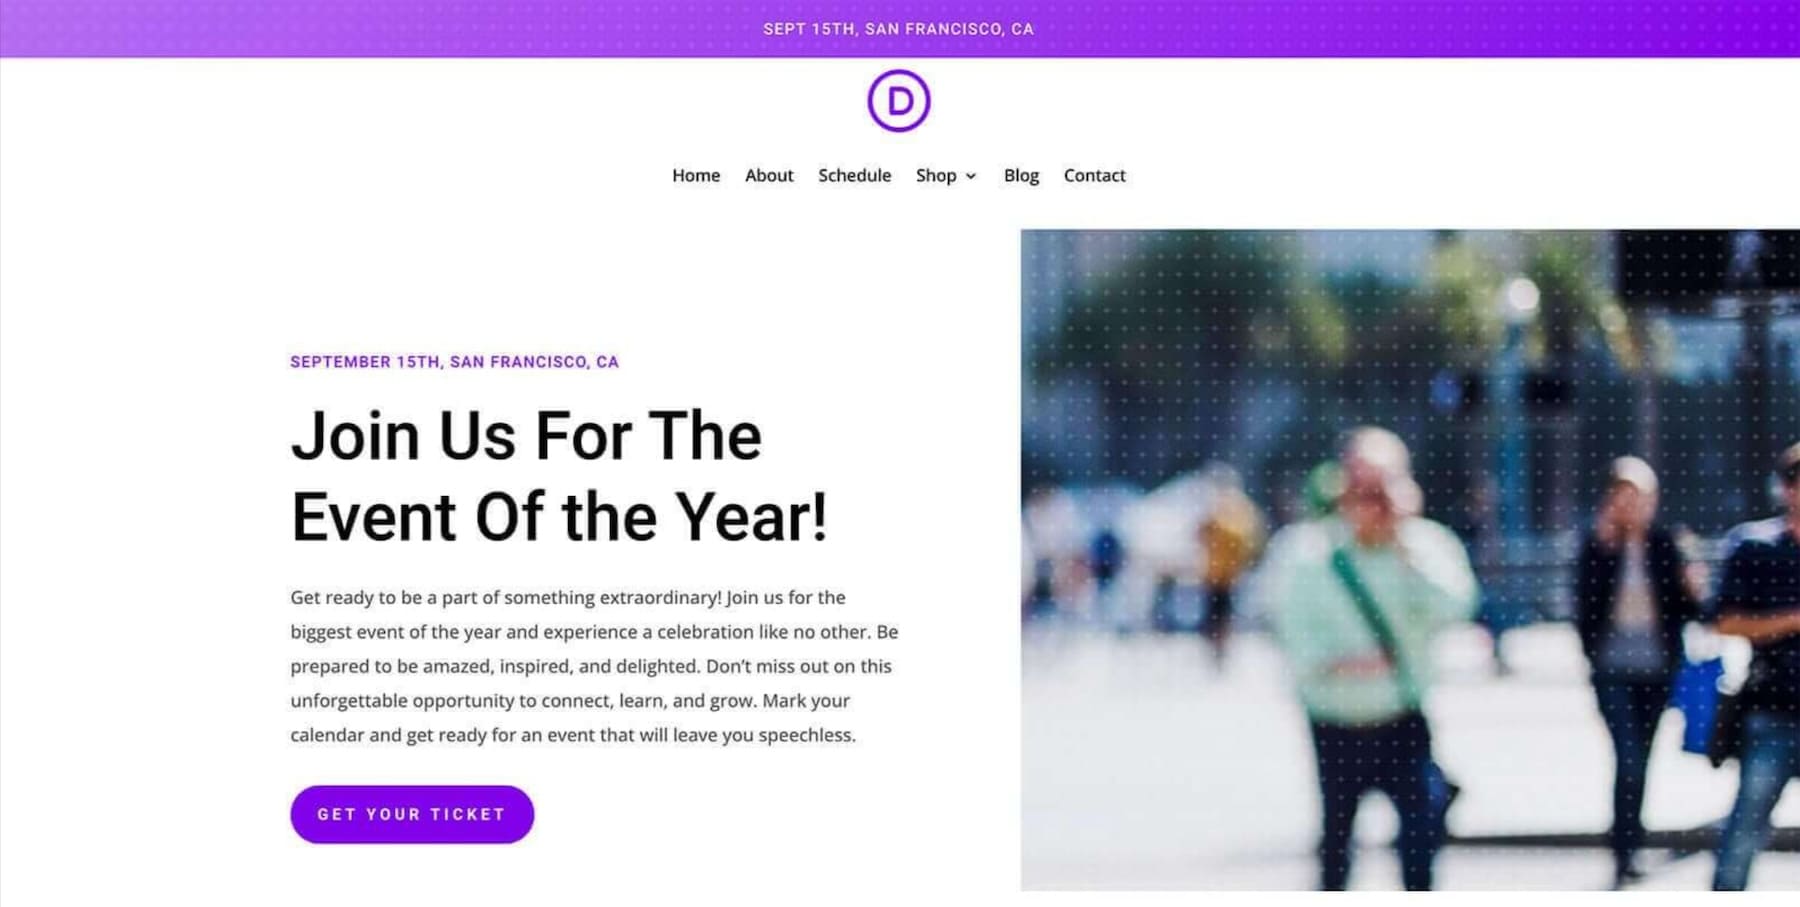
The Event Starter Site template includes home, about, calendar, shop, blog, and other relevant pages for those who need a stylish website to announce and schedule events. It includes calendar and payment integration to allow easy ticket booking for visitors. The website provides a shop page template to sell event merchandise and other products.
Beauty
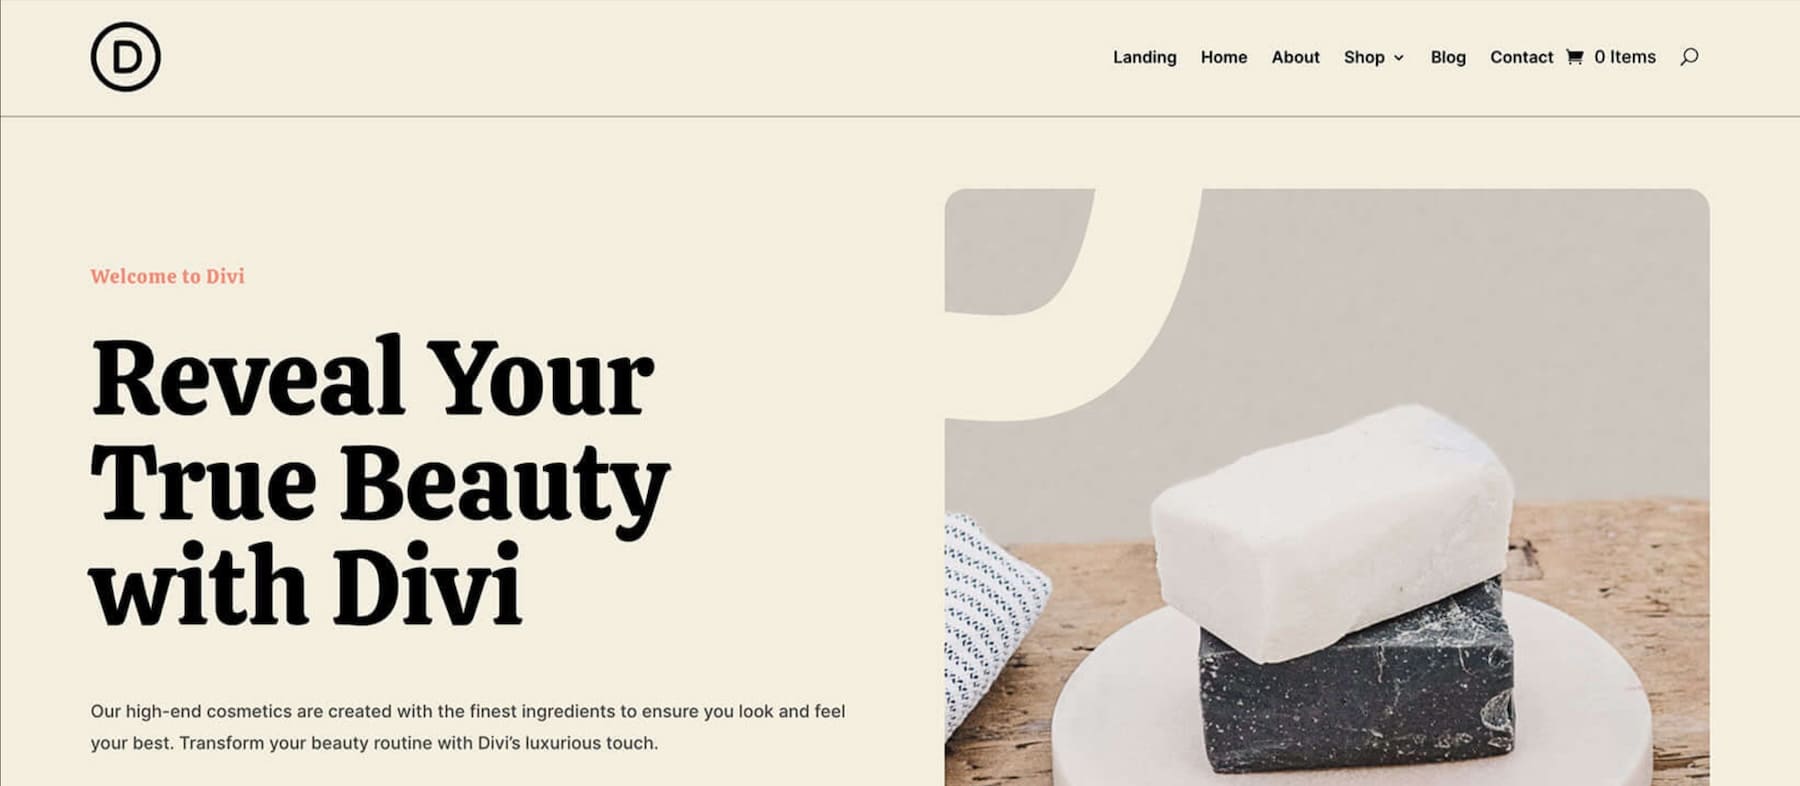
The Beauty Starter Site is perfect for starting a beauty brand online. Its beautiful font and color combination give a modern and stand-out look—ideal for new brands trying to establish an online presence. With this site template, you can turn on the e-commerce option to automatically allow Divi Builder to create shop, checkout, and product pages.
Consultant
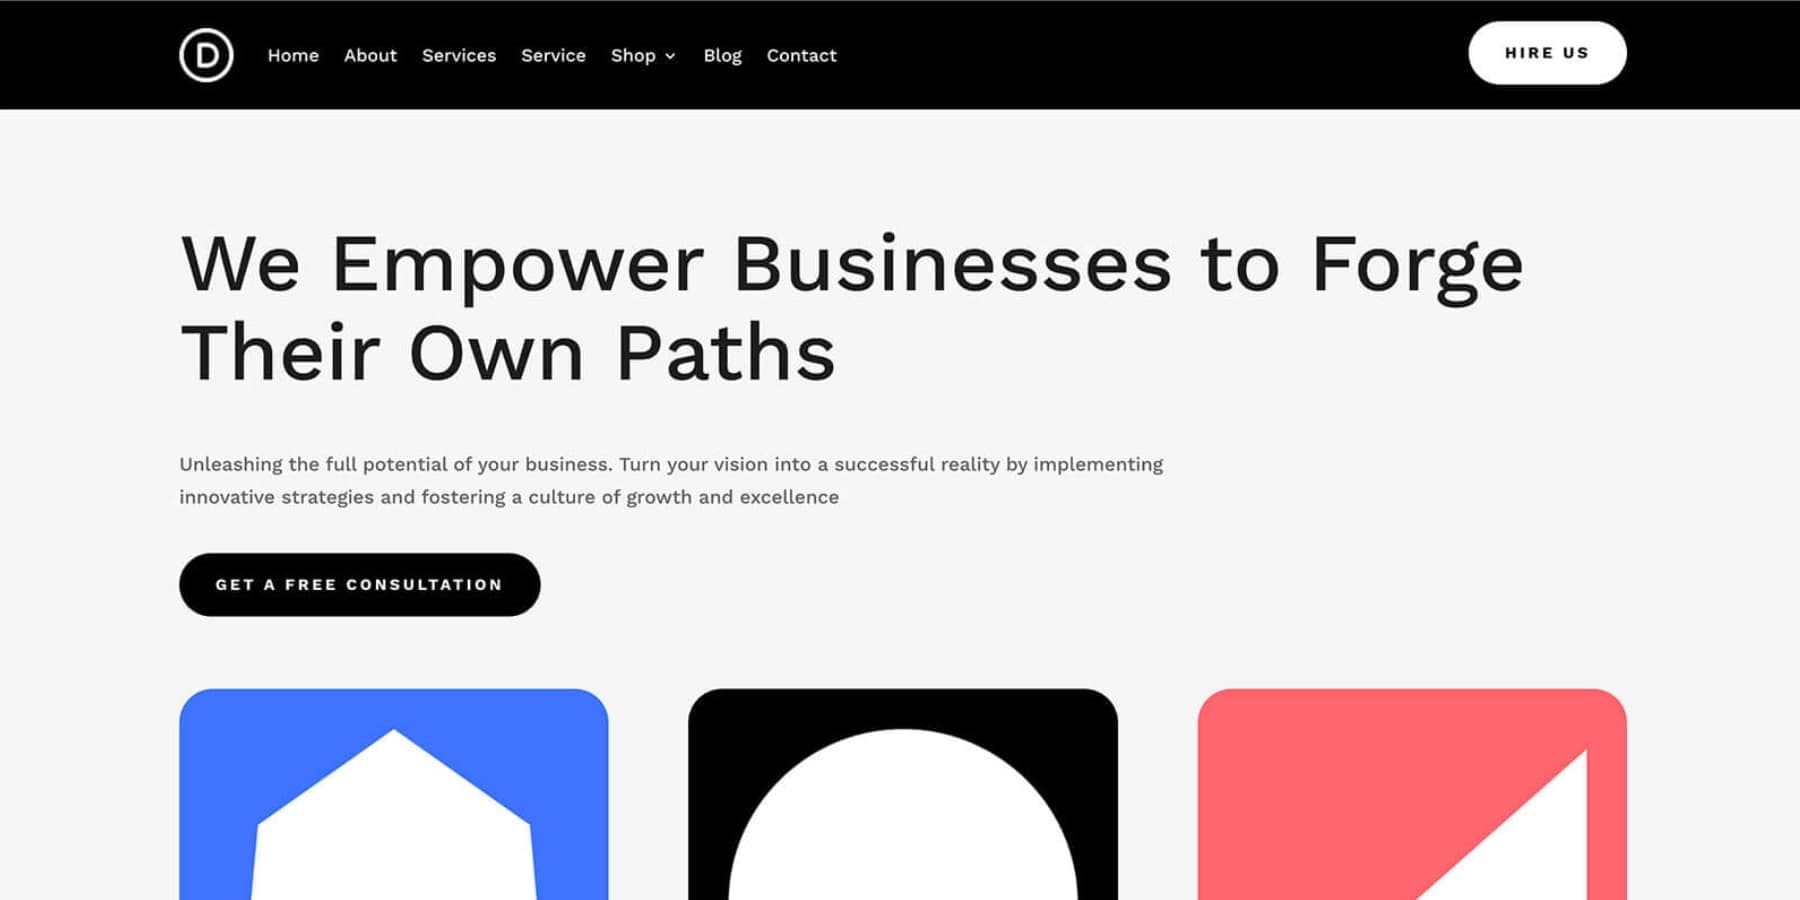
The Consultant Starter Site is ideal for service providers, especially agencies and freelancers. It features a clean, professional design with clear organization. A user-friendly top navigation bar provides easy access to critical sections: Home, About, Services, Shop, Blog, and Contact. Serif-font headings add elegance, while sans-serif body text ensures readability.
These are just a few of our Starter Sites. We’ll keep adding more to the list, so keep an eye out for new Starter Sites.
Start Building Your Starter Site
How to Use Divi Starter Sites to Create a New Website
To create a new website using Divi Quick Sites and Starter Sites, you’ll need a WordPress site set up with a hosting provider. If you need help, check out how to install WordPress. And if you are looking for a hosting company for Divi, we recommend Siteground.
1. Purchase and Install Divi
Once you have a WordPress website running, you can purchase a Divi membership and install Divi.
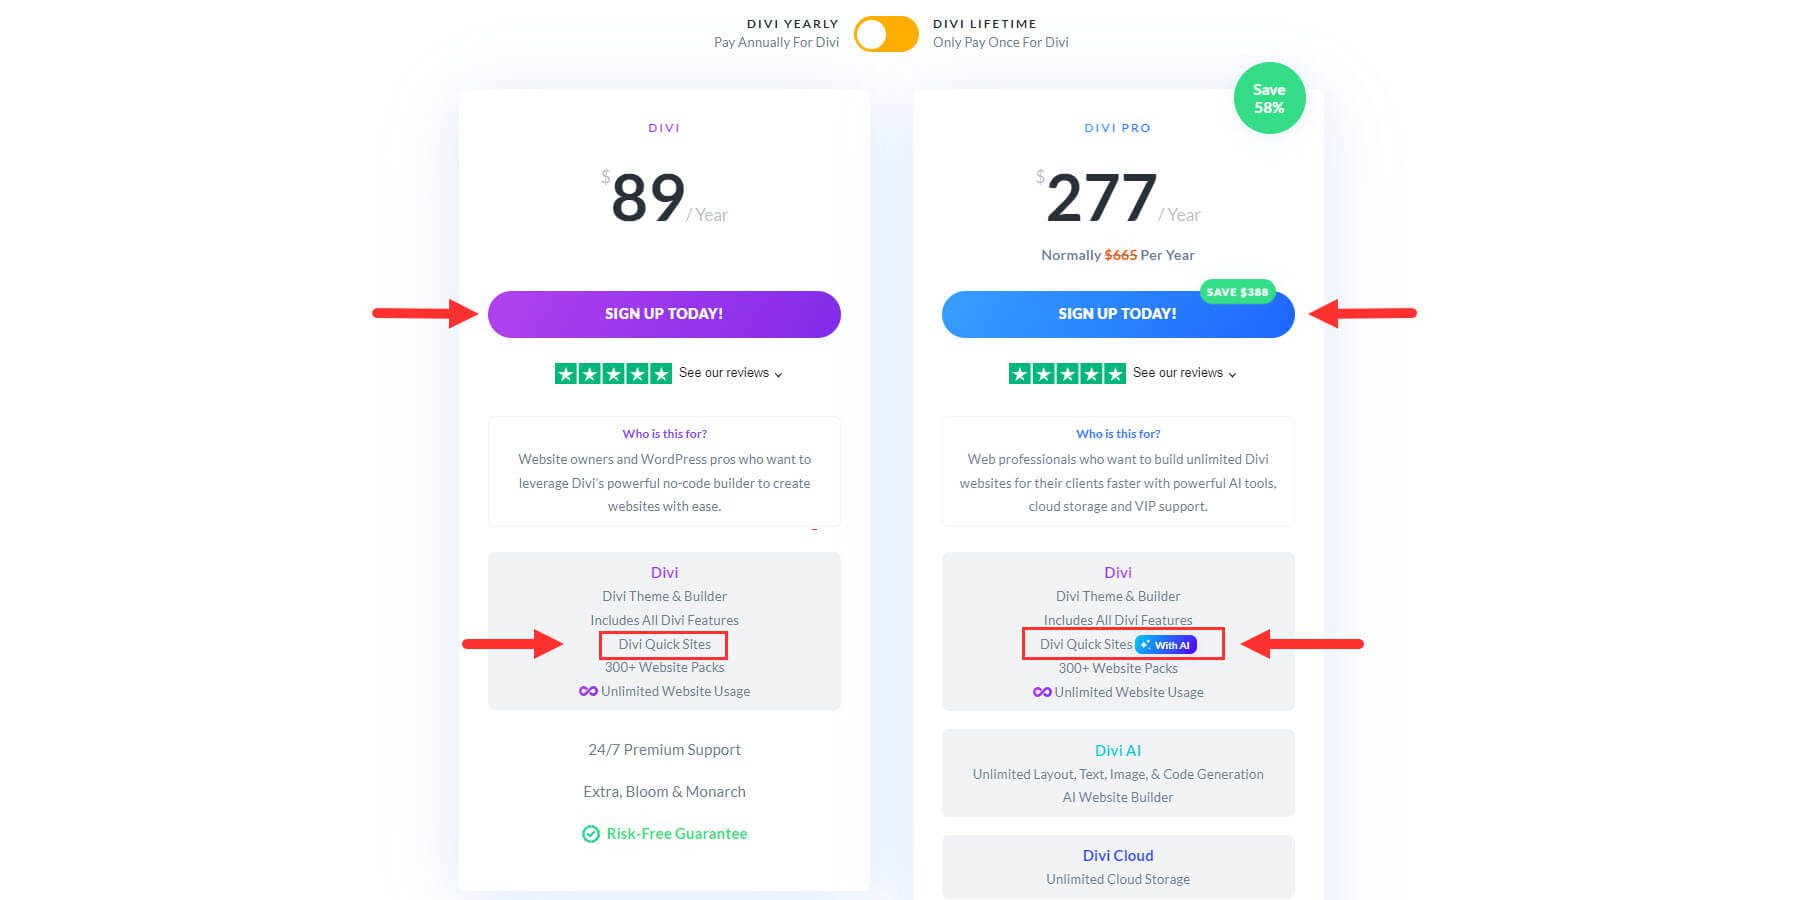
Divi Quick Sites and Divi Starter Sites are core features of Divi so existing users will have immediate access to this feature.
Are you new to Divi? You’ll need to purchase a Divi membership to get access to Divi. A standard Divi membership will give you access to Divi Quick Sites as well as all our Starter Sites.
If you want to use Divi Quick Sites with Divi AI, you’ll need an active Divi AI membership which you can purchase here. Divi AI is also included with Divi Pro which gives you our entire suite of Divi products at a discount.
Click the button below to get started.
Download and Install Divi
Once you’ve purchased the Divi theme, download it from your Elegant Themes members’ area.
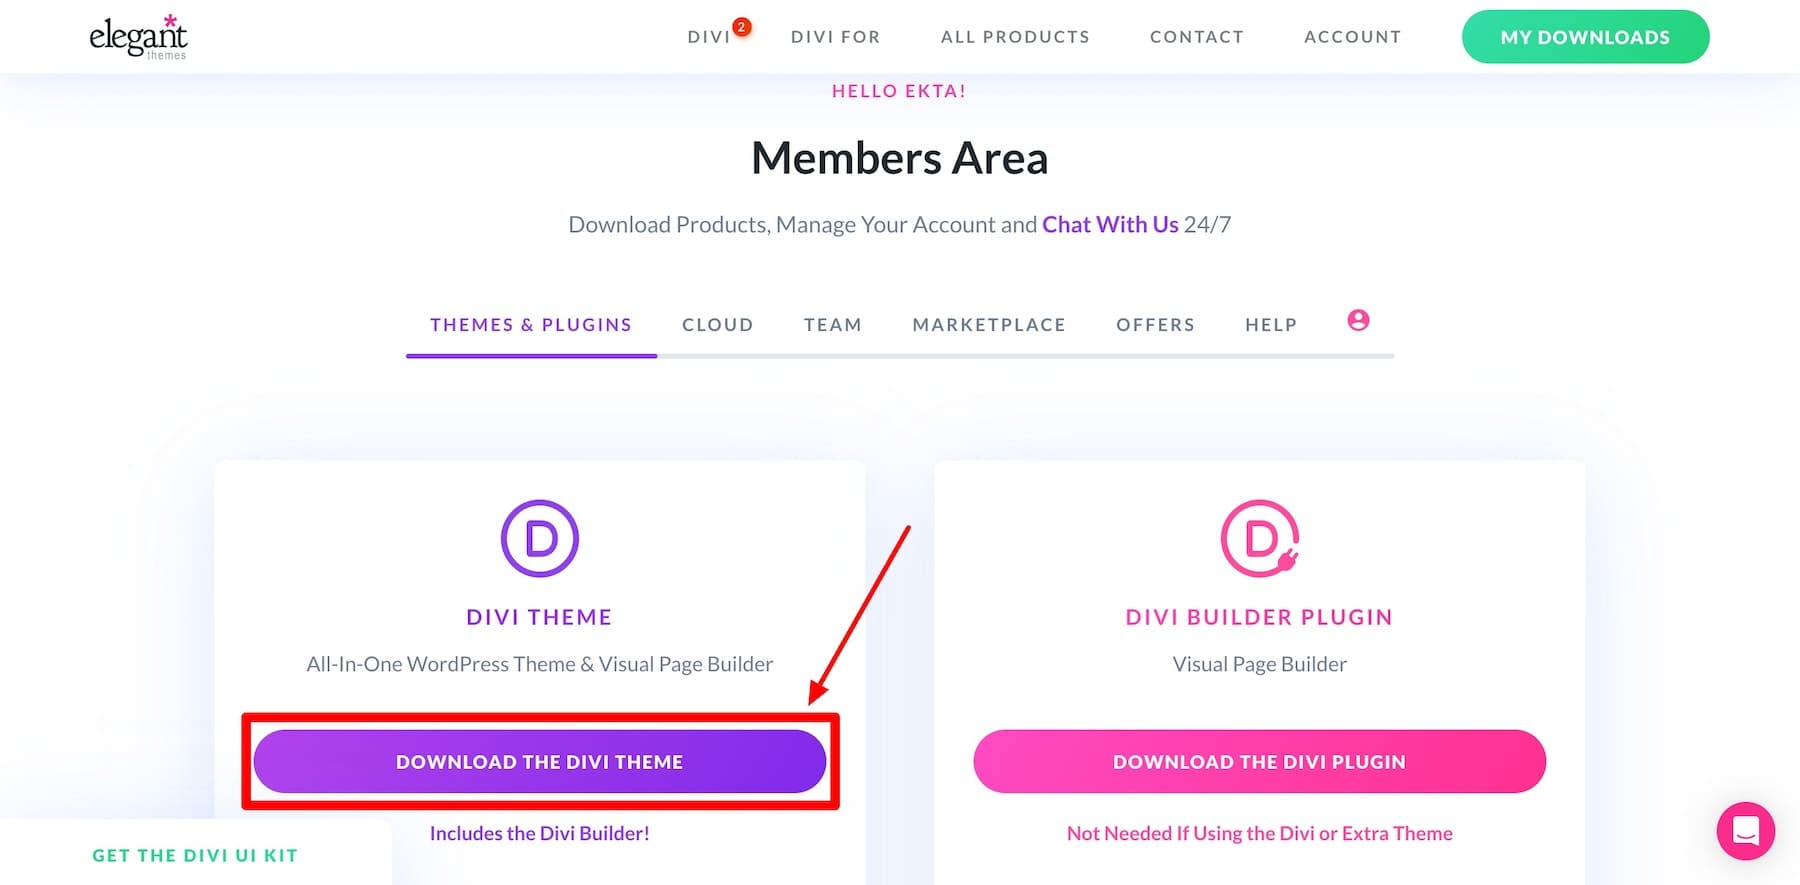
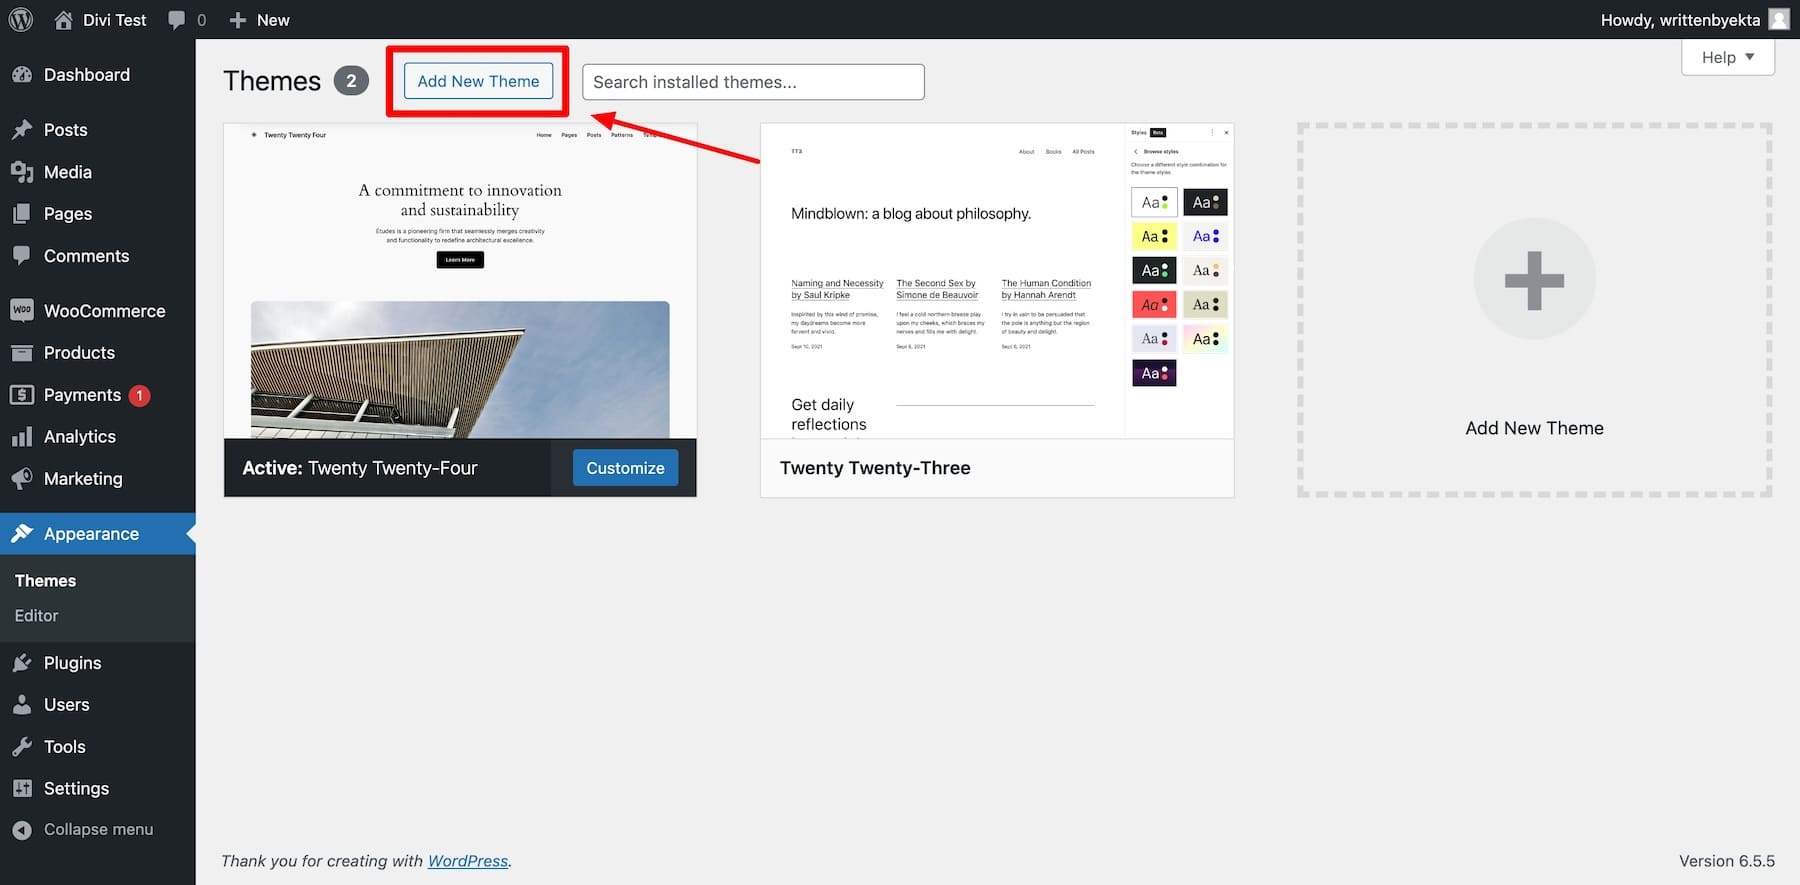
To install the Divi theme on your WordPress dashboard, go to Appearance > Themes > Add New Theme.
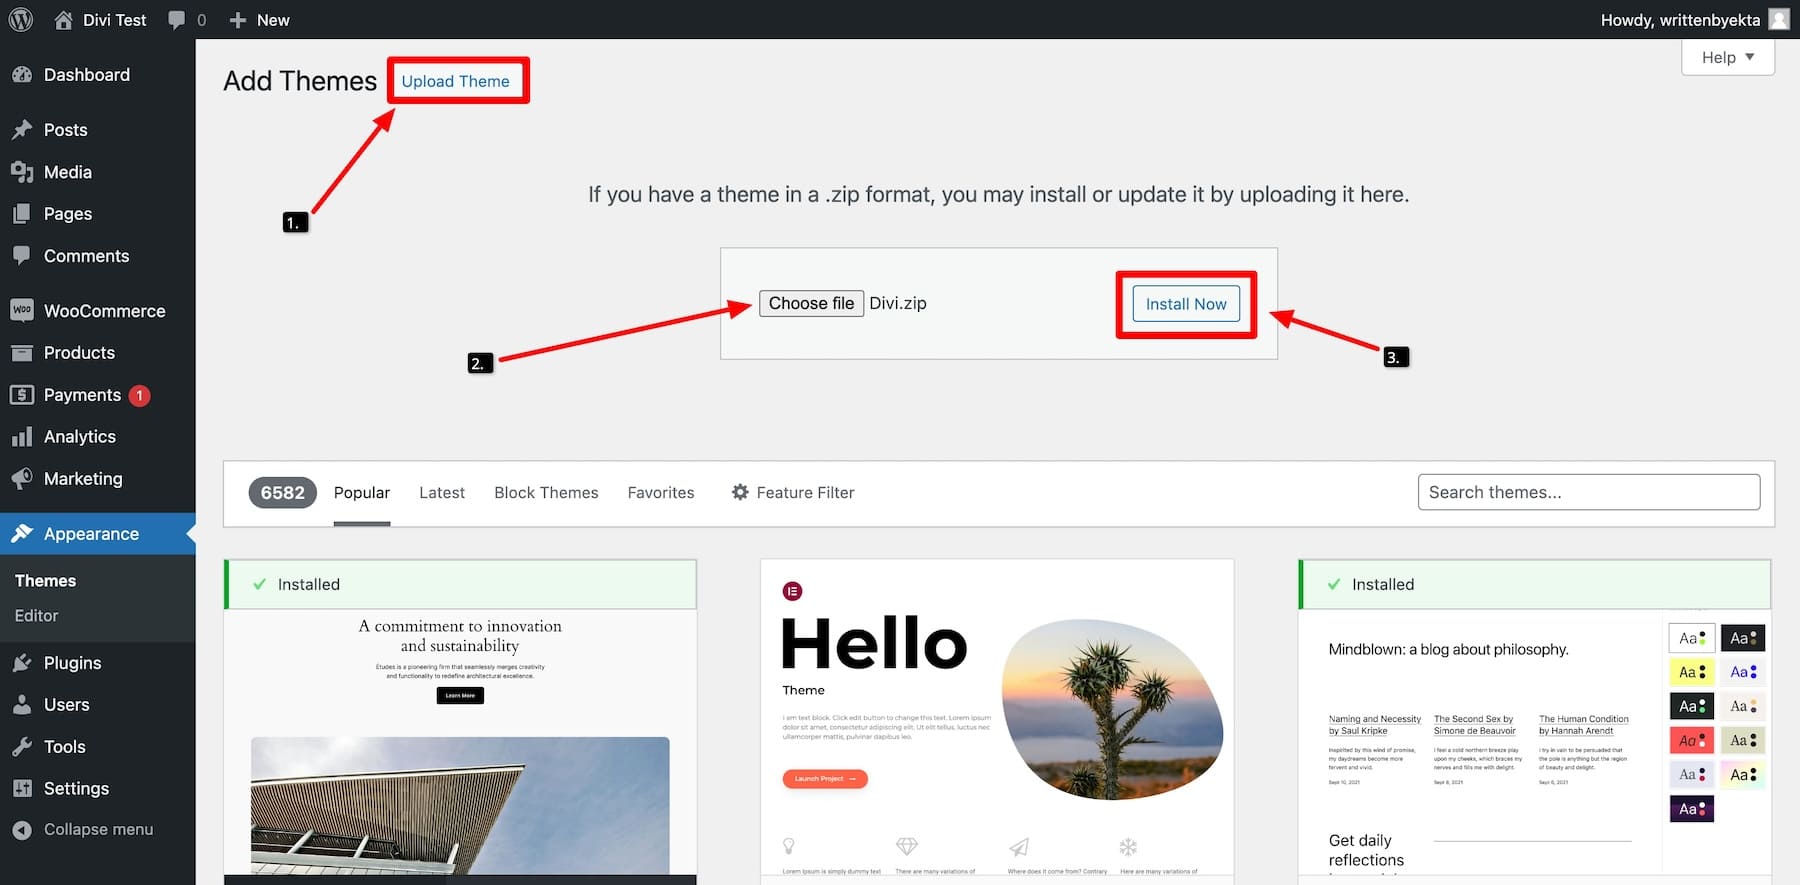
Click “Upload Theme.” Upload the downloaded Divi theme zip file. Then, click “Install Now.”
Once the theme is installed, click “Activate.” The Divi theme is now active, and you’re ready to use it on your WordPress dashboard.
2. Launching The Divi Onboarding Wizard to Activate Your Divi License
Activating your Divi license is required to receive theme updates and premium support and to access Divi Quick Sites.
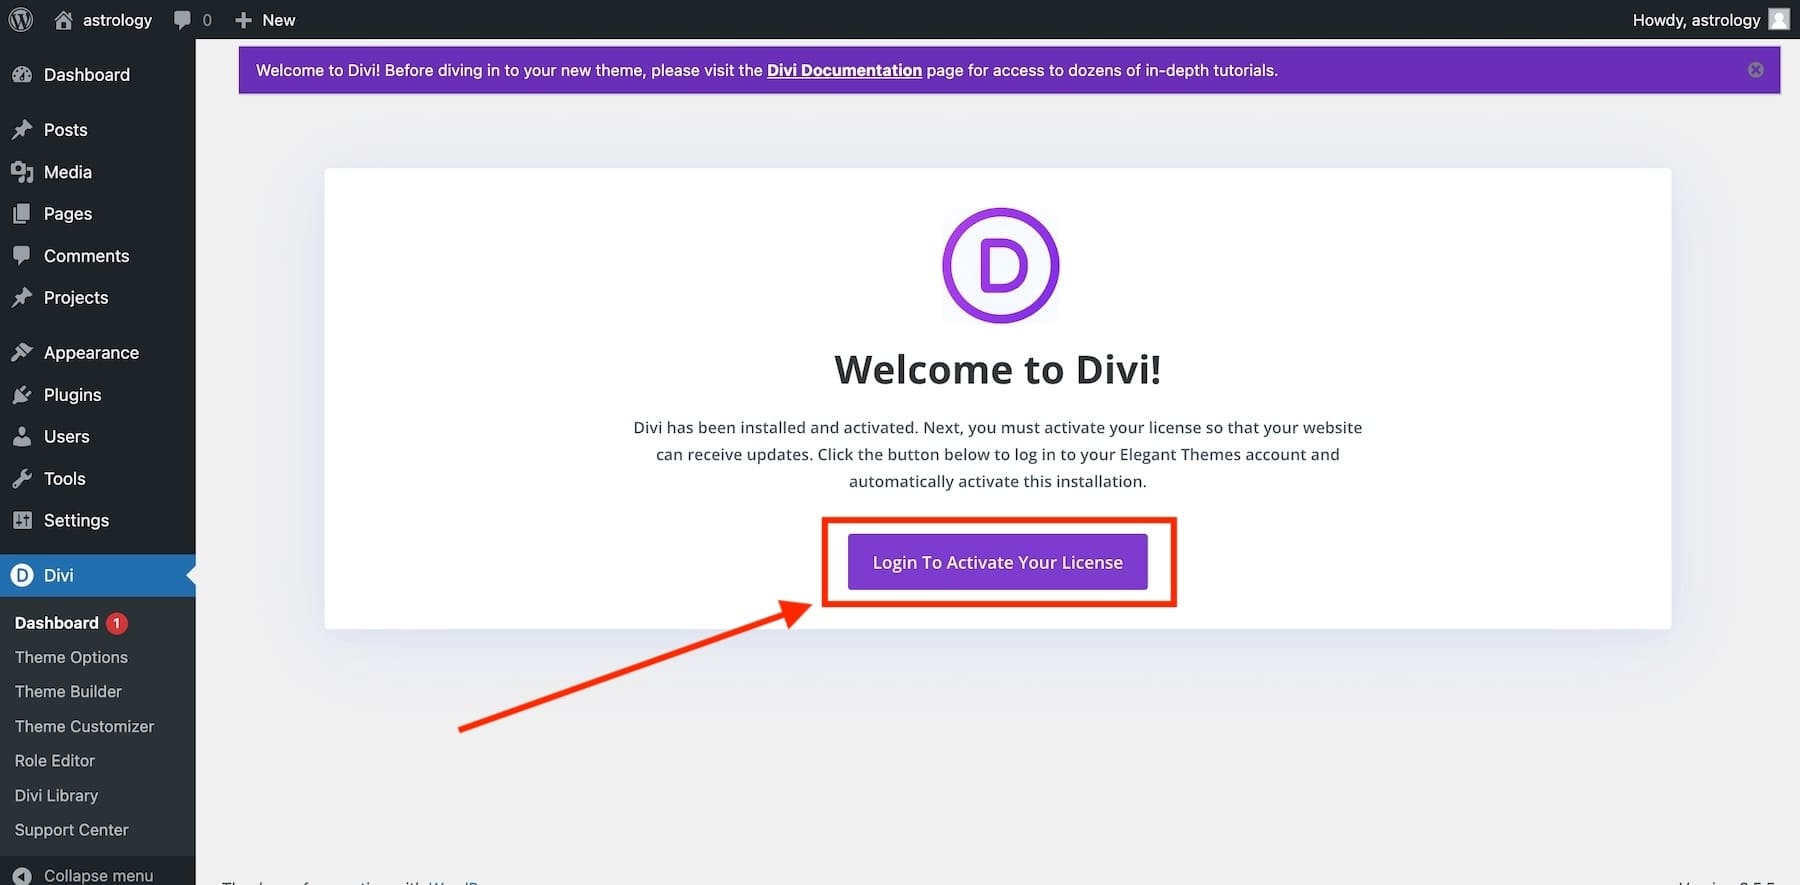
To make it easier for you, we’ve streamlined the onboarding process! Now, you don’t have to generate and activate the API key manually—it gets activated automatically. All you need to do is log in with your Elegant Themes Membership details.
To do so, click on “Login to Activate Your License.”
The next window will ask you to log in with your Divi membership login details. Fill in your membership username and password to log in.
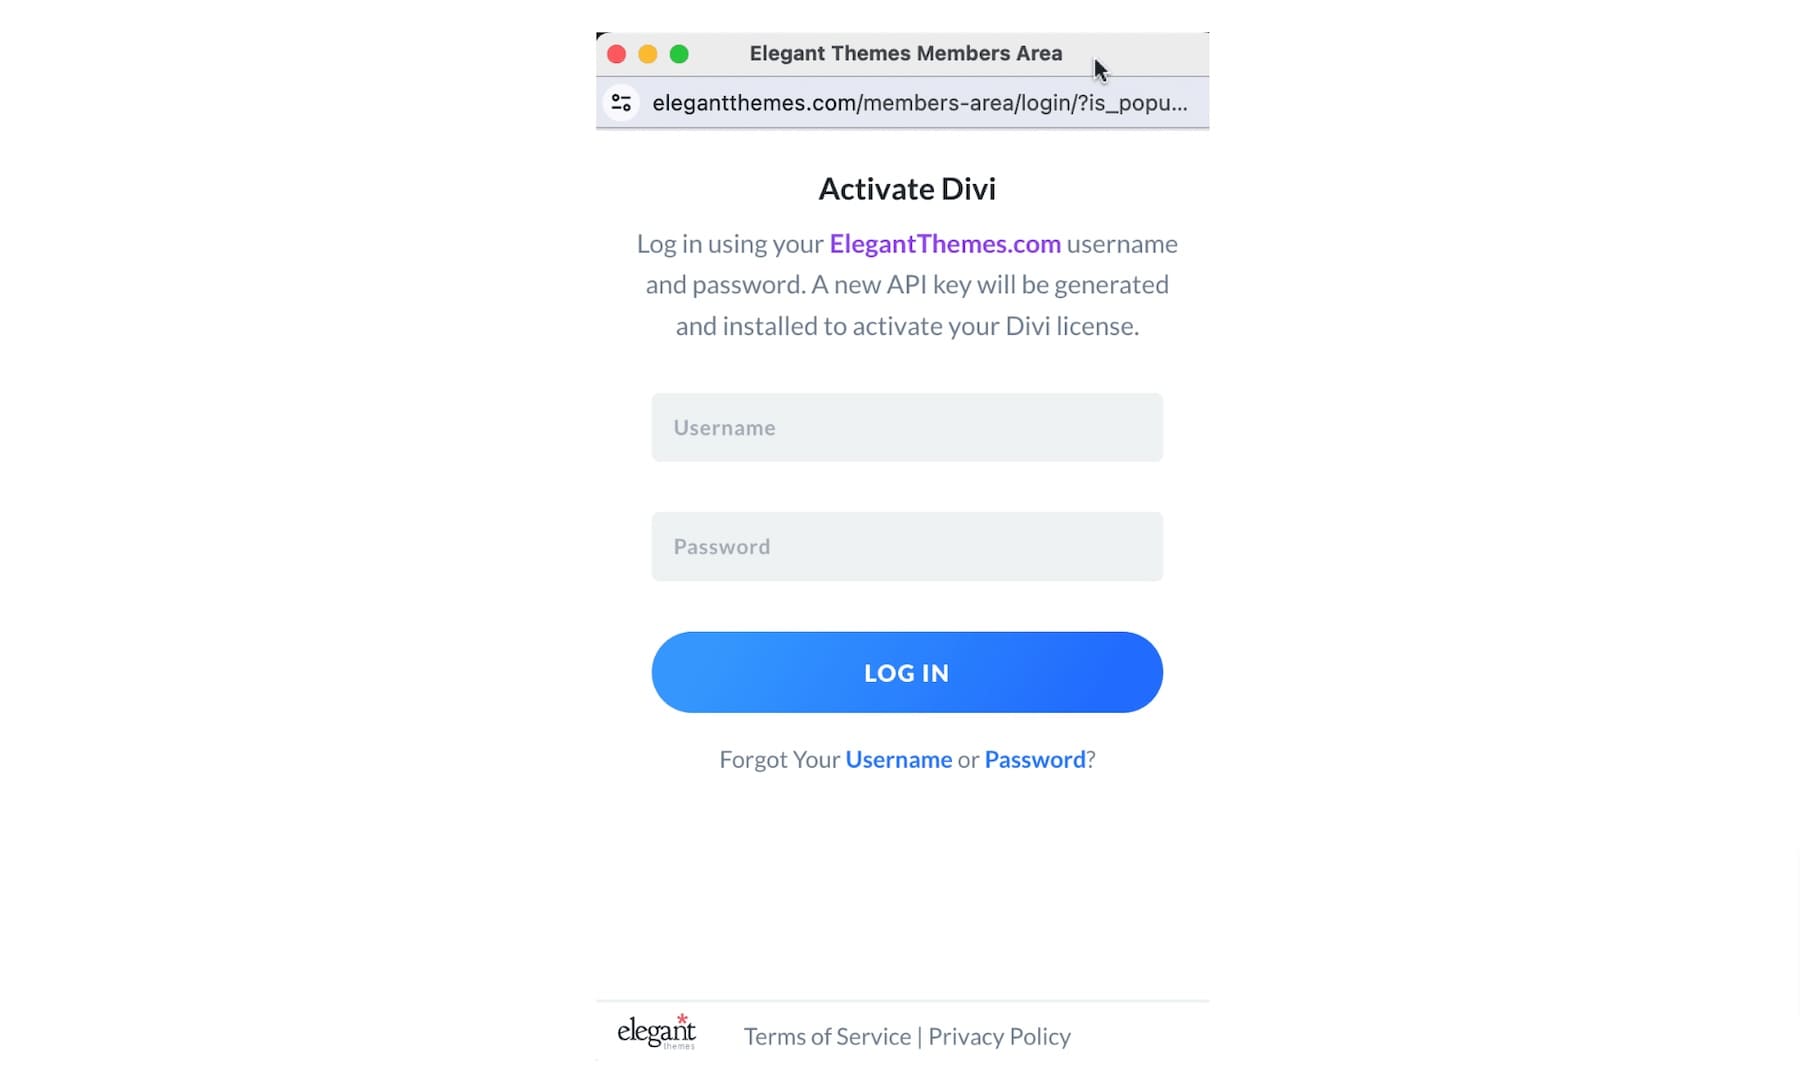 This will activate your license with a new API key automatically.
3. Generate a New Website Using Divi Starter Sites
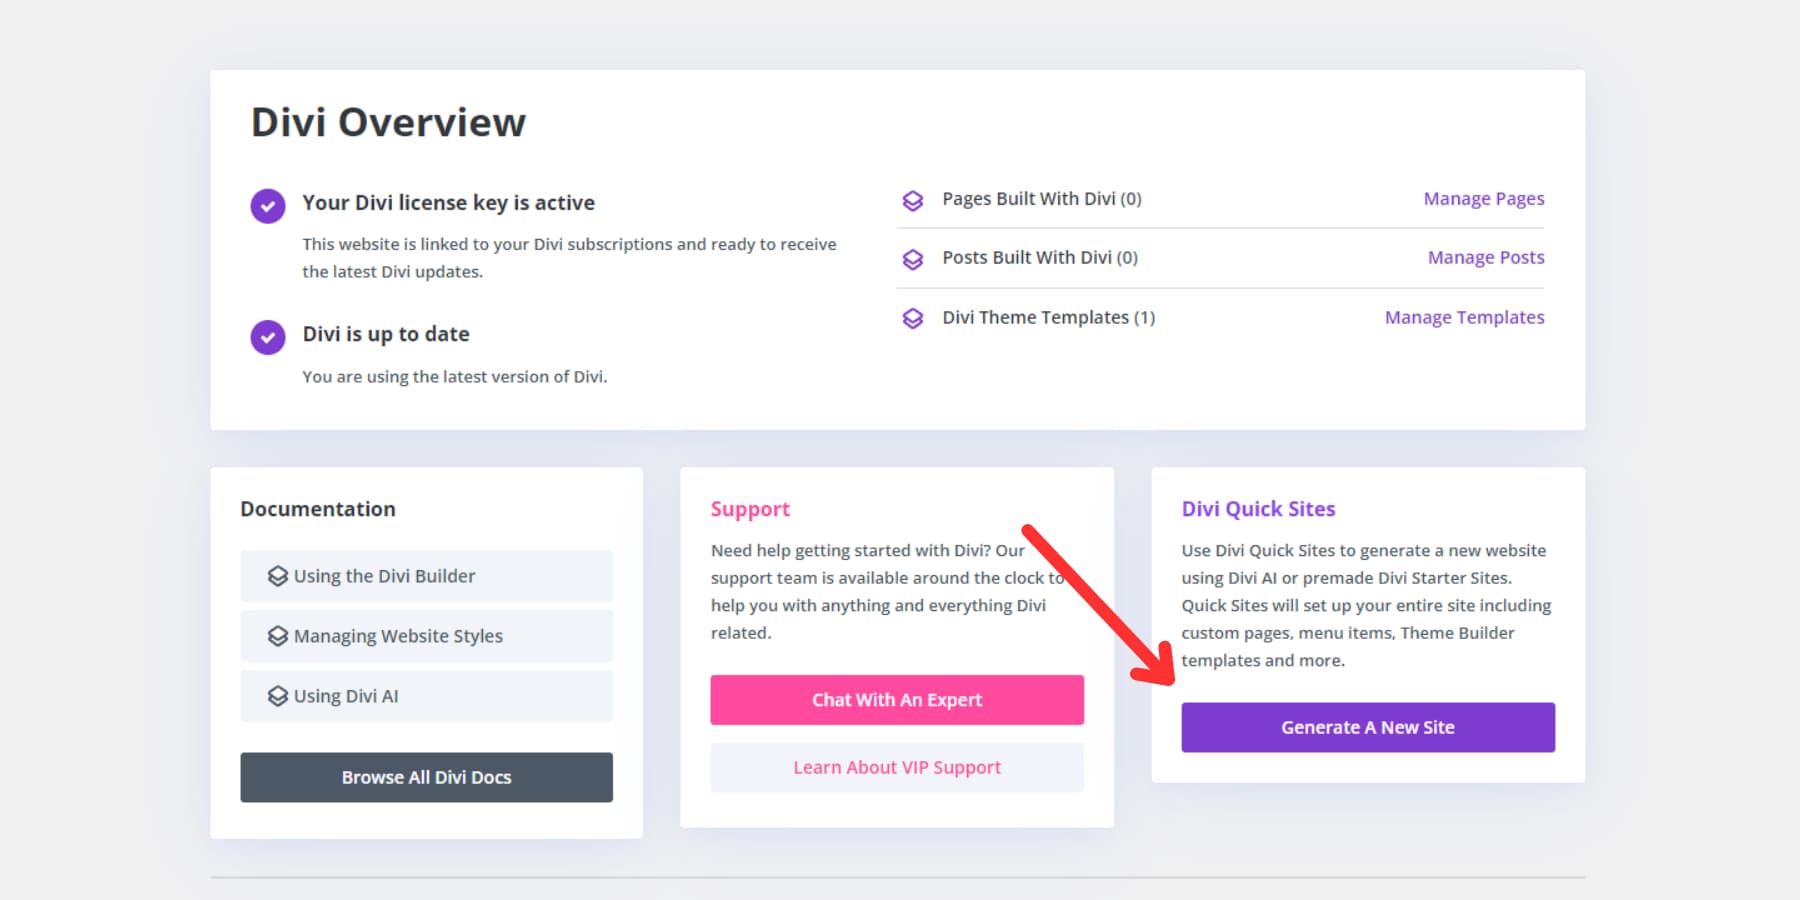
Once you’re logged in, you’ll be brought to the main Divi Dashboard where you can manage your Divi website, access documentation, support, and generate a new site with Divi Quick Sites.
To generate a website using Divi Quick Sites, click “Generate A New Site” from the Divi Dashboard.
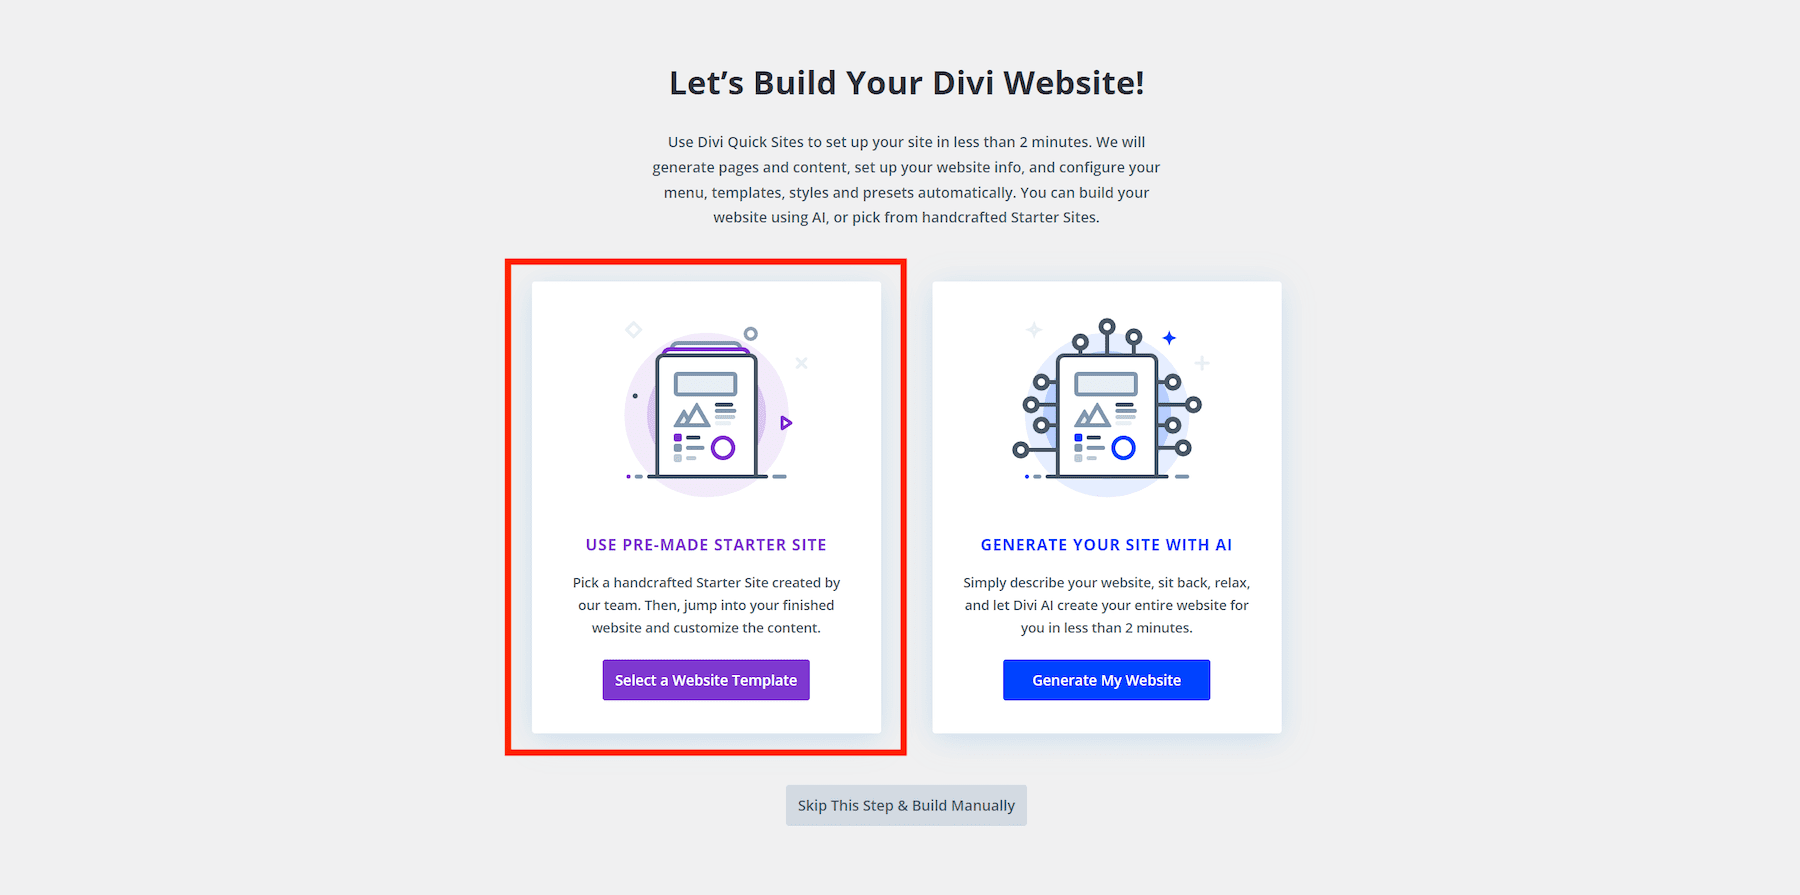
On the next window, choose “Select a Website Template.”
4. Choose A Starter Site
Now, choose your favorite website design from our hand-crafted Starter Sites.
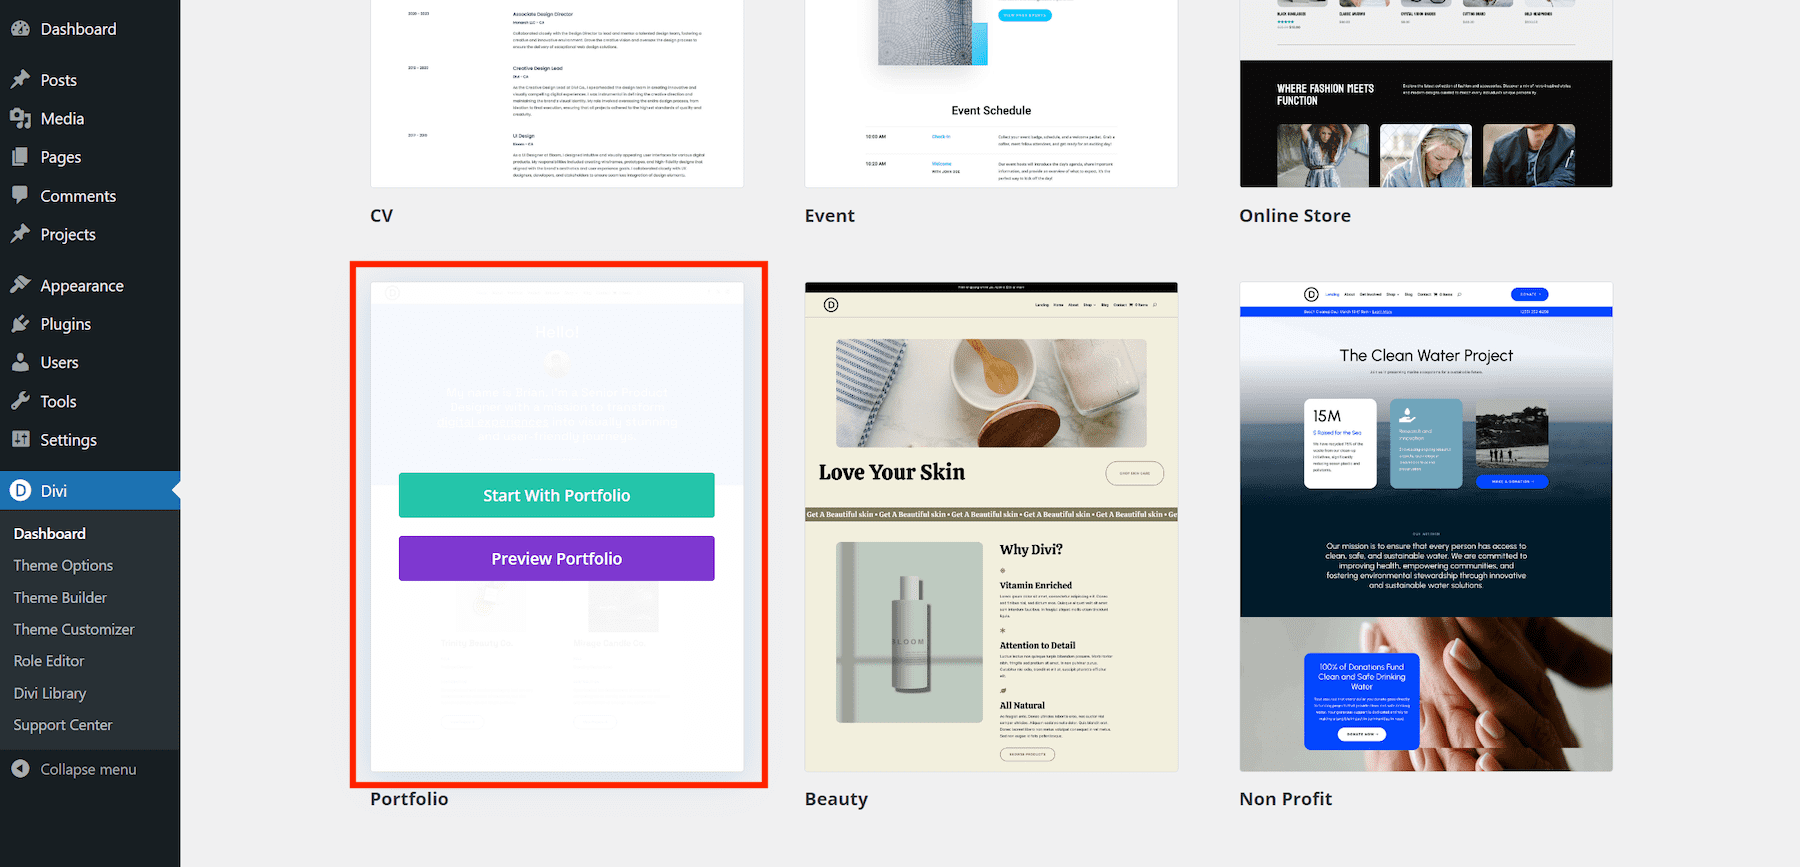
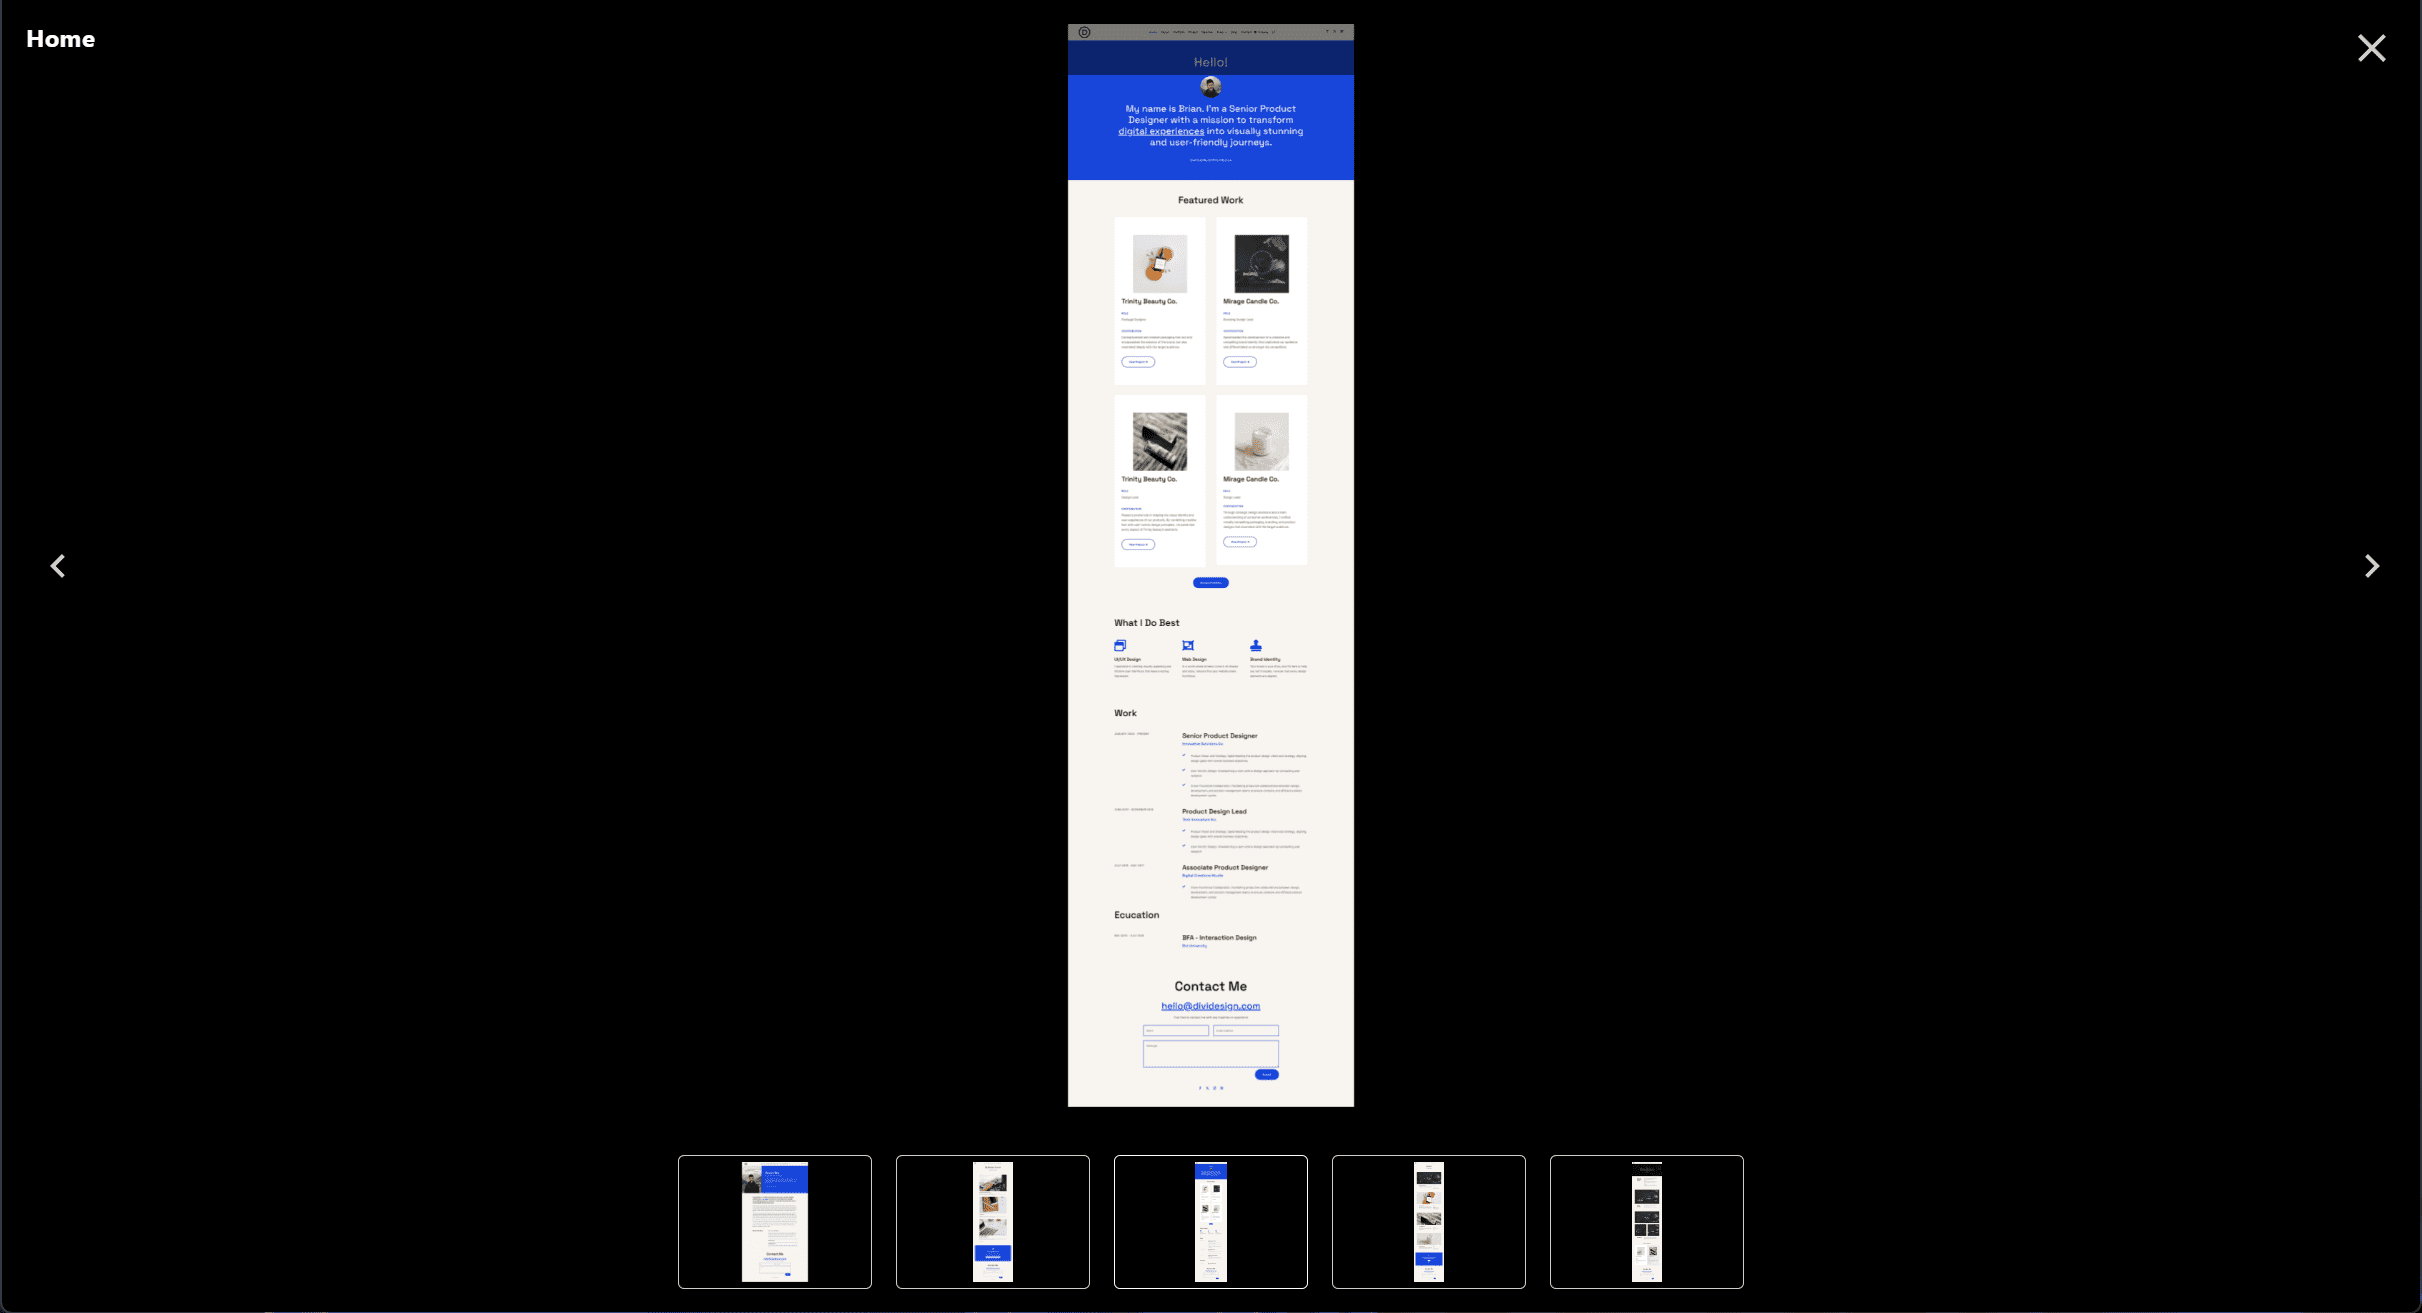
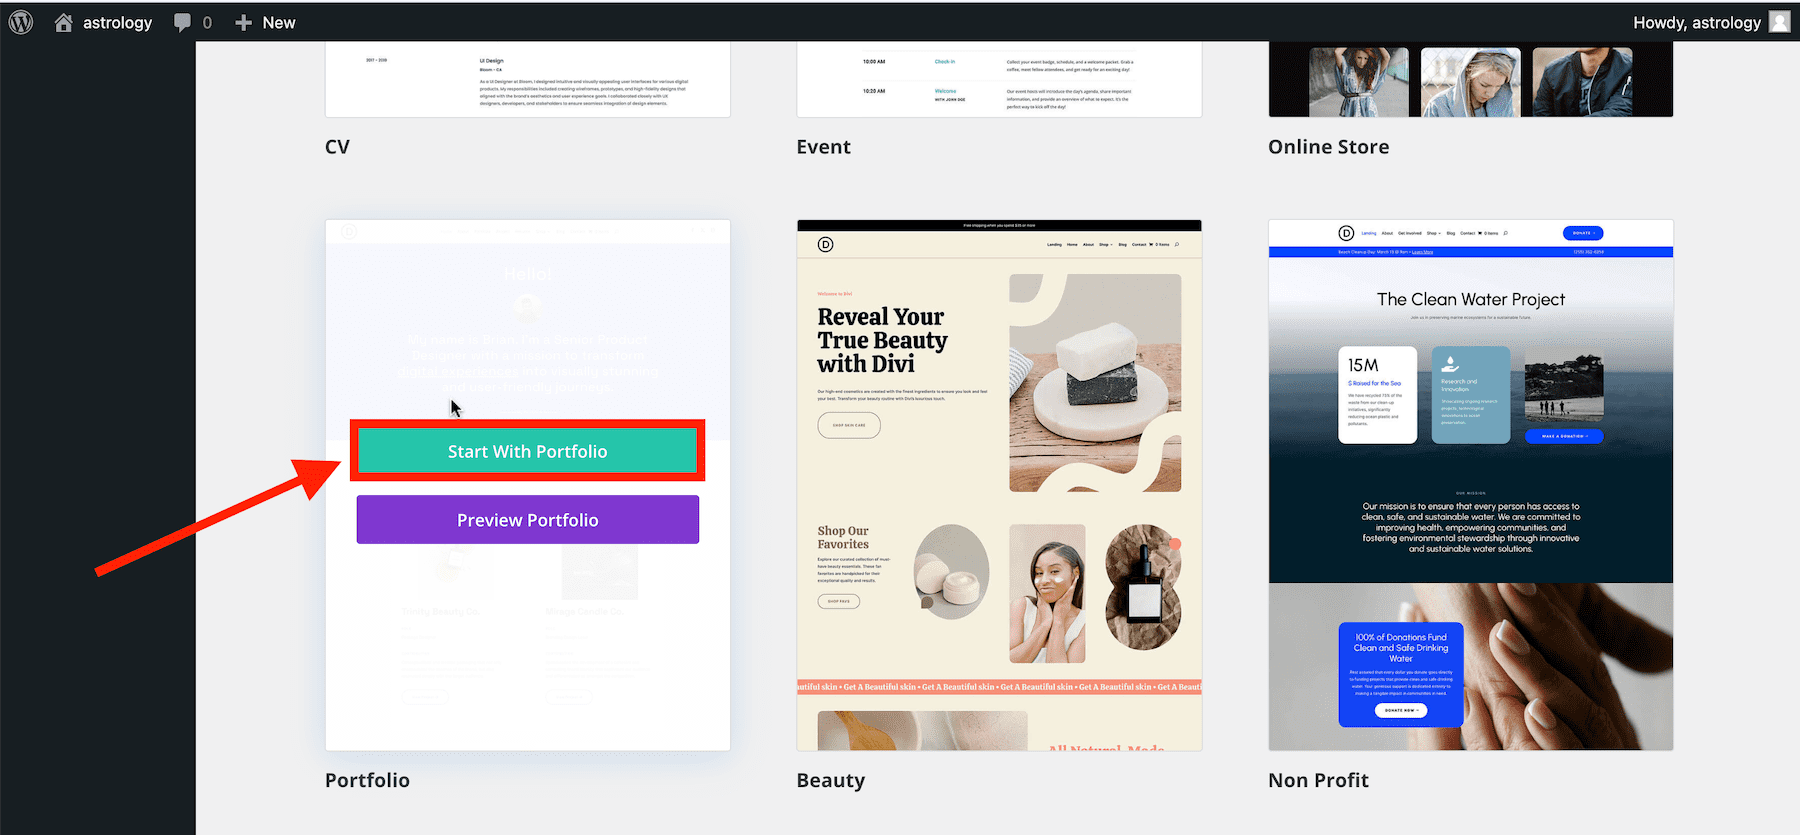
Hover over the Starter Site to see the options to “Preview” or “Start With” the selected Starter site. For example, to preview the Portfolio Starter Site, hover over to Portfolio and select “Preview Portfolio.”
This will bring up a lightbox popup preview of all the page designs from the Portfolio Starter Site. Use the slider arrows to change pages to see if they fit your needs.
When you are ready to build your site using the Starter site, exit the preview popup, hover over the Portfolio Starter Site in the list again, and select “Start With Portfolio.”
5. Enter Website Information and Select Pages
Next, Divi Quick Sites will ask you for some information about your new website and what pages you want generated.
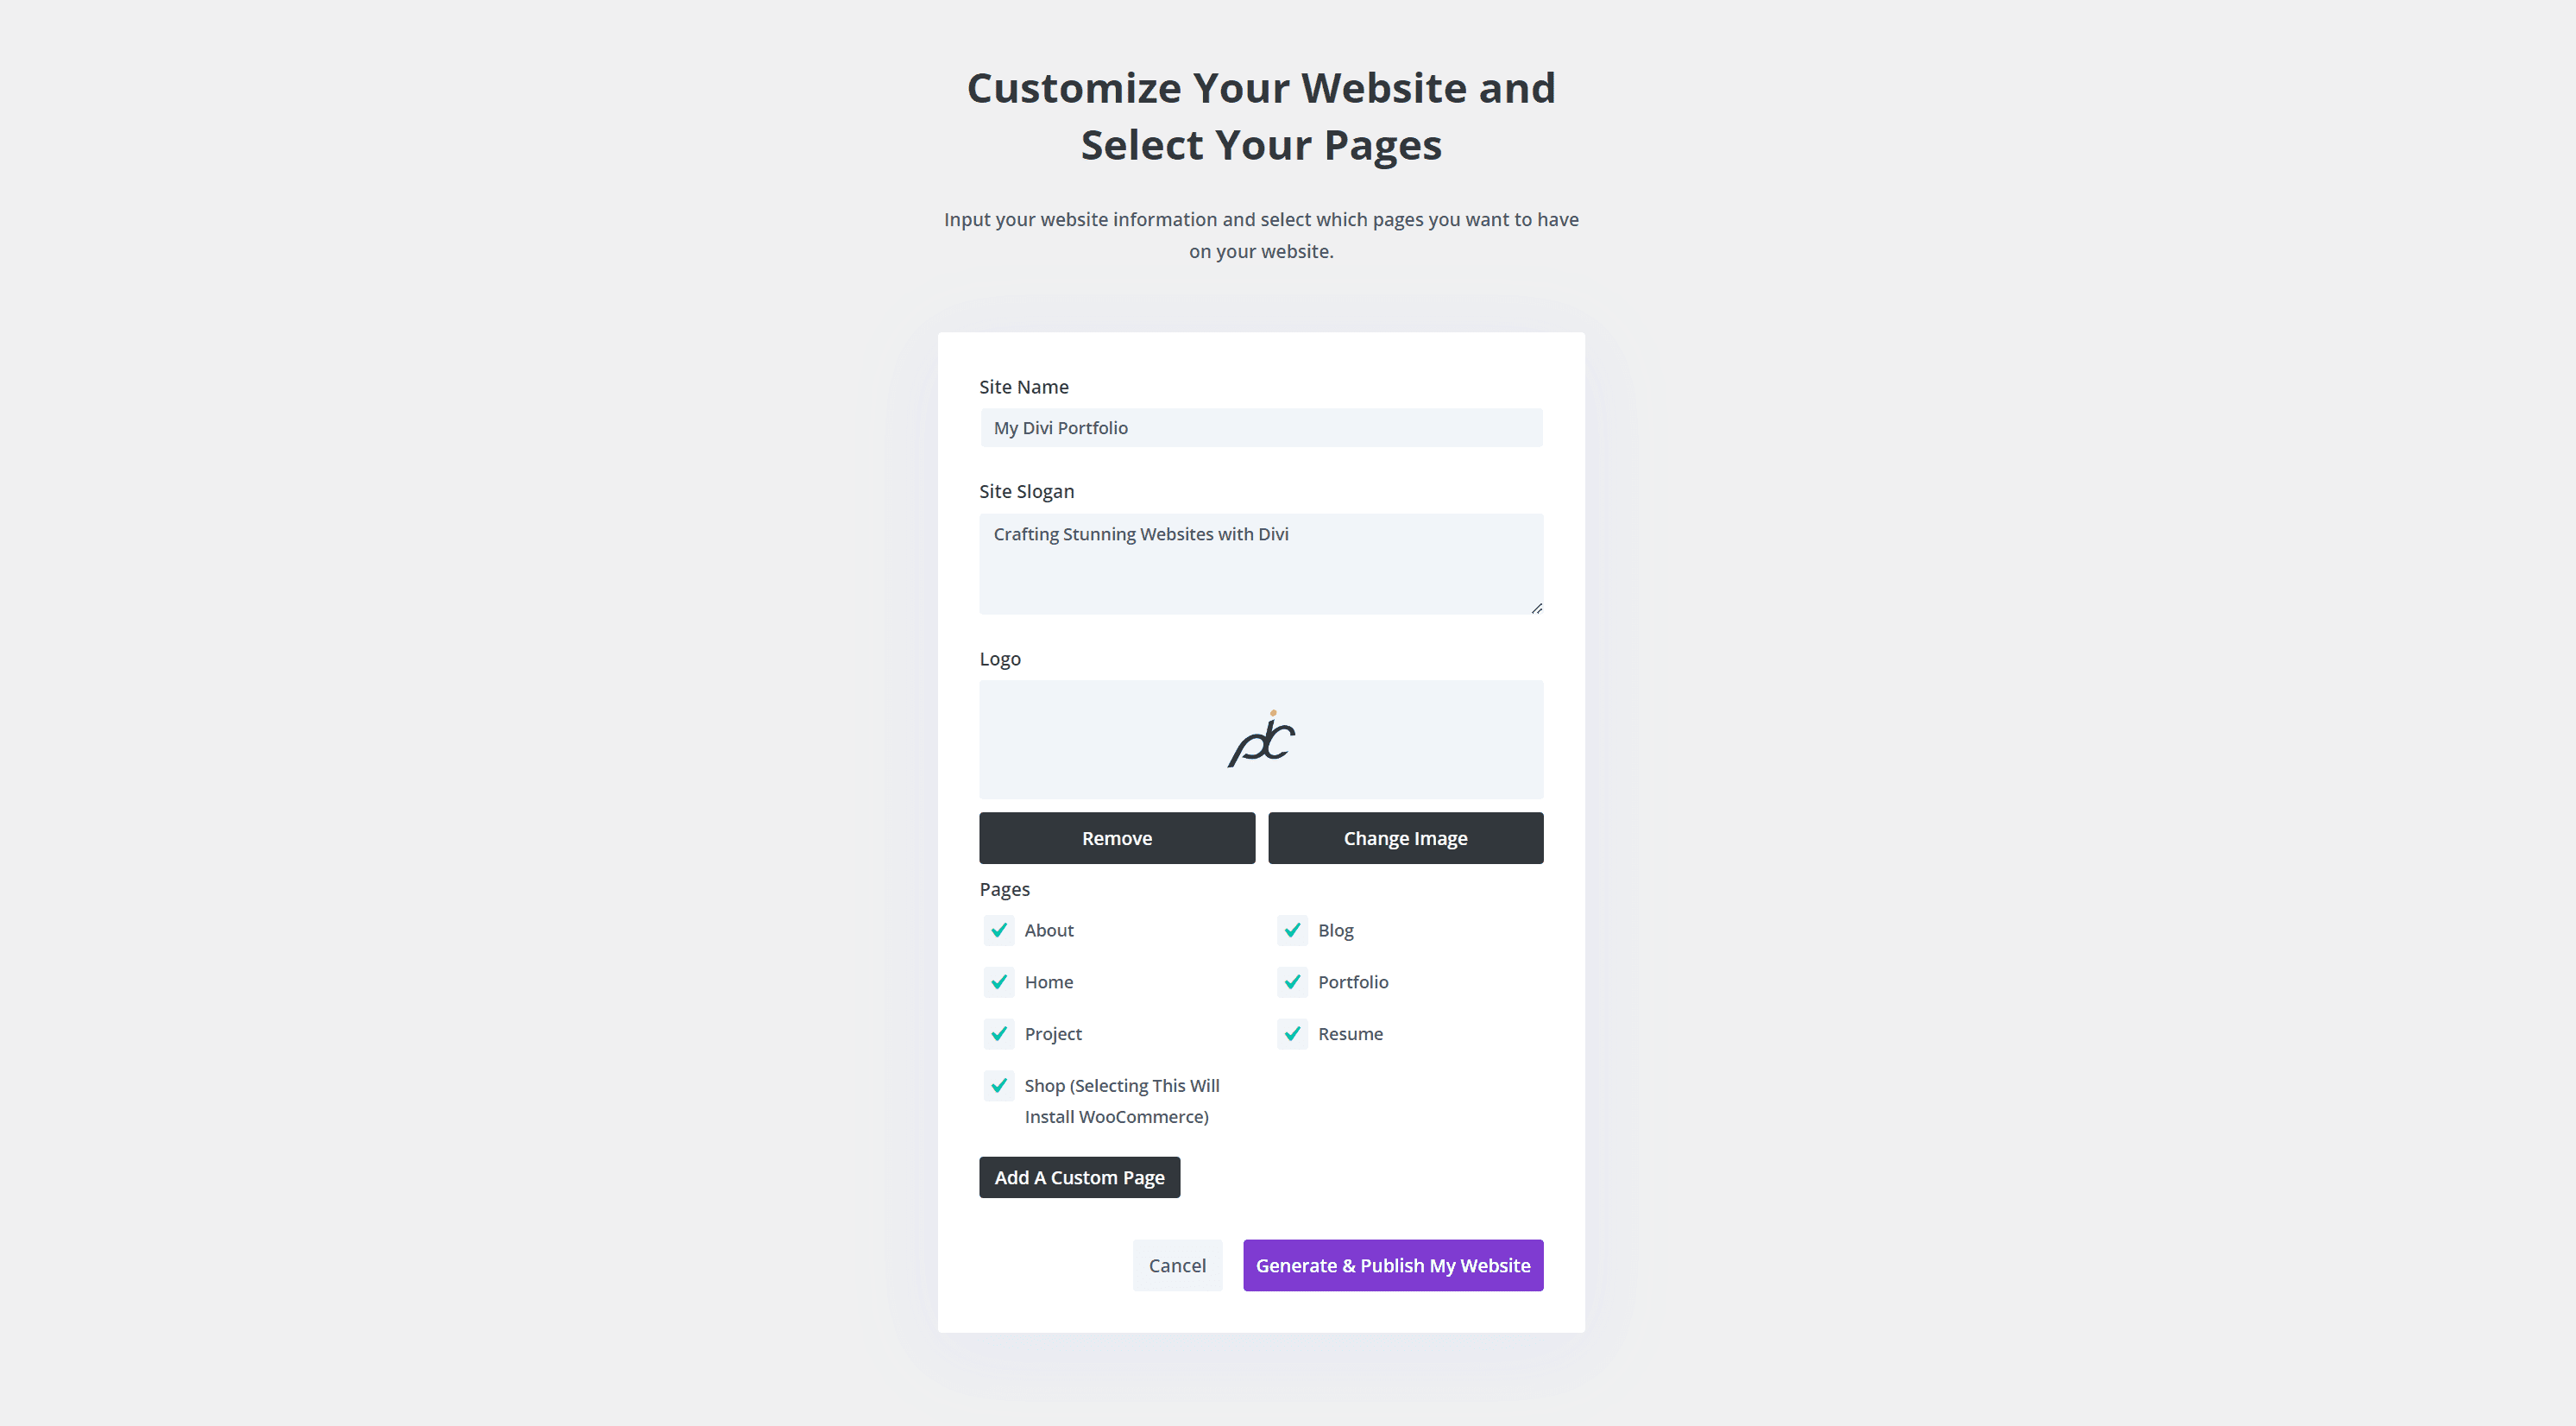
Fill out the form with the following details:
- Site Name (or Site Title)
- Site Slogan (or tagline)
- Site Logo: Uploading your logo here will automatically allow the Divi Builder to add it to your site and default header template site-wide.
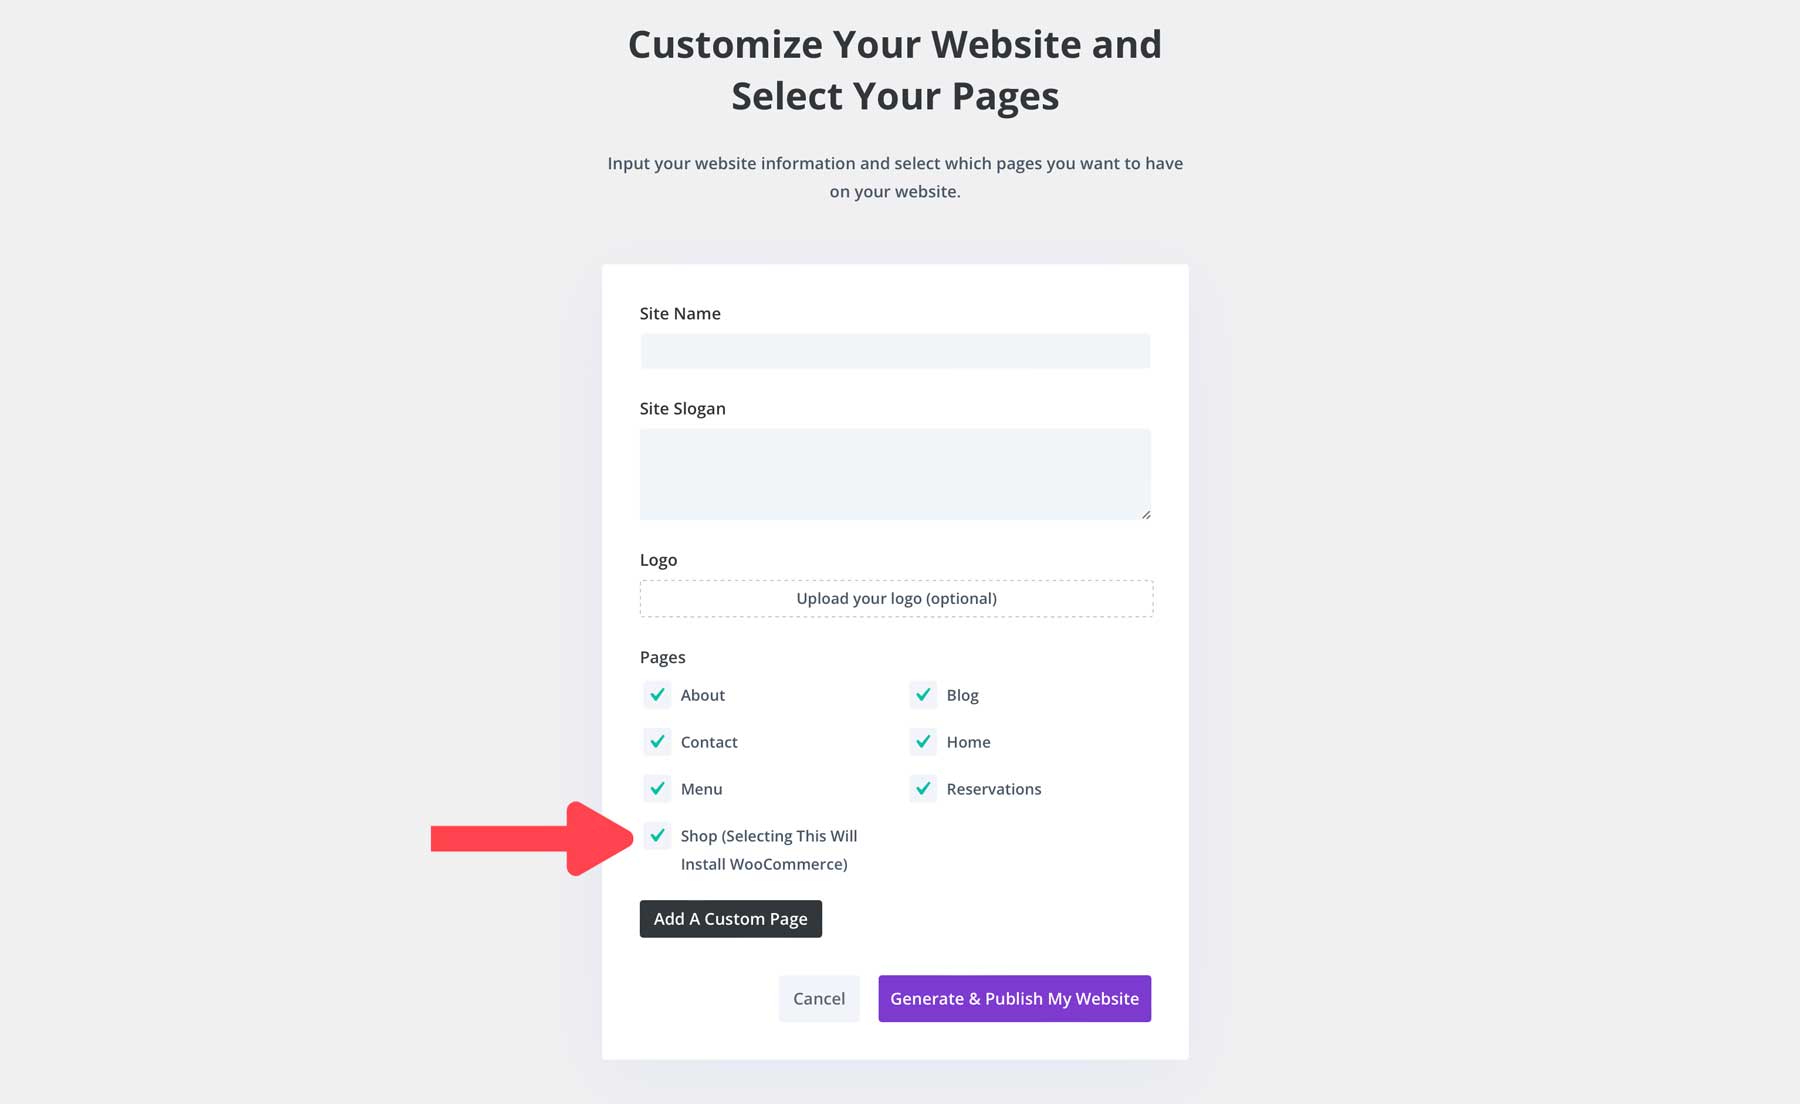
- Pages: Check all the pages you want to include from the Starter Site. Selecting a Store page will let the builder know you need WooCommerce setup, which it’ll install and configure automatically.
- Add A Custom Page: You can also get a jump start on any other pages you might need by clicking “Add A Custom Page” and giving the page a title.
Selecting Pages
All the core pages will be pre-selected by default. Unless you have a specific reason, it is best to select all of them. Even if you don’t have plans for that specific page, you may be able to use the design for something else. Plus, it gives you more custom design elements to replicate when adding new content.
It is important to be reminded that selecting the Shop page will install WooCommerce and premade templates for WooCommerce pages. So, if you don’t plan on using WooCommerce, you can leave that page out.
Any custom page you add will include only the basic design elements since there wasn’t a premade layout for them. So, you will need to finish designing those later using all of the reusable elements on the core pages. But it is helpful to add any pages you plan on building so that they will be automatically created and added to your menu, which saves you time.
After completing your website information, click the “Generate & Publish My Website” button.
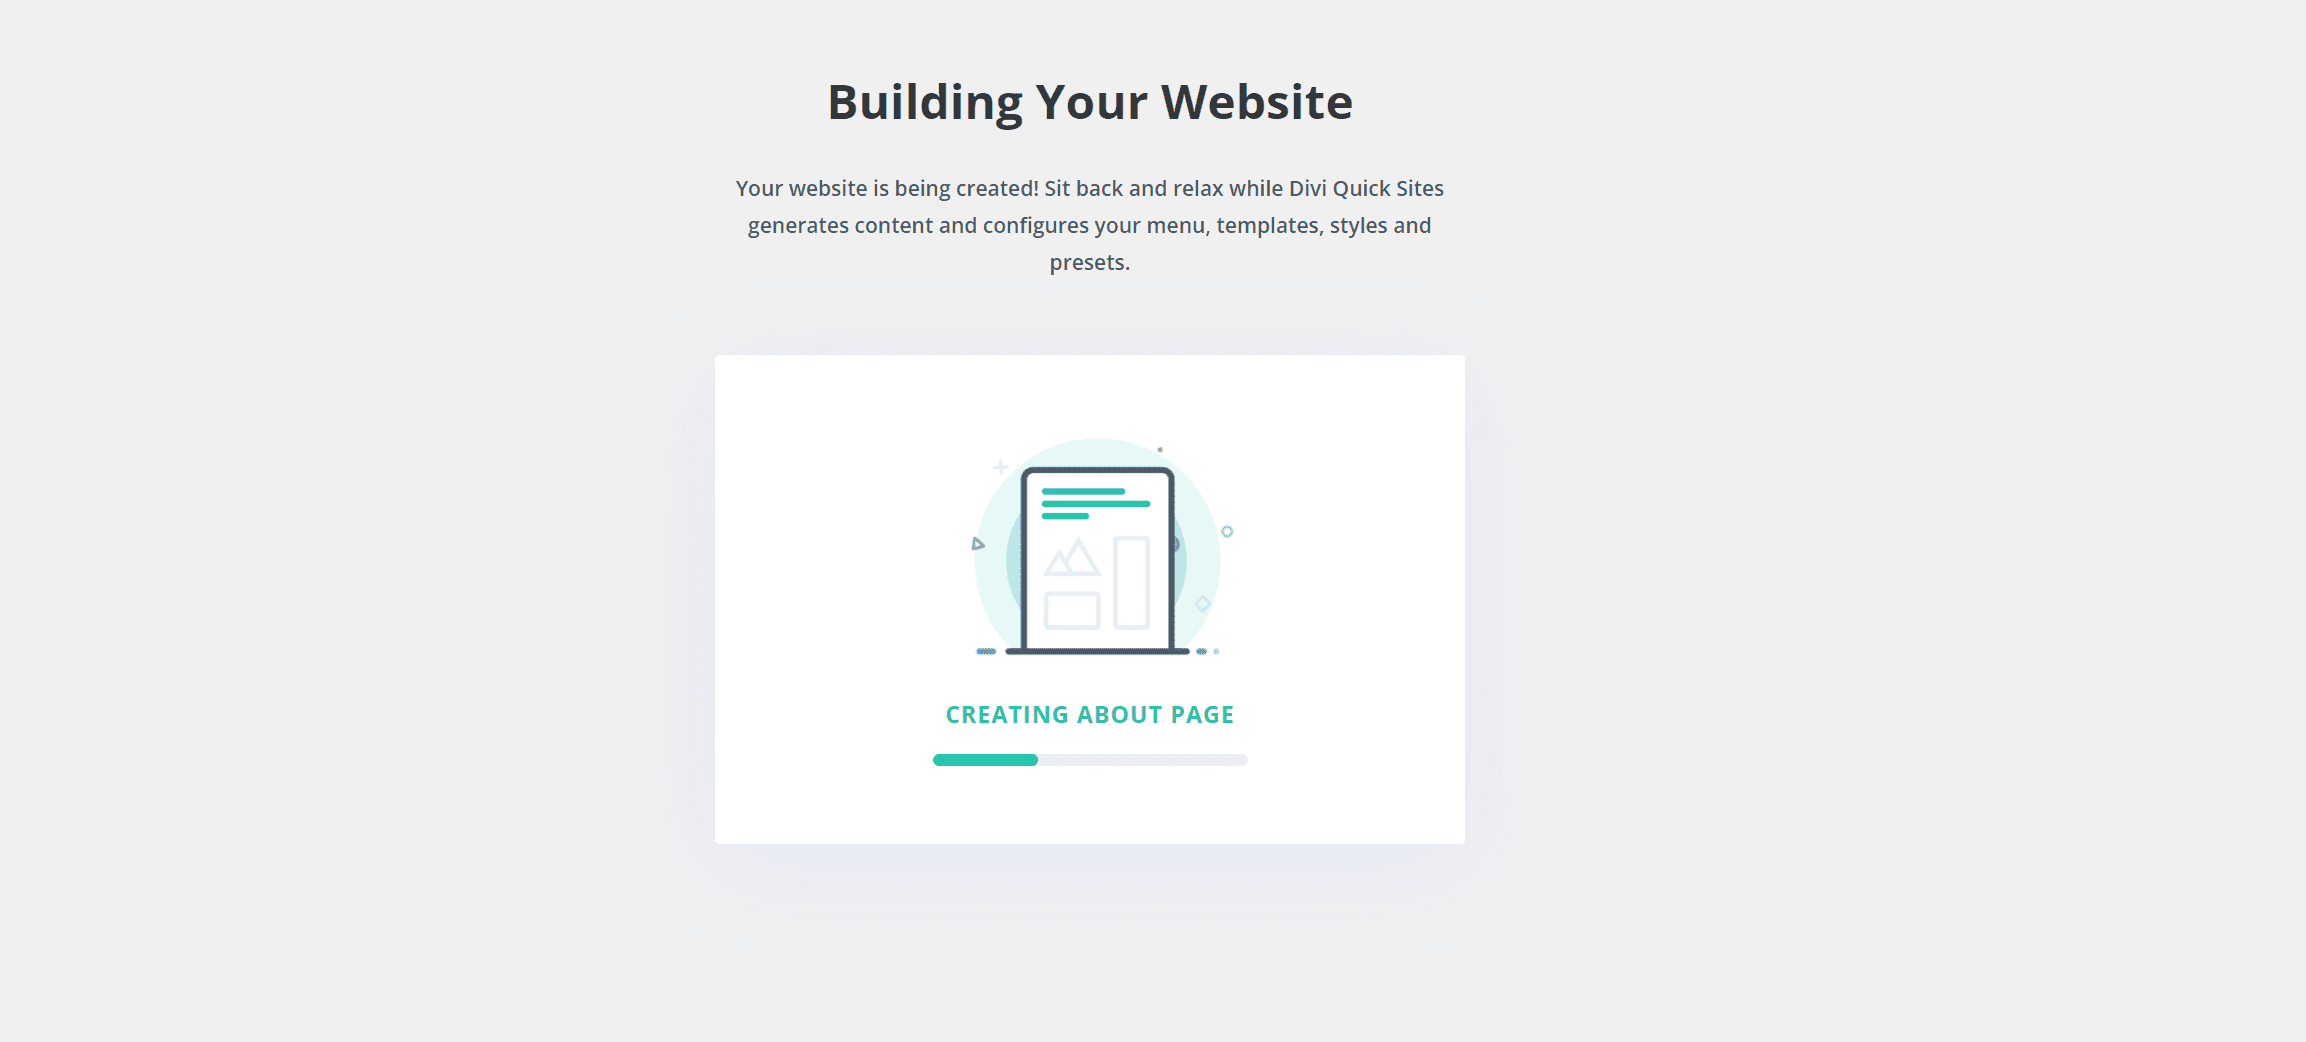
6. Relax While Divi Builds Your Website
That’s it! Divi Quick Sites will create your new website in 1-2 minutes using the Starter Site template you chose and the information you provided. Everything is being set up for you – all your pages, templates, styles, presets, and navigation menu.
4. Explore Your New Divi Site!
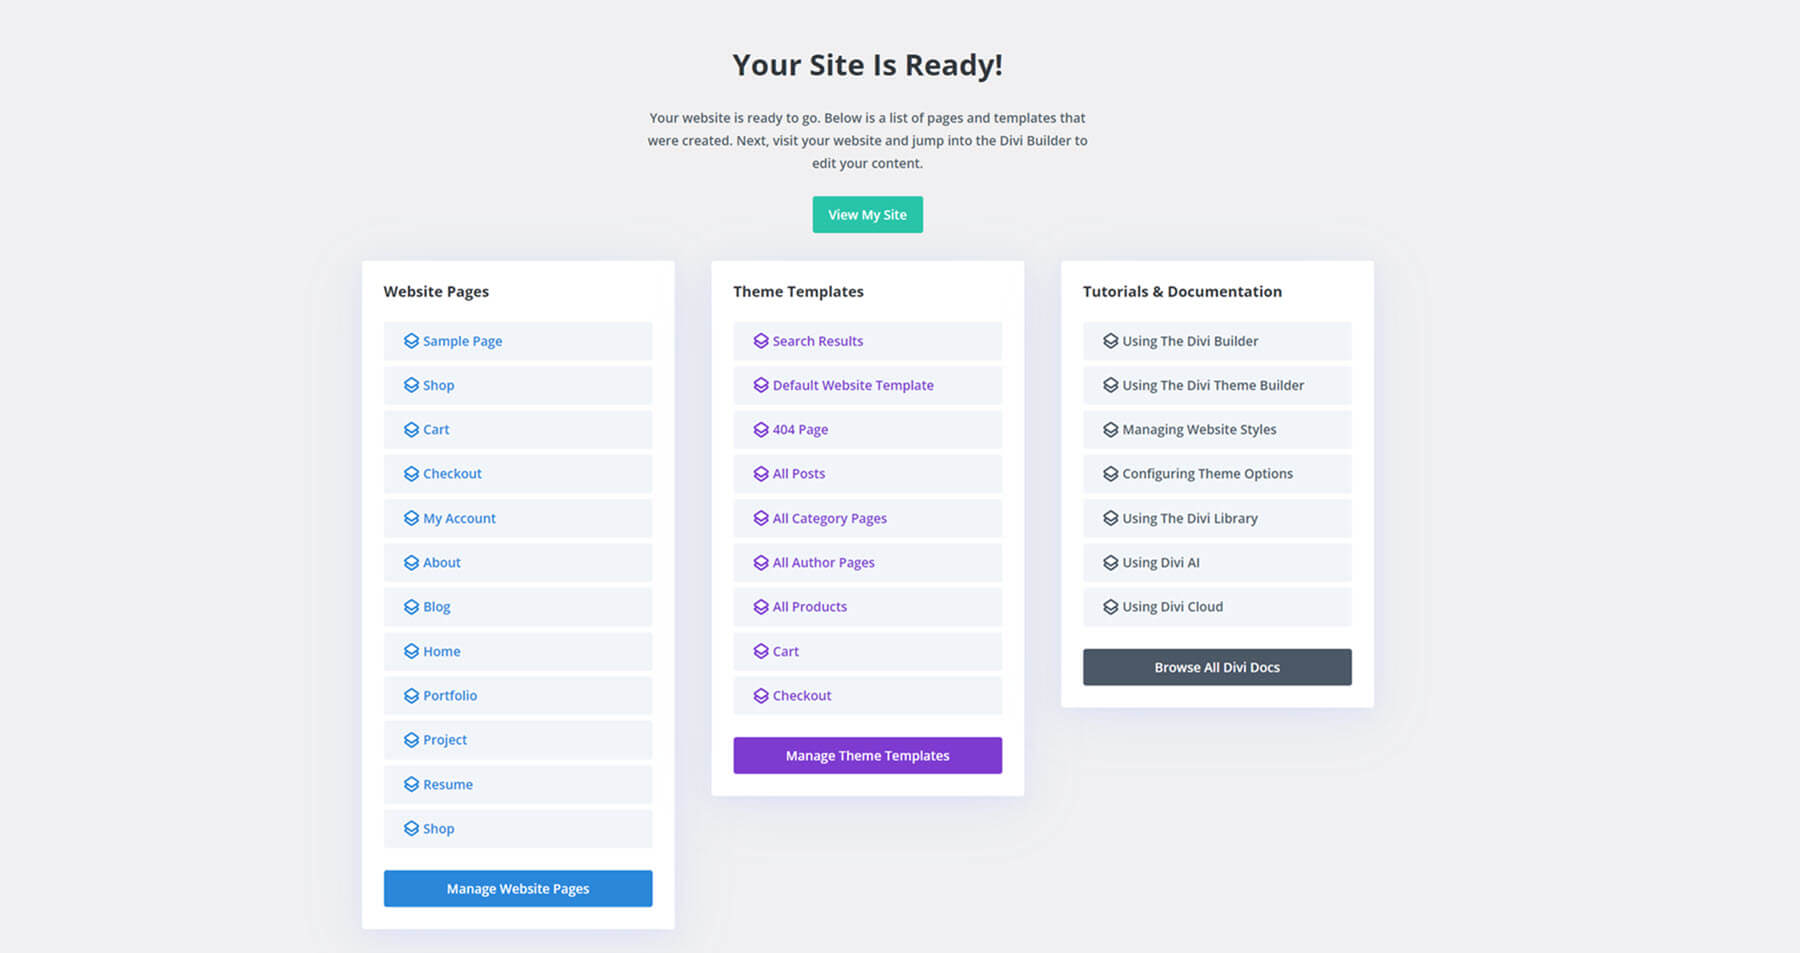
Once it has finished generating your site, you will see a confirmation page that says, “Your Site is Ready!” The page includes a “View My Site” button to click if you want to see the live version of your site. You will also see a list of all the Website Pages and Theme Templates that were created, as well as Tutorials and Documentation links to help you get started.
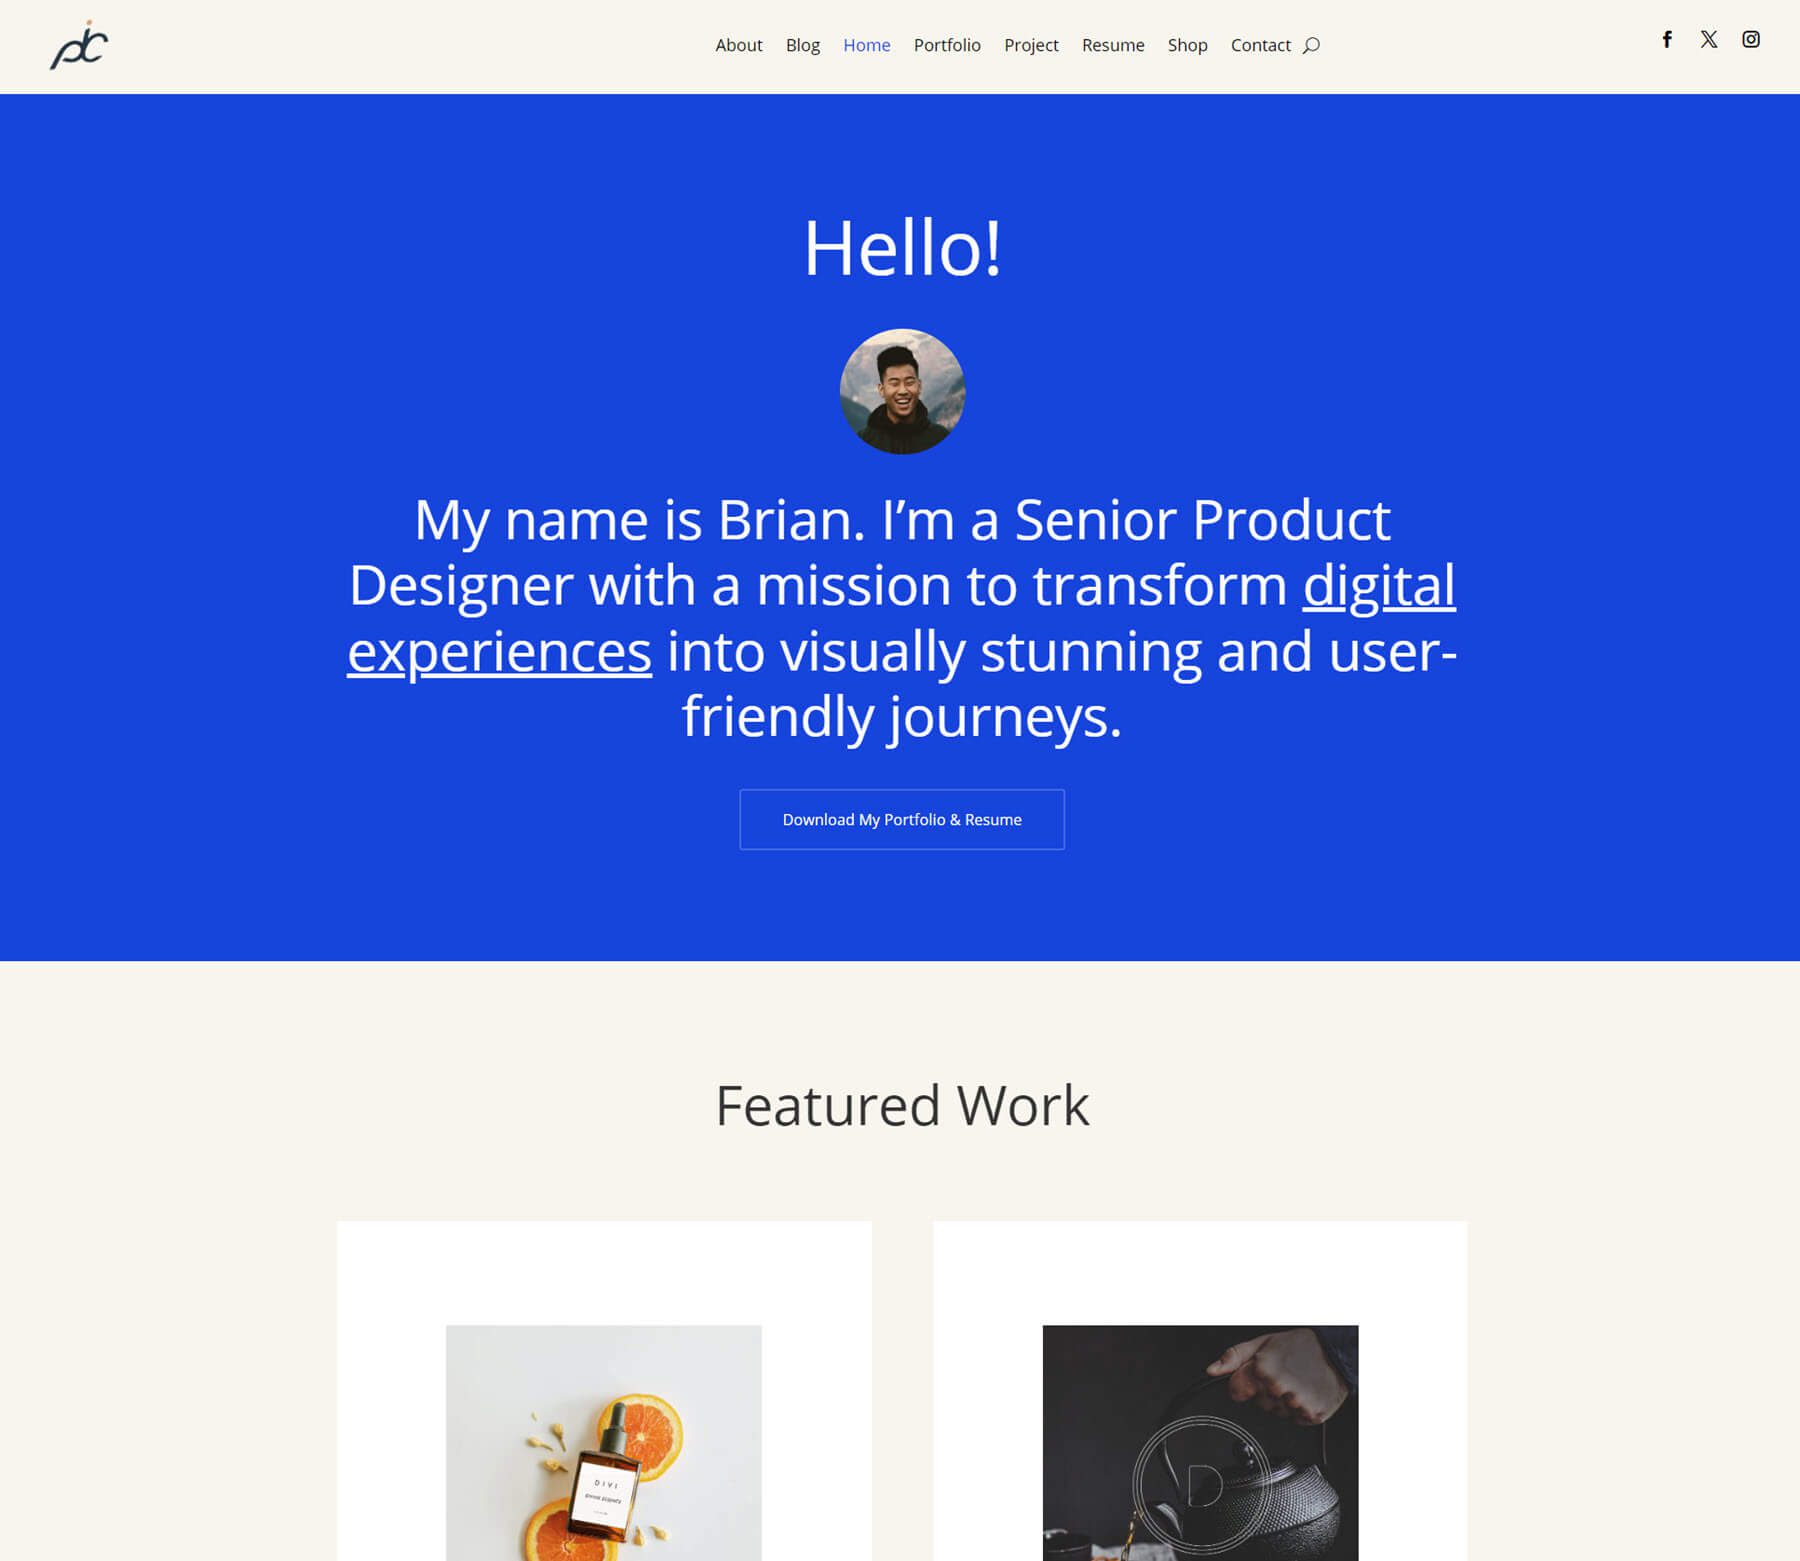
Your website will have the selected Starter site’s default settings, such as pages, content, images, global colors, fonts, presets, etc. Here’s how the generated site looks when you click on “View My Site” from the “Your Site is Ready!” page:
You can also visit your Divi Dashboard anytime to view and manage your site in the future.
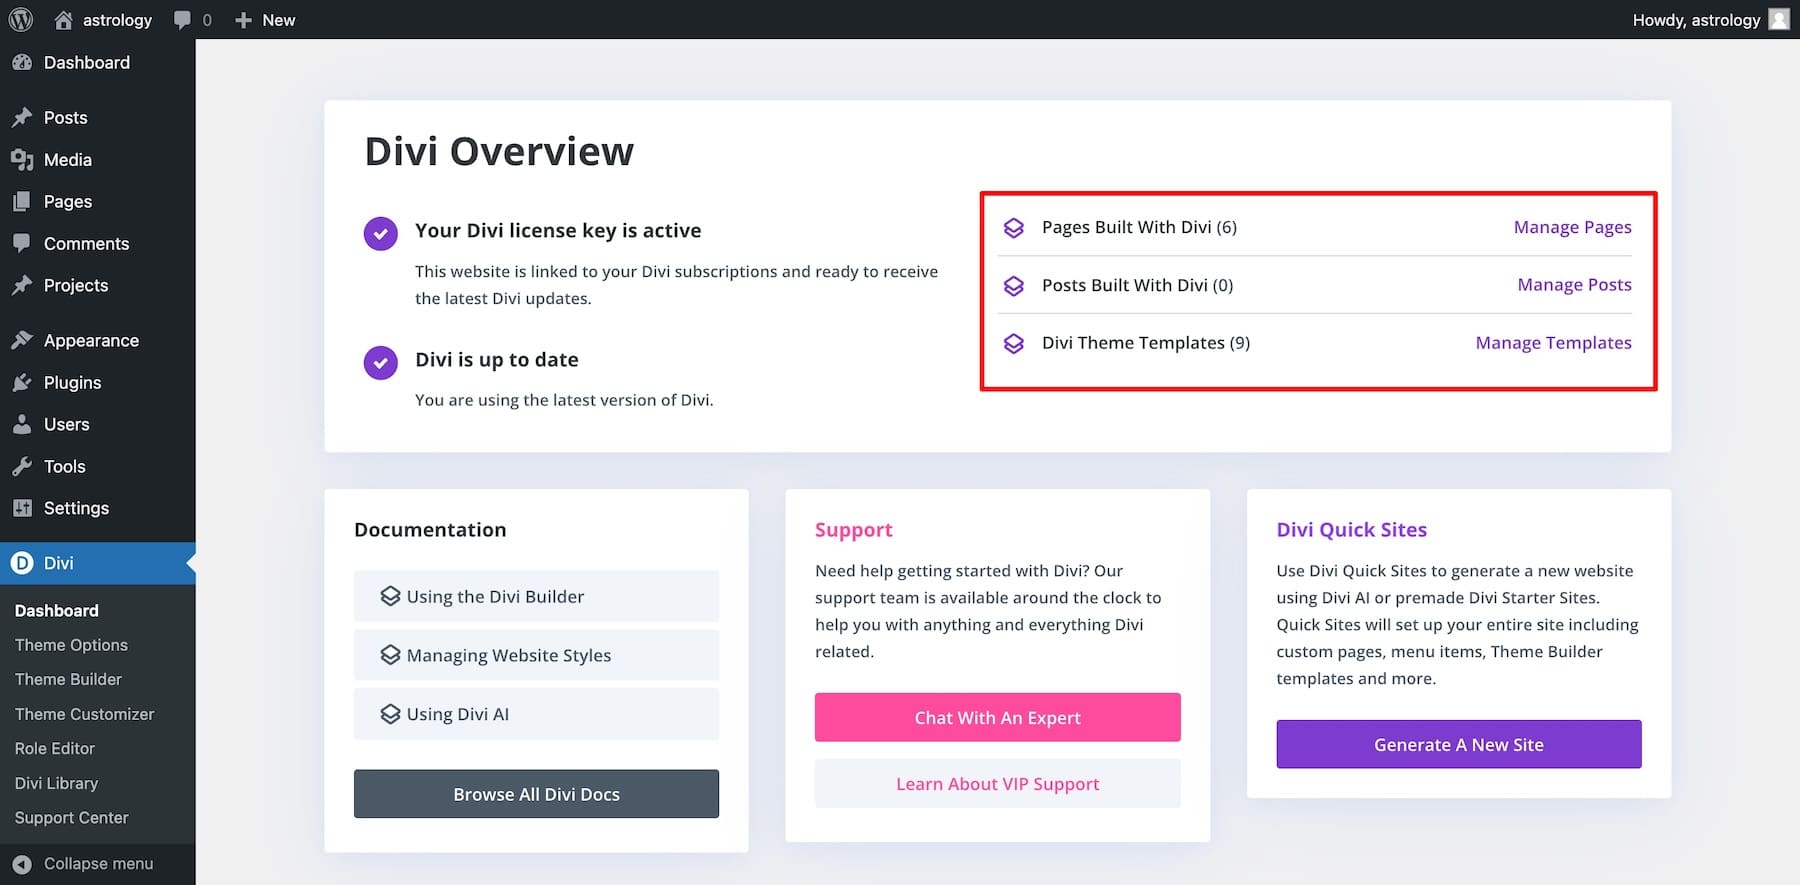
The Manage Pages button takes you to WordPress Pages, Manage Posts takes you to WordPress Posts, and Manage Templates takes you to Divi Theme Builder.
Next Steps: Customizing Your Starter Site
Now that your new Starter Site is live, the website needs to be edited to match your brand. To make it your own, you’ll need to customize it. But we’re not talking about spending hours manually adjusting each element’s style according to your brand. We’re talking about a better, much faster approach to editing your site.
Excited? Let’s start with editing site pages.
1. Editing Pages
Select any individual page from the list to start editing it with Divi. For example, hover over the Home page and click on the tiny pencil (edit) icon to edit it.
Tip: The eye button lets you preview the page to see the live version of individual pages.
![]()
Alternatively, you can click the “Manage Website Pages” button, which will take you to WordPress Pages. Hover over and click “Edit With Divi” on any page you want to customize.
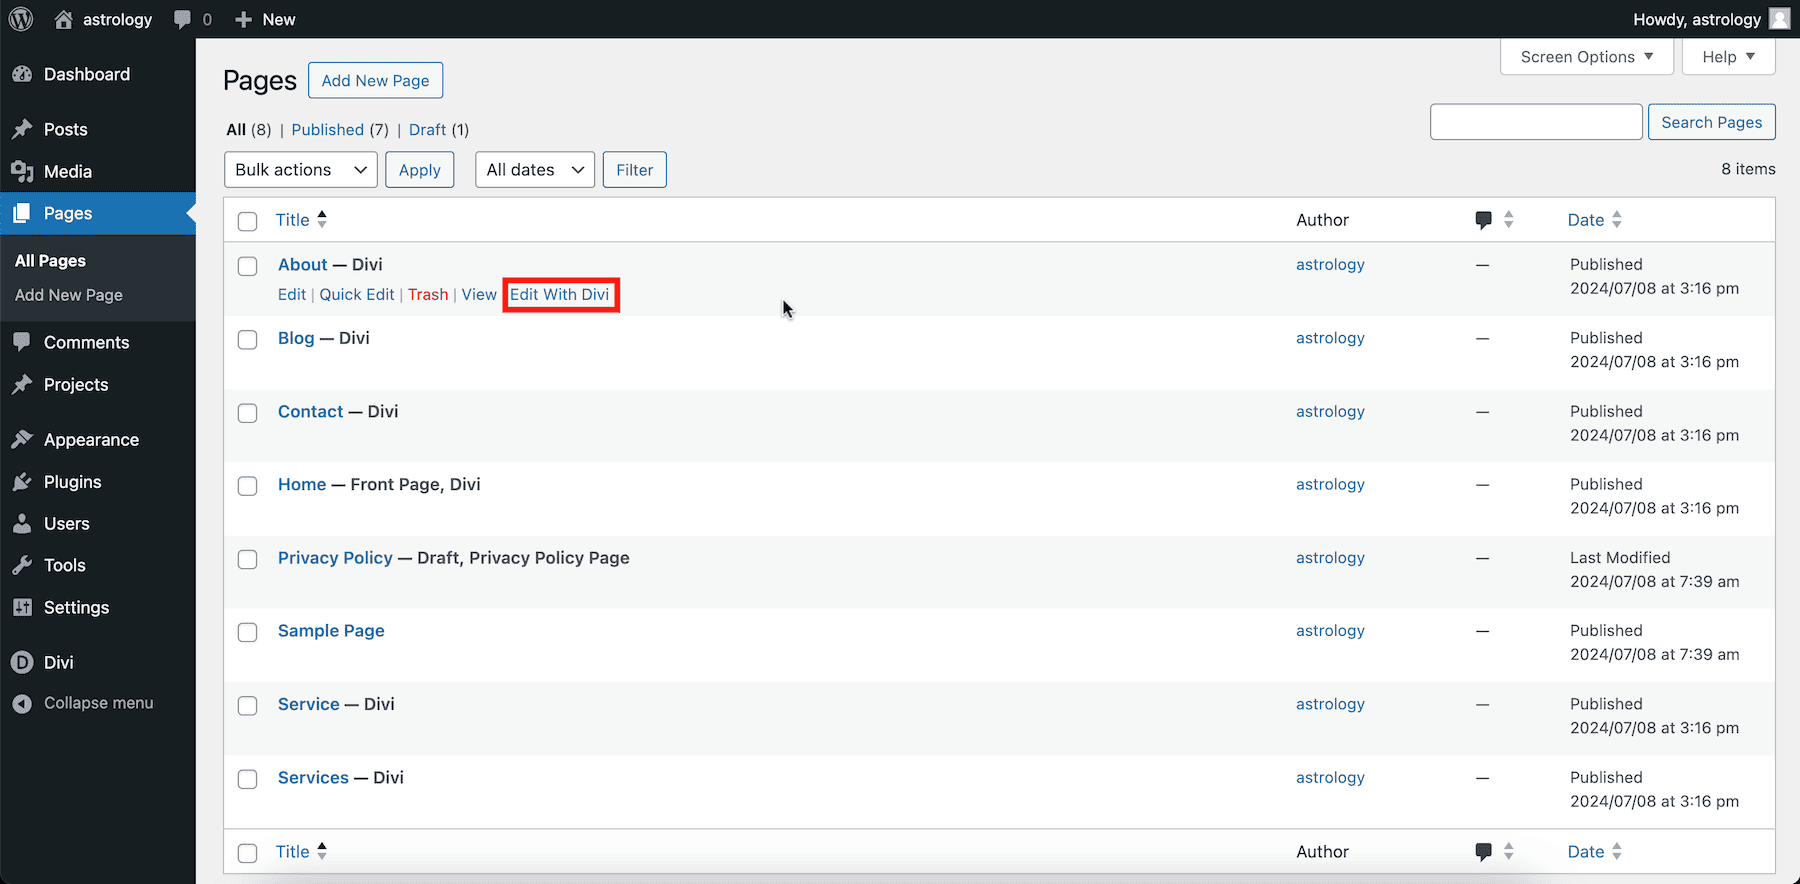
Both methods will take you to the Divi Page Builder, where you can make changes visually.
Using Divi Builder is straightforward. Divi Builder supports inline editing, so you can edit any text element directly on the screen without opening the settings every time.
Similarly, hover over an image element to upload your images and click on the gear (settings) icon. You can use the little settings icon to choose a different picture from your WordPress Media Library or use Divi AI to generate a new image.
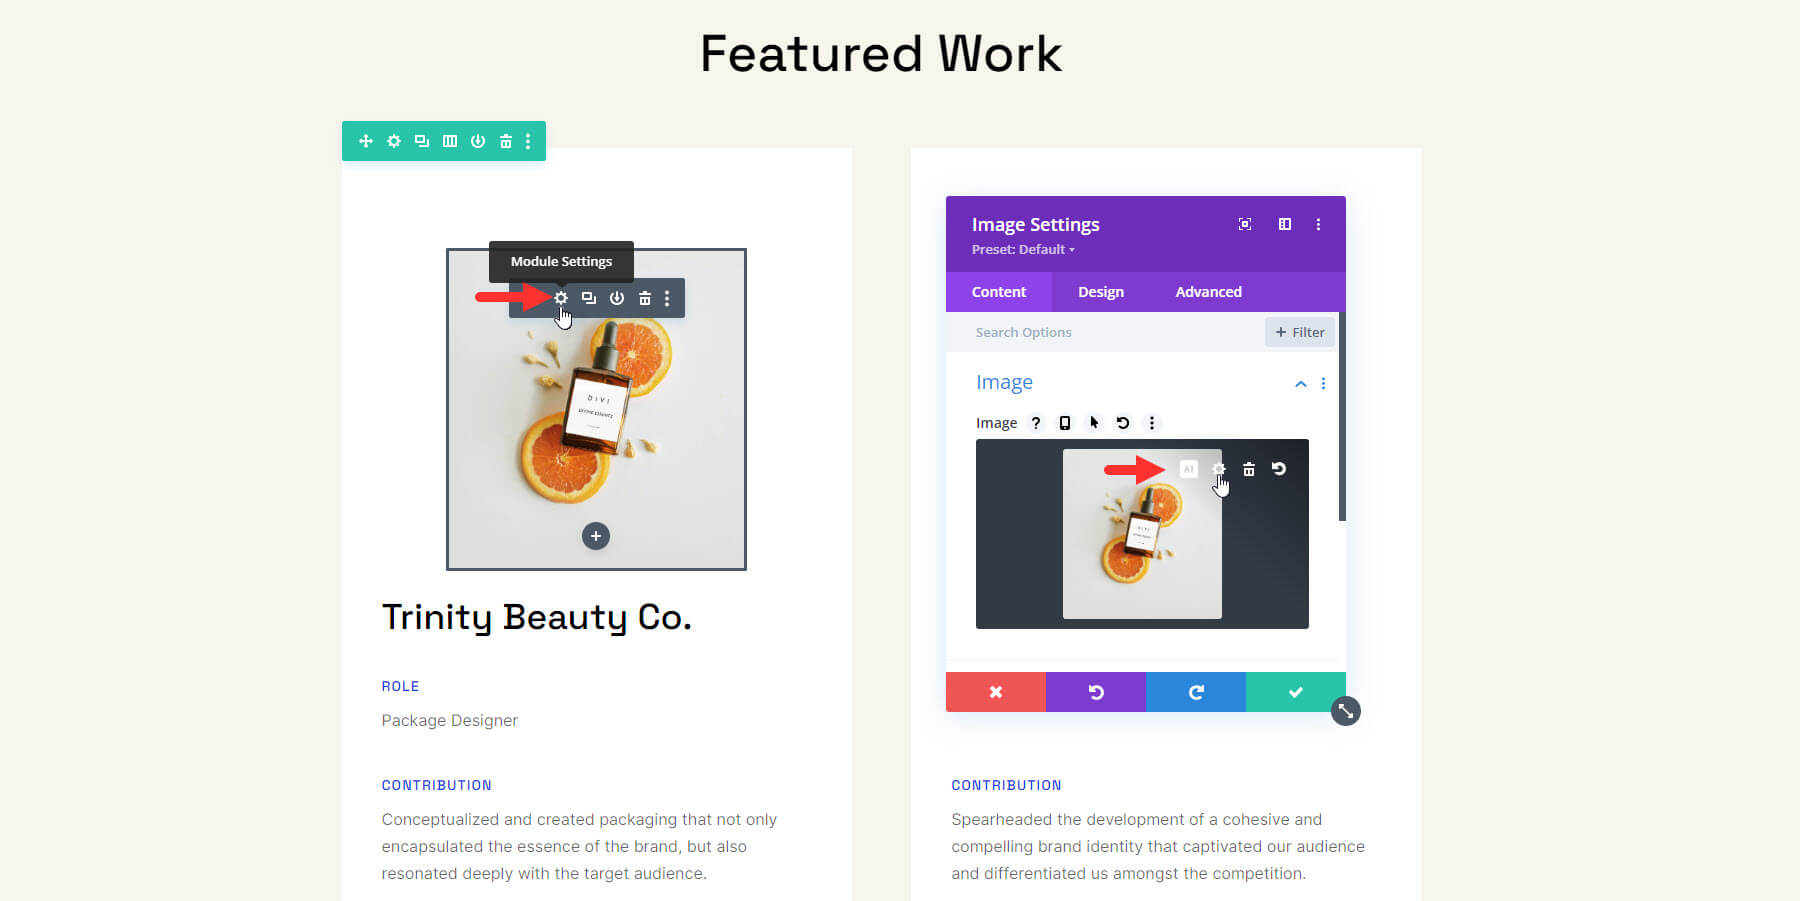
Also, update links, buttons, and other elements by going through the settings option for each element. Watch this video on getting started with Divi to learn how to edit pages with Divi Builder.
2. Customizing Global Fonts
Your Starter Site will automatically update your website’s global fonts for your headings and body text. You can update the global fonts to improve your site’s appearance and match branding.
Divi’s Global Fonts can be changed from the Theme Customizer or directly from the Divi Builder.
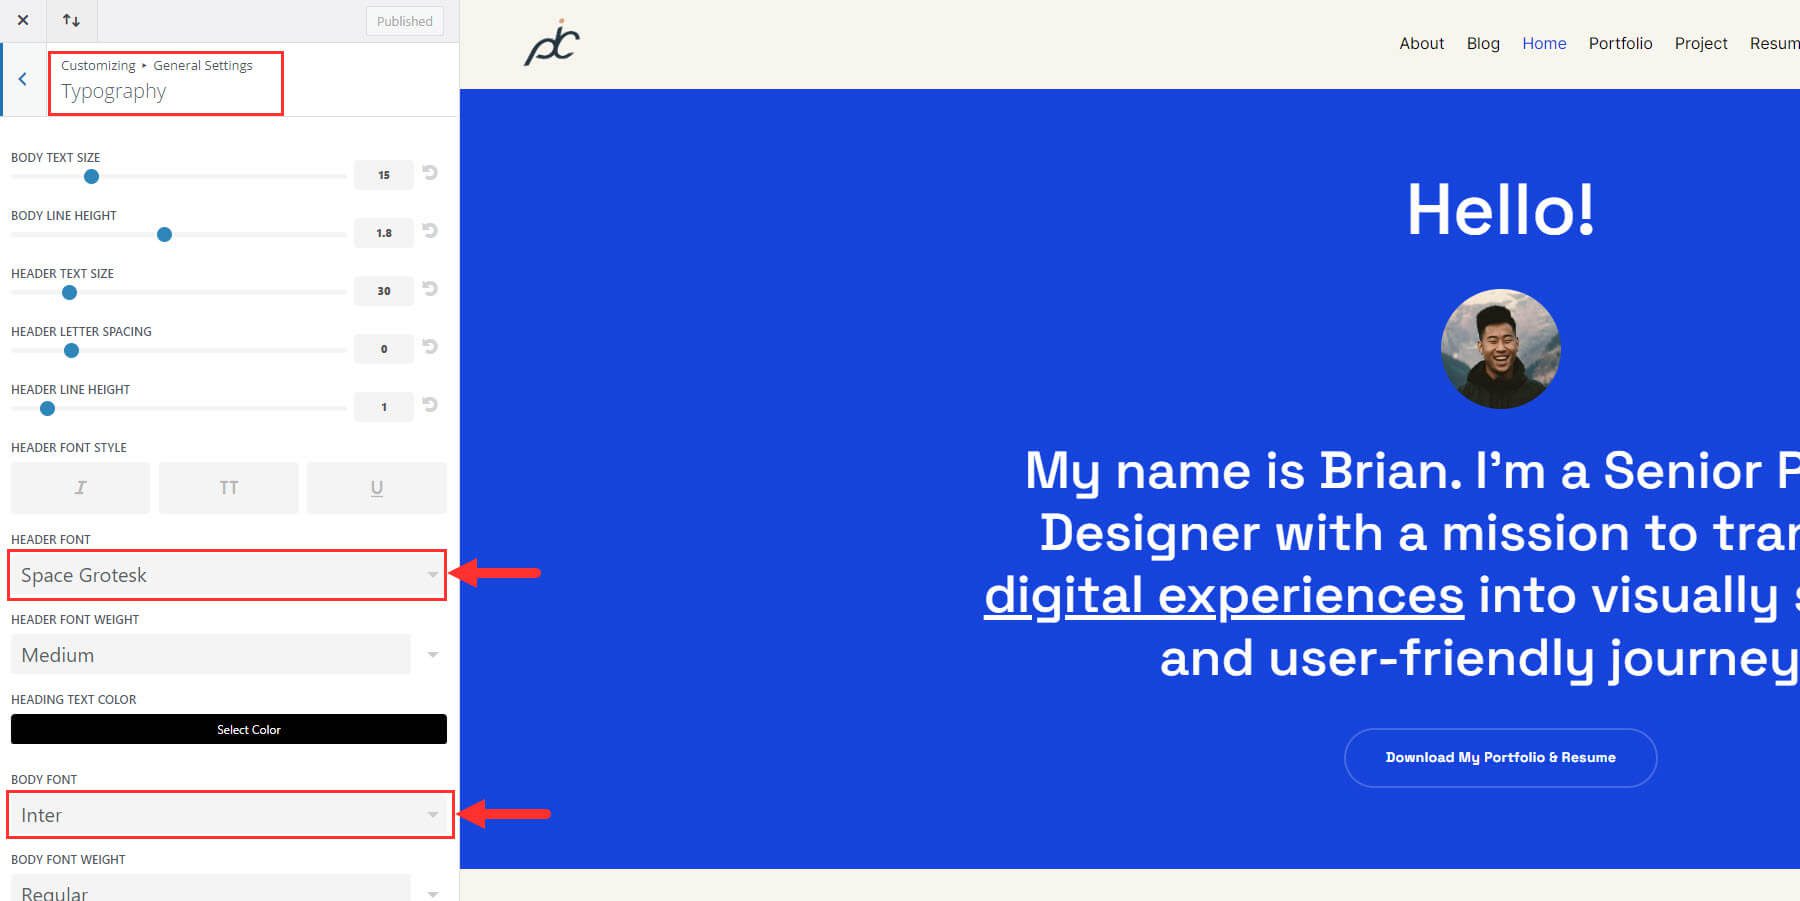
To change them in the Theme Customizer, go to your WordPress Dashboard and navigate to Divi > Theme Customizer. Then select General Settings > Typography. There, you can change your Header Font and Body Font.
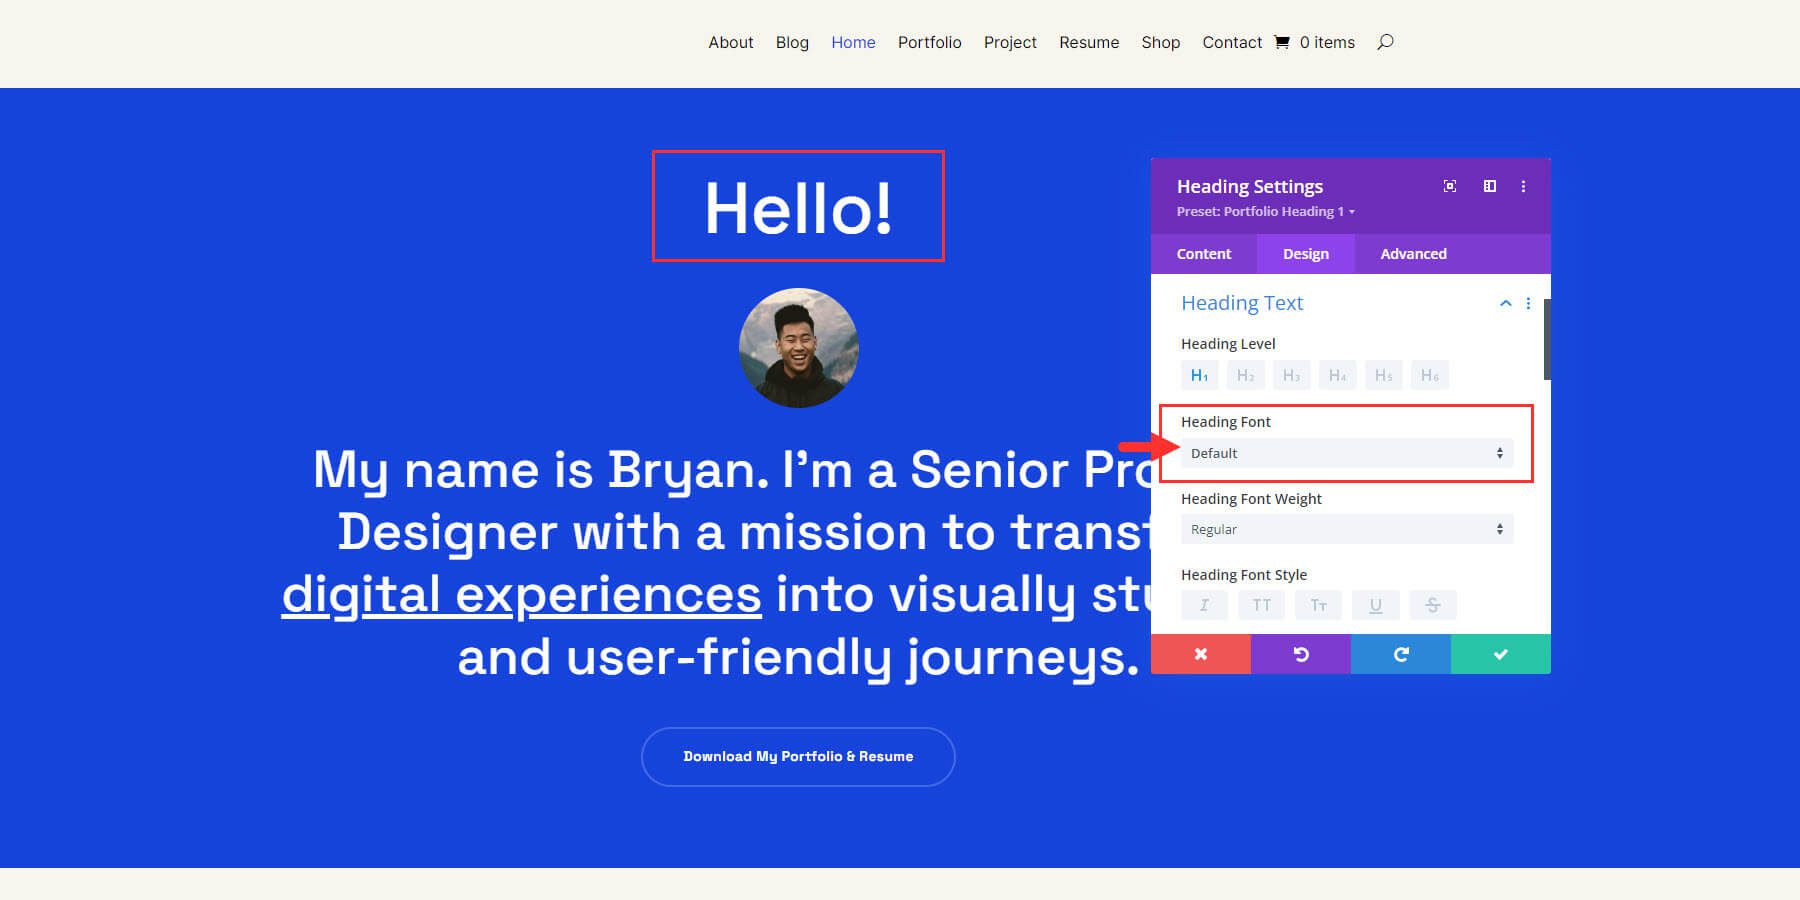
But you can also access and edit Global Fonts directly from the Divi Builder. Simply open the settings modal of any Divi Module containing text. For example, you can open the Heading Module settings. Then go to the Design tab and find the Heading Font. You’ll notice it is set to the default, which means it is using your default global font. Click the dropdown menu to see your font options.
In the font options popup, you can find your Global Fonts listed with a button to “edit global fonts.” This is convenient because it gives you easy access to select your Global Font when creating new content as well as the ability to change them without going to the Theme Customizer.
For the Portfolio Starter Site, the global heading font is “Space Grotesk” and global body font is “Inter.” To edit them, click “Edit Global fonts.”
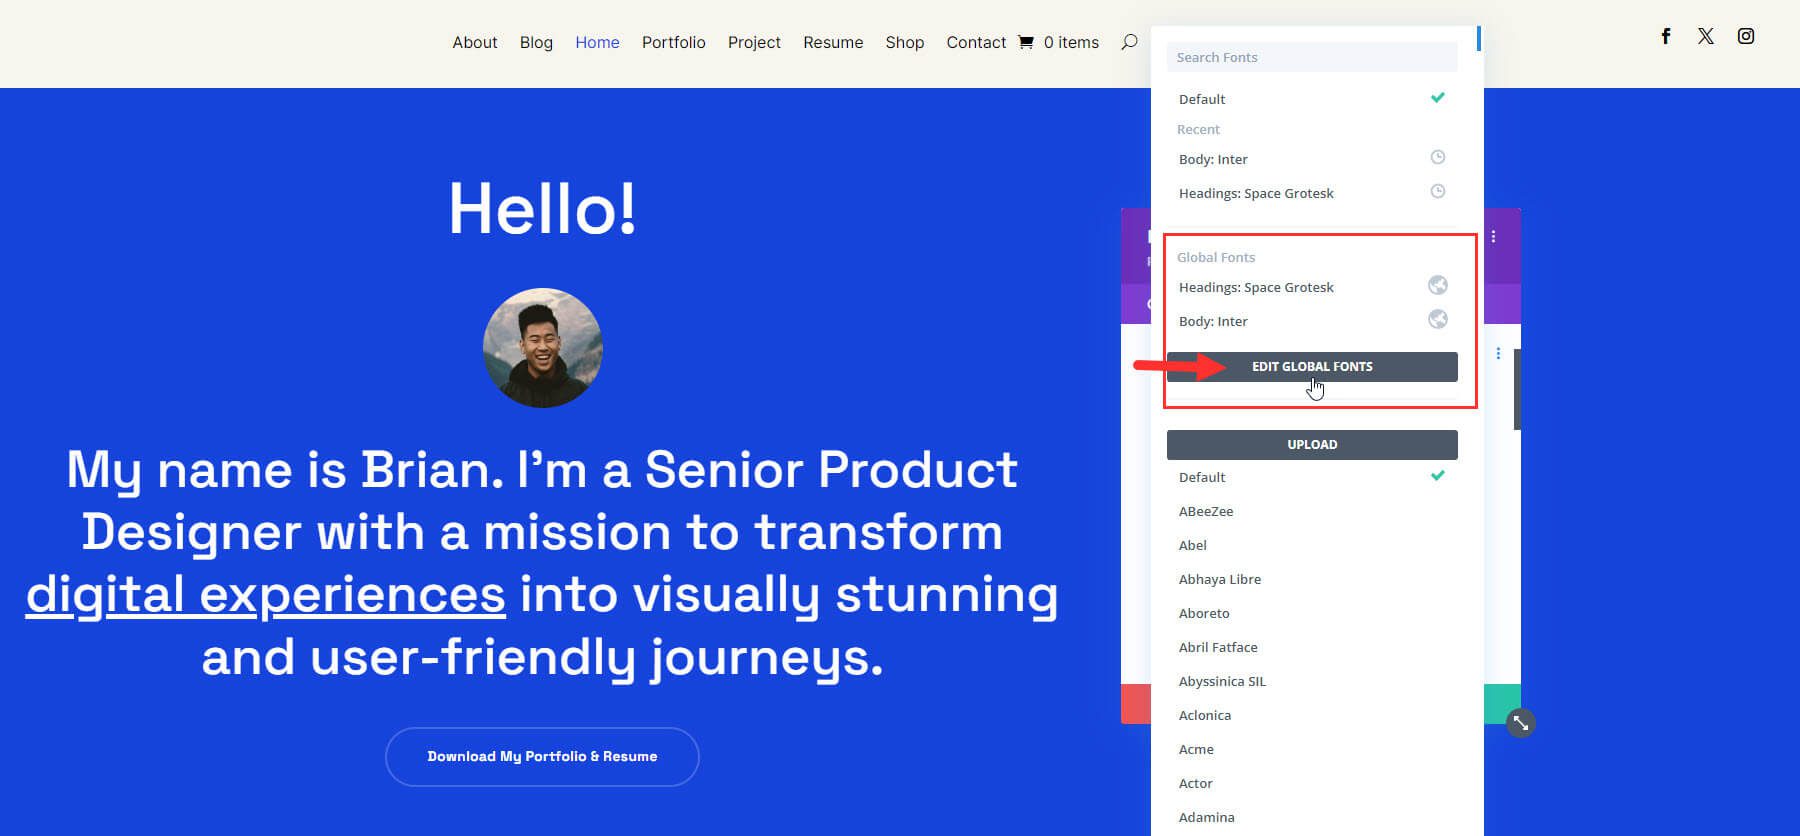
Choose your new heading and body fonts and click “Save.”
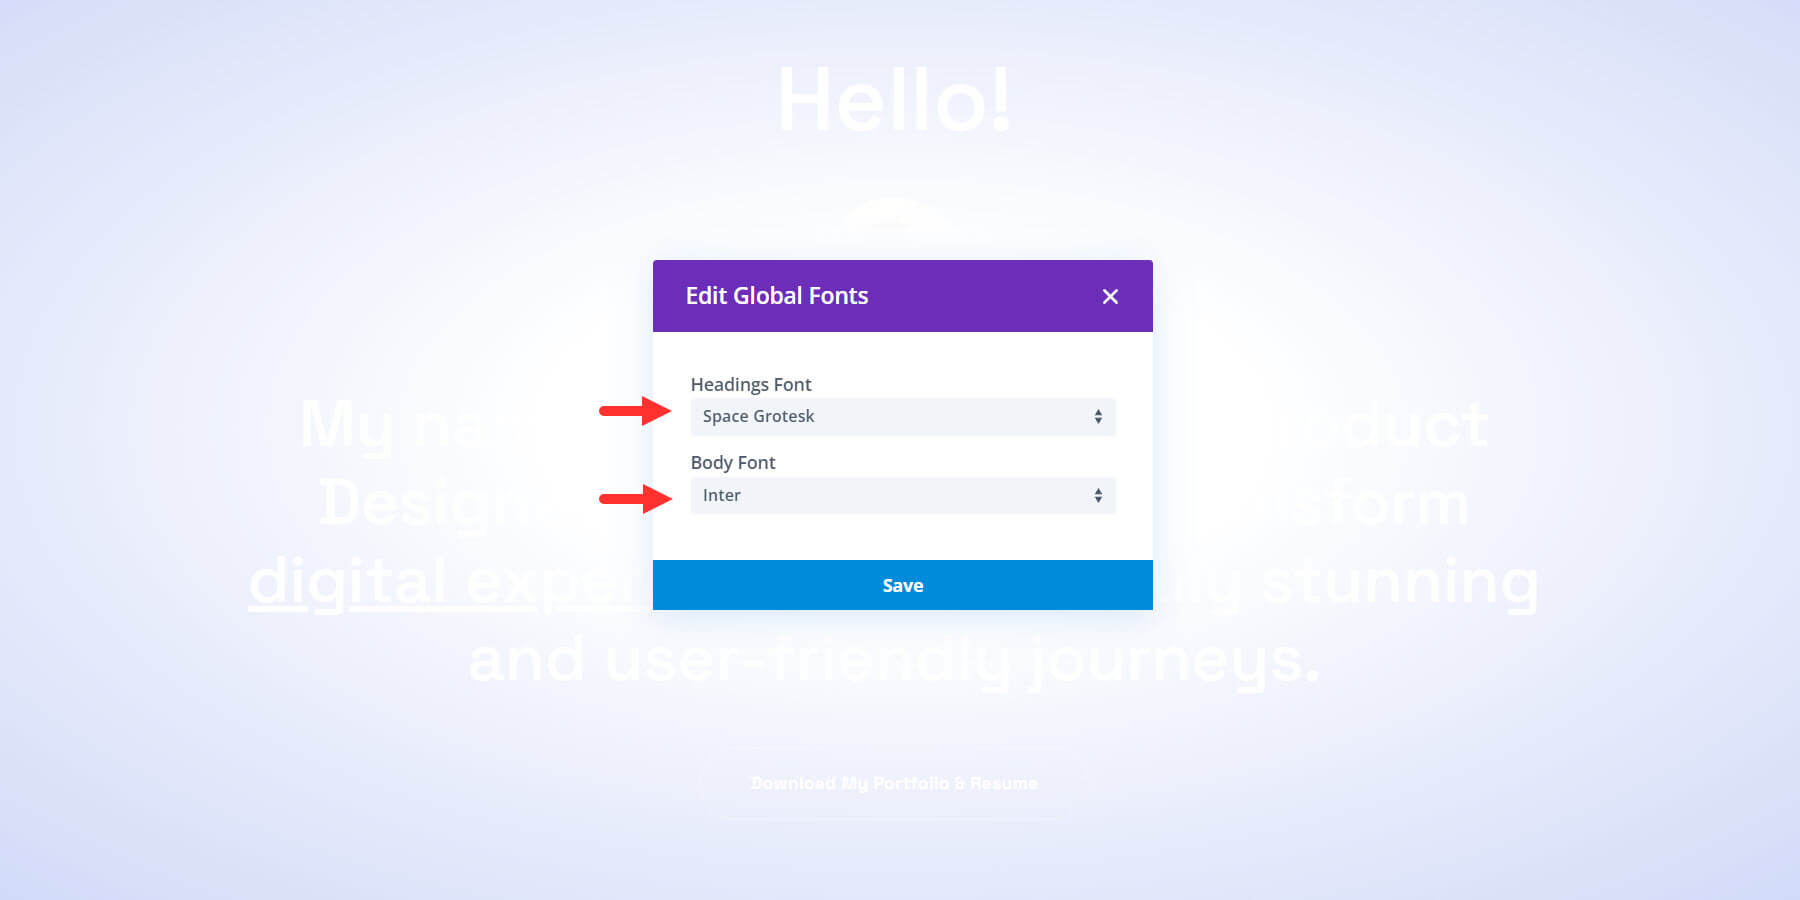
Keep in mind that this is just a good initial step to update your new site with the main Fonts you plan to use. You can always override these global fonts by selecting a different font from the list on a case-by-case basis.
3. Customizing Global Colors
Colors play a powerful role in your website branding, so it is important to keep colors specific and consistent. Your Starter Site will have Global colors to help you get the perfect color scheme for your new site with just a few clicks.
You can access your Global Colors from any Module’s settings that contain a color option. For example, click to edit a Button Module find the button background color option under the design tab. You will see your row of saved colors. Select the “global” toggle button to view all your site’s global colors. Then select the gear icon to edit those global colors.
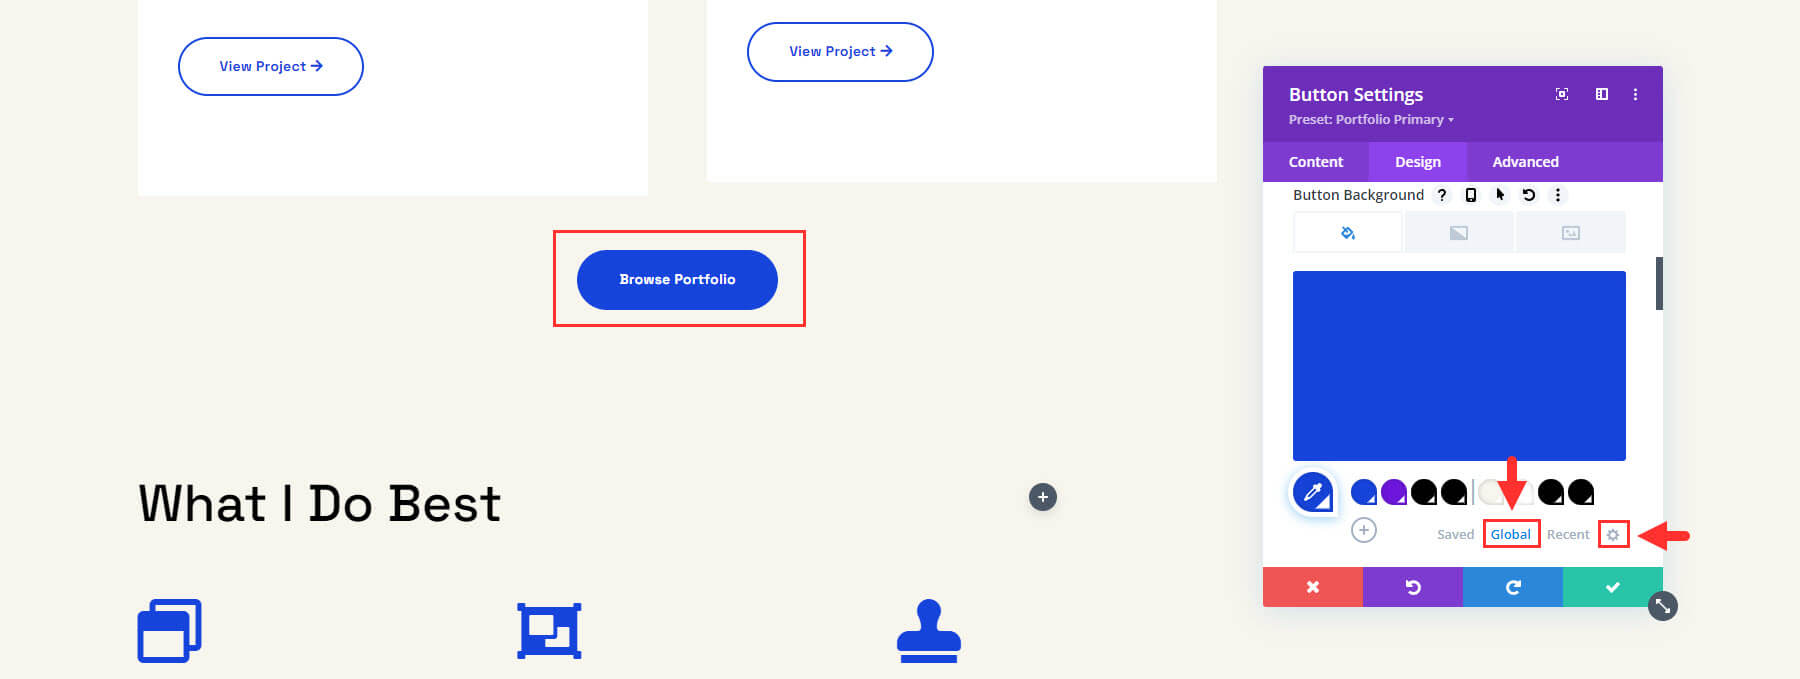
Generally, the first is the primary website color, the second is the secondary color, the third is the heading color, and the fourth is the body color. Updating these four colors alone will change the entire look of your site!
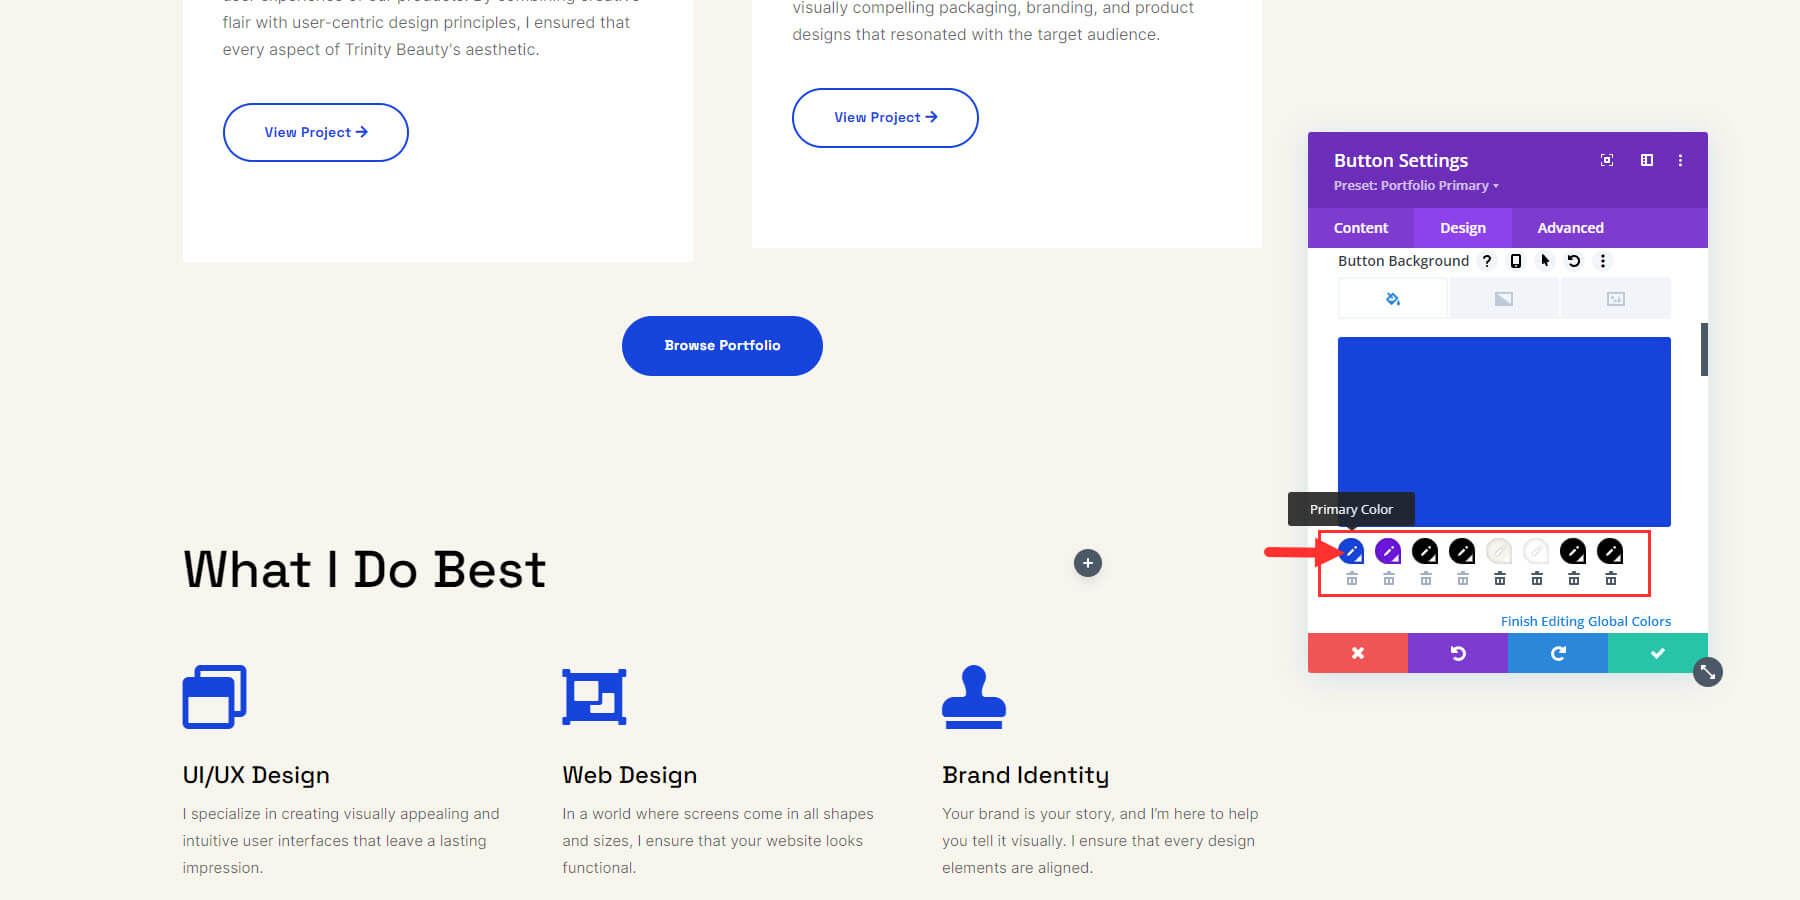
You can start by changing the primary color by clicking on it, then using the color picker or entering the hex code, and clicking the green check icon. A confirmation box will pop up to confirm that you want to make the change. Click OK to confirm.
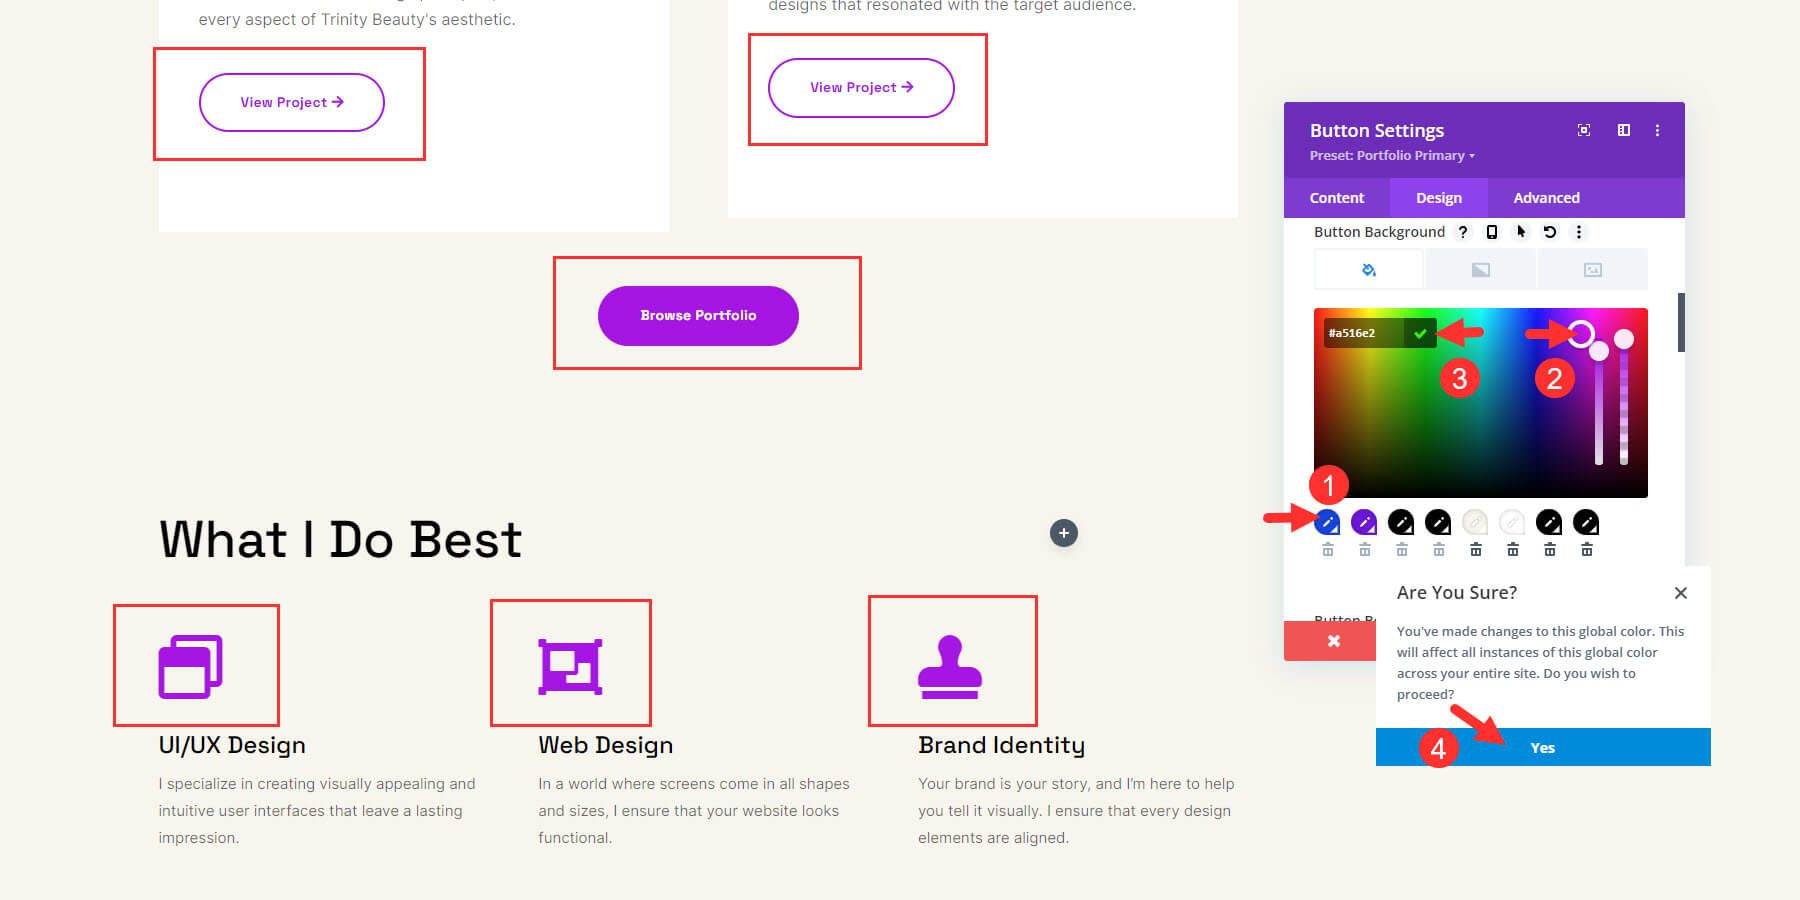
Once you modify all four, the changes will appear side-wide. You can add more global colors by clicking the plus button right next to the row of colors if needed.
3. Editing Global Presets
Global presets are pre-configured styles and settings that can be applied to multiple elements across a website for consistent design and easier updates.
Each Starter site is purposefully designed with modules that have global presets already in place. You can modify the existitng presets to make site-wide changes and avoid having to manually modify each element.
Let’s start by changing a Button Module preset. Open the settings for one of the Button modules on your page using the Divi Builder. At the top, you’ll notice that it has a preset style saved differently from the default. Click on the dropdown button next to the preset to open more options. You will see a list of all the presets imported from the Starter site. The green check mark let’s you know which one is currently being used, which in this case is “Portfolio Primary Outlined Icon.”
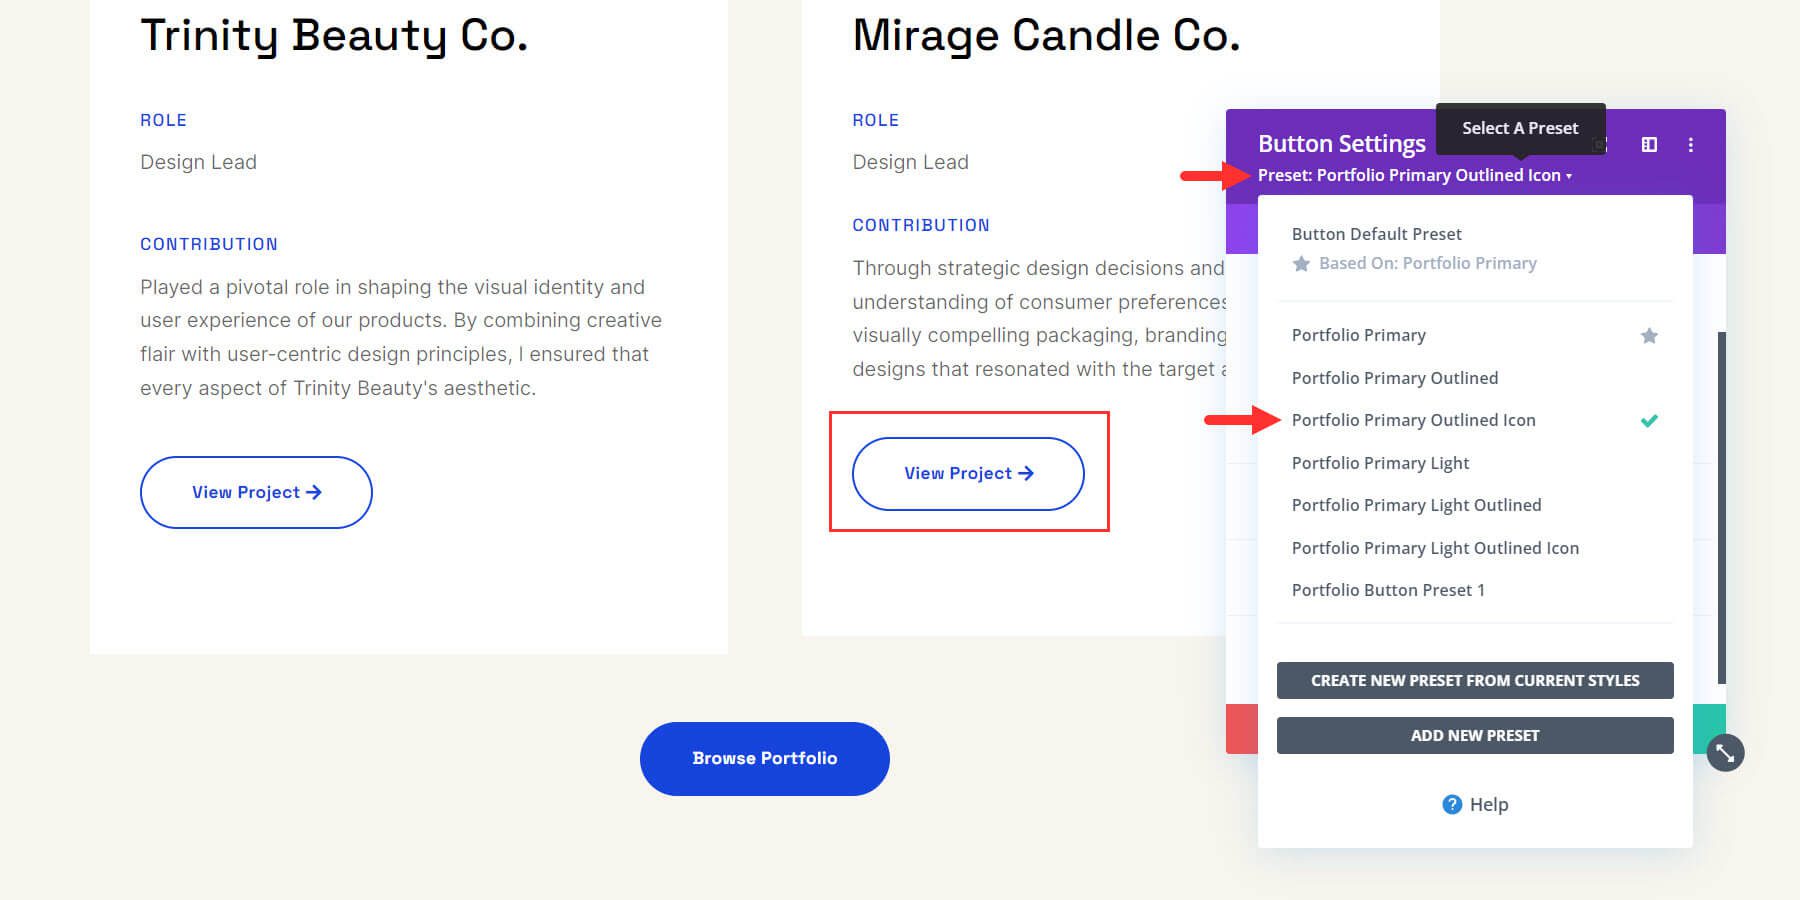
You can choose any preset you want to use from the list to automatically update the module with the preset’s design settings.
The true power of global presets is demonstrated whenever you need to make site-wide changes to a design element or module. To do this, you can edit the preset from any module containing it. To edit a preset, hover over it and click the pencil icon.
![]()
The grey color of the settings box means you’re editing the preset settings. Now, make the changes you want. Once you’re done with the changes, click on the green check button.
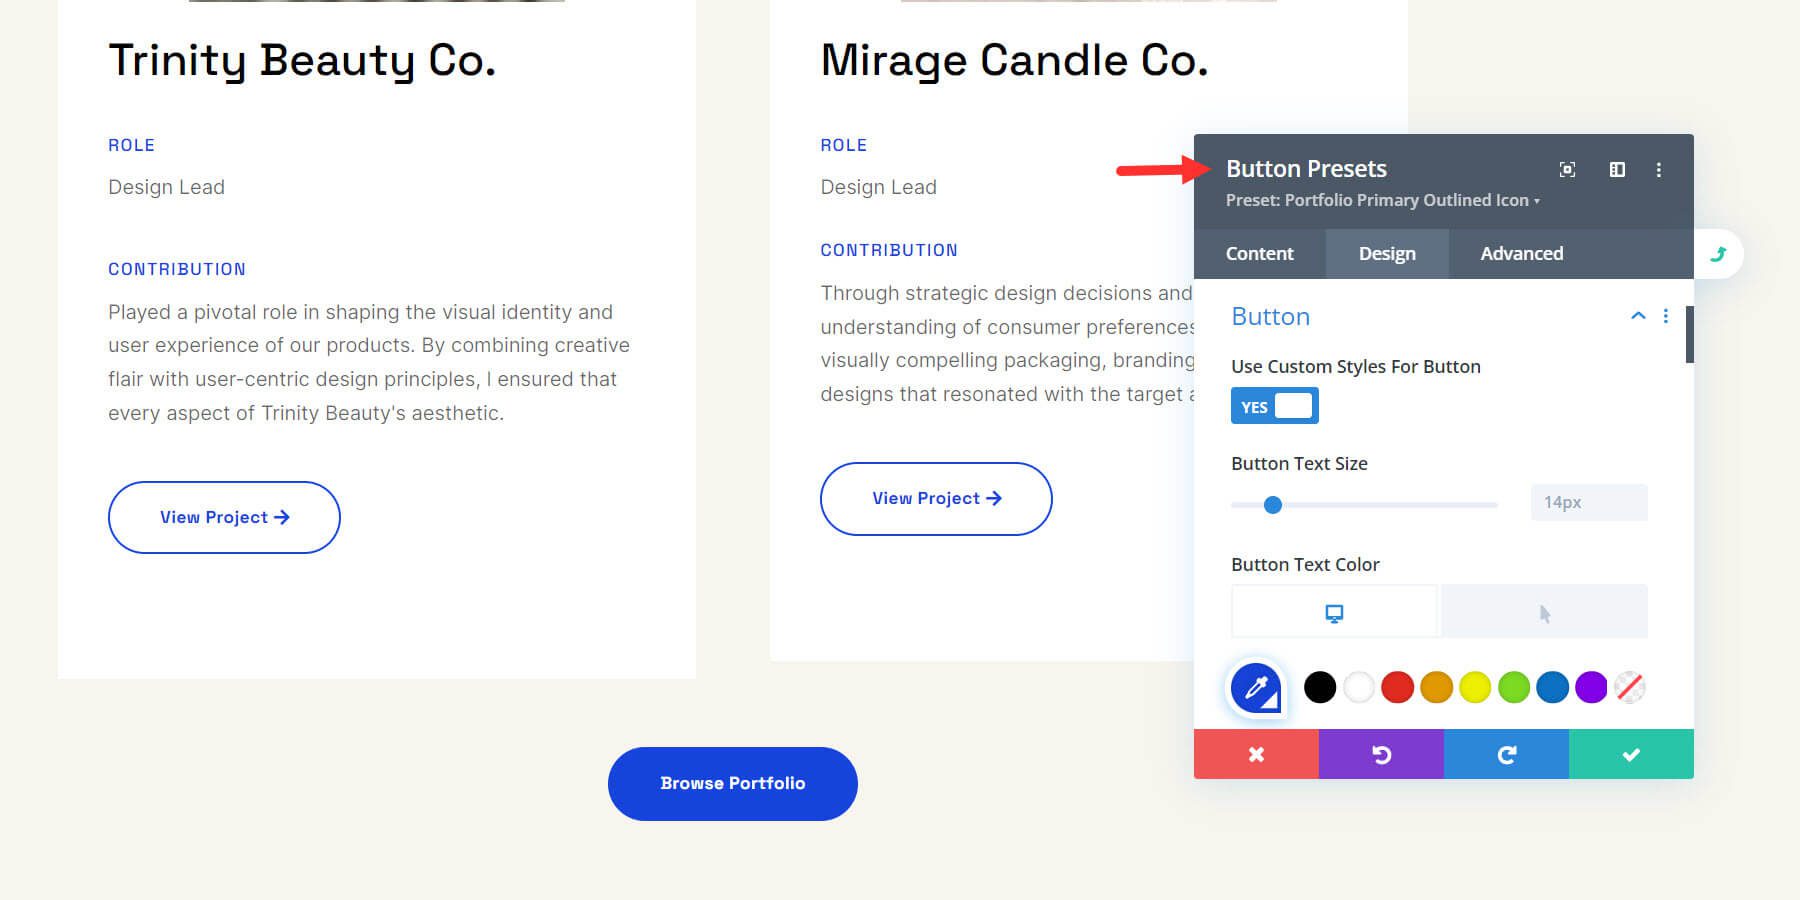
After this, the preset used in every heading element site-wide will be updated. It’s that easy!
Here is a video illustration of how to update a preset. Notice how all the buttons on the page are instantly updated by changing the preset.
Similarly, you can edit global presets of any section, text, button, or other element of your site. Watch this video on Divi Global Presets to learn how to use them to make site-wide changes and optimize your site faster.
4. Editing Your Starter Site Theme Builder Templates
Divi Quick Sites also replicates Theme Builder templates from the Starter site and creates copies for your website. From the “Your Site is Ready!” page, click on “Manage Theme Templates” to view them.
You can also go to Divi > Theme Builder from your WordPress dashboard.
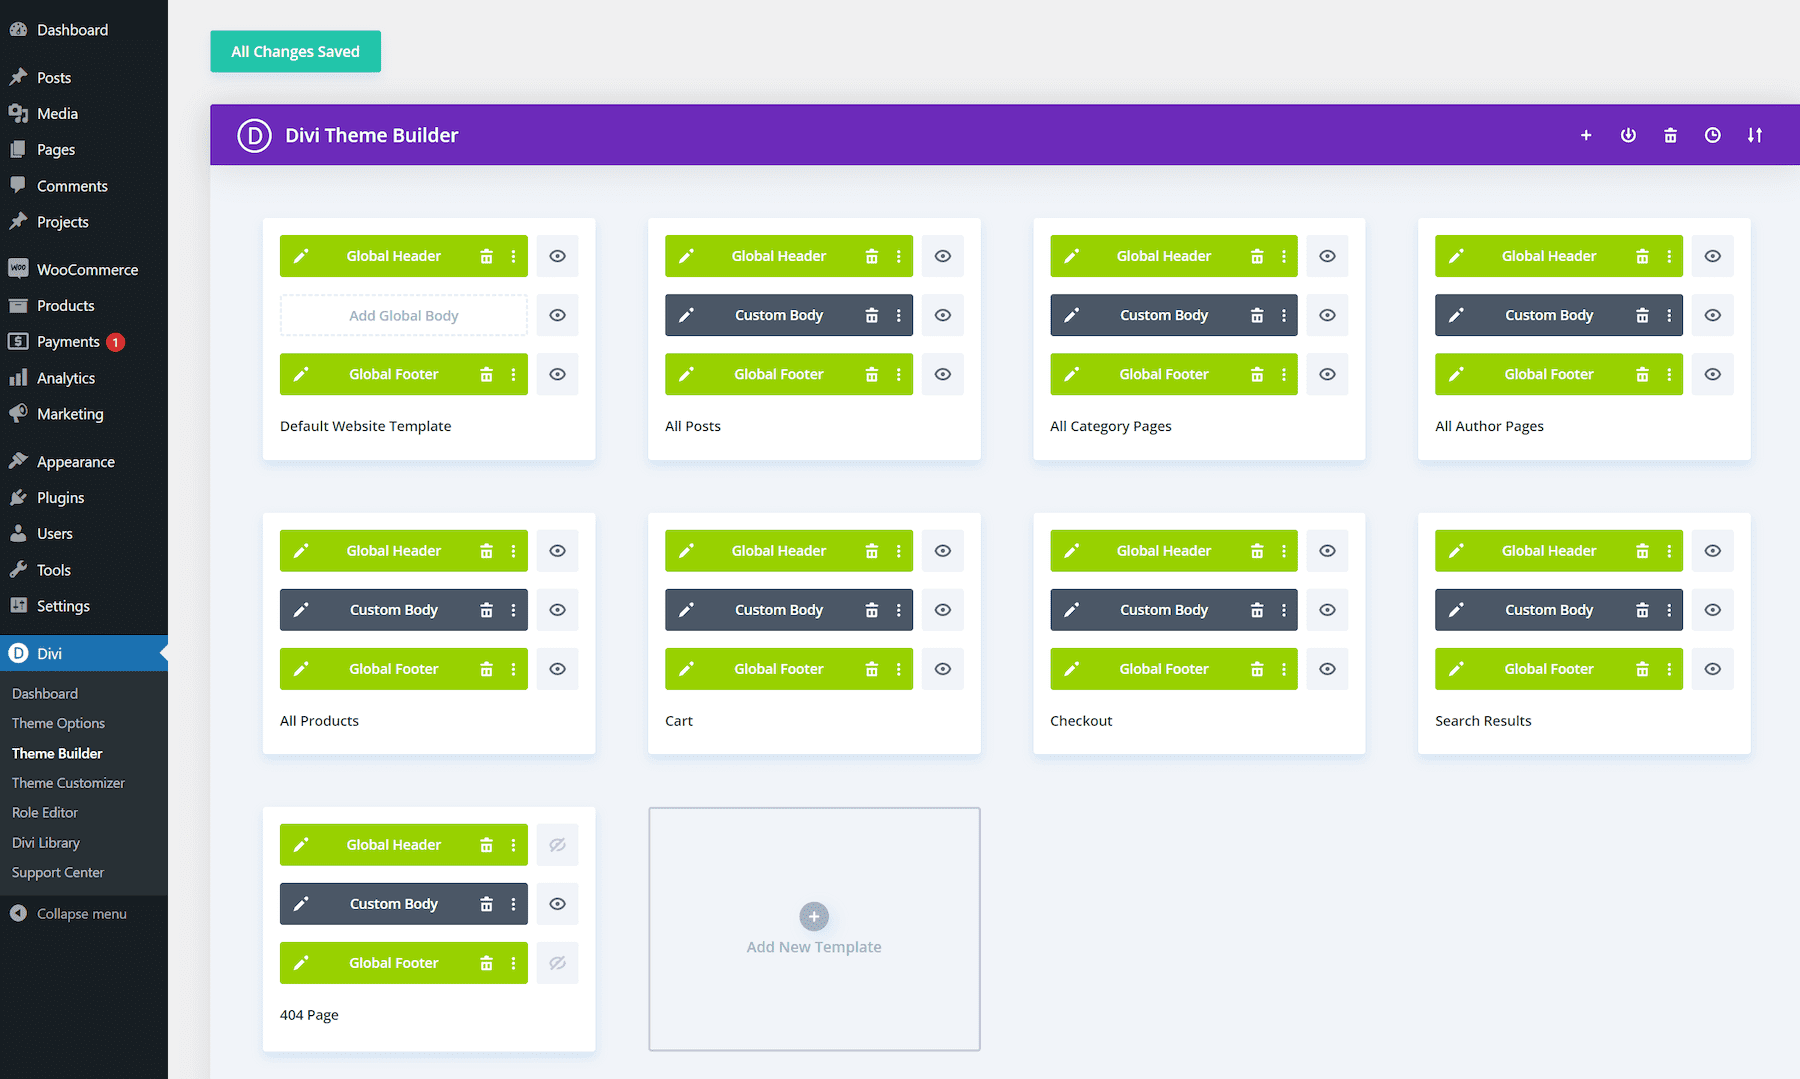
To edit the global header of the Default Header Template, click the pencil icon on the left side of the global header.
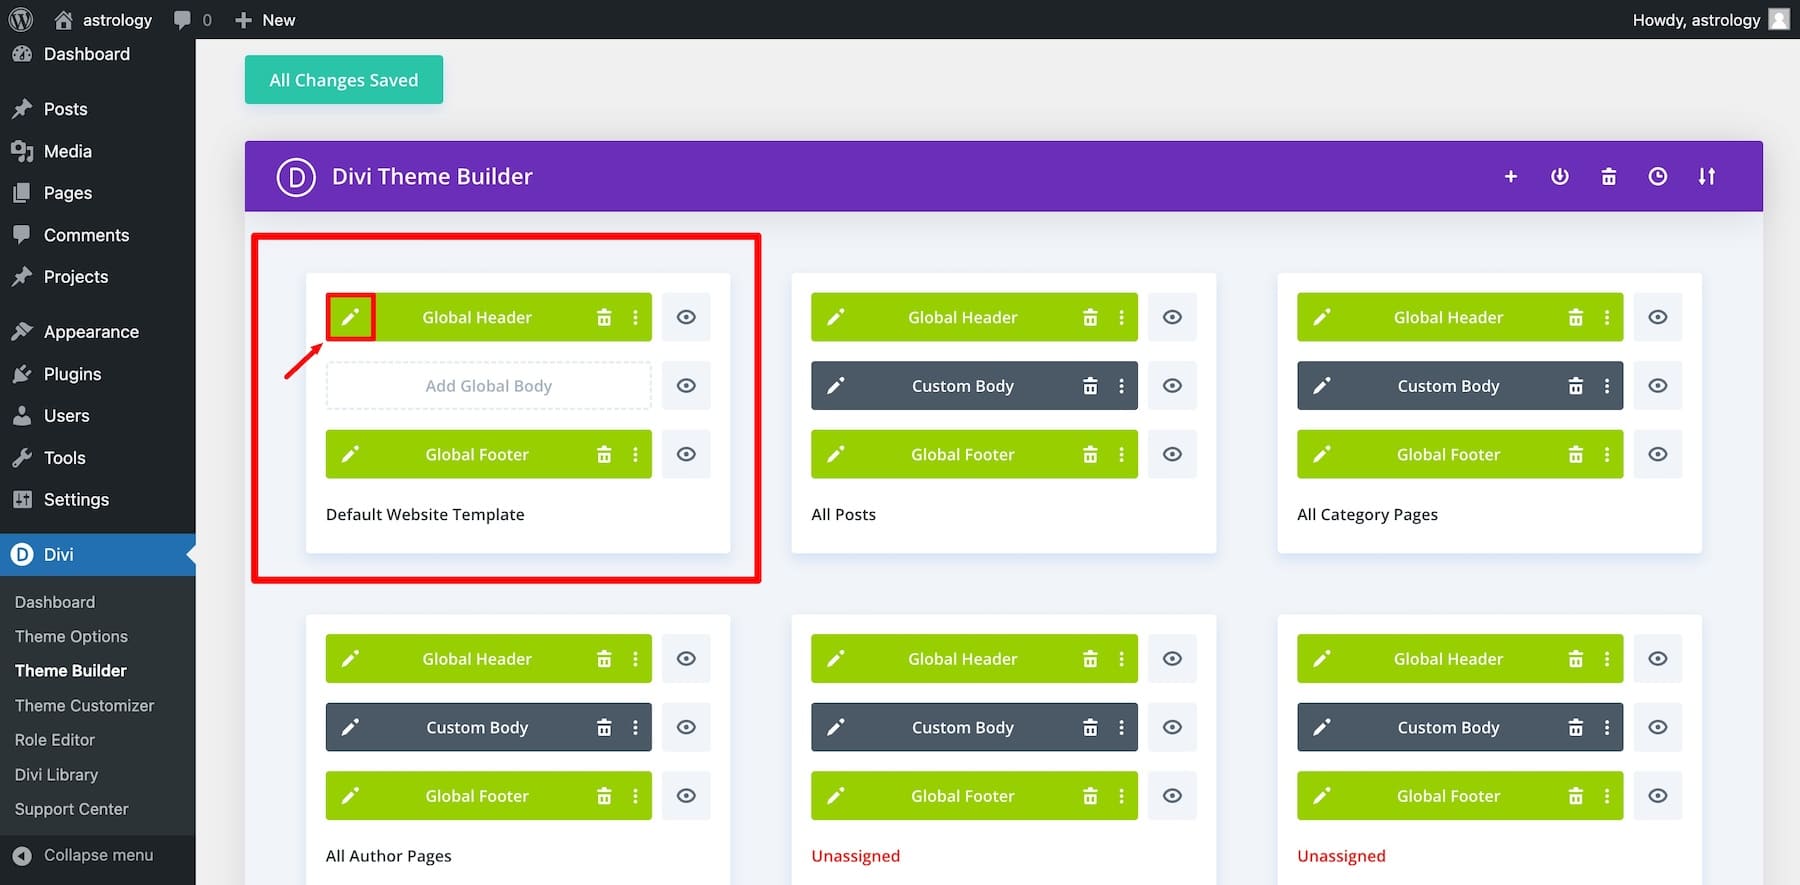
This will open the Divi Page Builder, which means you can customize it and any other global element visually by dragging and dropping them.
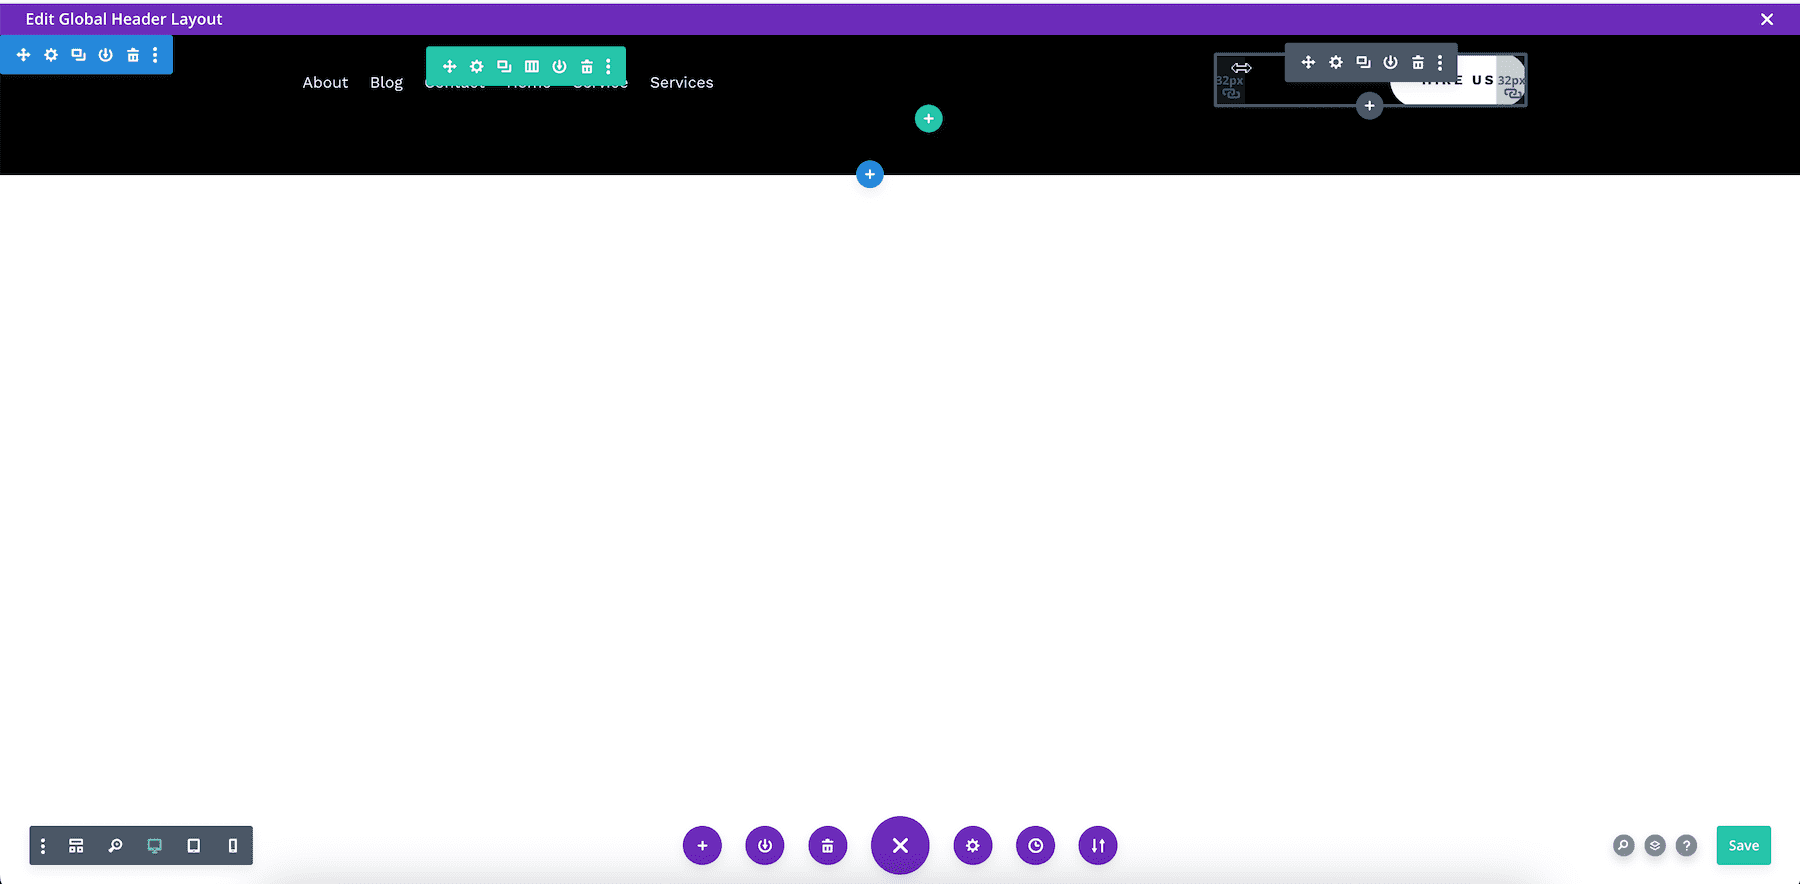
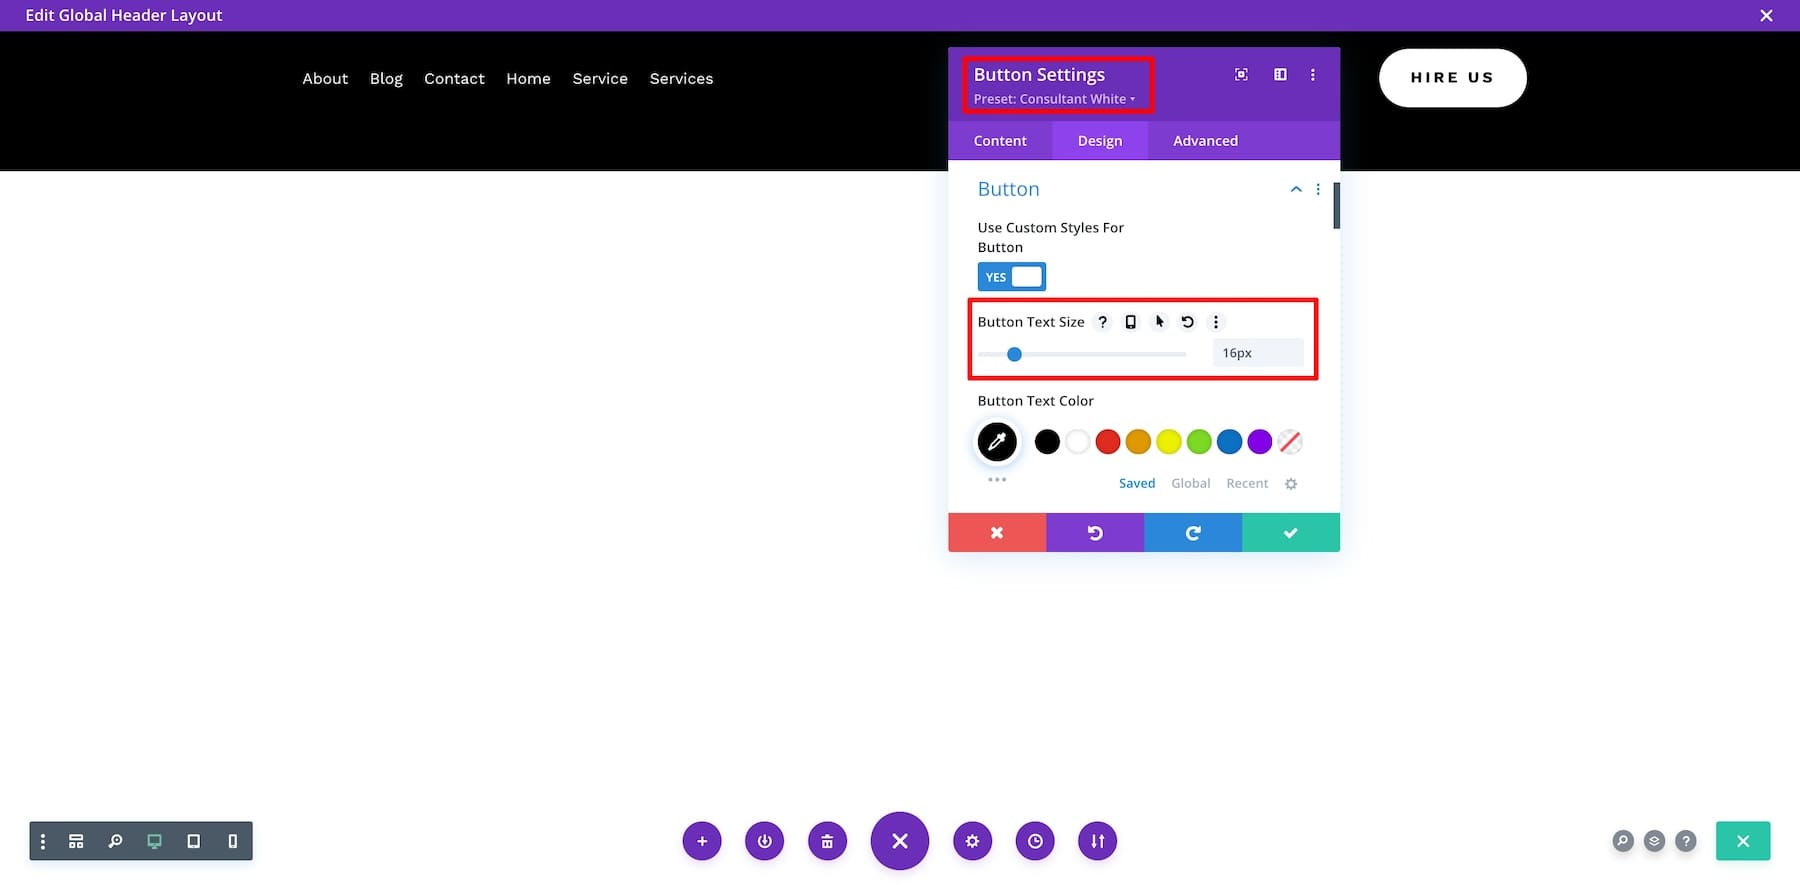
Let’s say I want to edit the button’s font size. So I hover over it and click on settings. Then I go to Design, scroll down to Button, and change the font size. You can also make changes and modify the button’s preset style.
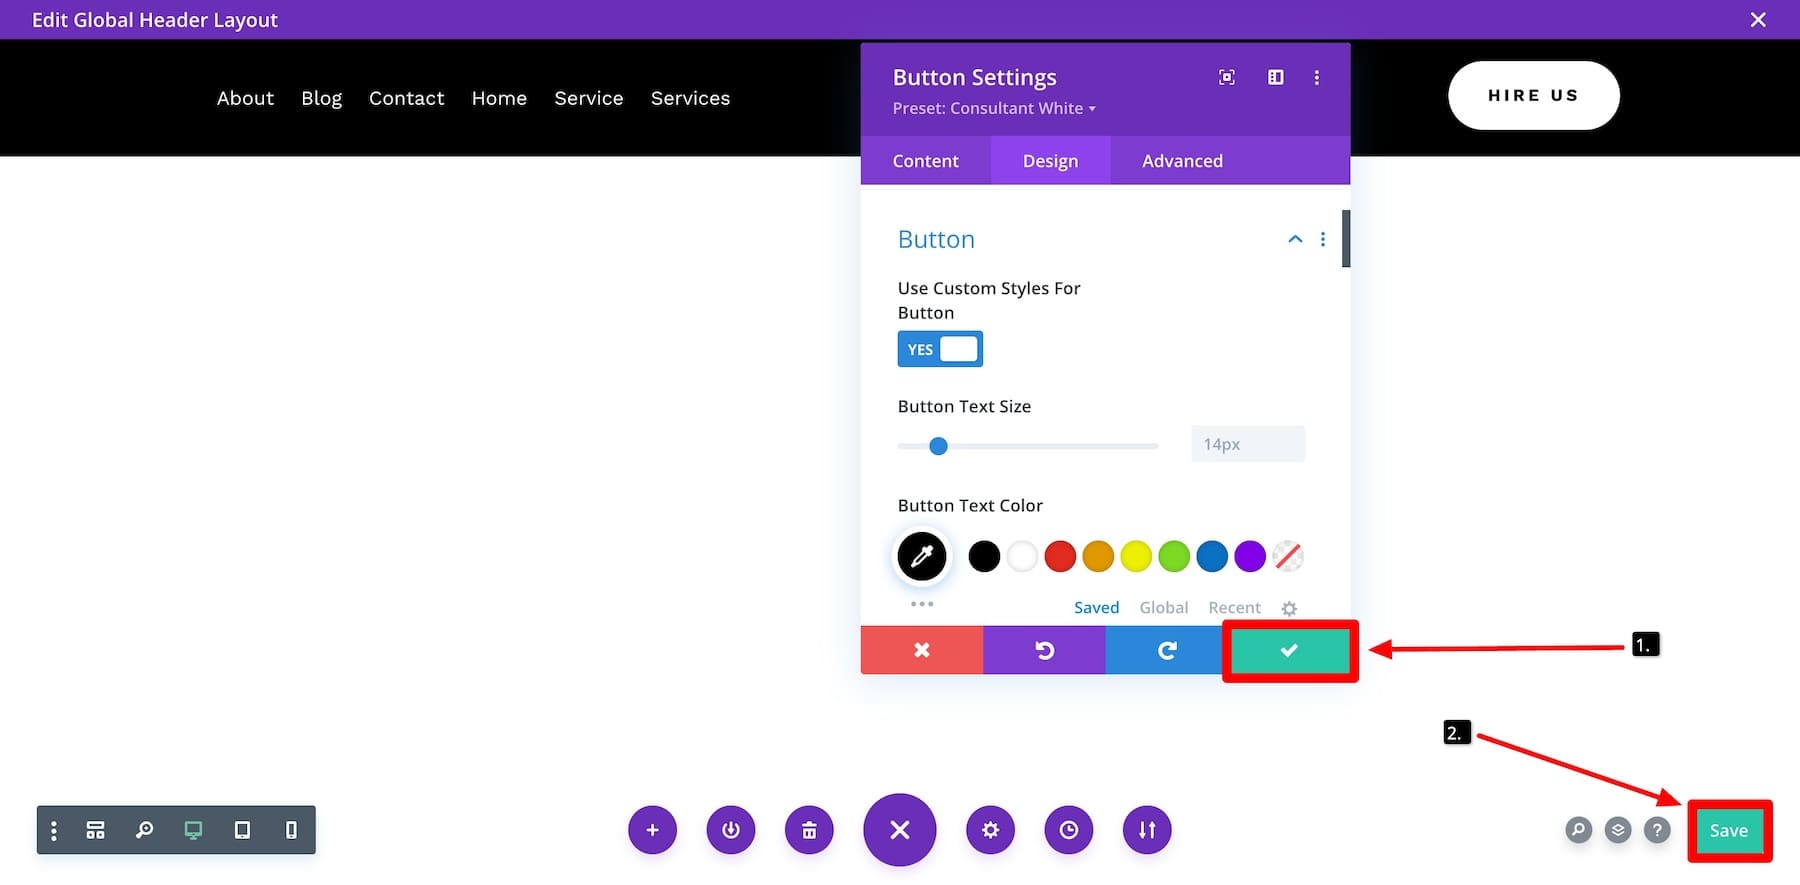
Once done, click the green check button and Save. This will update the global header across all pages where it’s used.
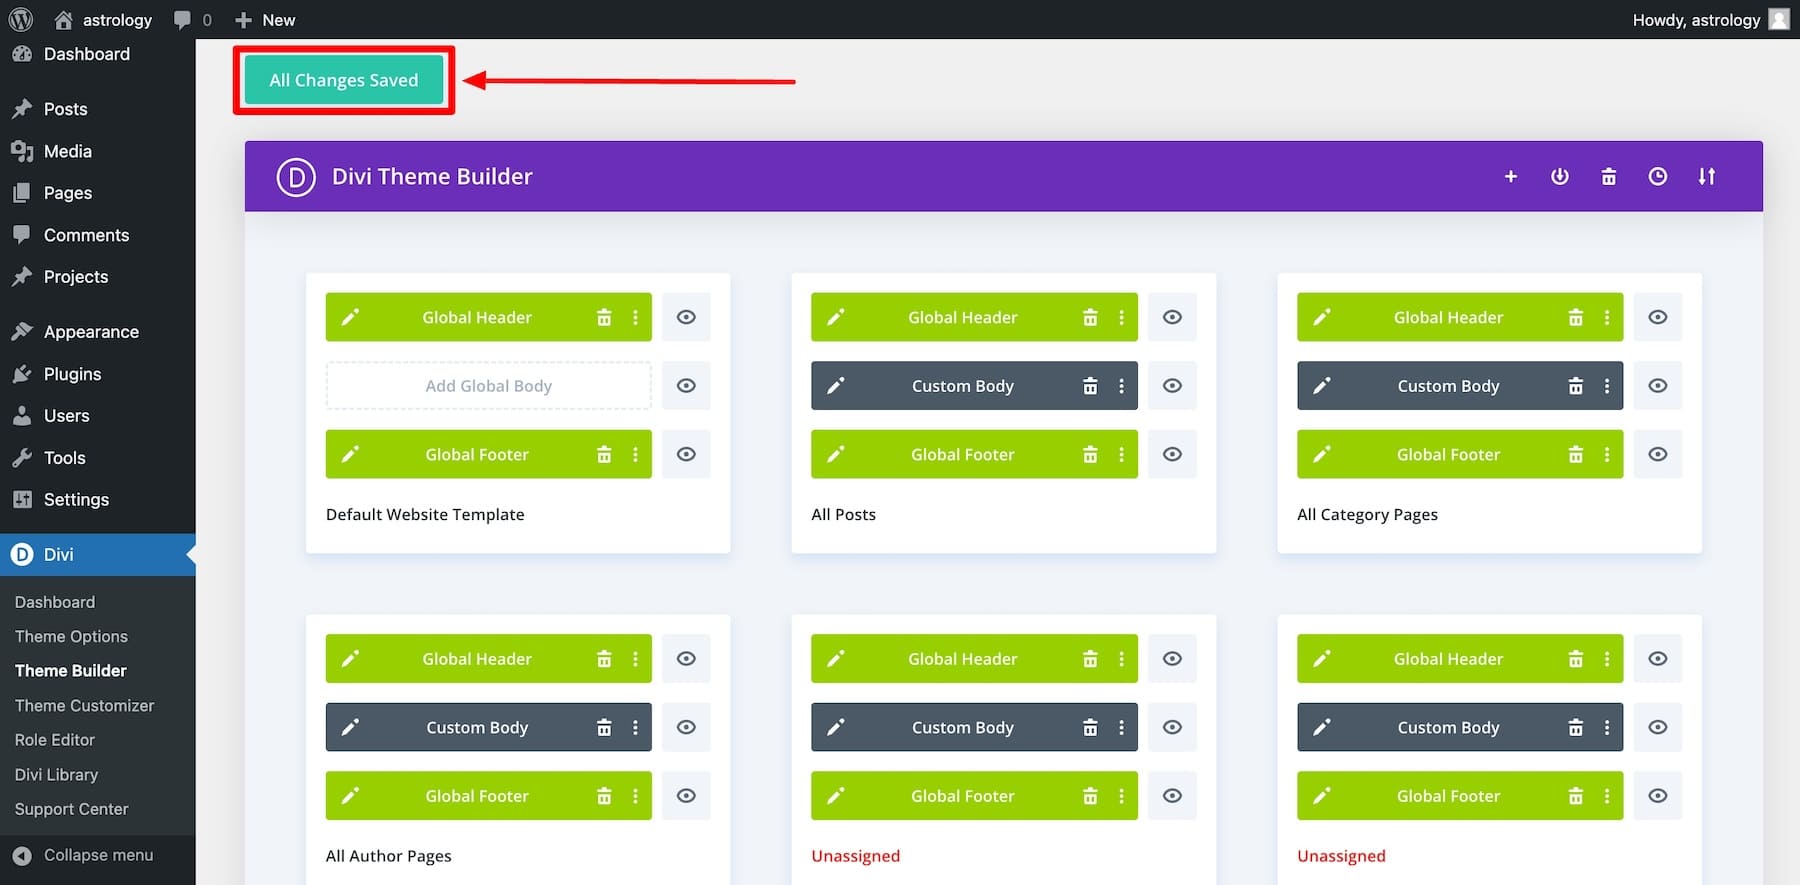
Remember to return to the Theme Builder page and click the “Save Changes” button. Otherwise, you’ll lose all the changes you made.
Similarly, you can also customize the global footer and other Theme Builder templates. If you want, you can also create a new template.
Editing Theme Builder templates with Divi Builder is super easy. It lets you create new elements, make custom headers and footers, and do more in drag-and-drop style. For more, check out the powerful features of the Theme Builder.
Wrapping Up
Divi Quick Sites and Divi Starter Sites are a powerful combo for getting a Divi website up in minutes. It puts you in the best position to make any adjustments you need using all the stunning features that make Divi such a powerful design tool. Get started on your next project with a builder that can deliver an entire website with all the tools you need to make it your own.
Speed Up Even More With Divi AI And Quick Sites
Starter Sites with Divi Quick Sites lets you quickly create a website with ready-made templates that you can easily customize.
But what’s even better is using Divi AI with these Starter Sites to make the design process more manageable and quick. Divi AI takes it a step further by automatically generating on-brand content and making sure everything looks consistent and professional, making creating a website simple and accessible for everyone.
Get 33% off Divi AI and start generating on-brand content and high-quality images for your website. Imagine quickly building a unique, modern, conversion-optimized website without manually editing each element!
Exciting, right? Don’t miss out on this incredible discount—sign up today and create a powerful website to represent your brand and effortlessly enhance your web design process.
Get Divi Quick Sites with Divi AI
The post How To Use Divi’s New Starter Sites (Guide) appeared first on Elegant Themes Blog.
