Do you need to set up a shared Gmail inbox for your WordPress website?
If you want to make it easier for your team to handle emails for your WordPress site, then creating a shared inbox is the way to go. It lets everyone on your team see and reply to emails from one place, making sure nothing slips through the cracks.
In this guide, we will show you 3 ways to set up a shared Gmail inbox in WordPress.

Why Do You Need a Shared Email Inbox for WordPress?
If you are launching a business website, then you will soon need a shared business email inbox to support your operations.
At WPBeginner, we use a shared professional email inbox for hundreds of daily messages, like partnership requests and affiliates. This keeps our team on the same page and helps us respond efficiently to every email.
Other Awesome Motive brands like WPForms and OptinMonster use shared business email inboxes, too. They use them to gather all customer questions and support requests, making it easier to respond quickly.
Does Gmail Offer a Shared Email Inbox Feature?
Gmail itself doesn’t offer a shared inbox feature. While you can technically create a new Gmail address and share the password, we strongly advise against doing this.
Password sharing poses security risks like unauthorized access and difficulty tracking who’s accessing the account. Plus, everyone on the team would have access to all emails, potentially exposing them to sensitive information.
Another option is using Google Groups for a shared inbox.
From our experience, this feature is quick and free, but it’s not the most efficient way to receive and send emails as a team. Furthermore, it doesn’t come with the features needed for streamlining communication and improving email response times.
For that reason, this tutorial will show you 3 solutions to create a shared Gmail inbox for your WordPress website. You can use the quick links below to skip to your desired method:
Method 1: Set Up a Shared Gmail Inbox With GrooveHQ (Recommended)
The first method is to use GrooveHQ, which is one of the best help desk software on the market. This is what we use at WPBeginner to gather all of our marketing and partnership emails, and it has been a smooth experience throughout.
Step 1: Connect Groove With Your Gmail Account
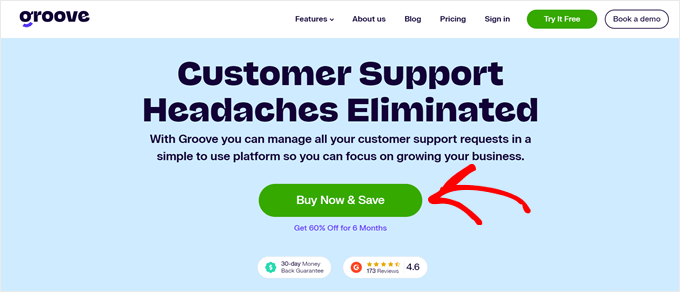
To use Groove, you will need to go to their website and click the ‘Buy Now & Save’ button.
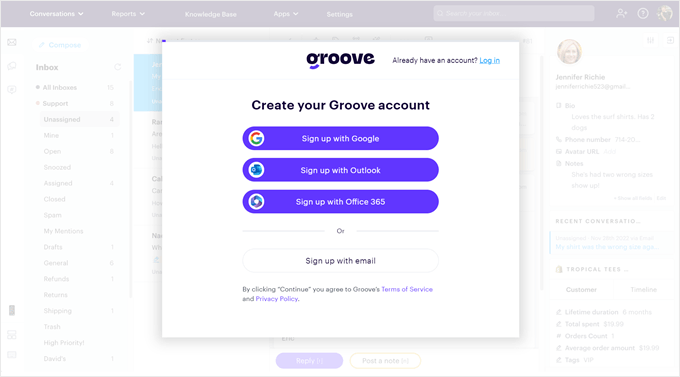
Next, simply sign up for a Groove account using Gmail or another email address.
All GrooveHQ plans include a free 7-day trial after you sign up, and you can select a subscription before or once the trial ends. For more information, check out our full GrooveHQ review.
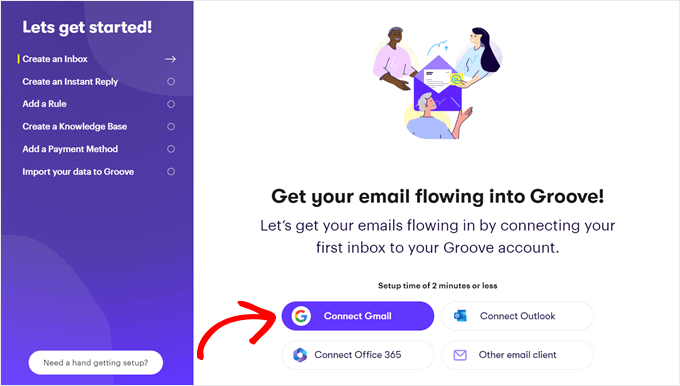
Once you have created an account, Groove will show you a checklist of tasks to finish your setup.
To set up your shared Gmail inbox, simply click ‘Connect Gmail’ in the ‘Create an Inbox’ step.
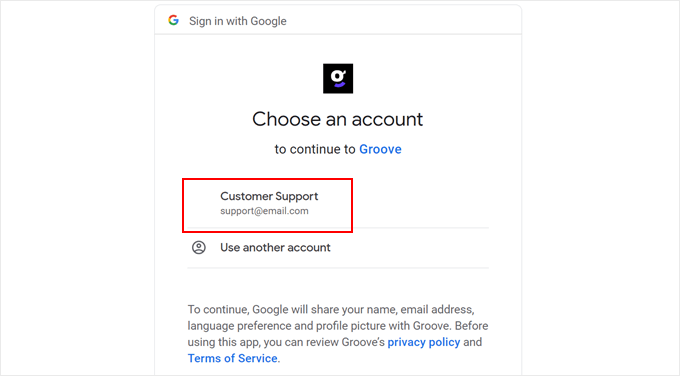
You will then choose a Gmail account that will be connected to Groove.
Simply pick an account and go through the consent screen to complete the connection.
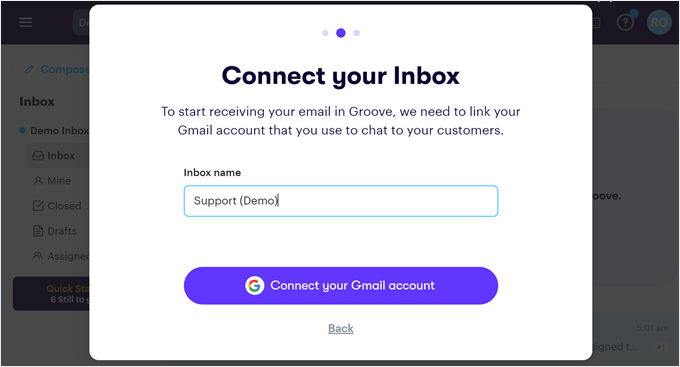
Once done, you will go back to the Groove website to name your inbox. You can think of what you will use the inbox for. If it’s for customer support, then just name it ‘Customer Support.’
After you do that, go ahead and click ‘Connect your Gmail account.’
Next, you need to select how much email history Groove should import. The furthest you can choose is 1 year.
You can also choose if the emails they can import should be in the state of Open or Closed, and if the email tags need to be imported, too.
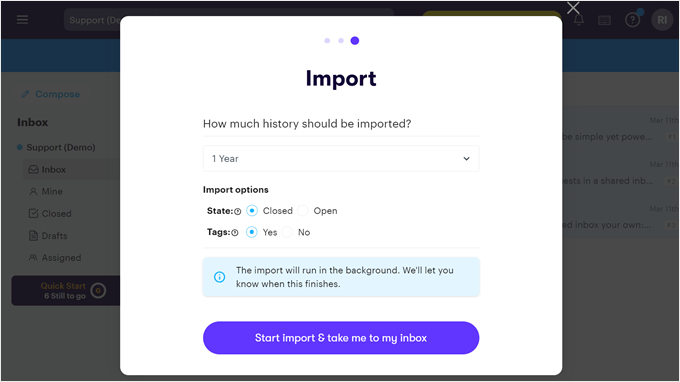
Once you have configured these settings, click ‘Start import & take me to my Inbox.’
The import will then run in the background as you explore your inbox interface.
Step 2: Invite Your Team Members to Groove
Now that you have connected your Gmail email account with Groove, let’s invite some team members so that you can start assigning tasks to them.
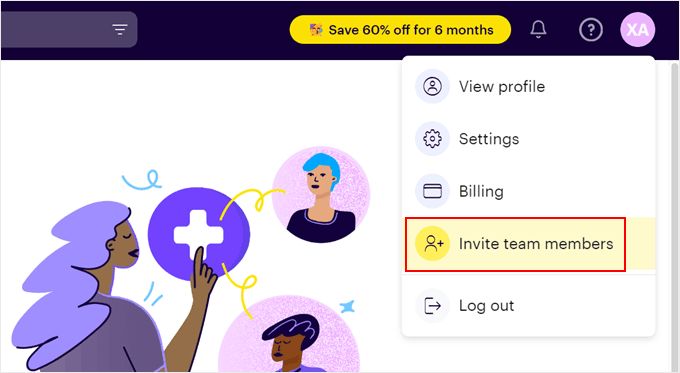
On the top right side of your Groove email inbox, click on your profile avatar and select ‘Invite team members’ in the dropdown menu.
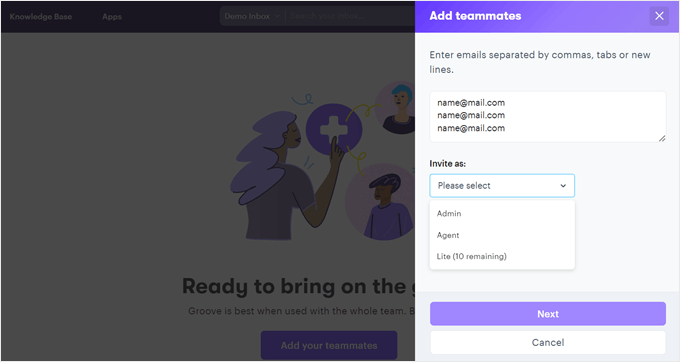
Next, you need to insert the email addresses of your team members. Each one needs to be in a separate line or separated by a comma.
Below, choose the type of access for these users. You have three options: Admin, Agent (for support staff), or Lite (for team members who don’t need to talk directly to the email recipients but want to add notes to conversations).
Each time you add new team members, you can only select one access type. If some team members require different types of access, then you’ll need to repeat this step.
Once you are done, just click ‘Next.’
At this stage, go ahead and select which inboxes these team members should have access to. For example, if you are adding support agents, then most likely they only need to access the customer service inbox.
After that, click ‘Invite.’
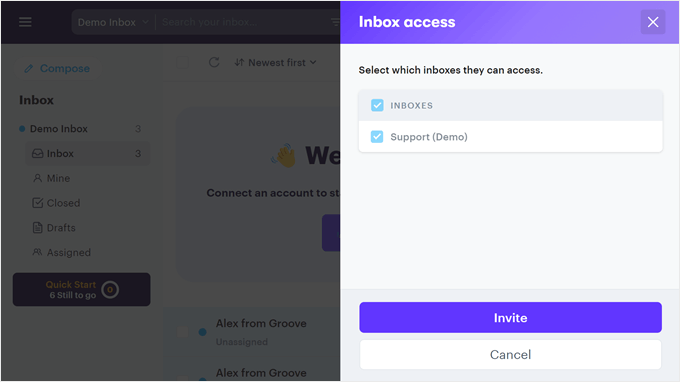
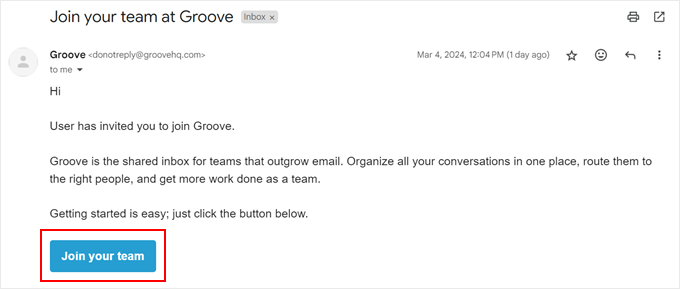
Now, Groove will send your team members an email invitation to your inbox.
They can simply click on the button there to access Groove. Here’s what the email looks like:
Step 3: Add a GrooveHQ Widget to Your WordPress Site
Groove does not have an official WordPress plugin, but you can connect your WordPress website with Groove using its widget code. We will use the free WPCode plugin to do this, as it makes adding custom code snippets safe, easy, and manageable.
We recommend installing this WordPress plugin first before continuing with the rest of the steps.
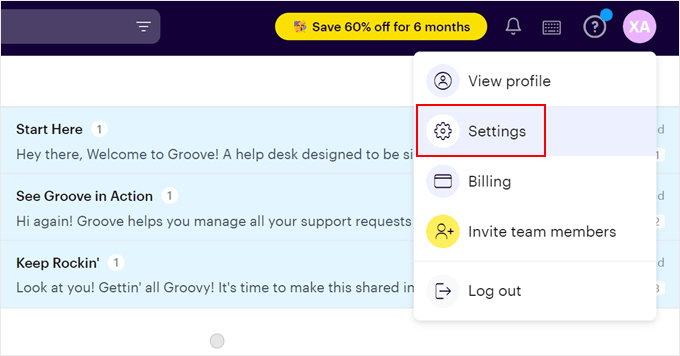
Once you have done that, go back to the Groove page and click on your profile avatar to open the dropdown menu. Then, click ‘Settings.’
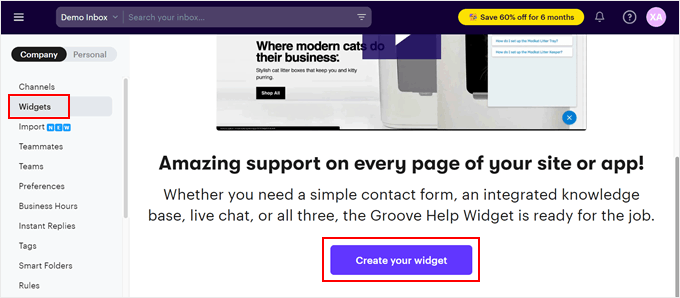
In the Settings page, select ‘Widget’ in the left sidebar.
After that, click the ‘Create your widget’ button.
On the next screen, go ahead and give your widget a name.
It can be something simple, like ‘Support Widget.’

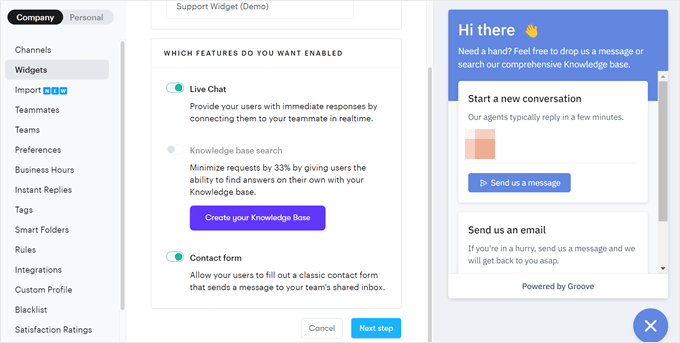
Then, select what kind of Groove features you want the widget to have. Besides a contact form to receive customer or partnership emails, you can also use the widget to enable a live chat feature.
You can also opt to create a knowledge base for frequently asked questions.
Once you are done, click ‘Next step’ at the bottom.
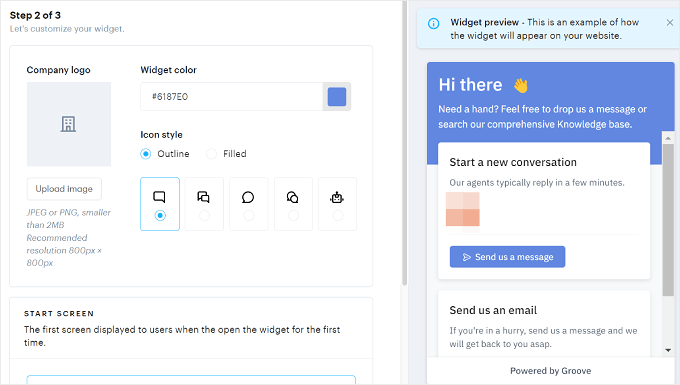
The next step is to customize the widget itself. Here, you can add your company logo, change the default widget color, and modify the icon style of the widget.
The handy preview will show you what the widget looks like with your customizations.
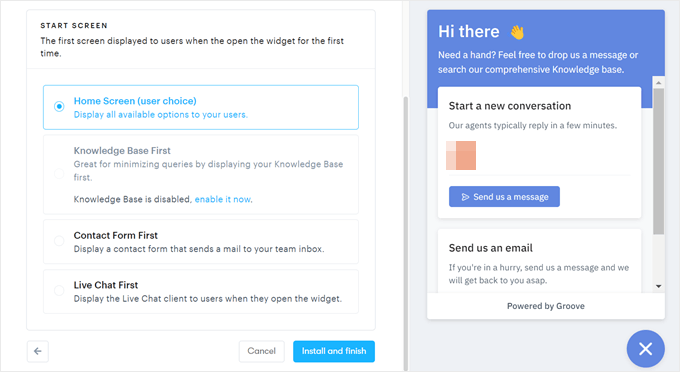
If you scroll to the bottom, you need to select what feature should be the first screen users see when they open the widget.
The Home Screen means all of the Groove features you have enabled will be shown here. So, if you enable the live chat and contact form features, then the user will see them both, and they can choose the best one for their needs.
Alternatively, you can select Contact Form First if you only use Groove for your shared email inbox.
Once you’ve made your choice, you can click ‘Install and finish.’
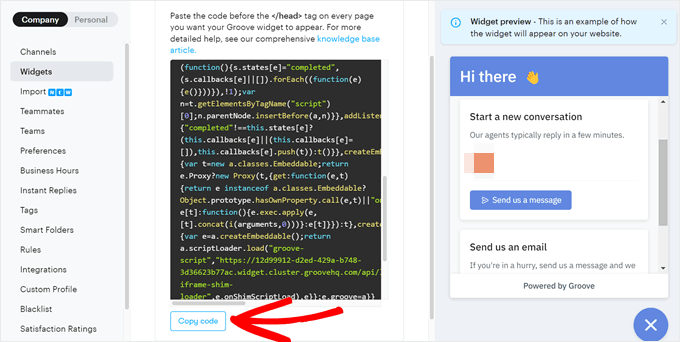
At this stage, Groove will generate an installation code for you to insert before the </head> tag on your website.
Here, just click ‘Copy Code.’
Now, open your WordPress admin area and go to Code Snippets » Header & Footer.
Then, just paste the code from earlier in the ‘Header’ section and click ‘Save Changes.’
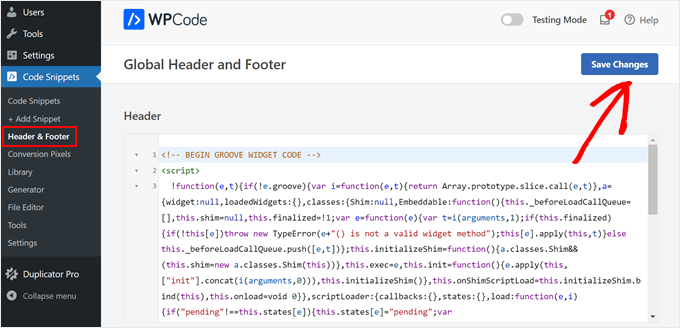
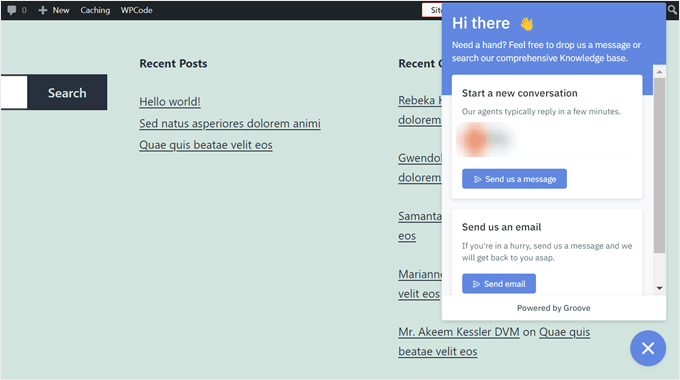
That’s it. All you need to do next is visit your website and see if the widget works properly. You can also give the widget a try by using it to send a test email to your shared email inbox.
Here’s what our widget looks like on our demo website:
Method 2: Create a Shared Gmail Inbox Inside With Heroic Inbox
GrooveHQ makes it easy for beginners to set up a shared Gmail inbox with little technical setup.
However, this means you will need to use a separate software from WordPress to view and manage your shared emails. This might be inconvenient for some people, as you have to switch between different platforms.
If you prefer using a WordPress plugin instead, then we recommend Heroic Inbox. This help desk plugin lets you connect your WordPress website with Gmail, create a shared email inbox, and invite other team members to collaborate within the inbox.
That said, do note that Heroic Inbox does not have a widget like GrooveHQ. It only sets up a shared email inbox in the WordPress dashboard for the business email accounts you use.
Also, the setup takes slightly longer than the first method, so be sure to read each step carefully.
Step 1: Set Up the Heroic Inbox Plugin
First things first, you need to purchase a Heroic Inbox plan on the HeroThemes website, as the plugin doesn’t come with a free version. You can learn more about the pricing in our full HeroThemes review.

Once you have purchased a plan, you should have your account details, download link, and license key sent to your email. You can download the plugin using the link in the email.
Then, open your WordPress admin area to install the plugin. For step-by-step instructions, you can read our beginner’s guide on how to install a WordPress plugin.
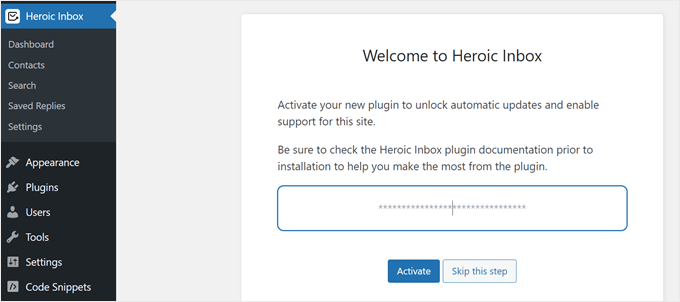
Once the plugin is installed and active, you will be asked to insert your license key. Go ahead and do that, and then click the ‘Activate’ button when you are done.
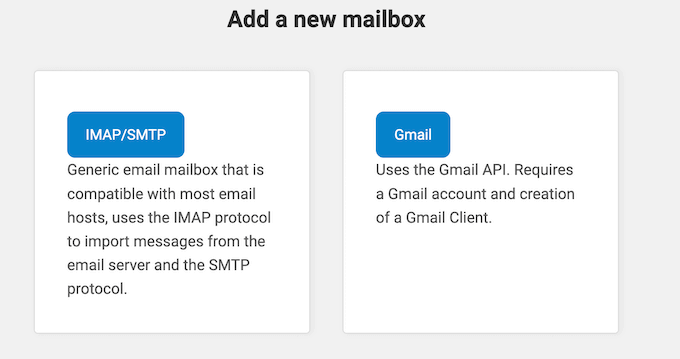
Now, you will see two options to add an email inbox to Heroic Inbox: generic or Gmail.
Simply select the ‘Gmail’ option to continue.
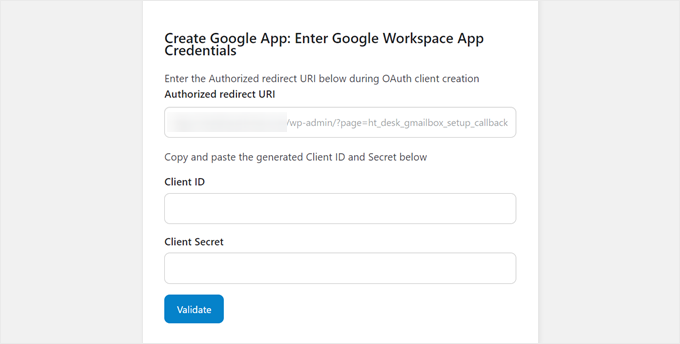
Next, you will see a screen that asks you to enter your Google Workspace app credentials.
Heroic Inbox will provide you with an Authorized Redirect URI that you need to enter when you create your Google Workspace app. It’s a specific URL that an application registers with an authorization server (like Google or Facebook) to receive authentication responses securely.
In the next step, we will show you how to create a Google app to get your credentials for Heroic Inbox.
Step 2: Create a Google Workspace App for Heroic Inbox
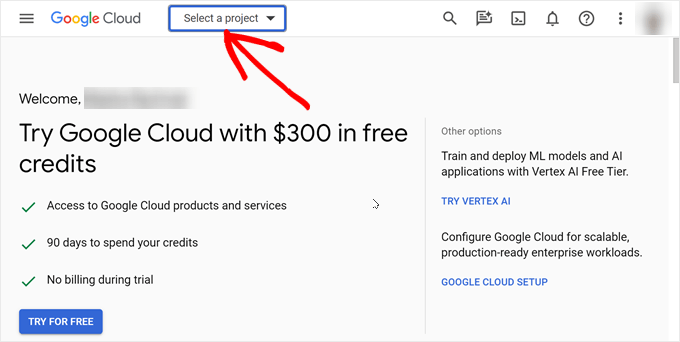
First, go to the Google Cloud console website. If you haven’t signed in to your Google Workspace account already, then you can do that now.
After that, click the ‘Select a project’ menu on the top-left side of the page.
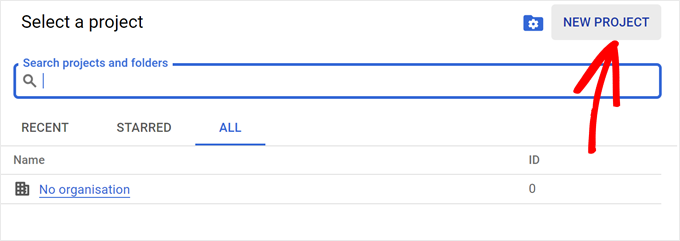
A popup will appear asking you to select a project.
Since we are creating a new Google Workspace app for Heroic Inbox, simply select ‘New Project’ in the top right corner of the window.
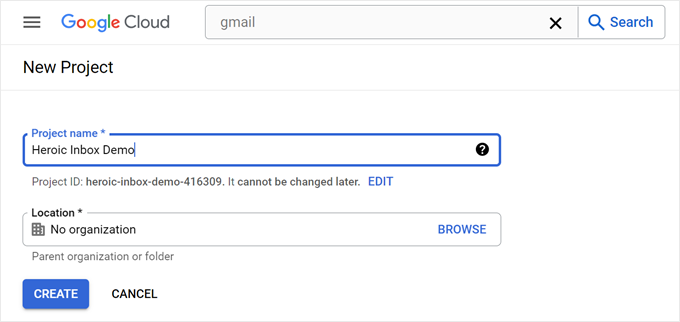
At this stage, you need to fill in your project name. It can be something that you can easily identify later on, like ‘Heroic Inbox Project.’
You will also need to select a location to store the project in Google Cloud. You can just choose ‘No organization’ and then click the ‘Create’ button.
The next step is to navigate to the search bar and look for the ‘Gmail API.’
Go ahead and select that Google API once you’ve found it.

On the next page, click ‘Enable.’
This will let Gmail receive and send emails on behalf of the plugin.
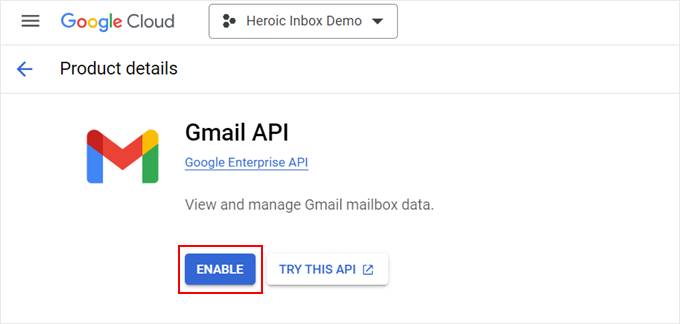
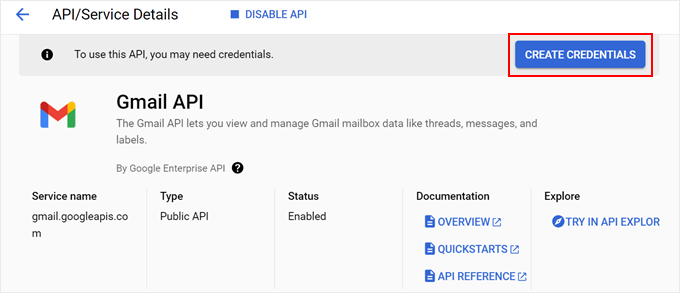
You have now enabled the Gmail API, but you still need to connect it with Heroic Inbox.
Now, click the ‘Create Credentials’ button.
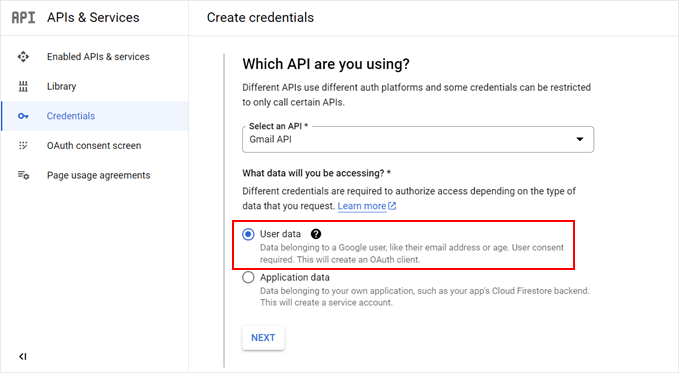
At this point, you can select what type of API you are using. Simply click ‘Gmail API’ for this one.
As for the data, select ‘User data.’ Once done, click ‘Next.’
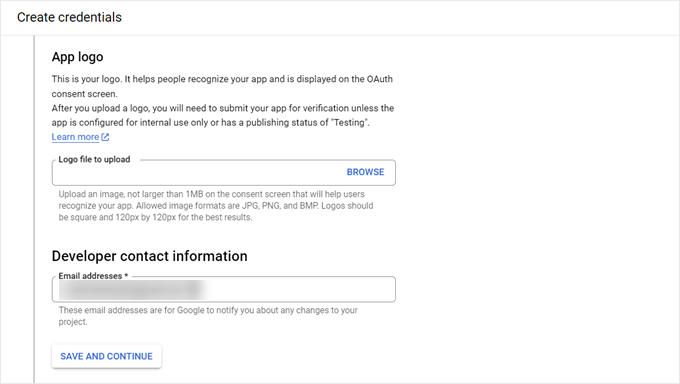
Next, you can upload a logo to use in your Google consent screen (which is optional) and insert your developer contact information. You can use your own email for this.
After that, click ‘Save and Continue.’
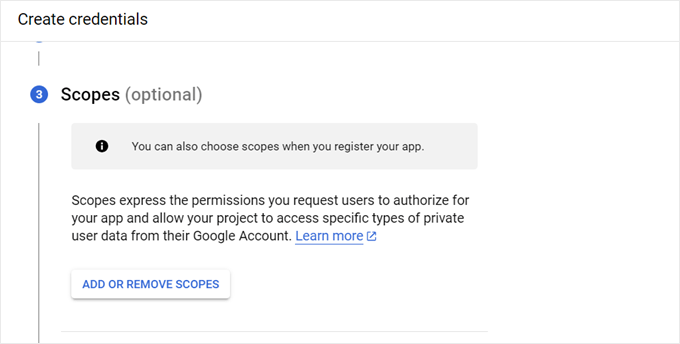
This next step is about permission scopes, which are optional to configure.
Heroic Inbox recommends leaving it be, so you can scroll down to the step after this one.
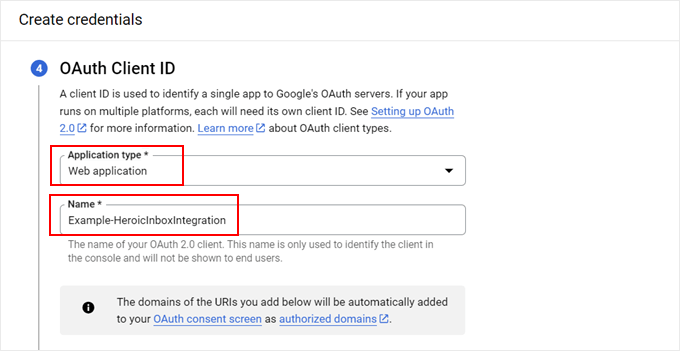
In the OAuth Client ID step, you need to select an application type, which should be ‘Web application.’
Then, you can fill out the application name. It can be as simple as ‘Heroic Inbox Integration.’
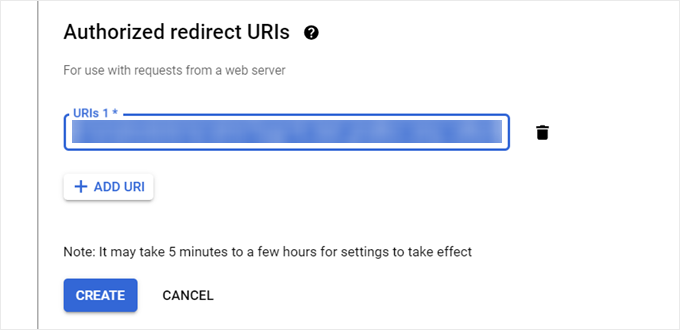
Now, you can go back to your Heroic Inbox plugin settings page from earlier where it provides you with the Authorized Redirect URI. Go ahead and copy it.
After that, go back to Google Cloud and paste it into the appropriate field.
Once that’s done, click ‘Create.’
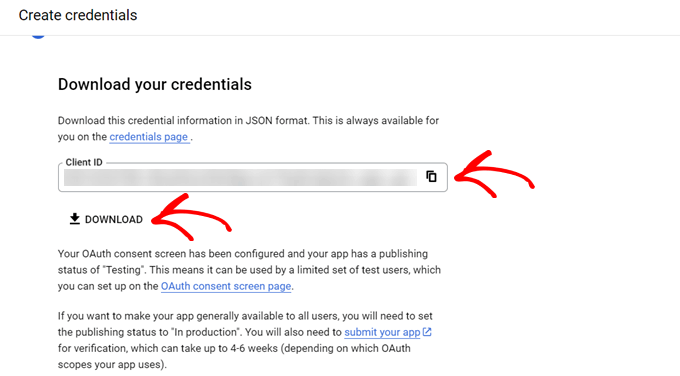
Google Cloud will then generate your OAuth 2 Client ID and Client Secret.
You can find your Client ID on that page. Then, click ‘Download’ to download the Client Secret file onto your computer.
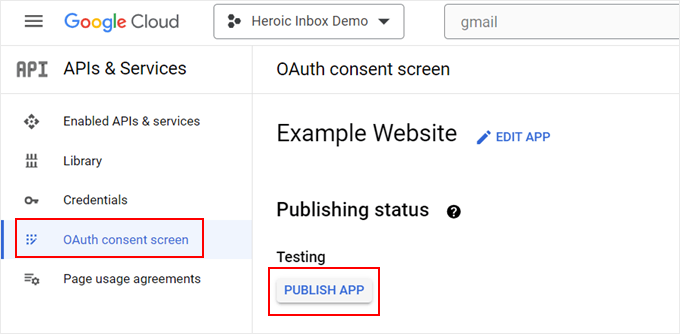
At this stage, navigate to the ‘OAuth consent screen’ menu in Google Cloud.
Then, click ‘Publish App’ so that the API is no longer in testing mode.
At last, you can open your Heroic Inbox plugin page again from earlier. You can paste the Client ID and Client Screen in the appropriate fields.
Note: You will need to open the Client Secret file in a text editor like Notepad. Make sure to copy only the part after "client_secret":" and ".
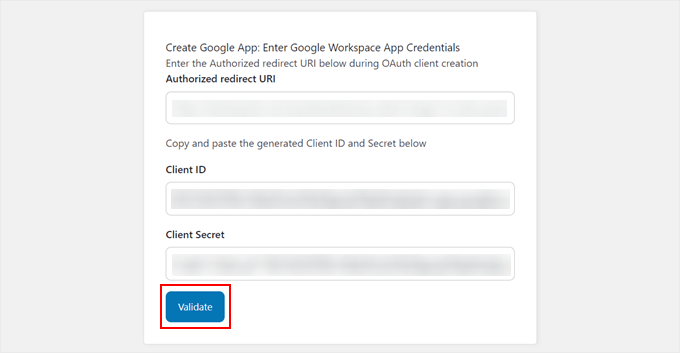
Once you do that, click ‘Validate.’
On the next screen, click the ‘Select Mailbox’ button.
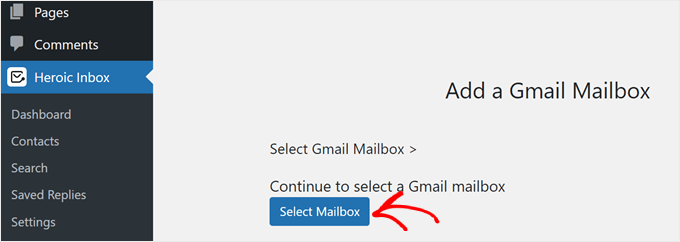
You will then be redirected to select a Gmail account to link to WordPress.
You can always repeat this step to add more Gmail inboxes.
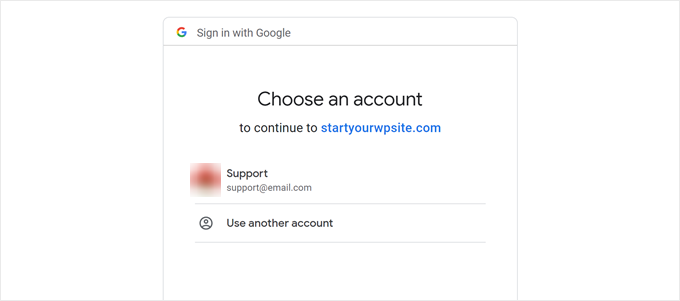
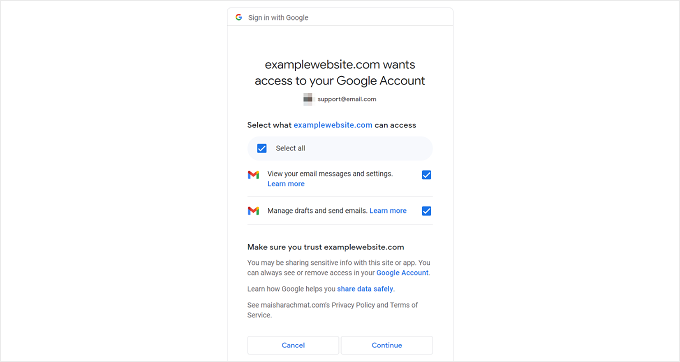
After you choose an account, check all of the boxes on the consent screen. This is to ensure that Heroic Inbox works properly.
Then, click ‘Continue.’
If the connection is successful, then you will return to the Heroic Inbox plugin page and see a text that says ‘Heroix Inbox is Ready!’
You can also click the ‘Test Mailbox Configuration’ button to send yourself a test email made with the Heroic Inbox plugin.
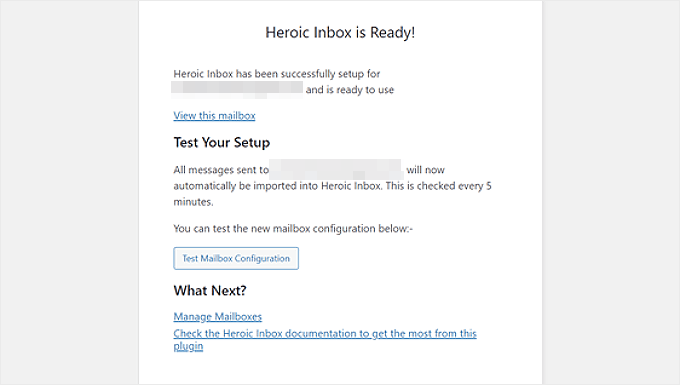
You can look at the screenshot below to see what a successful test email looks like.
That’s it!

Step 3: Add WordPress Users to Your Mailbox
Now that you’ve connected Heroic Inbox with Gmail, you can start adding users to access the inbox.
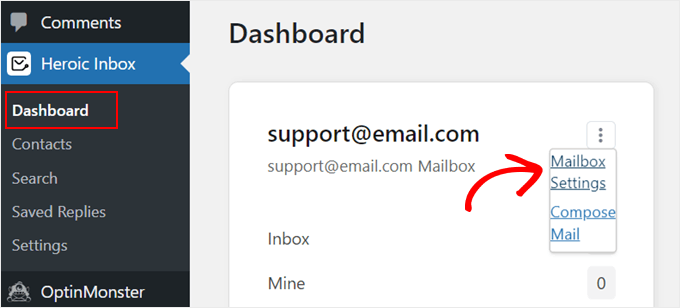
All you need to do is go to Heroic Inbox » Dashboard in the WordPress admin panel. Then, you will find your mailbox there. Simply click the three-dot menu and select ‘Mailbox Settings.’
Here, switch to the ‘Users’ tab.
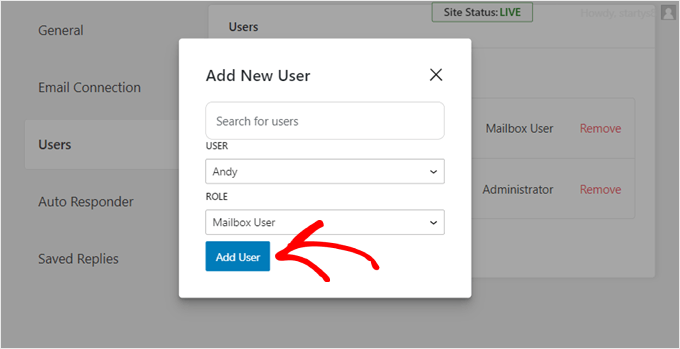
Then, you must click ‘Add User’ to add new WordPress users to the inbox.
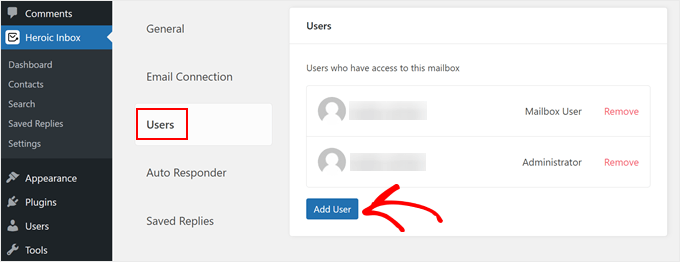
Now, go ahead and select a user from the dropdown menu and select the right role for them. You can either assign them a Mailbox User or an Administrator role.
Once you are done, click ‘Add User.’
That’s it. You have successfully set up a shared Gmail inbox for your WordPress blog or website.
Method 3: Create a Shared Gmail Inbox With Google Groups (Free)
If you are looking for a free and quick solution to set up a shared Gmail inbox, then you can do that with Google Groups. The downside of this method is that the interface is not as user-friendly as the other two, and you may get a limit for the amount of emails you can send daily.
That said, if you have a small team and you are in the early stages of your small business, then Google Groups can be a good temporary solution.
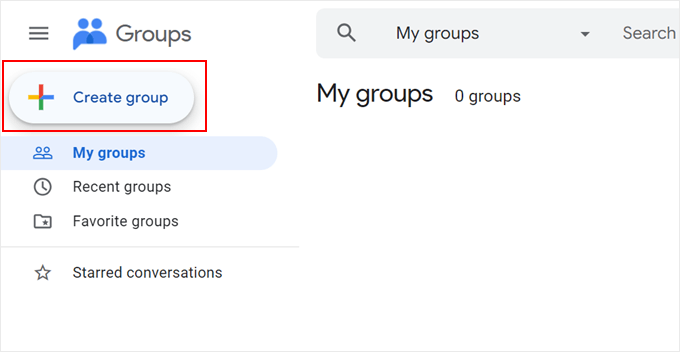
First, log in to your Gmail account. Then, go to the Google Groups website and click ‘Create group.’
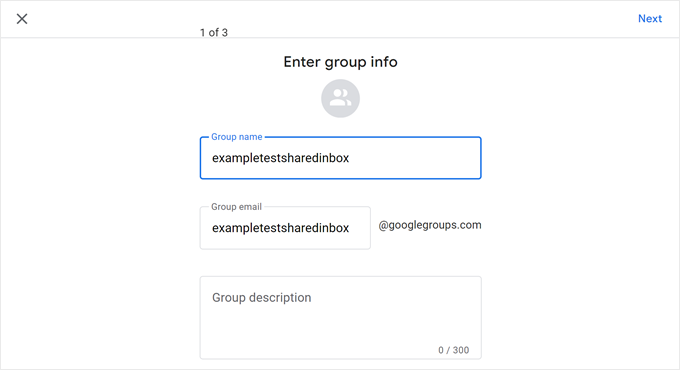
Then, you need to give your group a name and create a new group email.
If you are using a personal Gmail account, then your domain name will be @googlegroups.com. But if you have a custom domain name, then the group account will use that instead.
Once done, click ‘Next.’
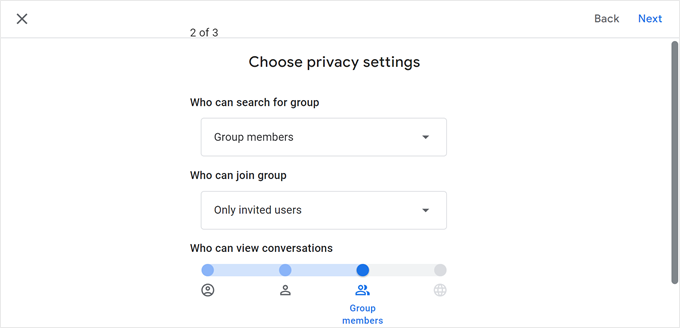
After that, you can configure your privacy settings.
Here, you can make your Google group publicly searchable, allow only invited members to join, and decide what group members and group managers can do.
If you are done with this page, click ‘Next.’
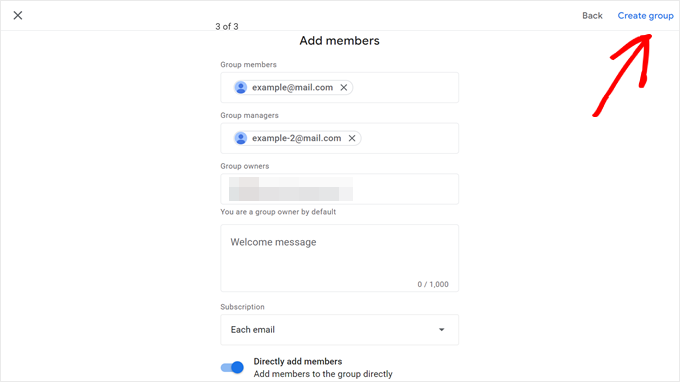
The next step is adding members. Here, simply type your team members’ email addresses into the Group members, Group managers, or Group owners fields.
You can also choose ‘Each email’ for the subscription. This means every group user will get a notification as new emails are received, rather than in batches.
When that’s finished, click ‘Create group.’
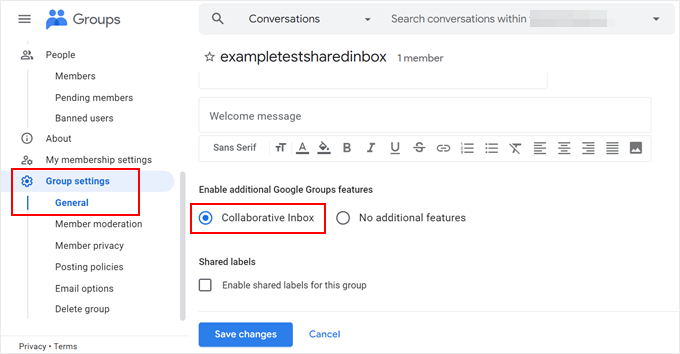
Once you have created a group, navigate to ‘Group settings’ in the sidebar and select ‘General.’
Then, find the Enable additional Google Groups features section and select ‘Collaborative Inbox.’ Once done, simply click the ‘Save changes’ button.
Now, you can go ahead and use this email as your WordPress admin email address and/or for WordPress contact forms, popups, and so on. This way, you will get notified whenever you get a message from a website visitor.
Bonus Tip: Use WP Mail SMTP to Improve WordPress Email Deliverability
While WordPress is an excellent website builder platform, it isn’t a great option for sending emails. This is because many WordPress web hosting services are not set up to use the PHP mail() function, which is responsible for sending emails.
As a result, emails sent directly by WordPress websites often don’t get delivered.
That’s why Gmail and other email service providers don’t use the PHP mail() function. Instead, they use the SMTP setup over SSL/TLS for sending and receiving emails.
Thankfully, you can use the WP Mail SMTP plugin on your website. This plugin will configure your WordPress site to send emails using SMTP settings, including Gmail’s SMTP server, instead of the PHP function. That way, your emails will be delivered instead of ending up in the spam folder.
You can learn more in our ultimate guide on how to set up WP Mail SMTP with any host.
We hope this article helped you learn how to set up a shared Gmail inbox for your WordPress site. You may also want to check out our WordPress tutorials on how to create an email newsletter and our expert pick of the best contact form plugins.
If you liked this article, then please subscribe to our YouTube Channel for WordPress video tutorials. You can also find us on Twitter and Facebook.
The post How to Setup a Shared Gmail Inbox for Your WordPress Site first appeared on WPBeginner.
