Do you want to enable customer tracking in WooCommerce?
Customer tracking allows you to offer a personalized shopping experience based on customer behavior in your eCommerce store.
In this article, we will show you how to easily enable customer tracking in WooCommerce with Google Analytics.
Why Enable Customer Tracking in WooCommerce with Google Analytics?
Google Analytics allows you to see where your visitors are coming from and what they do on your website. In other words, it helps you track your traffic sources as well as user engagement on your website.
For eCommerce platforms, Google Analytics offers an enhanced eCommerce tracking feature. This allows you to better understand users’ shopping and checkout behavior. Plus, you can see which products perform the best and track your WooCommerce store’s sales performance.
By default, a WooCommerce store allows your customers to create an account or checkout as guest users. Creating an account helps the user save their shipping and billing information for faster checkout next time. It also helps you offer customers a personalized shopping experience based on their browsing and shopping history.
Wouldn’t it be great if you could track logged-in users with their user IDs in Google Analytics and also see the path customers took before making a purchase?
This will give you access to a treasure trove of information and insights on customer behavior. You can use it to offer a better on-site experience and boost your sales.
Let’s take a look at how to easily enable customer tracking in WooCommerce. Here are quick links that you can use to jump ahead to any section:
Set up Ecommerce Tracking in WordPress with Google Analytics
The best way to set up WooCommerce customer tracking in Google Analytics is using MonsterInsights. It is the best analytics solution for WordPress and helps you set up tracking without editing code.
If you use the native method for tracking WooCommerce conversions, then you’ll need to edit the tracking code, use Google Tag Manager, or both. This can be tricky for beginners, and the slightest mistake can mess up your analytics data.
The MonsterInsights plugin offers an eCommerce addon, which automatically detects WooCommerce and starts tracking customer behavior in Google Analytics. It also comes with a Customer Journey addon that allows you to see users’ behavior before they make a purchase.
First, you will need to install and activate the MonsterInsights plugin. For more details, see our step-by-step guide on how to install a WordPress plugin.
You will need to be on the ‘Pro’ plan to access the eCommerce and User Journey addons, which we will use for this tutorial. However, there is also a MonsterInsights Lite version you can use for free.
Upon activation, you will see the welcome screen and the setup wizard. Simply click the ‘Launch the Wizard’ button and follow the on-screen instructions.

For detailed instructions, see our article on how to install Google Analytics in WordPress.
Install the MonsterInsights eCommerce Addon
Once you’ve configured Google Analytics on your website, the next step is to install the eCommerce addon.
The addon automatically sets up eCommerce tracking on your website and detects your WooCommerce store.
First, you need to visit the Insights » Addons page from your WordPress dashboard and navigate to the ‘eCommerce’ addon. Simply click the ‘Install’ button, and the addon will automatically activate.
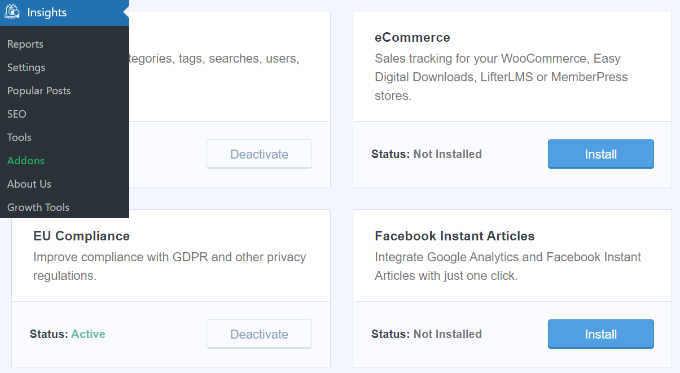
That’s it! MonsterInsights will take care of the rest once the addon is active.
For more details, please see our guide on how to set up WooCommerce conversion tracking.
Enabling User Journey Addon in MonsterInsights
Now that you’ve set up WooCommerce tracking in Google Analytics, the next step is to enable the MonsterInsights Customer Journey addon.
The addon will allow you to see the steps a customer takes before making a purchase in WooCommerce. Plus, it also shows the time it took at each step, the pages a user visited, and more.
First, you’ll need to go to Insights » Addons from your WordPress admin panel. Next, navigate to the User Journey addon and click the ‘Install’ button.
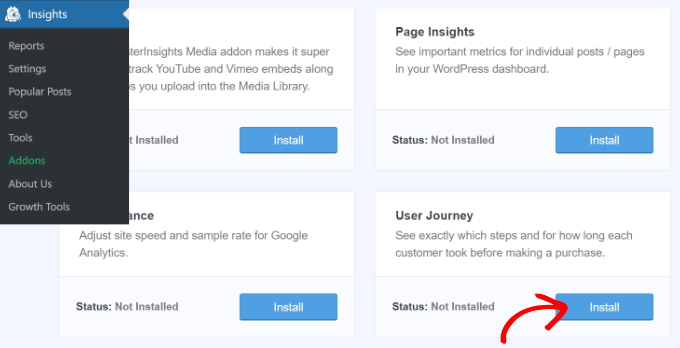
The addon will automatically activate and start tracking your WooCommerce customer’s journey.
Next, you can go to WooCommerce » Orders from your WordPress dashboard to view the path your customers took when purchasing a product.
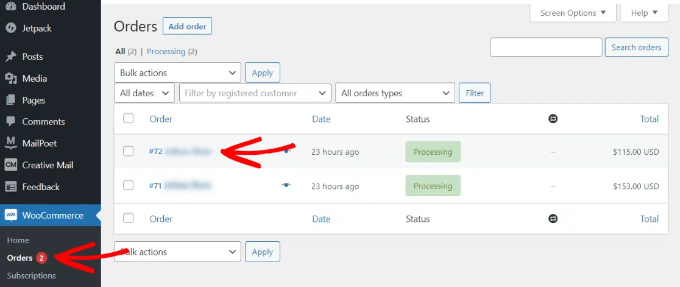
After that, click on the order for which you’d like to see the user journey.
On the next screen, you’ll see the path a customer took before buying the product. You get to view the pages they visited, where they clicked, and how much time they spent on a page.
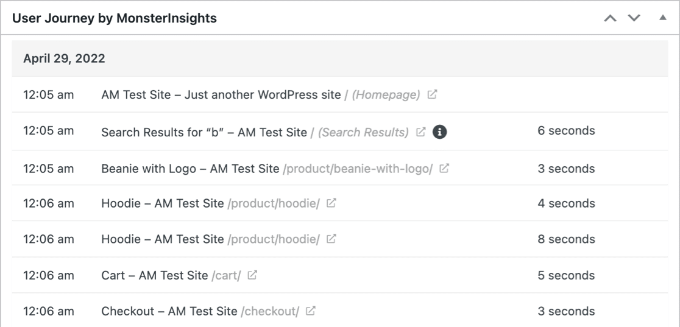
This is really useful information to better understand your customers. You can see which product categories are performing the best and where customers are exiting your store during the purchase process. Using the data, you can then fix these issues and optimize your site for more conversions.
Enabling User ID Tracking in Google Analytics
While MonsterInsights makes it very easy to track customers on your WooCommerce store, it also tracks WordPress ID tracking in Google Analytics.
WordPress ID is a unique ID to identify every user on your website. The user ID is called the ‘Client ID’ in Universal Analytics and the ‘App Instance ID’ in Google Analytics.
Do remember that enhanced eCommerce tracking will enable eCommerce reporting features for your WooCommerce store. However, it does not enable user tracking by default.
Let’s take a look at how you can enable user ID tracking in Google Analytics 4.
Enabling Customer Tracking in Google Analytics 4
To start, you’ll need to go to the Admin settings from your GA4 dashboard and click the ‘Reporting Identity’ option.
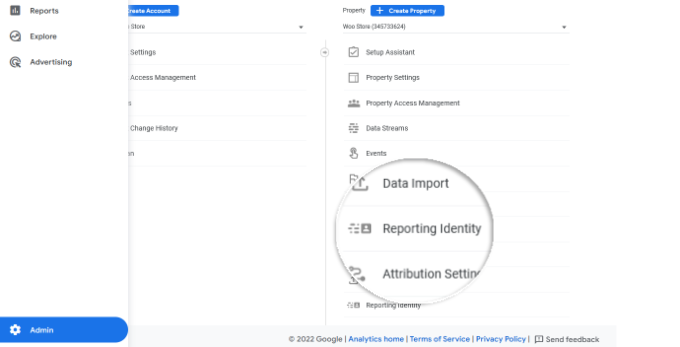
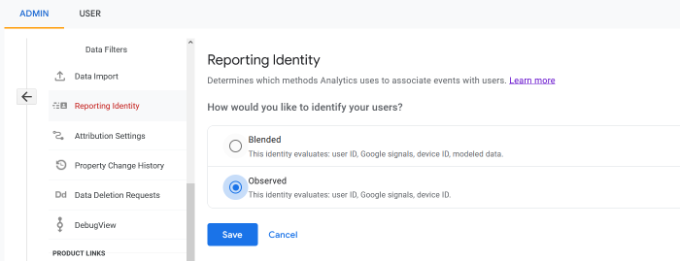
On the next screen, you will need to select a way to identify users on your online store.
GA4 uses multiple ways to identify customers. These include user ID, Google signals, device ID, and modeled data. For the sake of this tutorial, we’ll select the ‘Observed’ option and click the ‘Save’ button.
Viewing Customer Tracking Reports in Google Analytics
Now that everything is set up, Google Analytics will now track all your website customers. It will also be able to track logged-in users with their unique WordPress user ID.
View User ID Data in Google Analytics 4
You can view GA4 eCommerce tracking WooCommerce data by going to the ‘Explore’ tab from the menu on your left.
Under Explorations, you’ll see different report templates. Simply click the existing ‘User explorer’ report.
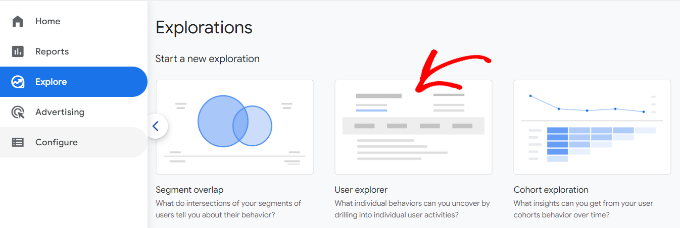
Next, you’ll see the User explorer report in Google Analytics 4.
One thing you can notice is the Client ID will be replaced with the App instance ID.
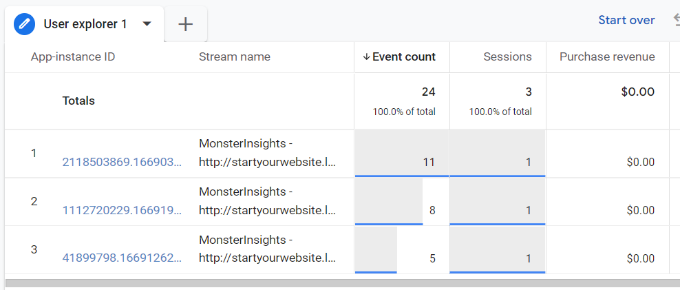
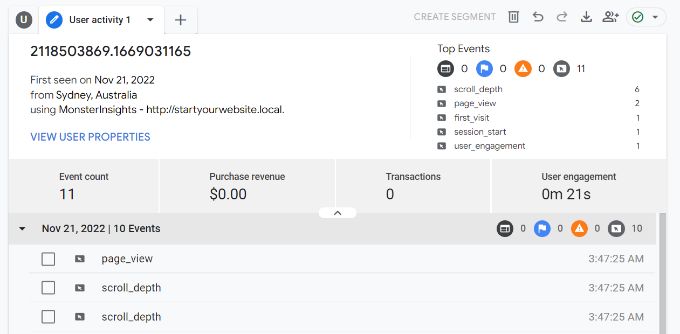
You can click on any of the app instance IDs to view more details.
For example, the report shows the total events that were triggered, the location of the user, the time stamp for each event, and more.
View User ID Data in Universal Analytics
Note: Universal Analytics has now sunset and is no longer processing data from your website. However, you can still view past data and use it for comparison.
To view all your individual customer activity, you can go to your Universal Analytics account and click on the Audience » User Explorer menu.
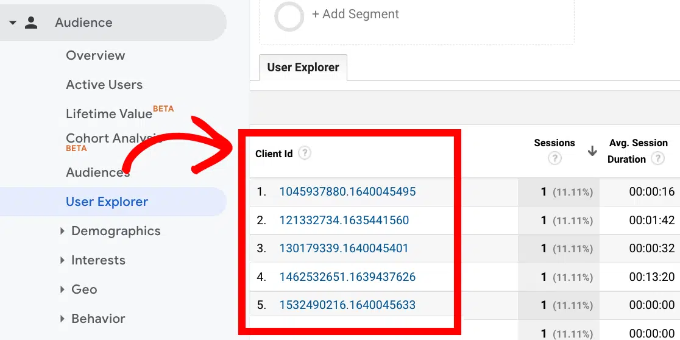
You will see individual customer reports with a unique ID assigned to all non-logged-in users.
To view customer tracking reports for logged-in users in WooCommerce, you need to click on the Google Analytics logo on the top left corner of the screen.
This will show all your Google Analytics profiles. You will see your website profile and under ‘All website data’ you will see the UserID reporting view you created earlier.
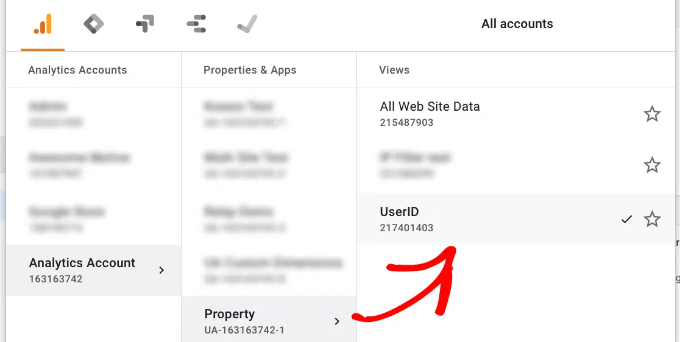
Go ahead and click on the UserID reporting view to load it.
Once it’s loaded, you need to click on the Audience » User Explorer menu. This way, you will see a logged-in customer tracking report where each user is represented by their WordPress user ID on your website.
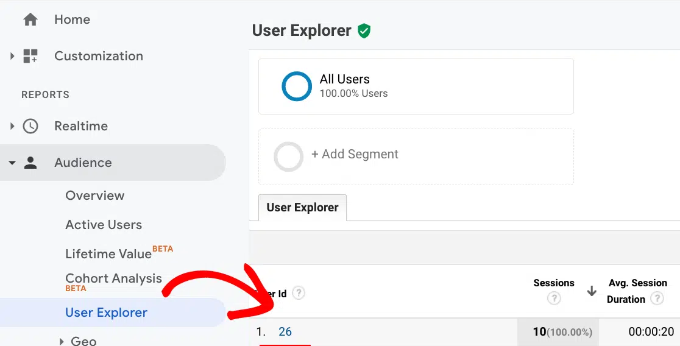
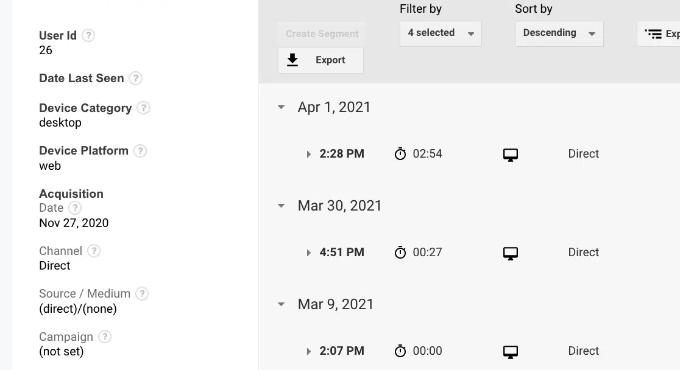
You can click on the user ID to view a customer’s individual tracking data.
For instance, the device category they use, acquisition date, the channel they used to arrive on the online store, and more.
Matching Customer Tracking with Their WordPress Accounts
Now that you’ve identified users in Google Analytics, you can match them with WordPress accounts. This will help you know who this customer is, and how you can create personalized offers, emails, or shopping experiences for them.
First, you need to note down the customer ID you see in your Google Analytics User-ID reporting view.
After that, go to your WordPress website’s admin area and click on the ‘Users’ menu. It will show you a list of all users on your WordPress site.
Next, you can click the ‘Edit’ link below any username in the list.
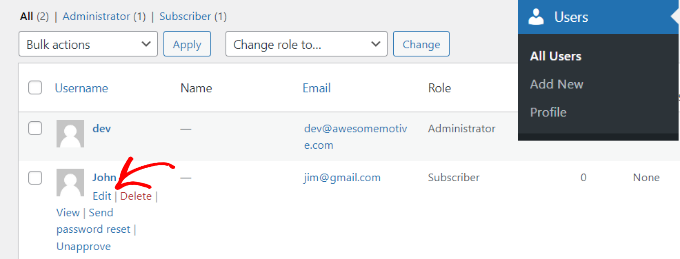
WordPress will now open the user profile for you.
If you look in your browser’s address bar you will ‘user_id’ parameter in the URL.

Next, you need to replace the value next to user_id with the one you copied from your Google Analytics report and press enter key on your keyboard.
WordPress will now load the user profile associated with that particular User ID. You now have the customer’s name, username, email address, and social media information. You can also track their orders, product views, cart activity, and more.
We hope this article helped you learn how to enable customer tracking in WooCommerce with Google Analytics. You may also want to see our expert pick of the best free WooCommerce plugins for your online store and how to get a free email domain.
If you liked this article, then please subscribe to our YouTube Channel for WordPress video tutorials. You can also find us on Twitter and Facebook.
The post How to Enable Customer Tracking in WooCommerce with Google Analytics first appeared on WPBeginner.