Once you build a WordPress website, maintaining it is crucial if you want ongoing success. A key part of this upkeep is regularly updating WordPress itself, your WordPress themes, and your WordPress plugins.
Updating WordPress websites is often overlooked. Many fear breaking the site, while others are tired of frequent updates. We understand, which is why, in this post, we’ll show you how to stay on top of these updates. We’ll introduce you to Divi Dash, which is one of the easiest ways for you to manage all your WordPress websites!
Why Are WordPress Updates Important?
Keeping your WordPress site updated is essential for a few key reasons. First of all, it’s all about security. Regular updates patch up vulnerabilities that hackers might exploit, making you less likely to face data breaches or lose user trust. If you let these updates slide, your site becomes an easy target for cyber-attacks, which nobody wants.
Another reason to stay on top of updates is performance. Developers are constantly optimizing the code to make everything run smoother and faster. This means your site will load quicker, providing a better experience for visitors, which can help lower bounce rates and even improve your search engine rankings.
There’s also the issue of compatibility. The internet is constantly evolving, and WordPress keeps pace with these changes. By updating regularly, you ensure your site works seamlessly with the latest browsers, devices, and tools. This helps you avoid any annoying glitches that could disrupt your site’s function.
Lastly, updates bring new features and improvements. When you keep everything current, you use the latest tools and enhancements developers roll out. This keeps your website looking fresh and modern, helping you stay competitive. Ignoring updates can make your site outdated and prone to issues, hurting your online presence and effectiveness.
Types Of Updates
As we have already established, keeping your WordPress website up-to-date is crucial for maintaining its security, performance, and functionality. But what exactly gets updated, and why does it matter? Let’s find out. While there are various updates that a WordPress website may need or receive, we’ll broadly categorize them into:
Core Updates
Keeping your WordPress site updated is vital for its health and security. Major updates come out two to three times a year, usually named after a jazz musician, bringing in new features, better user interfaces, and improvements to the core structure. Minor updates happen more often and focus on fixing bugs and addressing security issues. These updates also aim to boost performance and ensure compatibility with the latest web technologies.
Security updates are crucial and should be applied immediately since they fix vulnerabilities that hackers might exploit. Keeping your WordPress core updated lets you get the latest features and protect your site from potential threats. However, WordPress core updates have also been one of the biggest disruptors of websites, mainly if you use outdated plugins and themes and/or unprofessional developers.
Plugin Updates
Updating plugins is crucial to keep your WordPress site running smoothly and securely. Developers often release updates to enhance their plugins, add new features, and refine existing ones. These updates can improve your site’s performance, making it load faster and use server resources more efficiently.
Bug fixes in updates resolve issues that might cause errors or unexpected behavior on your site. Security patches are vital since plugins can be common targets for hackers. Lastly, compatibility updates ensure your plugins work well with the latest WordPress version and other popular plugins, preventing conflicts that could disrupt your site.
Theme Updates
Updating your WordPress theme is crucial for maintaining your site’s visual appeal and functionality. Developers frequently release updates to add new features, layouts, and customization options, helping you keep your site’s design fresh and modern. These updates also improve compatibility with the latest WordPress core version and popular plugins, ensuring everything runs smoothly.
Bug fixes in theme updates can resolve issues with layout, responsiveness, or specific functionalities. These updates often address security vulnerabilities, protecting your site and visitors’ information from potential threats.
Updating WordPress: A Checklist Of Things To Do Before
When updating WordPress, it is recommended that you test changes on a staging or development site. This helps you spot and fix any conflicts before applying updates to your live site. It’s also a good idea to do updates during off-peak hours to reduce any impact on your visitors.
Ensure new update versions are compatible with your current WordPress setup and other active themes and plugins. Incompatibilities can cause problems or even break your site. Reading through changelogs or release notes from update developers can provide helpful information about what’s changed.
Always back up your website, including files and databases, before updating anything. Many WordPress hosts offer backup options, or you can use update plugins like UpdraftPlus. This way, you can quickly restore everything if something goes wrong.
Checking support threads for ongoing issues or waiting a few days before updating can be beneficial (unless it’s a hotfix or security patch). In the meantime, developers might release quick updates to fix problems in the latest version.
After updating, thoroughly test your website to make sure everything works properly. Check forms, eCommerce functions, and essential integrations to ensure they all function as expected.
How To Update WordPress Websites (3 Ways)
WordPress has multiple methods for keeping your site up-to-date. Let’s explore each approach in depth:
1. Quickest Option: Updating WordPress Sites With Divi Dash
Divi Dash is a handy tool for managing WordPress websites. It’s free for all Divi members and designed to make WordPress management more straightforward and efficient.
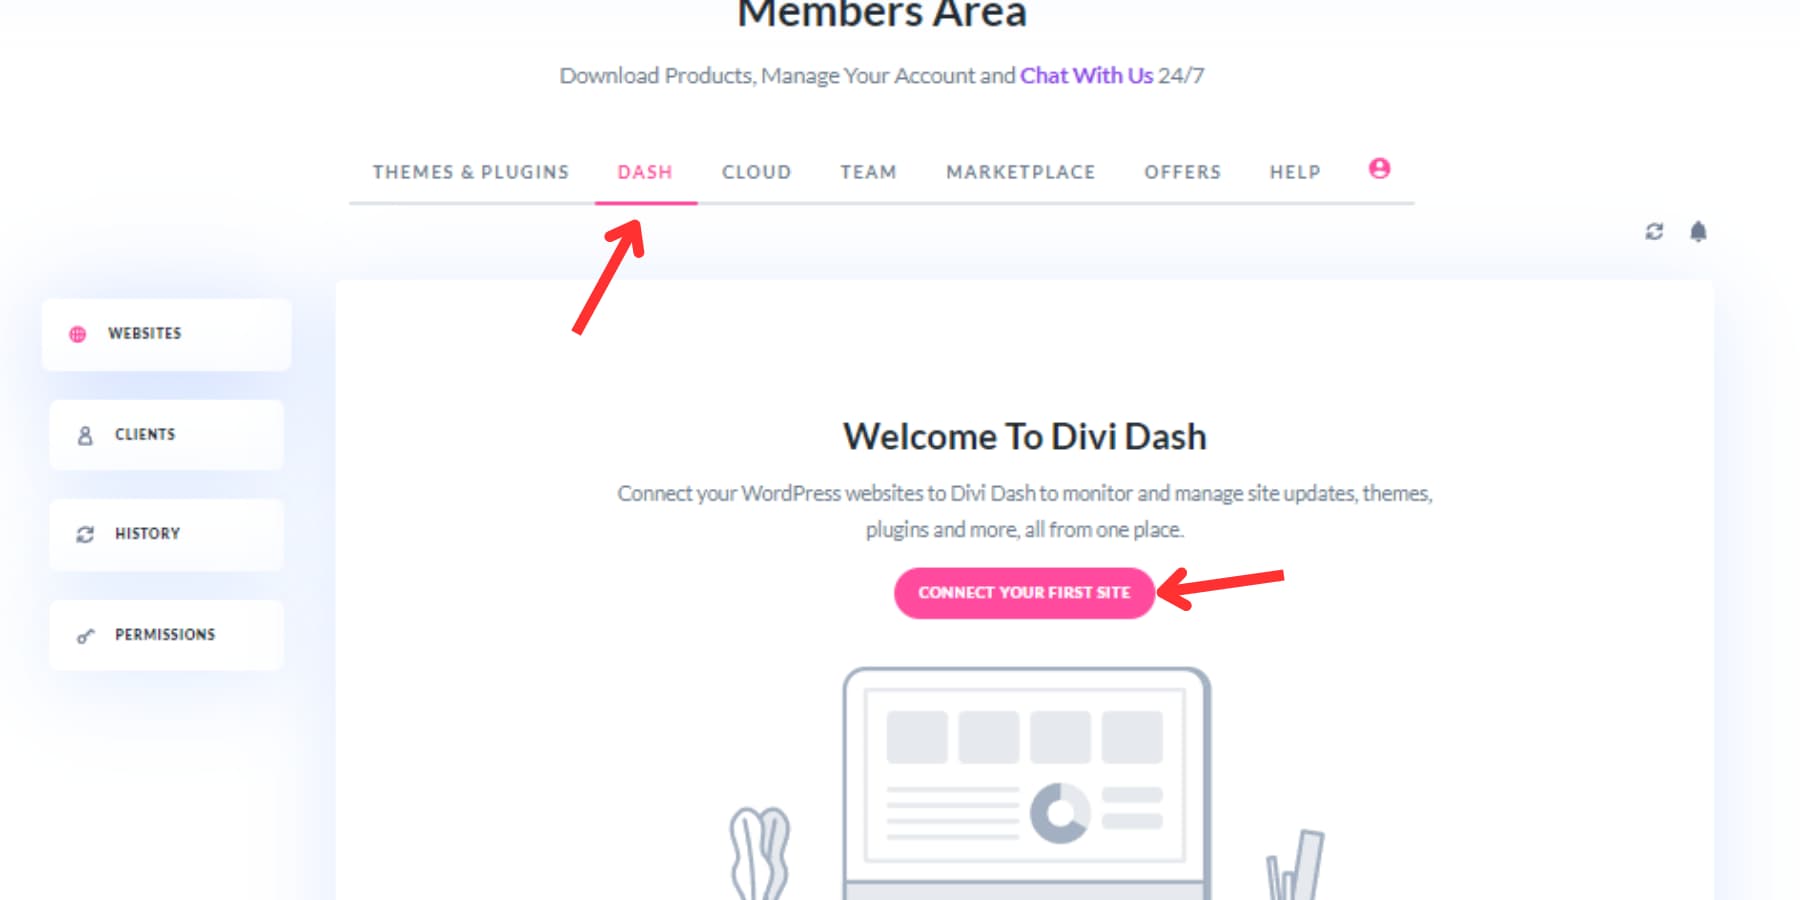
To begin using Divi Dash, head over to the Elegant Themes’ Members Area and choose the ‘Dash’ option from the main menu. Then, click on the ‘Add Your First Website’ button to move forward. This guide presumes that you hold a Divi membership. If you haven’t registered yet, now is an excellent opportunity to do so and take advantage of these robust features.
Enter your website’s URL, administrator username, and password in the dialogue box. If you prefer not to provide your password, you can use a connect key instead.
Once your website(s) is added, Divi Dash comprehensively shows you all the themes and plugins used across your websites, highlighting which ones need updates. You can update everything across all websites with a single click or choose to update individual websites, specific themes, or plugins.
Additionally, Divi Dash allows you to automate updates by setting a schedule. You can customize the update schedule for each website, specifying which items will be updated and when.
Beyond updates, you can activate or deactivate them and conveniently delete inactive themes and plugins. This helps keep your websites clutter-free and running smoothly.
Speaking of which, each website in Divi Dash has a detailed dashboard where you can perform various administrative tasks, such as checking the system Status, which details your server configuration and highlights any adjustments needed for optimal performance. You can also manage WordPress users by adding new ones, deleting existing ones, or adjusting their roles.
Additionally, you can track important information about the website by adding notes and performing database cleanup tasks like deleting spam comments, old post revisions, and clearing the trash.
Divi Dash enables you to organize websites by client. The clients tab provides a client-centric view, showing contact information, notes, and a list of websites managed for each client. The platform integrates with Divi Teams, allowing you to invite team members and assign specific permissions. For instance, a user can be given the ability to manage updates without access to critical tasks like user management or plugin deletion.
Future versions of Divi Dash will include uptime monitoring, analytics, and vulnerability reporting, making it an indispensable tool for anyone looking to make website management more accessible and efficient.
2. Updating Automatically
WordPress simplifies the update process with its built-in automatic update feature. When you access your admin area, you’ll see notifications about updates available for your plugins, themes, and core software.
To view all available updates, head to the Dashboard → Updates page. This page consolidates all updates for your site, including core, theme, and plugins. You can also update everything from this page or reinstall core updates if you encounter any issues.
If you only want to update themes, go to the Themes section under the Appearance menu. You’ll see the themes you’ve installed and any orange-tinted messages saying “New Updates Available” above each theme’s preview. Click “Update Now” to apply the updates. The update icon will briefly spin, and your theme will be updated to the latest version.
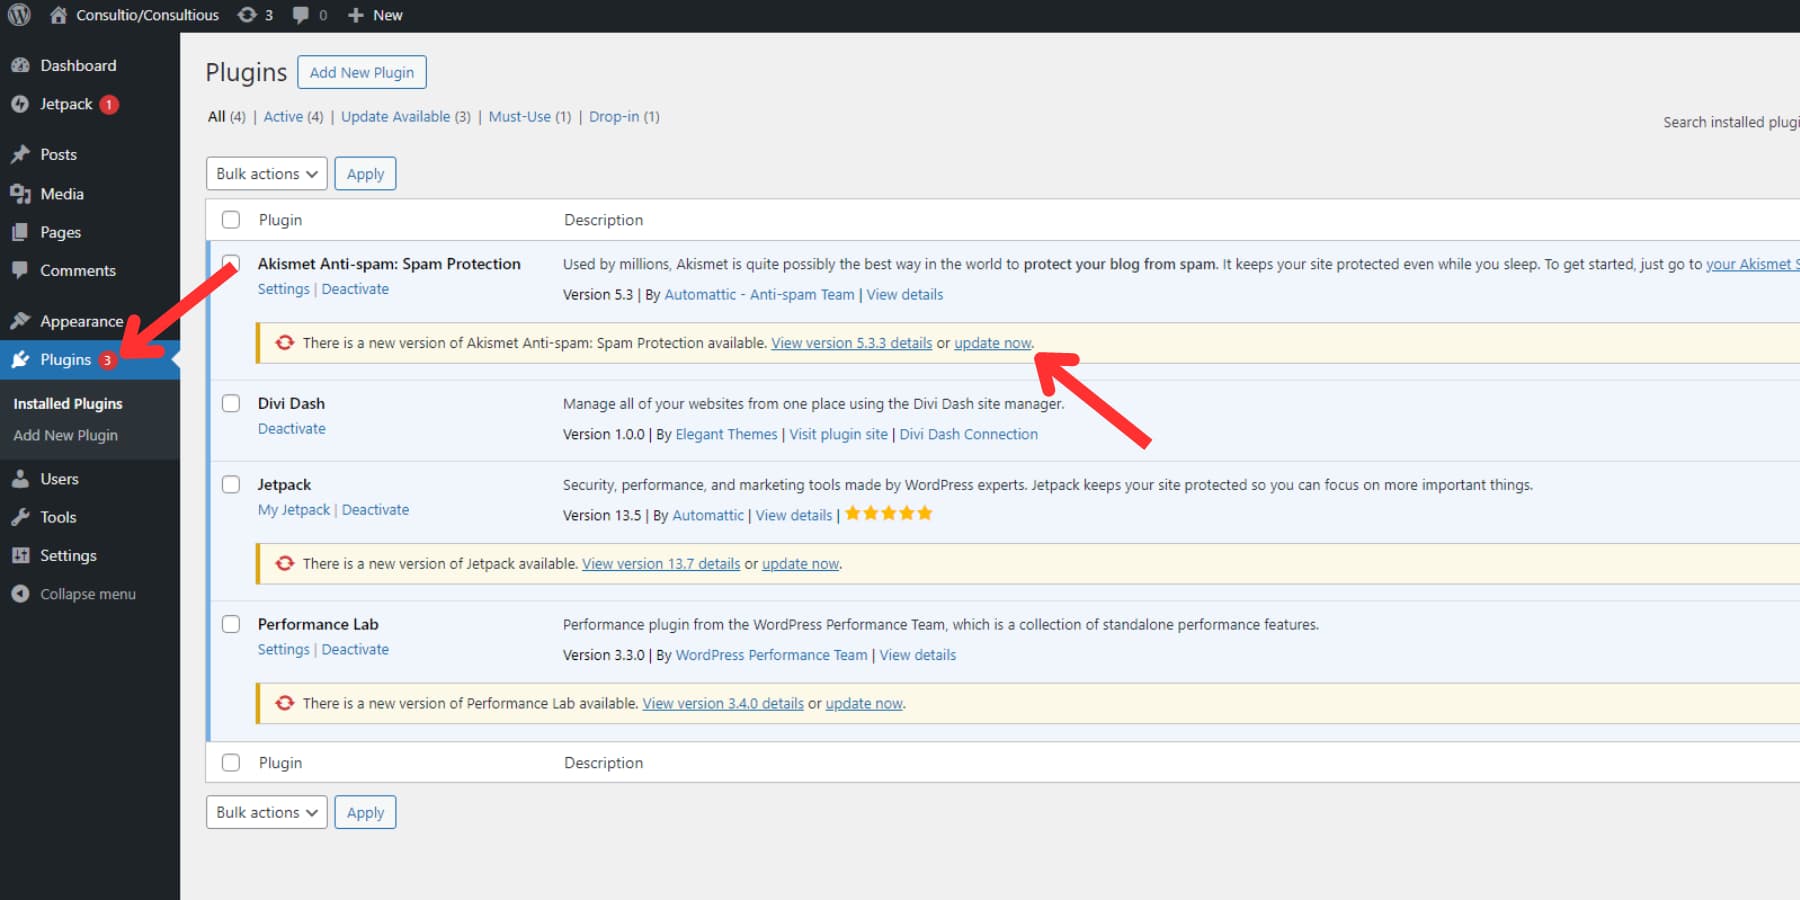
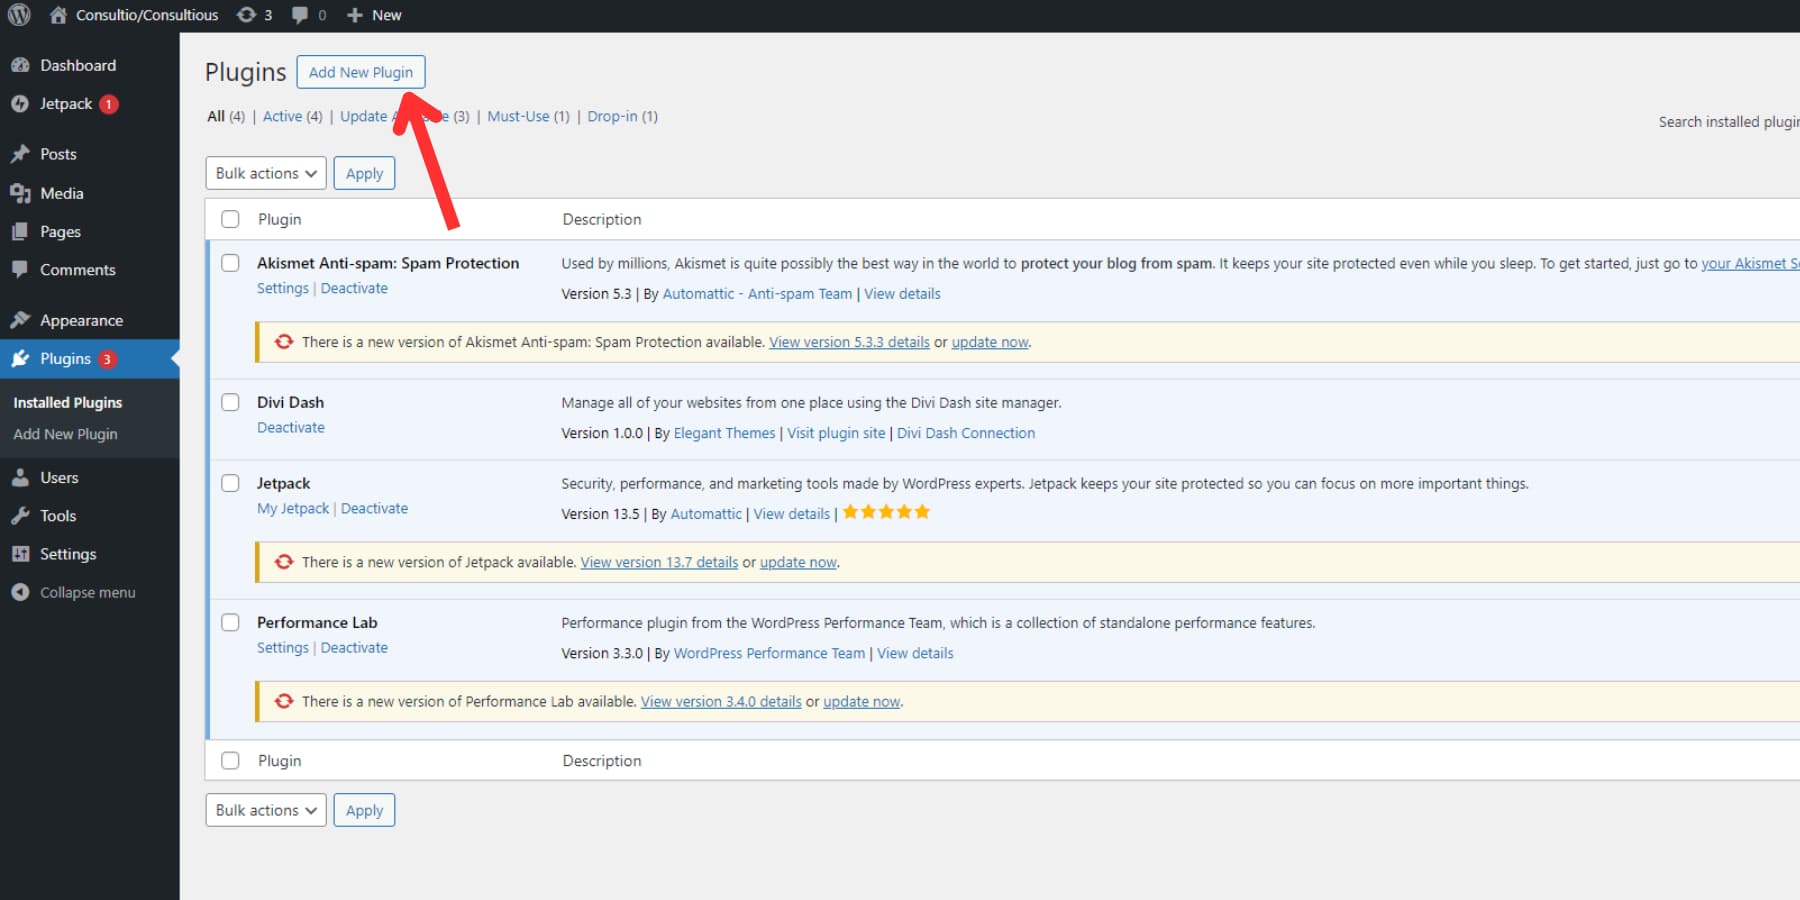
For plugin updates, navigate to Plugins → Installed Plugins. You’ll find a list of plugins that need updating, indicated by orangish notifications beneath each plugin. Use the ‘Update Now’ link next to the message and update them one at a time, ensuring each completes before moving on to the next.
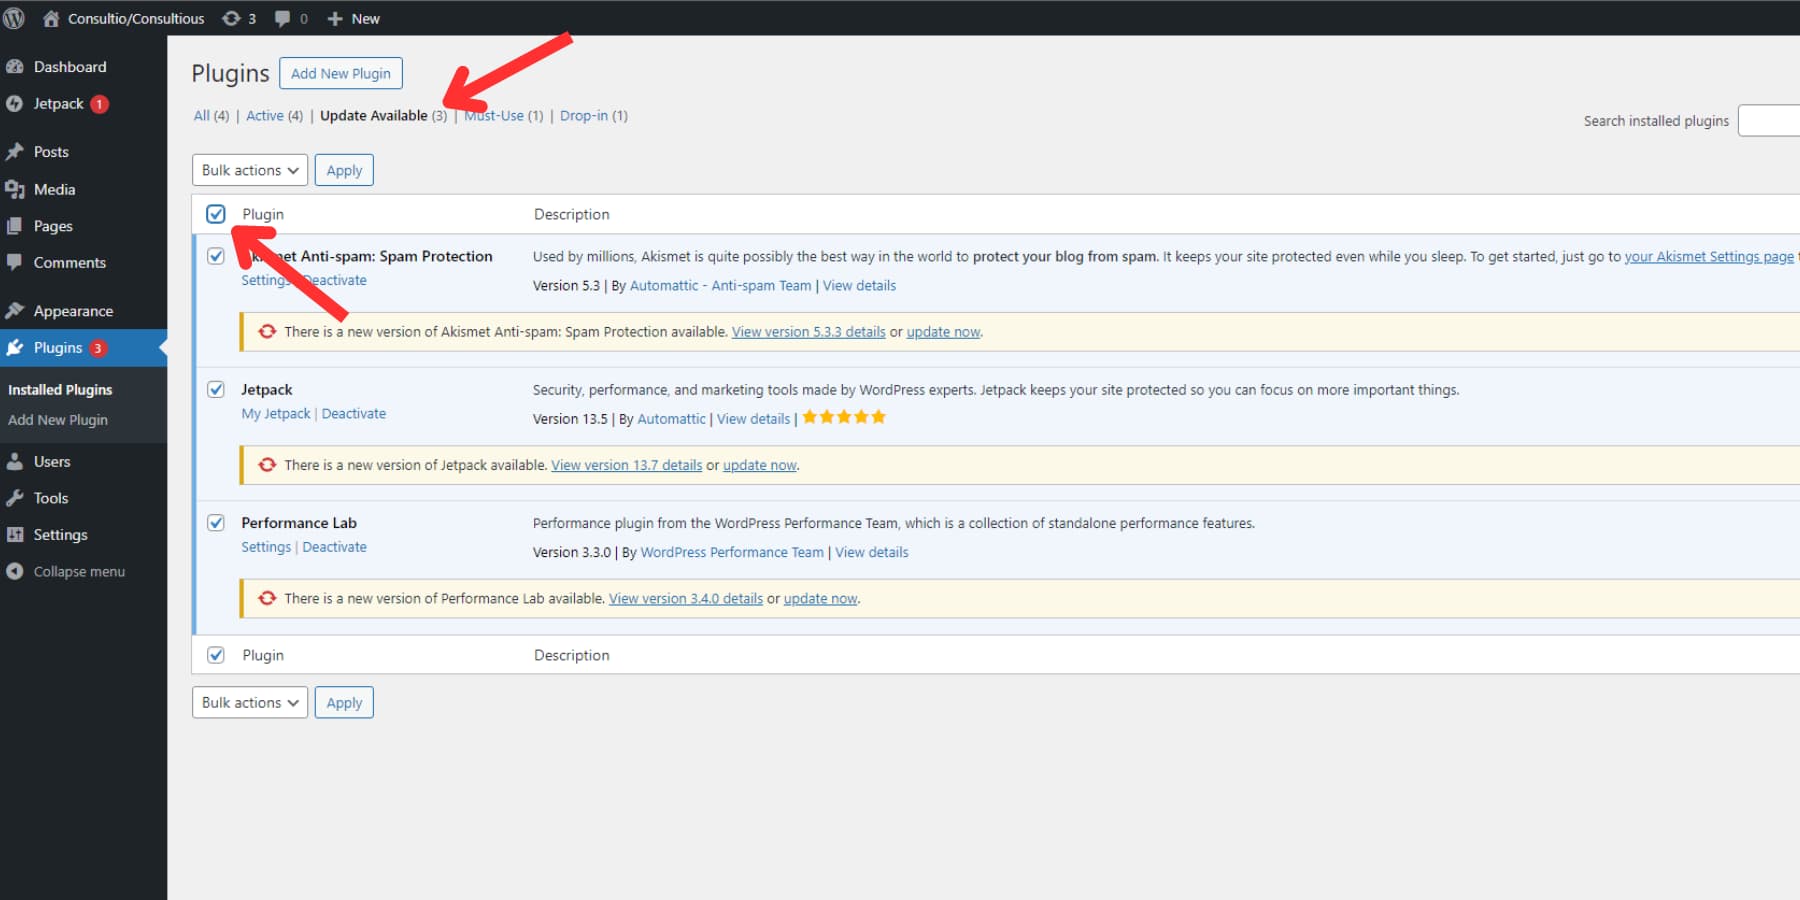
If you need to update multiple plugins quickly, go to Plugins → Installed Plugins and click the “Update Available” tab to see all plugins with pending updates. You can select the ones you want to update by checking their boxes or using the top select-all checkbox. From the Bulk Actions dropdown, choose “Update,” then click “Apply.”
Setting Auto-Updates
WordPress 5.5 has made site maintenance easier by adding automatic updates for core software, plugins, and themes. You no longer have to manually update these components, ensuring your site always has the latest security patches and bug fixes.
When you go to the Dashboard and then the Updates section in your WordPress admin panel, you’ll see a message saying, “This site is automatically kept up to date with maintenance and security releases of WordPress only.” Depending on your hosting provider, these minor updates are typically turned on by default.
If you want every WordPress update to be managed this way, simply click the link that says, “Enable automatic updates for all new versions of WordPress.” This will ensure that major WordPress updates are installed automatically, too.
To turn on automatic updates for a theme, go to the themes page under the Appearance menu. Hover over the theme you want to update automatically, click “Theme Details,” then select “Enable auto-updates” in the popup window.
To enable them for plugins, head to the ‘Plugins’ section in your WordPress dashboard for plugins. Each plugin will have an “Enable auto-updates” link next to it. Click on this link to activate automatic updates for that plugin.
If you want to enable auto-updates for multiple plugins simultaneously, select the desired ones, go to the ‘Bulk Actions’ dropdown menu, and choose “Enable auto-updates.”
While automatic updates are convenient and can enhance site security, they can sometimes cause compatibility issues or introduce new bugs. It’s generally safe to enable automatic updates for well-known and reputable themes and plugin developers like Elegant Themes, as we have a thorough testing process and unmatched reliability.
To reduce risks, consider using a backup plugin like UpdraftPlus. This plugin allows you to create backups before updates, giving you a safety net in case anything goes wrong.
3. Updating Manually
While automatic updates are generally preferred, there are situations where a manual update is beneficial. For example, custom themes, plugins, or those that encounter issues with automatic updates might require a manual process. So, let’s take a look:
Updating WordPress Core Manually
Updating your WordPress core manually might seem unnecessary nowadays, thanks to WordPress’s efficient automatic update system. However, we’ll still do it for the sake of completeness. Let’s walk through the process briefly.
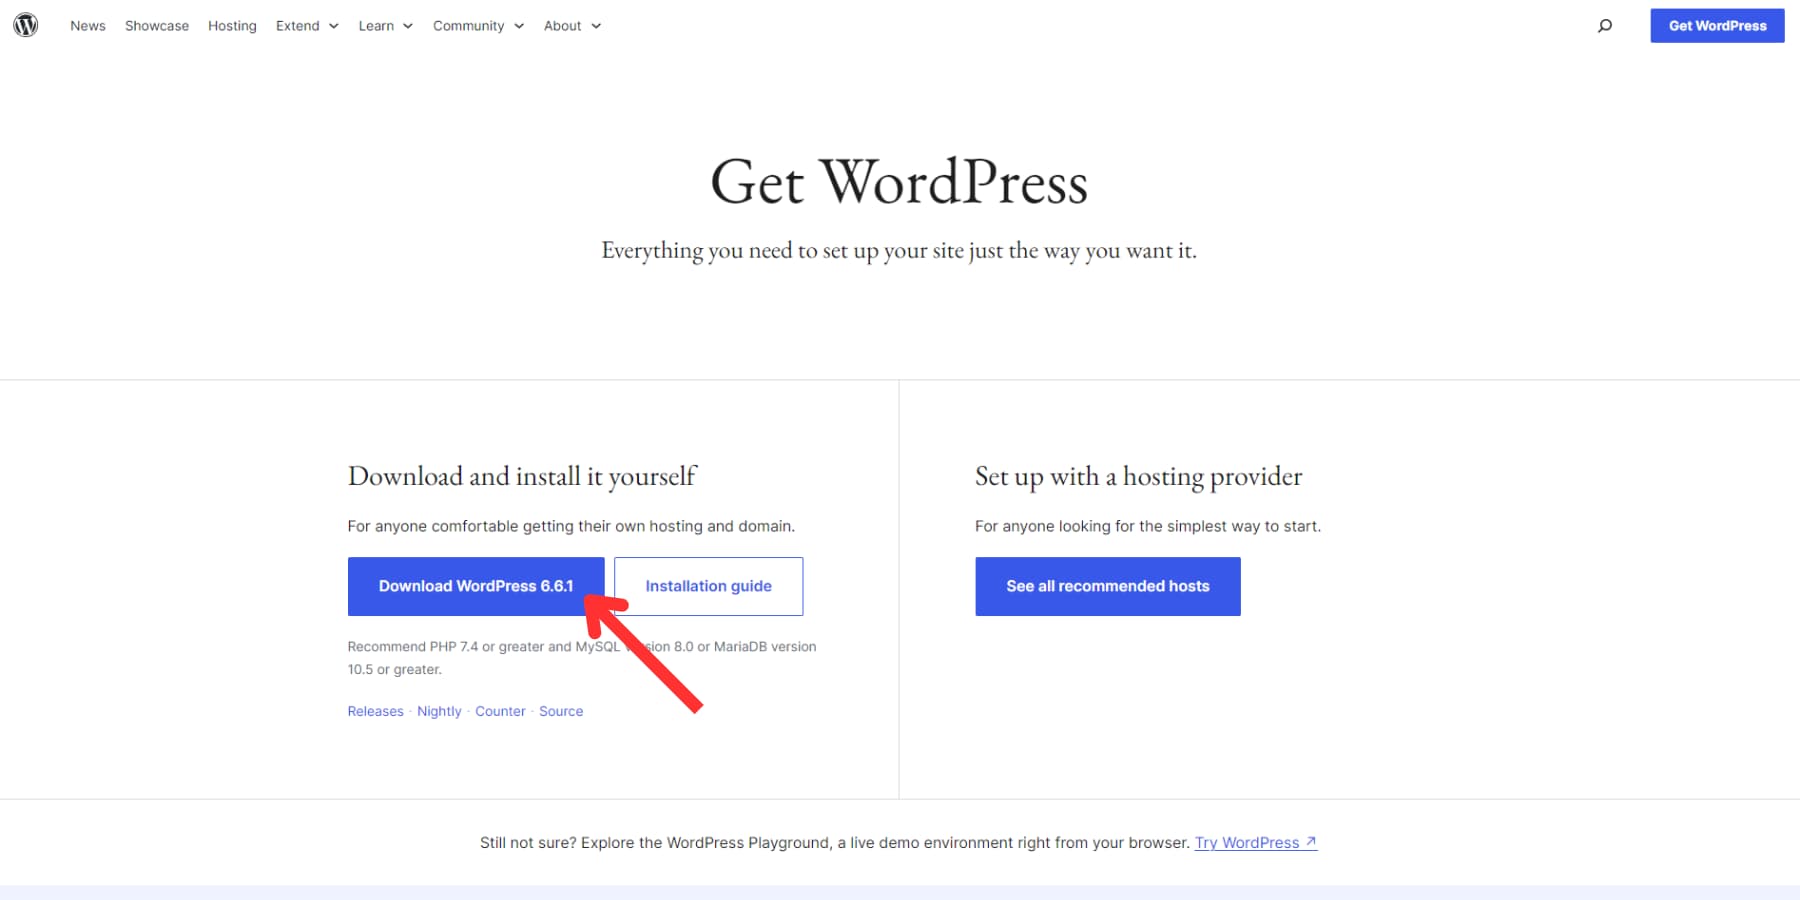
First, download the latest version of WordPress from the official WordPress.org site. Once you have it, extract the zip file to prepare for the update.
To proceed, you’ll need a file manager. This could be the cPanel file manager, another file manager provided by your host, or even an FTP client. The steps are nearly identical regardless of the tool you use. I won’t cover how to access your website’s root directory with these tools, but let’s assume you’re already there.
Start by deactivating all your plugins. Go to the wp-content folder, locate the “plugins” folder, and rename it to “plugins_temp.” or anything else you feel would be easy to refer to later. This will temporarily deactivate your plugins.
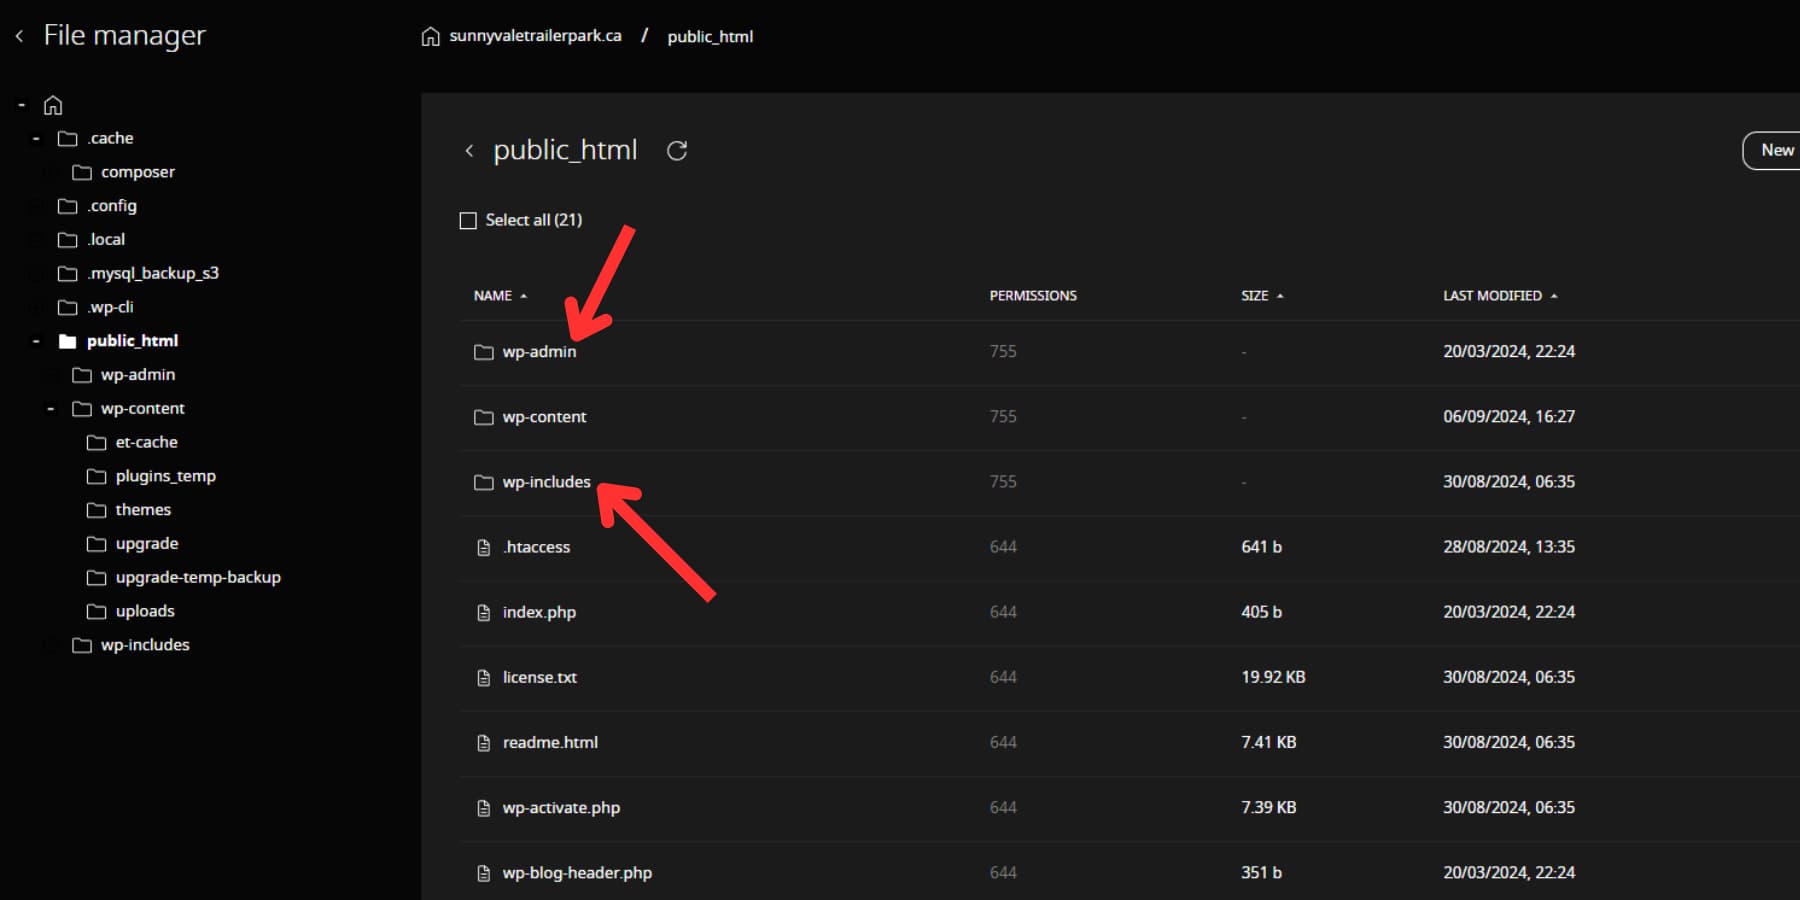
Next, delete the wp-includes and wp-admin folders from your website. If you receive any warnings, you can proceed without worry.
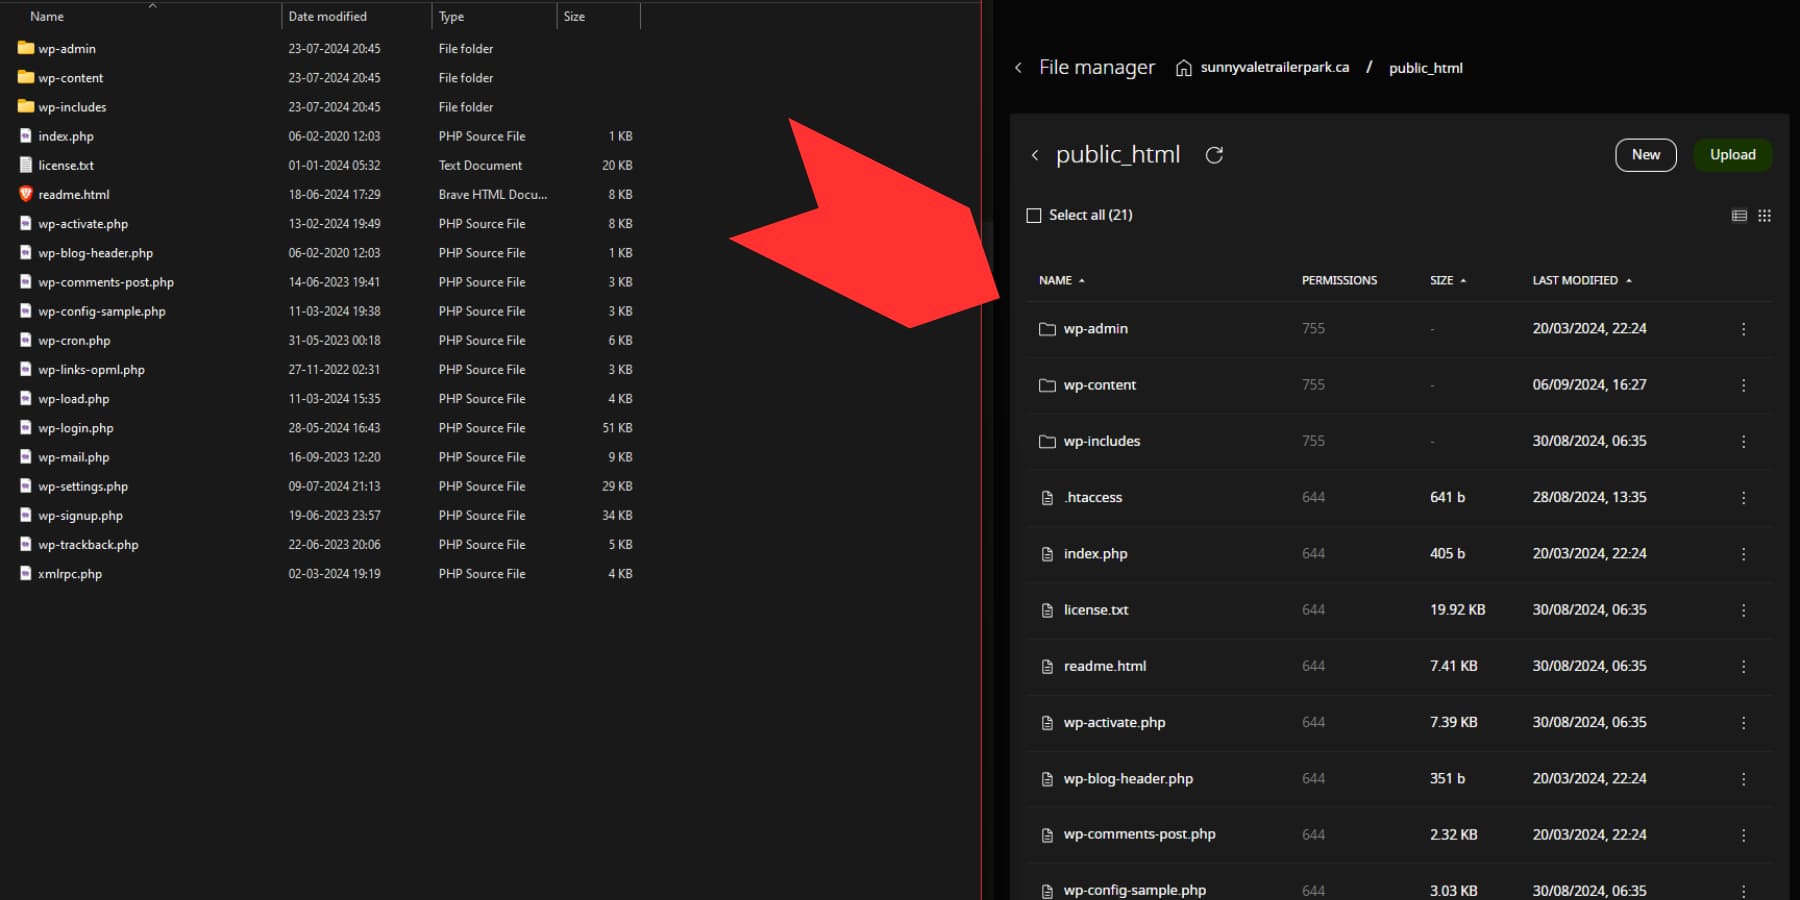
Then, upload the new wp-includes and wp-admin folders from the extracted .zip file. After that, move to the new wp-content folder and upload its individual files to your existing wp-content folder, allowing them to overwrite the old ones. Only overwrite files from the existing wp-content folder if new ones replace them.
Afterward, upload and replace all other files from the extracted folder into your website’s root directory. Once done, return to wp-content and rename “plugins_temp” back to “plugins.”
Finally, visit your domain, followed by /wp-admin. Log in when prompted. If any database updates are needed, WordPress will guide you through that before letting you proceed.
Updating Themes & Plugins Manually
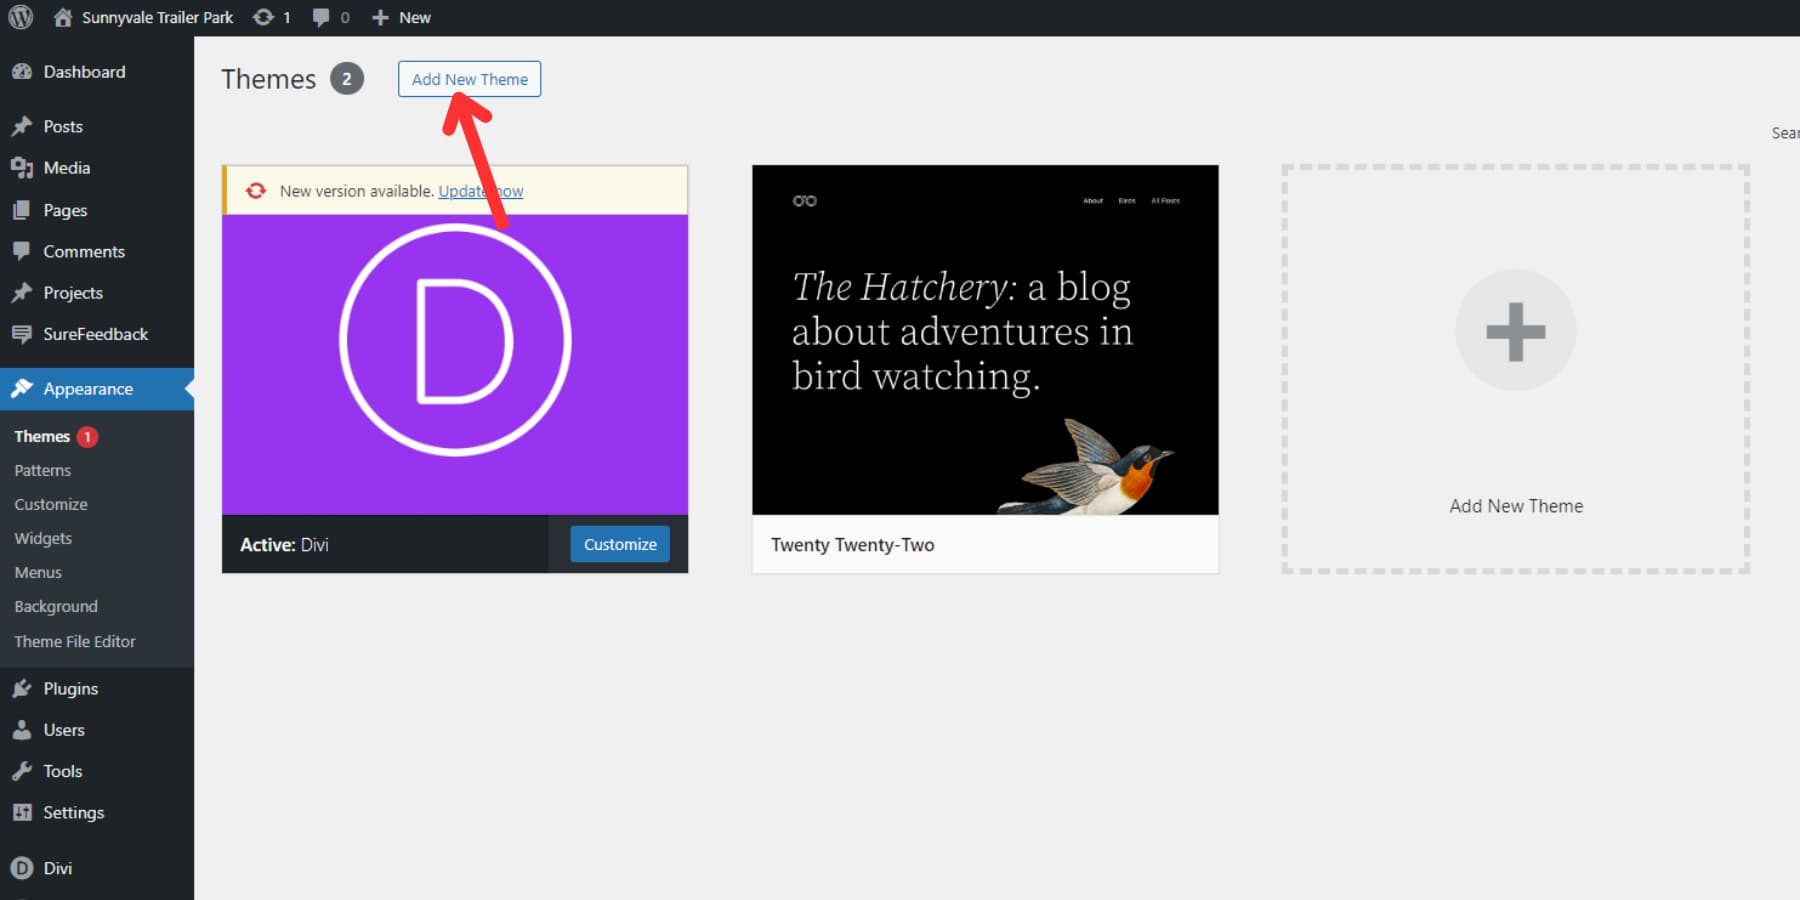
Updating WordPress themes and plugins manually is relatively straightforward and sometimes necessary. To update a theme manually, go to the Themes page under the Appearance tab in your WordPress dashboard and click the “Add New Theme” button at the top.
On the Add Themes page, you’ll see an “Upload Theme” button at the top again. Click it to upload the zip file of the updated theme. Once uploaded, WordPress will detect the newer version and prompt you to proceed with the update. Click the “Replace Current with uploaded” button to complete the update.
To manually update a plugin, go to your plugins page and hit the “Add New Plugin” button.
On the Add Plugins page, click the “Upload Plugin” button at the top to upload the updated plugin’s zip file. WordPress will recognize that you already have an older version installed and ask if you want to proceed with the update. Click the “Replace Current with uploaded” button to update the plugin.
Wrapping Up
Regularly updating your WordPress website is crucial for security, performance, and functionality. You can maintain a robust and secure online presence by following the steps outlined in this guide—backing up your site, updating WordPress core, themes, and plugins, and testing thoroughly. Remember, staying current protects your site and ensures you leverage the latest features and improvements WordPress offers.
While there are broadly two ways to keep your WordPress website up-to-date, they could get tiresome over time. However, with a great tool like Divi Dash, being on top of your WordPress updates is just clicking a button away.
Divi Dash is free for all Divi users. Sign up today to access Divi AI, Divi Quick Sites, and Divi Dash, all in one membership.
The post How To Keep Your WordPress Website Up-to-Date appeared first on Elegant Themes Blog.

