Do you want to learn how to create custom meta boxes for your WordPress posts, pages, and custom post types?
WordPress adds metadata to your content automatically, such as the publication date, categories, and tags. However, you may also want to add your own custom meta data.
In this article, we will show you how to easily add unique information to your content, by creating a custom meta data box in WordPress.

What is a Custom Meta Box in WordPress?
When you create posts and pages, or custom post types in WordPress, that content usually has its own metadata. This metadata is information related to the content like date and time, the author name, title, and more.
You can also add your own metadata using the default custom fields box.
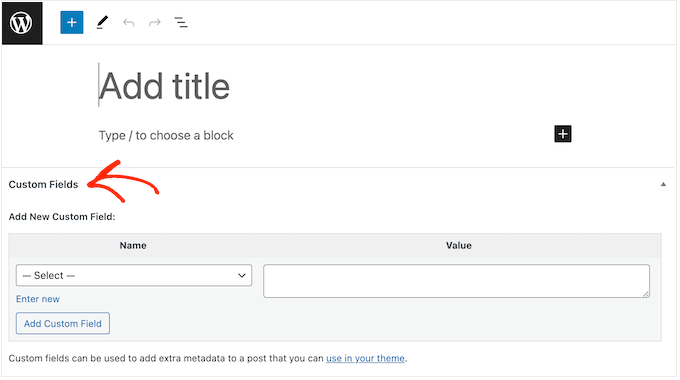
Pro Tip: Can’t see the Custom Fields box in the post editor? Then see our guide on how to fix custom fields not showing in WordPress.
The Custom Fields box is a good solution if you just want to add custom metadata to a few posts. However, if you plan to add lots of unique information to your content, then it makes sense to create a custom metadata box.
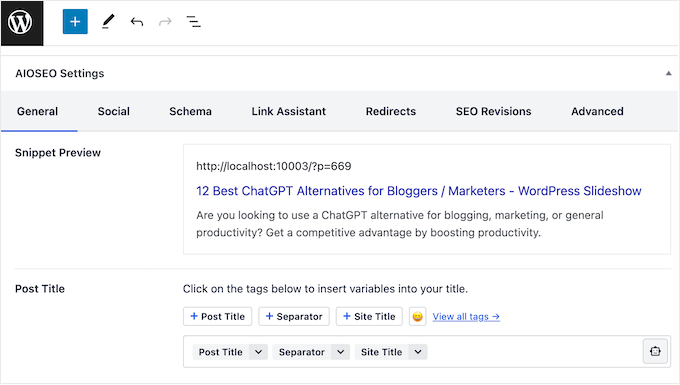
In fact, many of the popular WordPress plugins add custom meta boxes to the Edit screen for posts and pages. In the following image, you can see how easy it is to add SEO information to your post, using a custom meta box provided by AIOSEO.
With that being said, let’s see how you can easily add custom meta boxes in WordPress posts and post types.
How to Add Custom Meta Boxes in WordPress Posts and Post Types
The easiest way to add custom meta boxes to WordPress is by using Advanced Custom Fields. This plugin allows you to attach all kinds of extra information to your posts and pages, and then show that data to visitors using a shortcode.
The first thing you need to do is install and activate the Advanced Custom Fields plugin. For more details, see our step-by-step guide on how to install a WordPress plugin.
Create a Custom Meta Box
Upon activation, go to ACF » Field Groups and then click on the ‘Add New’ button.
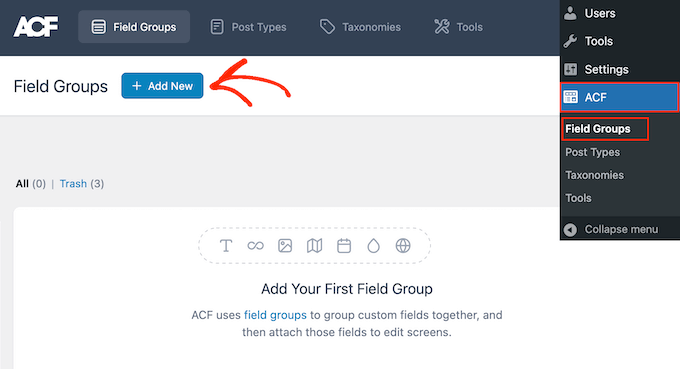
Here, you can create the custom fields that will appear in the metadata box.
To start, you’ll need to type a title into the field that shows ‘Field Group Title’ by default. This will appear in the WordPress content editor, and it will be used as the title of your meta box.
With that being said, you should use something descriptive, especially if you manage a multi-author WordPress blog or share the dashboard with other people.
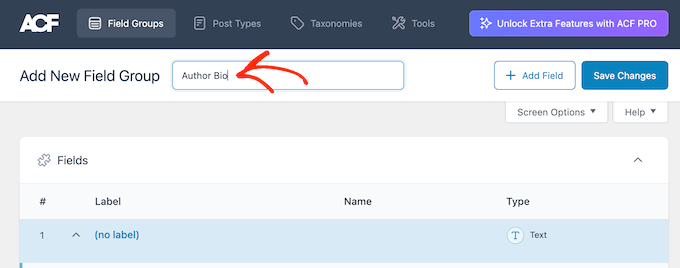
With that done, you’re ready to add the first field to your meta box.
Add Custom Fields to the Meta Box
To start, open the ‘Field Type’ dropdown and choose the type of field you want to add, such as Text, Date Picker, Checkbox, or any other field type.
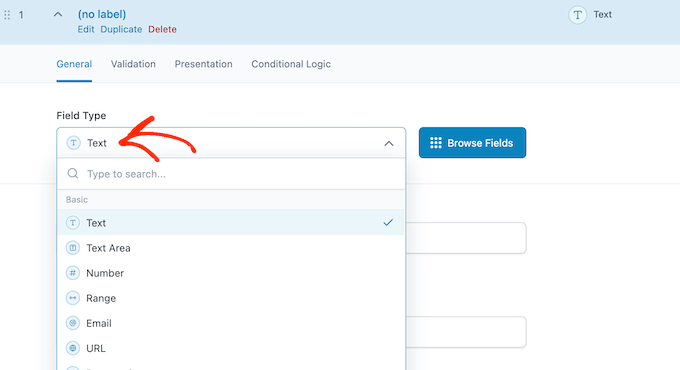
After that, type in a label for the field.
Advanced Custom Fields will show this label before the field, so it will help users understand what information they need to enter.
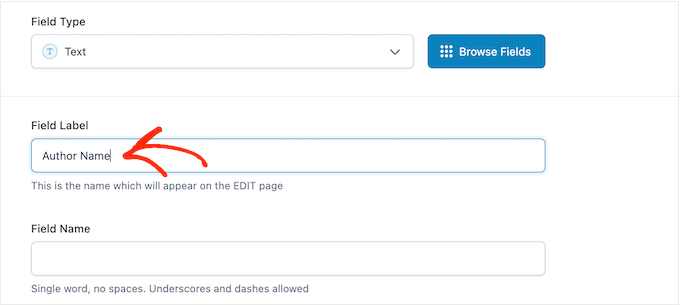
Advanced Custom Fields will generate the ‘Field Name’ automatically, so you can leave this field empty.
With that done, you may want to type in a ‘Default Value.’ This will be added to the page, post, or custom post type automatically if the user doesn’t add their own information.
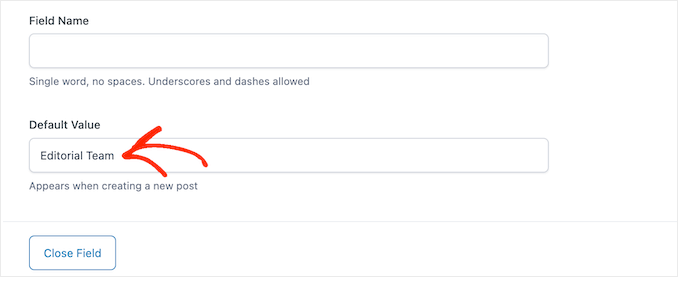
You may see more options depending on the kind of field you’re creating. For example, if you selected ‘Image’ from the ‘File Type’ dropdown, then you can choose the image format.
Most of these options are self-explanatory so you can follow the onscreen instructions to configure the custom field.
When you’re happy with how the field is set up, click on ‘Close Field’ to collapse the section.
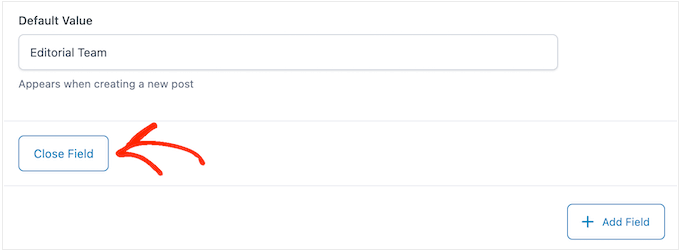
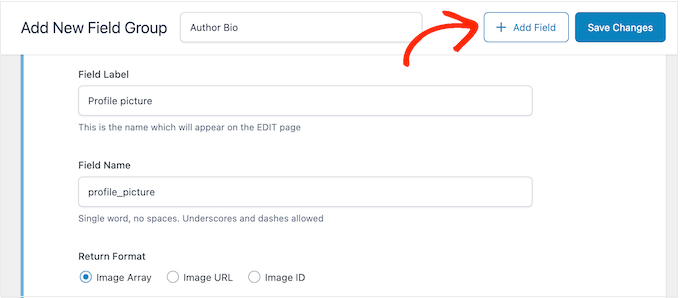
You can now add more fields to the custom meta box by clicking on the ‘Add Field’ button.
Then, simply configure the field by following the exact same process described above.
Add a Custom Meta Box to the WordPress Content Editor
When you’re happy with how the custom meta box is set up, you’ll need to define where and when the meta box will appear.
Scroll to the ‘Settings’ section and then click on the ‘Location Rules’ tab.
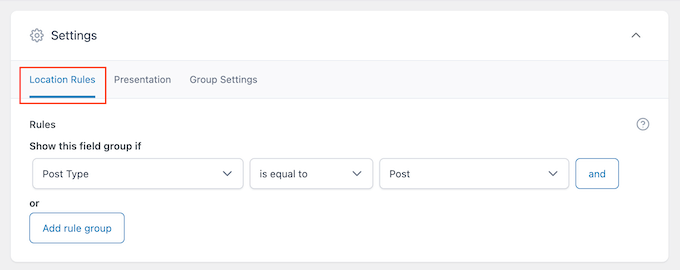
Advanced Custom Fields can add the box to all kinds of content. For example, you can show the meta box on specific post types, categories, taxonomies, navigation menus, and more.
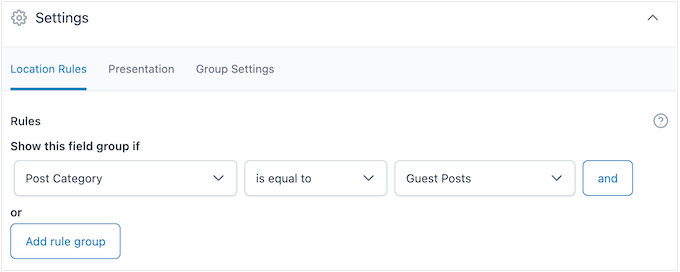
Simply use the dropdown menus to choose where the meta box will appear in your WordPress dashboard. For example, if you accept guest posts then you may want to add the box to all posts in the ‘Guest Posts’ category.
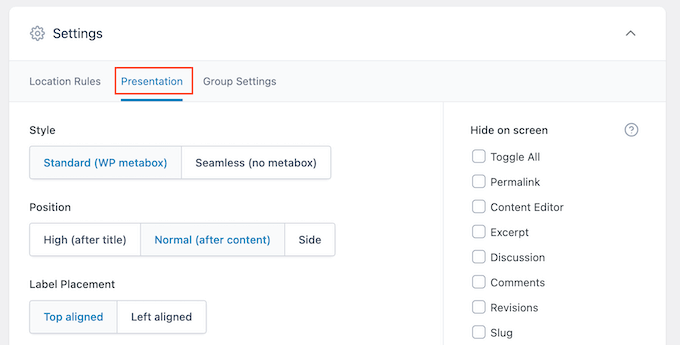
After that, click on the ‘Presentation’ tab.
Here, you can choose the meta box style, where it appears on your WordPress blog, and where the label and instructions will appear.
If you plan to add multiple boxes in the same location, then you can change the order they appear in by typing into the ‘Order No’ field.
For example, showing the most important meta boxes towards the top of the screen may improve your editorial workflow.
If you’re unsure, then you can leave this field set to 0.
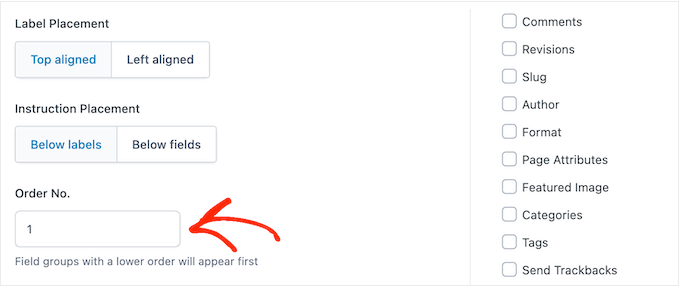
On this screen, you’ll also see a list of all the fields that WordPress usually shows on the post edit screen.
If you want to hide a field, then simply check its box. For example, if you’re using custom fields to create an author info box, then you may want to hide the default ‘Author’ field.
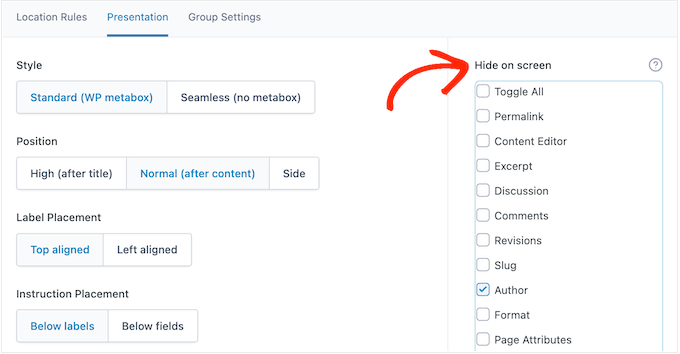
When you’re happy with the changes you’ve made, click on ‘Save Changes’ to make the field group live.
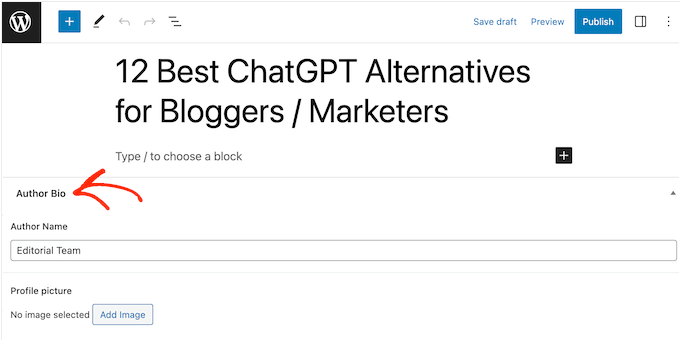
You’ve now successfully created a custom meta box for your WordPress post, page, or custom post type. Depending on your settings, you can now visit the post editor to see the custom meta box in action.
Displaying Your Custom Meta Box Data in WordPress Theme
You’ve now successfully added a custom meta box to the WordPress dashboard. Any information users type into the meta box will be stored in the WordPress database when they save or publish the post. However, this information won’t appear on your website by default.
With that in mind, let’s make sure the custom metadata appears in your WordPress theme, so visitors can see it.
You can do this using shortcode or by editing your WordPress theme files.
How to Display Custom Metadata using Shortcode
Adding a shortcode in WordPress is the easiest method, and allows you to control exactly where the information appears on your website. For example, if you’ve created a ‘Star Rating’ field, then you can show this information after the post title, inside the content, in the footer, or anywhere else simply by adding a shortcode.
However, you will need to add a shortcode to every page, post, or custom post type manually. This can take a lot of time and effort, especially if you have a lot of content.
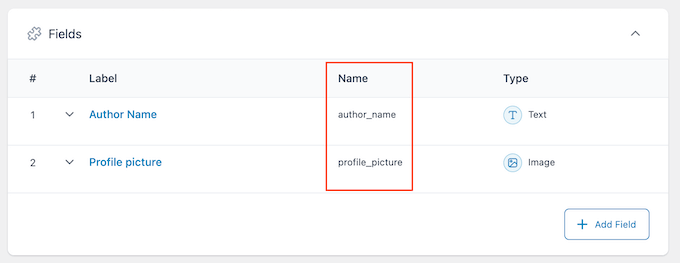
To get a field’s shortcode, go to ACF » Field Groups. Then, hover over the field group that you want to display and click on the ‘Edit’ link when it appears.
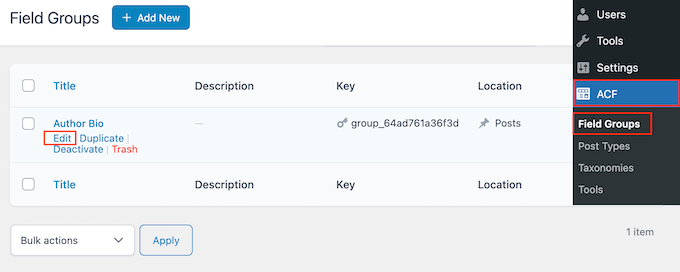
You’ll now see all the fields that make up this group.
For each field you want to display, make a note of the value in the ‘Name’ field.
With that done, go to the page, post, or custom post type where you want to show the custom metadata.
You can now click on the ‘+’ icon and type in ‘Shortcode.’
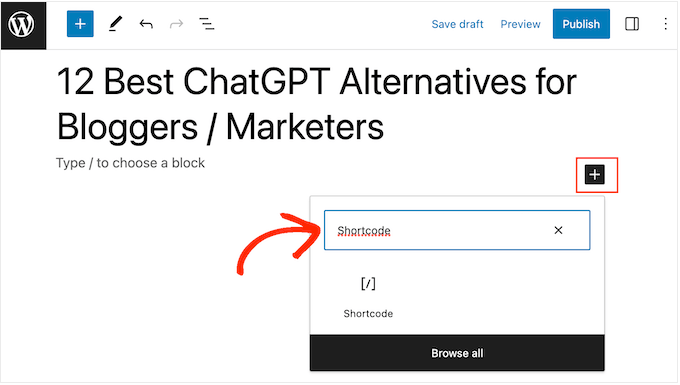
When the right block appears, click to add it to your layout.
You can now add the following shortcode to the block, making sure to replace "article_byline" with the name of the field you want to show.
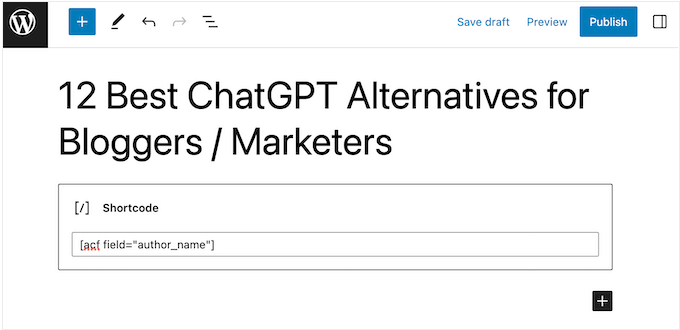
You can now repeat these steps to add multiple custom fields to the post.
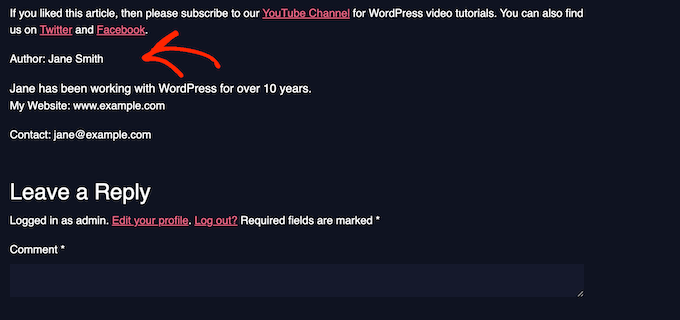
When you’re happy with the changes you’ve made, either click on the ‘Publish’ or ‘Update’ button. Now, simply visit your WordPress website to see the custom metadata in action.
How to Display Custom Metadata by Editing Your WordPress Theme
If you want to show custom metadata in the same location on every page, post, or custom post type, then you can add code to your WordPress theme files.
This can save you time in the long-term, but it isn’t the most beginner-friendly method. You’ll also lose all the custom code the next time you update your WordPress theme, which is why we recommend creating a child theme. You can then add your custom code to the child.
If you haven’t edited your theme files before, then take a look at our beginner’s guide on how to copy and paste code in WordPress.
You’ll need to edit the file where you want to show the custom metadata. This will vary depending on your theme, but you’ll usually need to edit your site’s single.php, content.php, or page.php file.
Once you have the right file, you’ll need to add the code inside the WordPress loop. To find this loop, simply search for code that looks something like this:
<?php while ( have_posts() ) : the_post(); ?>
You can then paste your code after this line and before the line that ends the loop:
<?php endwhile; // end of the loop. ?>
As an example, your custom field code should look something like this:
<h2 class="article-byline"><?php the_field('article_byline'); ?></h2>
Notice how we wrapped the code in a h2 heading with a CSS class. This allows us to format and style the custom field later by adding custom CSS to our theme.
Here’s another example:
<blockquote class="article-pullquote">

<?php the_field('article_pullquote'); ?>

</blockquote>
When adding code to your theme, don’t forget to replace the field names.
With that done, you can visit any post where you’ve already entered data into the custom fields. You will now see your unique metadata in action.

We hope this article helped you learn how to add custom meta boxes in WordPress posts and post types. You may also want to see our guide on how to create automated workflows in WordPress, or see our expert pick of the best SEO plugins and tools that you should use.
If you liked this article, then please subscribe to our YouTube Channel for WordPress video tutorials. You can also find us on Twitter and Facebook.
The post How to Add Custom Meta Boxes in WordPress Posts and Post Types first appeared on WPBeginner.
