Are you wondering how to style your WordPress forms?
You can customize your forms to match your WordPress website’s design. This can create a more visually appealing and professional look for your site and improve the user experience.
In this article, we will show you how to easily customize and style WordPress forms, step by step.
Why Customize and Style Your WordPress Forms?
When you add a form to your WordPress website using a plugin, you will notice that its layout is usually simple and plain-looking.
For example, if you add a registration form to your website using a user-registration form plugin, then you will see that its layout is a bit boring. This can fail to capture your visitor’s attention and even discourage them from filling out the form.

By customizing your forms, you can match them to your WordPress theme and your branding to make them more attractive.
This can lead to more conversions because styled WordPress forms are easier to navigate and can encourage more users to fill them in.

Styled forms can also increase your brand awareness among users. For instance, you can use your website logo and signature company colors to make your form more memorable and effective.
Having said that, let’s see how to easily customize and style your WordPress forms, step by step. We will cover 2 methods in this post, and you can use the quick links below to jump to the one you want to use:
Method 1: How to Customize and Style WordPress Forms With WPForms (Code Free Method)
You can easily customize and style your WordPress forms using WPForms. It is the best WordPress contact form plugin on the market, used by over 6 million websites.
WPForms comes with a drag-and-drop builder that makes it super easy to create any kind of form you want. Plus, it even has built-in customization options for your form that don’t require any coding.
First, you need to install and activate the WPForms plugin. For detailed instructions, you may want to see our step-by-step guide on how to install a WordPress plugin.
Note: WPForms also has a free version that you can use for this tutorial. However, we will be using the premium plugin because it has more settings and options.
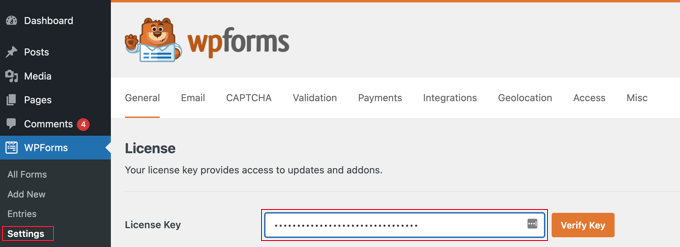
Upon activation, you need to visit the WPForms » Settings page from the WordPress admin sidebar to enter your license key.
You can find this information in your account on the WPForms website.
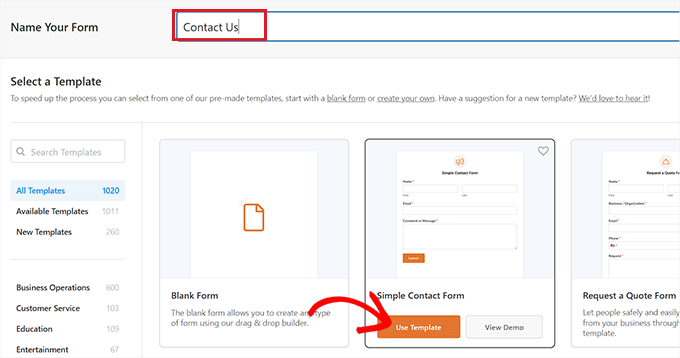
Once you’ve done that, head over to the WPForms » Add New screen from the WordPress dashboard.
This will take you to the ‘Select a Template’ page, where you can start by typing a name for your form. After that, you can pick any form template that you want and click the ‘Use Template’ button under it.
For the sake of this tutorial, we will be creating and adding a simple contact form to our website.
This will launch the template in the WPForms form builder, where you will see a form preview on the right and form fields in the left column.
From here, you can drag and drop any form field of your choice to the form according to your liking.
For detailed instructions, see our tutorial on how to create a contact form in WordPress.
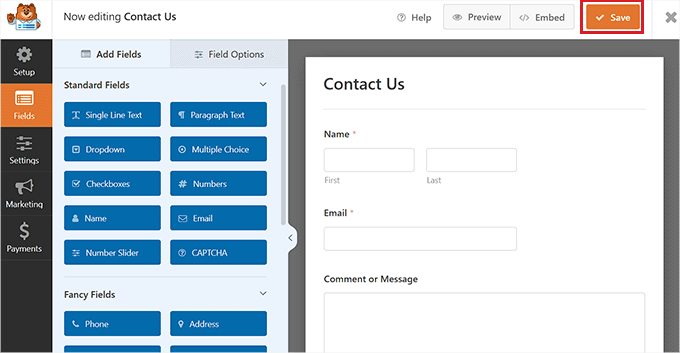
Once you are done customizing your form, simply click the ‘Save’ button at the top to exit the form builder.
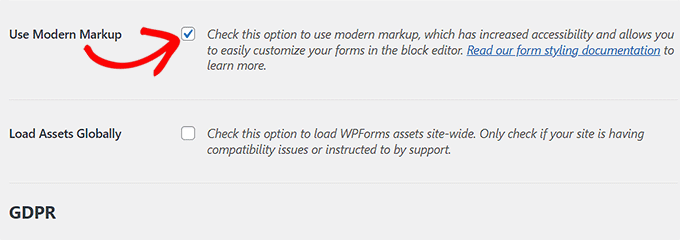
After that, you need to visit the WPForms » Settings page from the WordPress dashboard and check the ‘Use Modern Markup’ option. If you fail to check this box, then the WPForms customization settings won’t be available in the block editor.
Don’t forget to click the ‘Save Changes’ button to store your settings.
Next, open the page or post where you want to add the form that you just created.
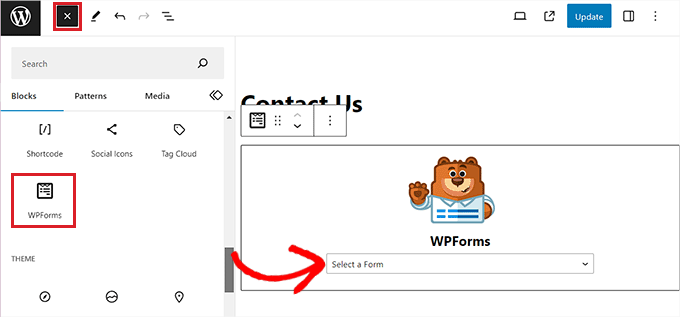
From here, you need to click the add block ‘+’ button in the top left corner of the screen to open the block menu and add the WPForms block.
Once you have added the block, simply select the form that you want to add to your site from the dropdown menu within the block itself.
Now that you’ve added the form, it’s time to customize it and style it.
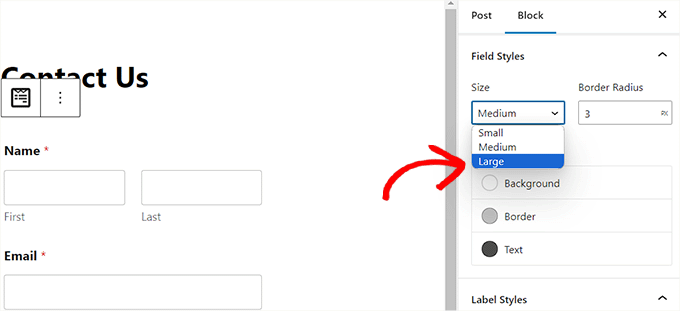
To do this, you must open the block panel on the right side of the screen and scroll down to the ‘Field Styles’ section.
From here, you can select a size for your form fields from the dropdown menu and even set a border radius for them.
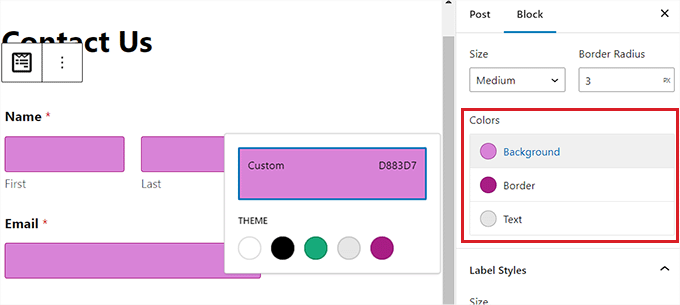
Next, you can change the background, text, and border color of the form fields by using the color picker tool.
Here, you can use your brand’s signature colors or other colors that are used on the rest of your WordPress blog to create a visually appealing form.
Once you’ve done that, scroll down to the ‘Label Styles’ section, where you can select the font size of the labels from the dropdown menu.
After that, you can also change the font color of the labels, sub-labels, and error messages that will be displayed in your form.
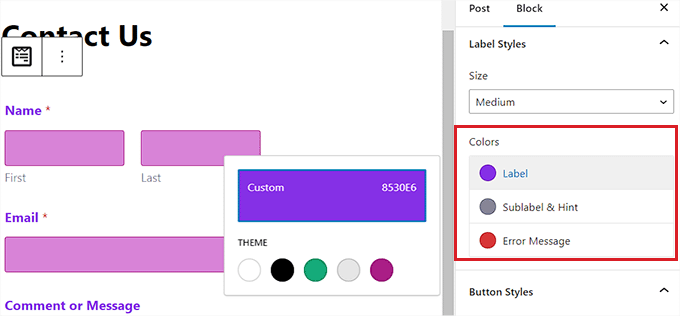
To customize the button in your form, you need to scroll down to the ‘Button Styles’ section and choose its size from the dropdown menu.
You can also set a border radius and change the background and text color of the form button.
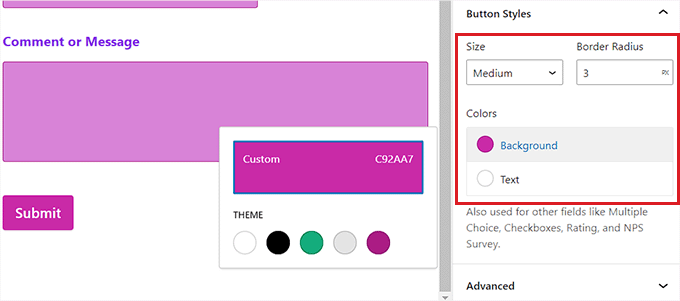
Once you’ve finished customizing the form, simply click the ‘Update’ or ‘Publish’ button at the top to store your settings.
Now, you can visit your site to view the styled WordPress form in action.

Method 2: How to Style WordPress Forms With CSS (Advanced Customization)
If you don’t want to use the customization options offered by WPForms or you want to apply different customizations with CSS, then you can also use a custom CSS snippet.
To do this, first, you will have to create a form using WPForms, which is the #1 form builder on the market.
It is a drag-and-drop builder that comes with many templates that you can use to create contact forms, file upload forms, registration forms, RSVP forms, and much more.
For detailed instructions, you can see our tutorial on how to create a contact form in WordPress or see method 1.
Once you have created a form, it’s time to customize it using WPCode, which is the best WordPress code snippets plugin on the market.

It is the easiest and safest way to add CSS code for styling your WordPress form.
First, you will need to install and activate the WPCode plugin. For detailed instructions, you may want to see our beginner’s guide on how to install a WordPress plugin.
Note: WPCode has a free version. However, you will need the premium plan of the plugin to unlock the ‘CSS Snippet’ option.
Upon activation, visit the Code Snippets » + Add Snippet page from the WordPress dashboard.
Once you are there, just click the ‘Use Snippet’ button under the ‘Add Your Custom Code (New Snippet)’ option.

This will take you to the ‘Create Custom Snippet’ page, where you can start by typing a name for your code snippet.
After that, select the ‘CSS Snippet’ option from the dropdown menu in the right corner of the screen.
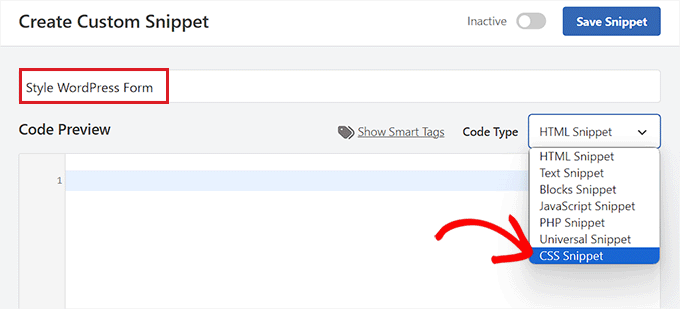
Next, copy and paste the following code into the ‘Code Preview’ box:
#wpforms-0000 .wpforms-form {
    background-color: #ADD8E6 !important;
	font-family: 'Arial', sans-serif !important;
    padding: 20px 15px !important;
    border: 3px solid #666 !important;
    border-radius: 20px !important;
}
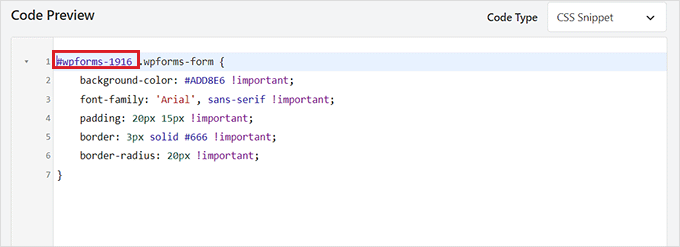
Once you’ve done that, you will have to replace the default shortcode at the top with the shortcode of the form that you want to customize.
To do this, visit the WPForms » All Forms page from the WordPress dashboard and copy the WPForms ID number of the form that you want to style.
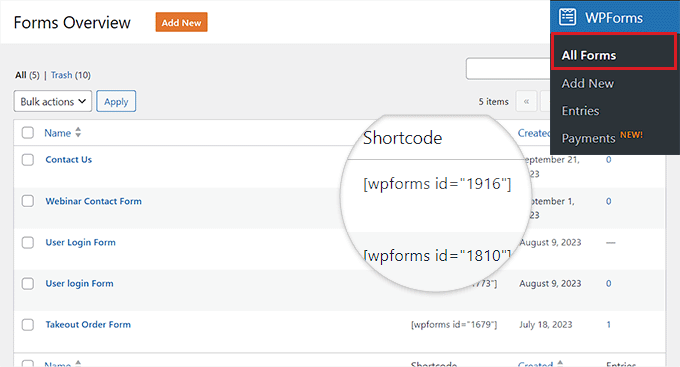
After that, paste the ID number of the form next to the wpforms- line in the code. Now, all the code will be executed in this specific form only.
Next, you can easily change the hex code for the background color, add a font family of your choice, and configure the padding and border radiuses of the form by changing the code snippet.
Once you have done that, scroll down to the ‘Insertion’ section and select the ‘Auto Insert’ mode.
The code will automatically be executed on your site upon activation.

Finally, scroll back to the top of the page and toggle the switch to ‘Active’.
After that, click the ‘Save Snippet’ button to store your settings
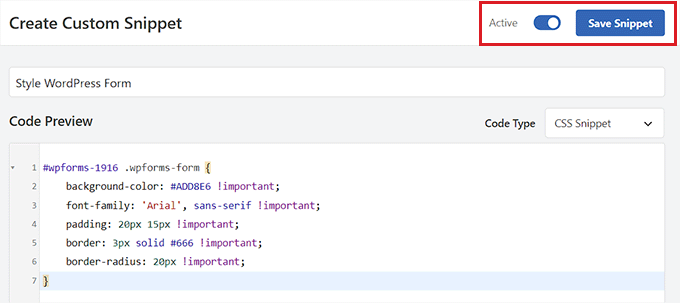
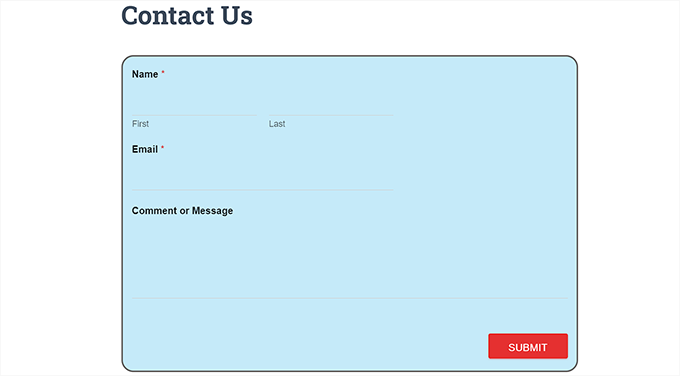
Now, the WordPress form will automatically be customized according to the CSS snippet, and you can go view it.
However, if you haven’t added the form to your website yet, then just open a page or post in the block editor.
Once you are there, click the ‘+’ button in the top left corner to open the block menu and add the WPForms block.

After that, select the form that you styled using the CSS snippet from the dropdown menu in the block itself.
Finally, click the ‘Update’ or ‘Publish’ button to store your settings.
Now, you can visit your WordPress site to see the customized form in action.
Bonus: How to Create Custom Website Pages
Styling WordPress forms is just one way to make your site more attractive and visually interesting. You can also design your own fully customized website pages using SeedProd.
It is the best WordPress page builder plugin on the market that allows you to create attractive pages without using any code.
SeedProd comes with a drag-and-drop builder, pre-made templates and site kits, easy customization options, color palettes, and advanced page blocks. Plus, you can easily embed your WPForms forms within the SeedProd editor.
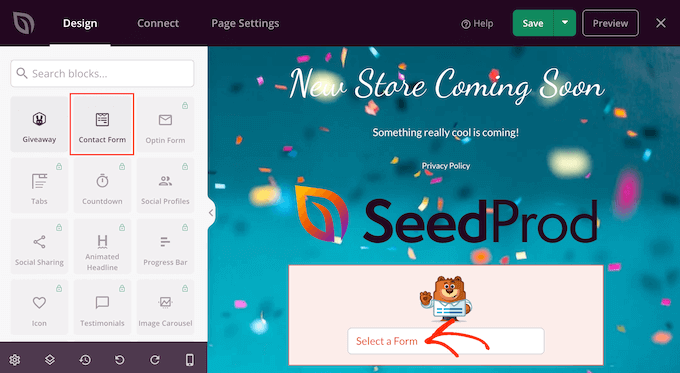
You can even use SeedProd to create a viral waitlist page, a sales page, a maintenance page, a coming soon page, and so much more.
For more details, you can see our tutorial on how to create a landing page in WordPress.
We hope this article helped you learn how to customize and style your WordPress forms. You may also want to see our tutorial on how to add a coupon code field to WordPress forms and our comparison of WPForms vs. Gravity Forms vs. Formidable Forms.
If you liked this article, then please subscribe to our YouTube Channel for WordPress video tutorials. You can also find us on Twitter and Facebook.
The post How to Customize and Style Your WordPress Forms (2 Easy Methods) first appeared on WPBeginner.
