Do you want to learn how to track third-party domain requests in WordPress?
If your website is slow, then visitors may leave before it even has a chance to load. However, even if you’ve optimized every part of your website, third-party domain requests can still have a big impact on your page loading times.
In this article, we will show you how to track third-party domain requests in WordPress.
Why Track Third-Party Domain Requests in WordPress?
By reducing your page load times, you can improve the user experience, get more visitors, and boost your WordPress SEO. There are lots of ways to speed up your website, including optimizing your images and choosing the best WordPress hosting.
However, third-party domain requests can also affect your site’s performance even with the best hosting and optimization.
A third-party domain request loads content or resources from a location outside of your domain. Some common examples include content from social media sites like Twitter and Facebook, advertising networks including Google AdSense, and even some WordPress comment plugins.
A large number of third-party domain requests can slow down your website. However, sometimes even a single third-party request can block the rest of the page from loading. When this happens, WordPress will connect to the third-party URL and download all the required content, before loading the rest of your page.
With that being said, let’s see how you can speed up your website by tracking and optimizing third-party domain requests in WordPress.
How to Identify Third-Party Domain Requests in WordPress
The first step is identifying all the third-party domain requests your site is making, using Pingdom. Pingdom is a popular performance monitoring tool that allows you to monitor your WordPress server uptime. It can also show all your site’s third-party domain requests.
First, you need to visit the Pingdom website and paste your domain name into the ‘URL’ field. Then, click on ‘Start Test.’

After a few moments, Pingdom will show a breakdown of your site’s performance. To see all the third-party domain requests, scroll to the ‘File Requests’ section.
Here, you’ll see the content type, URL, and size of each request.
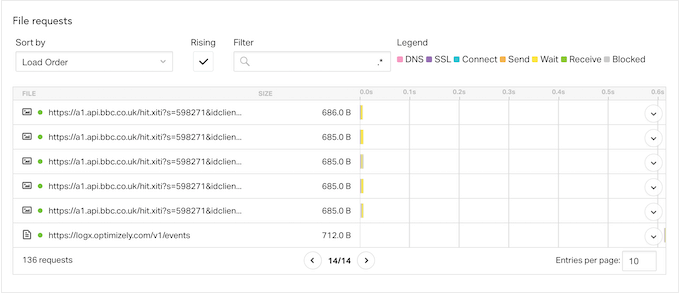
To find the third-party requests, simply look for any items that don’t begin with your site’s domain name.
If you want to learn more about a request, then simply hover your mouse over its bar in the waterfall chart.
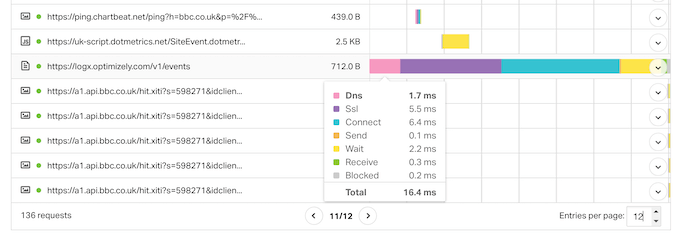
Here, you’ll see all the steps that WordPress takes to get content from this third-party domain including making a DNS lookup, SSL handshake, and downloading data from that domain.
Pingdom also shows how long each step takes, so you can identify the domain requests that make the biggest impact on your site’s performance.
If you don’t recognize a third-party service, then just paste its URL into a search engine such as Google. Often, this will bring up links to documentation, pages, and forums where you can learn more about the domain.

How to Optimize Third-Party Domain Requests
Once you’ve identified the third-party domain requests that are hurting your website’s performance, there are a few different ways to optimize those requests and boost your WordPress speed.
The method that works best for you may vary depending on how your WordPress website is set up, the requests it makes, and other factors. With that in mind, simply use the quick links below to jump straight to the method you want to learn more about.
Method 1. Remove the Third-Party Domain Request
This isn’t a good option for all WordPress blogs, but removing one or more third-party requests can have a huge impact on your page loading times.
You may have added a domain request by accident, or you might have changed direction so a particular third-party request no longer works well for your business.
For example, you may have originally added Google AdSense but now make more money selling WooCommerce products on your online store. By removing Google AdSense, you might improve your store’s performance to a point where you get lots more sales, and make far more money compared to showing online ads.
Here, there’s no easy solution that will work for all websites. With that in mind, you may want to try removing different services and content from your site, and then tracking the impact this has on important metrics such as your conversion rates.
If you do decide to remove feature and plugins that make third-party domain requests, then it’s smart to back up your WordPress website. This allows you to quickly restore your website if you encounter any errors, or simply realize you made a mistake.
You may also want to put your site into maintenance mode while making this change, just in case it breaks your website.
The steps for removing third-party domain requests will vary depending on the request.
However, you can often find detailed step-by-step guides in the documentation for the related service, plugin, or software, or by typing your search query into Google. For more on this topic, please see our guide on how to properly ask for WordPress support and get it.
Method 2. Remove Unnecessary WordPress Plugins
Plugins are a huge reason why WordPress is so popular. With the right plugins, you can add missing features, extend the built-in functionality, and turn your WordPress blog into any kind of website.
However, some WordPress plugins make a lot of third-party requests and may even slow down your website. You might be completely unaware that these requests are even happening.
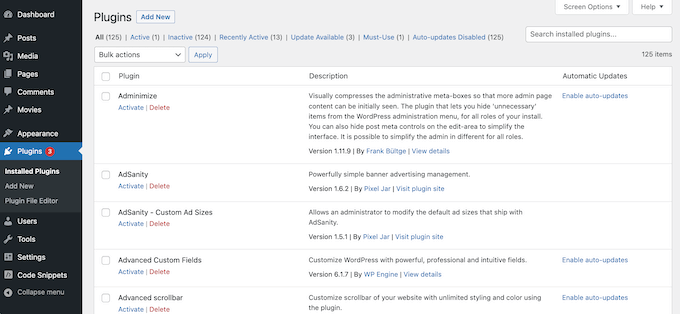
With that in mind, it’s a good idea to go to Plugins » Installed Plugins in the WordPress dashboard, and remove any plugins that you no longer need.
You can even try replacing multiple smaller plugins with a single WordPress plugin. For example, there are countless SEO plugins and tools on the market, but AIOSEO is a complete SEO toolkit that performs a long list of important SEO tasks.
Method 3. Preconnect to Important Third-Party Domains
Another option is to connect to the external domain right at the beginning of the page loading process. When a browser preconnects to an external domain first, it can often download the third-party content much faster.
Just be aware that preconnecting to an external URL takes resources away from loading the rest of your page. If the external resource isn’t crucial, then prioritizing it in this way may hurt the user experience by delaying the rest of your content.
To use the preconnect method, you’ll need a list of all your third-party domain requests. If you haven’t already, then you can get this information using Pingdom, and by following the process described above.
After that, you’ll need to add custom code in WordPress. Some guides will tell you to edit your theme files directly, but this can cause many common WordPress errors. You also won’t be able to update your WordPress theme without losing customization.
That’s why recommend WPCode.
WPCode is the best code snippets plugin that allows you to add custom CSS, PHP, HTML, and more without putting your site at risk. You can also enable and disable your code snippets with the click of a button.
First, you will need to install and activate the free WPCode plugin. For more information, see our step-by-step guide on how to install a WordPress plugin.
Once the plugin is activated, go to Code Snippets » Add Snippet.
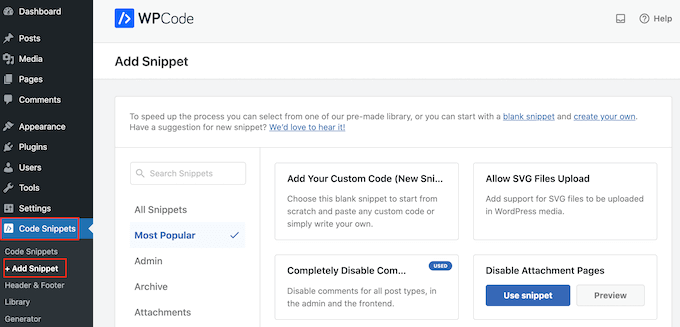
Here, you will see all the ready-made WPCode snippets you can add to your site. These include a snippet that allows you to completely disable comments, upload file types that WordPress doesn’t usually support, disable attachment pages, and much more.
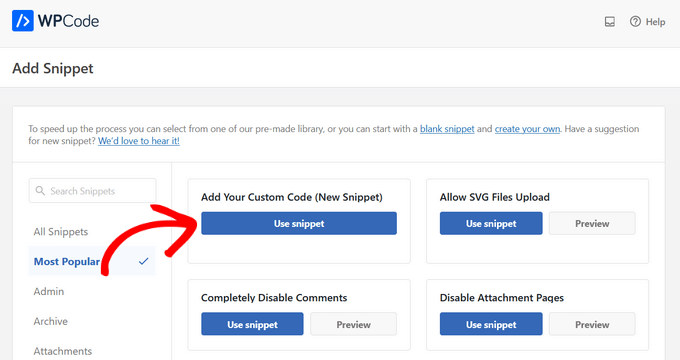
Simply hover your mouse over the ‘Add Your Custom Code (New Snippet)’ option and click the ‘Use snippet’ button when it appears.
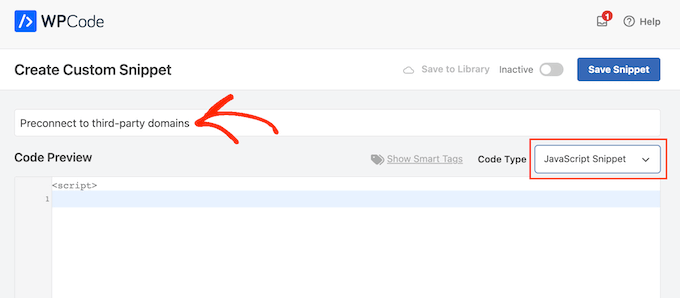
On the next screen, you need to type in a title for the code snippet. This is just for your reference, so you can use anything you want.
Then, open the ‘Code Type’ dropdown and choose ‘JavaScript Snippet.’
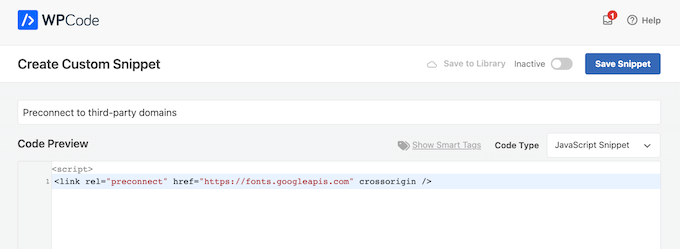
With that done, you’re ready to add each domain that WordPress should preconnect to.
For example, in the following code snippet we’re preconnecting to Google Fonts.
<link rel="preconnect" href="https://fonts.googleapis.com" crossorigin />
In the code editor, simply add each external URL that you want to use.
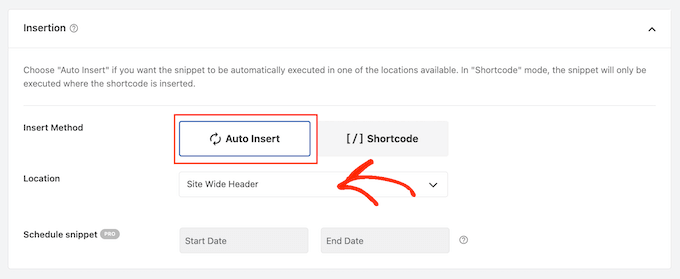
With that done, go ahead and scroll to the ‘Insertion’ settings. Here, select ‘Auto Insert’ if it isn’t already selected.
You can then open the ‘Location’ dropdown and choose ‘Site Wide Header.’
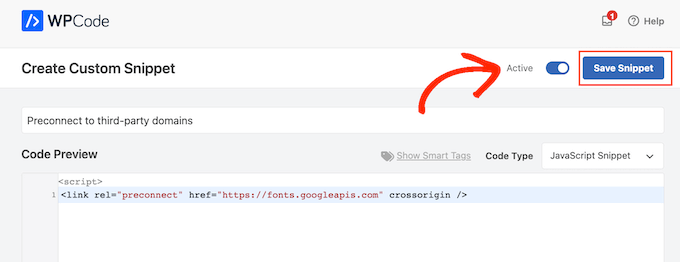
When you’re ready to make the code snippet live, scroll to the top of the page and click on the ‘Inactive’ toggle so it changes to ‘Active.
Then, click on the ‘Save Snippet’ button.
Method 4. Implement DNS Prefetching
DNS prefetching allows you to perform a DNS lookup in the background before the visitor needs the linked content or resource. This is particularly useful for third-party resources that are used across your website, such as Google Analytics, Google Fonts, or your WordPress Content Delivery Network (CDN) service.
To use DNS prefetching, simply create a new JavaScript snippet using WPCode, and by following the same process described above.
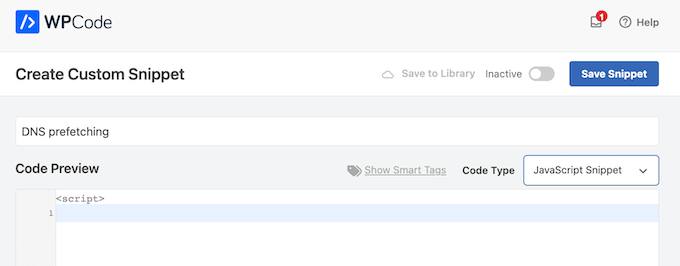
With that done, add each domain name that you want to prefetch using the following format:
<link rel="dns-prefetch" href="//fonts.googleapis.com">
After entering this information, add the code to your site-wide header by following the steps described in Method 3, and then publish the code snippet.
Method 5. Host Resources Locally
When used correctly, preconnecting and prefetching allow you to make third-party domain requests without impacting the visitor experience. However, where ever possible you should try to host resources and content locally.
Retrieving content from a local server is typically much faster, and it’s easier to improve that content’s performance. For example, you might use a caching plugin, or set up a CDN.
There are lots of different WordPress plugins and services that can help you host content locally. For example, if you want to use custom typography then you can host local fonts in WordPress rather than loading them from a third-party such as Google Fonts.
Similarly, you can easily add unique icon fonts to your WordPress theme using a plugin such as SeedProd.
If you’re using Google Ads, Google Analytics, Campaign Manager, or other popular free Google products, then you can host the gtag.js script locally on your own server using MonsterInsights with the Performance Addon.
By replacing external domain requests with local resources, you can often improve your website’s performance without compromising on its features and content.
Method 6. Use Lazy Loading
Instead of loading all your content at once, lazy loading downloads only the content visible on the user’s screen. It will then load more content as the user scrolls down the screen. This can make it seem like the page is loading faster.
WordPress will lazy load images by default, but depending on their location it may help to lazy load externally hosted content too. For example, if you want to embed YouTube videos in WordPress blog posts, then you can choose a plugin that has lazy loading built-in.
Other plugins such as Smash Balloon YouTube Feed come with built-in caching and delayed loading for the video player. This can improve the perceived page load times, even when you’re showing content from third-party websites.
We hope this article helped you learn how to track third-party domain requests in WordPress. You may also want to check out our guide on how to create a custom Instagram photo feed, or see our expert pick of the best YouTube video gallery plugins for WordPress.
If you liked this article, then please subscribe to our YouTube Channel for WordPress video tutorials. You can also find us on Twitter and Facebook.
The post How to Track Third-Party Domain Requests in WordPress first appeared on WPBeginner.
